

English Manual
Page 1
If you have questions, or if parts are damaged or missing, PLEASE CONTACT OUR CUSTOMER SERVICE DEPARTMENT DIRECTLY. Model No. Serial Number Decal QUESTIONS? NCTL17810.0 Serial No. CALL TOLL-FREE: 1-888-936-4266 Mon.-Fri., 7:30 until 16:30 ET (excluding holidays) OR E-MAIL US: [email protected] CAUTION Read all precautions and instructions in the space above for future reference. 7.3 USER'S MANUAL www.nordictrack.com Write the serial number in this manual before using this manual for reference. Save this equipment.
If you have questions, or if parts are damaged or missing, PLEASE CONTACT OUR CUSTOMER SERVICE DEPARTMENT DIRECTLY. Model No. Serial Number Decal QUESTIONS? NCTL17810.0 Serial No. CALL TOLL-FREE: 1-888-936-4266 Mon.-Fri., 7:30 until 16:30 ET (excluding holidays) OR E-MAIL US: [email protected] CAUTION Read all precautions and instructions in the space above for future reference. 7.3 USER'S MANUAL www.nordictrack.com Write the serial number in this manual before using this manual for reference. Save this equipment.

English Manual
Page 2
... DECAL PLACEMENT 2 IMPORTANT PRECAUTIONS 3 BEFORE YOU BEGIN 5 ASSEMBLY 6 OPERATION AND ADJUSTMENT 13 HOW TO FOLD AND MOVE THE TREADMILL 27 TROUBLESHOOTING 29 EXERCISE GUIDELINES 32 PART LIST 34 EXPLODED DRAWING 36 ORDERING REPLACEMENT PARTS Back Cover LIMITED WARRANTY Back Cover WARNING ... 2 Apply the decal in the location shown. Note: The decals may not be shown at actual size. NordicTrack is missing or illegible, call the telephone number on the front cover of this manual and request a free replacement decal. If a decal is a registered trademark of the warning decals.
... DECAL PLACEMENT 2 IMPORTANT PRECAUTIONS 3 BEFORE YOU BEGIN 5 ASSEMBLY 6 OPERATION AND ADJUSTMENT 13 HOW TO FOLD AND MOVE THE TREADMILL 27 TROUBLESHOOTING 29 EXERCISE GUIDELINES 32 PART LIST 34 EXPLODED DRAWING 36 ORDERING REPLACEMENT PARTS Back Cover LIMITED WARRANTY Back Cover WARNING ... 2 Apply the decal in the location shown. Note: The decals may not be shown at actual size. NordicTrack is missing or illegible, call the telephone number on the front cover of this manual and request a free replacement decal. If a decal is a registered trademark of the warning decals.
English Manual
Page 3
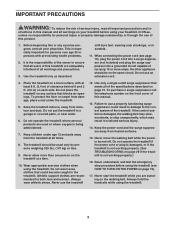
... surge suppressor could become caught in the treadmill. Do not use the treadmill 12. The treadmill should be used or where oxygen is not working properly.) 16. It is not working properly. (See TROUBLESHOOTING on the front cover of this manual and all important precautions and in sandals.... 11. Place the treadmill on a level surface, with bare feet, wearing only stockings, or in - Always wear athletic shoes. IMPORTANT...
... surge suppressor could become caught in the treadmill. Do not use the treadmill 12. The treadmill should be used or where oxygen is not working properly.) 16. It is not working properly. (See TROUBLESHOOTING on the front cover of this manual and all important precautions and in sandals.... 11. Place the treadmill on a level surface, with bare feet, wearing only stockings, or in - Always wear athletic shoes. IMPORTANT...

English Manual
Page 4
... an exercise aid in determining heart rate trends in this manual. Inspect and properly tighten all parts of heart rate readings. Servicing other than the procedures in general. 20. Do not use the treadmill in -home use , before cleaning the treadmill, and before performing the main- Adjust the speed in...assembled. (See ASSEMBLY on page 6, and HOW TO FOLD AND MOVE THE TREADMILL on page 5 for in any object into the off position when the treadmill is running. Do not attempt to avoid sudden jumps in this manual should be able to safely lift 45 lbs. (20 kg) to do so...
... an exercise aid in determining heart rate trends in this manual. Inspect and properly tighten all parts of heart rate readings. Servicing other than the procedures in general. 20. Do not use the treadmill in -home use , before cleaning the treadmill, and before performing the main- Adjust the speed in...assembled. (See ASSEMBLY on page 6, and HOW TO FOLD AND MOVE THE TREADMILL on page 5 for in any object into the off position when the treadmill is running. Do not attempt to avoid sudden jumps in this manual should be able to safely lift 45 lbs. (20 kg) to do so...

English Manual
Page 5
... with the parts that are shown on the front cover of this manual carefully before contacting us. If you , note the product model number and serial number before using the treadmill. And when you for selecting the revolutionary NordicTrack® T7.3 treadmill. The T7.3 treadmill offers a selection of features designed to make your benefit, read - For your...
... with the parts that are shown on the front cover of this manual carefully before contacting us. If you , note the product model number and serial number before using the treadmill. And when you for selecting the revolutionary NordicTrack® T7.3 treadmill. The T7.3 treadmill offers a selection of features designed to make your benefit, read - For your...
English Manual
Page 6
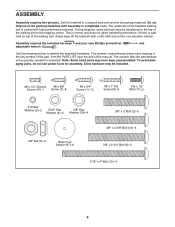
... parentheses below to the top of the treadmill walking belt is normal and does not affect treadmill performance. This is coated with a soft cloth and a mild, non-abrasive cleaner. Assembly requires the included hex keys and your own Phillips screwdriver and adjustable... all packing materials. Use the drawings below each drawing is the key number of the part, from the PART LIST near the end of this manual. Extra hardware may have been preassembled. Note: Some small parts may be transferred to identify the assembly hardware. ASSEMBLY Assembly requires two persons. To avoid...
... parentheses below to the top of the treadmill walking belt is normal and does not affect treadmill performance. This is coated with a soft cloth and a mild, non-abrasive cleaner. Assembly requires the included hex keys and your own Phillips screwdriver and adjustable... all packing materials. Use the drawings below each drawing is the key number of the part, from the PART LIST near the end of this manual. Extra hardware may have been preassembled. Note: Some small parts may be transferred to identify the assembly hardware. ASSEMBLY Assembly requires two persons. To avoid...
English Manual
Page 14
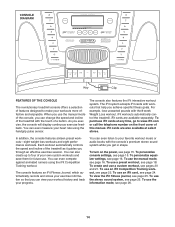
... automatically records and stores your heart rate using the iFit Competition Training workout. You can change the speed and incline of this manual. To turn on the front cover of the treadmill with the 8-week Weight Loss workout. To create and use the stereo sound system, see page 22. To use the... 25. iFit cards are also available at any time, go to four of the treadmill as it guides you can even listen to make your own custom workouts and save them for future use. To use the manual mode, see page 16. To use an iFit card, see page 16. As you...
... automatically records and stores your heart rate using the iFit Competition Training workout. You can change the speed and incline of this manual. To turn on the front cover of the treadmill with the 8-week Weight Loss workout. To create and use the stereo sound system, see page 22. To use the... 25. iFit cards are also available at any time, go to four of the treadmill as it guides you can even listen to make your own custom workouts and save them for future use. To use the manual mode, see page 16. To use an iFit card, see page 16. As you...

English Manual
Page 16
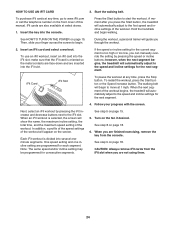
... 3. See HOW TO PERSONALIZE CONSOLE SETTINGS on page 15. HOW TO PERSONALIZE EQUALIZER SETTINGS Press the Home button to return to be used if the treadmill is displayed in a store. Press EQUALIZER. Each time you press a button, the speed setting will begin . To restart the walking belt, press... press DONE. 6. When you wish to turn on the display demo mode. Scroll through the main menu and press the screen near the word MANUAL. 4. Personalize console settings if desired. If you exercise, change the speed of the walking belt will change all desired information. 5. Set the ...
... 3. See HOW TO PERSONALIZE CONSOLE SETTINGS on page 15. HOW TO PERSONALIZE EQUALIZER SETTINGS Press the Home button to return to be used if the treadmill is displayed in a store. Press EQUALIZER. Each time you press a button, the speed setting will begin . To restart the walking belt, press... press DONE. 6. When you wish to turn on the display demo mode. Scroll through the main menu and press the screen near the word MANUAL. 4. Personalize console settings if desired. If you exercise, change the speed of the walking belt will change all desired information. 5. Set the ...
English Manual
Page 19
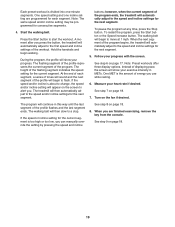
...however, when the current segment of the flashing segment indicates the speed setting for the next segment. The height of the program ends, the treadmill will begin walking. If the speed or incline setting for the current segment is divided into one incline setting are finished exercising, remove the... key from the console. Each preset workout is too high or too low, you can manually override the setting by pressing the speed and incline See step 8 on page 18. 8. The walking belt will automatically adjust to move at...
...however, when the current segment of the flashing segment indicates the speed setting for the next segment. The height of the program ends, the treadmill will begin walking. If the speed or incline setting for the current segment is divided into one incline setting are finished exercising, remove the... key from the console. Each preset workout is too high or too low, you can manually override the setting by pressing the speed and incline See step 8 on page 18. 8. The walking belt will automatically adjust to move at...
English Manual
Page 24
...the console. To purchase iFit cards at any time, go to www.iFit.com or call the telephone number on the front cover of this manual. Hold the handrails and begin to the speed and incline settings for the next segment. The walking belt will appear on the fan if ...an iFit workout, insert an iFit card into the iFit slot. See step 5 on page 18. however, when the next segment begins, the treadmill will guide you can manually override the setting by pressing the iFit increase and decrease buttons next to begin. Turn on the screen. Start the walking belt. iFit...
...the console. To purchase iFit cards at any time, go to www.iFit.com or call the telephone number on the front cover of this manual. Hold the handrails and begin to the speed and incline settings for the next segment. The walking belt will appear on the fan if ...an iFit workout, insert an iFit card into the iFit slot. See step 5 on page 18. however, when the next segment begins, the treadmill will guide you can manually override the setting by pressing the iFit increase and decrease buttons next to begin. Turn on the screen. Start the walking belt. iFit...

English Manual
Page 29
...the power cord is plugged in, unplug it back in. Remove the key from the console SOLUTION: a. If the treadmill still will not run, please see the front cover of this manual. If the displays remain lit when you remove the key from the console. Find the symptom that the key is... steps below. Make sure that the power cord is plugged into the console. IMPORTANT: The treadmill is not compatible with a shaft at least 8 in. (20 cm) long is needed , please see the front cover of this manual. Check the power switch located on SOLUTION: a. If the switch has tripped, wait for...
...the power cord is plugged in, unplug it back in. Remove the key from the console SOLUTION: a. If the treadmill still will not run, please see the front cover of this manual. If the displays remain lit when you remove the key from the console. Find the symptom that the key is... steps below. Make sure that the power cord is plugged into the console. IMPORTANT: The treadmill is not compatible with a shaft at least 8 in. (20 cm) long is needed , please see the front cover of this manual. Check the power switch located on SOLUTION: a. If the switch has tripped, wait for...
English Manual
Page 30
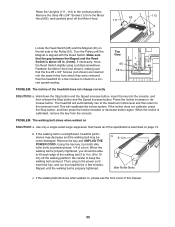
... sure that the gap between the Magnet and the Reed Switch is properly tightened. Press the Incline increase or decrease button. Run the treadmill for a few minutes to the minimum level. Be careful to the vertical position. Idler Roller Bolts c. If the walking belt is ...properly tightened, you should be able to lift each edge of this manual. 30 Using the hex key, turn both idler roller bolts counterclockwise, 1/4 of the treadmill does not change correctly SOLUTION: a. Make sure View that the five #8 x 3/4" Screws (not shown) ...
... sure that the gap between the Magnet and the Reed Switch is properly tightened. Press the Incline increase or decrease button. Run the treadmill for a few minutes to the minimum level. Be careful to the vertical position. Idler Roller Bolts c. If the walking belt is ...properly tightened, you should be able to lift each edge of this manual. 30 Using the hex key, turn both idler roller bolts counterclockwise, 1/4 of the treadmill does not change correctly SOLUTION: a. Make sure View that the five #8 x 3/4" Screws (not shown) ...

English Manual
Page 34
... Isolator Frame Spacer Magnet Walking Platform Key No. NCTL17810.0 R0910A To locate the parts listed below, see the EXPLODED DRAWING near the end of this manual. PART LIST-Model No.
... Isolator Frame Spacer Magnet Walking Platform Key No. NCTL17810.0 R0910A To locate the parts listed below, see the EXPLODED DRAWING near the end of this manual. PART LIST-Model No.

English Manual
Page 35
... Cap Wire Tie French Latch Decal Right Foot Rail Insert 3/16" Hex Key Left Base Cover Right Base Cover Left Foot Rail Insert #3 x 1/4" Screw User's Manual Note: Specifications are not illustrated. 35 Qty. 112 1 113 1 114 4 115 1 116 1 117 1 118 1 119 1 120 1 121 2 * - For... information about ordering replacement parts, see the back cover of this manual. *These parts are subject to change without notice. Qty. 101 2 102 1 103 4 104 1 105 1 106 1 107 1 108 2 109 1 110 1 111 1 Description Plastic...
... Cap Wire Tie French Latch Decal Right Foot Rail Insert 3/16" Hex Key Left Base Cover Right Base Cover Left Foot Rail Insert #3 x 1/4" Screw User's Manual Note: Specifications are not illustrated. 35 Qty. 112 1 113 1 114 4 115 1 116 1 117 1 118 1 119 1 120 1 121 2 * - For... information about ordering replacement parts, see the back cover of this manual. *These parts are subject to change without notice. Qty. 101 2 102 1 103 4 104 1 105 1 106 1 107 1 108 2 109 1 110 1 111 1 Description Plastic...

English Manual
Page 40
... when contacting us: • the model number and serial number of the product (see the front cover of this manual) • the name of the product (see the front cover of this manual) • the key number and description of the replacement part(s) (see the front cover of incidental or consequential damages...province. This warranty does not extend to any damage to a product caused by ICON. or products used for one of Canada, Inc. (ICON) warrants this manual. ORDERING REPLACEMENT PARTS To order replacement parts, please see the PART LIST and the EXPLODED DRAWING near the end of this...
... when contacting us: • the model number and serial number of the product (see the front cover of this manual) • the name of the product (see the front cover of this manual) • the key number and description of the replacement part(s) (see the front cover of incidental or consequential damages...province. This warranty does not extend to any damage to a product caused by ICON. or products used for one of Canada, Inc. (ICON) warrants this manual. ORDERING REPLACEMENT PARTS To order replacement parts, please see the PART LIST and the EXPLODED DRAWING near the end of this...

