
Enc Manual
Page 2
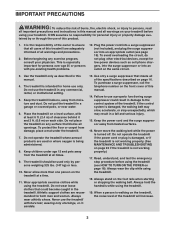
... a free replacement decal. NORDICTRACK is missing or illegible, call the telephone number on the front cover of ICON Health & Fitness, Inc. 2 Apply the decal in the location shown. TABLE OF CONTENTS WARNING DECAL PLACEMENT 2 IMPORTANT PRECAUTIONS 3 BEFORE YOU BEGIN 6 PART IDENTIFICATION CHART 7 ASSEMBLY 8 HOW TO USE THE TREADMILL 16 HOW TO FOLD AND MOVE THE TREADMILL 22 MAINTENANCE AND TROUBLESHOOTING 23 EXERCISE GUIDELINES 26 PART LIST 27 EXPLODED DRAWING 28 ORDERING REPLACEMENT PARTS Back Cover LIMITED WARRANTY...
... a free replacement decal. NORDICTRACK is missing or illegible, call the telephone number on the front cover of ICON Health & Fitness, Inc. 2 Apply the decal in the location shown. TABLE OF CONTENTS WARNING DECAL PLACEMENT 2 IMPORTANT PRECAUTIONS 3 BEFORE YOU BEGIN 6 PART IDENTIFICATION CHART 7 ASSEMBLY 8 HOW TO USE THE TREADMILL 16 HOW TO FOLD AND MOVE THE TREADMILL 22 MAINTENANCE AND TROUBLESHOOTING 23 EXERCISE GUIDELINES 26 PART LIST 27 EXPLODED DRAWING 28 ORDERING REPLACEMENT PARTS Back Cover LIMITED WARRANTY...
Enc Manual
Page 3
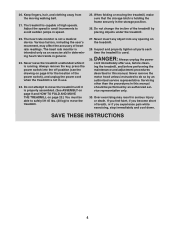
.... Always hold the handrails while using the treadmill. 18. Athletic support clothes are adequately informed of all of this manual. 14. Do not operate the treadmill if the power cord or plug is damaged, or if the treadmill is not working properly.) 17. Never move the walking belt while the power is not working properly. (See MAINTENANCE AND TROUBLESHOOTING on the front cover of the treadmill will increase. 3 Read, understand...
.... Always hold the handrails while using the treadmill. 18. Athletic support clothes are adequately informed of all of this manual. 14. Do not operate the treadmill if the power cord or plug is damaged, or if the treadmill is not working properly.) 17. Never move the walking belt while the power is not working properly. (See MAINTENANCE AND TROUBLESHOOTING on the front cover of the treadmill will increase. 3 Read, understand...
Enc Manual
Page 4
.... The heart rate monitor is properly assembled. (See ASSEMBLY on page 8 and HOW TO FOLD AND MOVE THE TREADMILL on the treadmill. 28. Never leave the treadmill unattended while it is not a medical device. When folding or moving walking belt. 21. Adjust the speed in small increments to do so by placing objects under the treadmill. 22. Never remove the motor hood unless instructed to avoid sudden jumps in the storage position...
.... The heart rate monitor is properly assembled. (See ASSEMBLY on page 8 and HOW TO FOLD AND MOVE THE TREADMILL on the treadmill. 28. Never leave the treadmill unattended while it is not a medical device. When folding or moving walking belt. 21. Adjust the speed in small increments to do so by placing objects under the treadmill. 22. Never remove the motor hood unless instructed to avoid sudden jumps in the storage position...
Enc Manual
Page 6
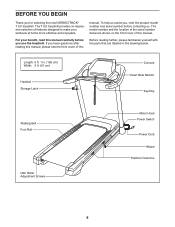
... familiarize yourself with the parts that are shown on the front cover of features designed to make your workouts at home more effective and enjoyable. Length: 6 ft. 1 in the drawing below. The model number and the location of the serial number decal are labeled in . (185 cm) Width: 3 ft. (91 cm) Handrail Storage Latch Console Heart Rate Monitor Key/Clip Walking Belt Foot Rail Idler Roller Adjustment Screws Motor Hood Power Switch Power Cord Wheel Platform Cushions...
... familiarize yourself with the parts that are shown on the front cover of features designed to make your workouts at home more effective and enjoyable. Length: 6 ft. 1 in the drawing below. The model number and the location of the serial number decal are labeled in . (185 cm) Width: 3 ft. (91 cm) Handrail Storage Latch Console Heart Rate Monitor Key/Clip Walking Belt Foot Rail Idler Roller Adjustment Screws Motor Hood Power Switch Power Cord Wheel Platform Cushions...

Enc Manual
Page 8
...: the included hex keys one Phillips screwdriver To avoid damaging parts, do not use power tools. 1. If there is normal. This is an oily substance on the exterior of this manual) and register your warranty • saves you time if you ever need to contact Customer Service • allows us to notify you of upgrades and offers Note: If...
...: the included hex keys one Phillips screwdriver To avoid damaging parts, do not use power tools. 1. If there is normal. This is an oily substance on the exterior of this manual) and register your warranty • saves you time if you ever need to contact Customer Service • allows us to notify you of upgrades and offers Note: If...

Enc Manual
Page 11
... same way. Remove and discard the two indicated screws (B) from each Handrail (84) (only one side is not 6 pinched. Identify the Left Tray (36). start both Screws, and then tighten them . Attach the other Handrail (not shown) in the same way. 1 1 1 36 Console Assembly 1 27 2 11 Set a Handrail (84) on the Right Upright (90). Make sure that the Upright Wire (81) is...
... same way. Remove and discard the two indicated screws (B) from each Handrail (84) (only one side is not 6 pinched. Identify the Left Tray (36). start both Screws, and then tighten them . Attach the other Handrail (not shown) in the same way. 1 1 1 36 Console Assembly 1 27 2 11 Set a Handrail (84) on the Right Upright (90). Make sure that the Upright Wire (81) is...

Enc Manual
Page 12
... and snap into the Right Upright (90). IF YOU DO NOT CONNECT THE CONNECTORS PROPERLY, THE CONSOLE MAY BECOME DAMAGED WHEN YOU TURN ON THE POWER. Console Assembly Attach the console assembly with the four 1/4" x 1/2" Screws (2) that you removed in step 7 and four 1/4" Star Washers (26); Set the console assembly on the Handrails (84). Be careful not to the console wire. do not, turn one side is shown). With...
... and snap into the Right Upright (90). IF YOU DO NOT CONNECT THE CONNECTORS PROPERLY, THE CONSOLE MAY BECOME DAMAGED WHEN YOU TURN ON THE POWER. Console Assembly Attach the console assembly with the four 1/4" x 1/2" Screws (2) that you removed in step 7 and four 1/4" Star Washers (26); Set the console assembly on the Handrails (84). Be careful not to the console wire. do not, turn one side is shown). With...
Enc Manual
Page 16
... using an adapter, contact a qualified electrician to determine whether the outlet box cover is UL 1449 listed as a properly grounded outlet box cover. IMPORTANT: If the treadmill is connected to users. If it will not fit an outlet, have a UL suppressed voltage rating of 400 volts or less and a minimum surge dissipation of 450 joules. The treadmill power cord has a plug with all local codes...
... using an adapter, contact a qualified electrician to determine whether the outlet box cover is UL 1449 listed as a properly grounded outlet box cover. IMPORTANT: If the treadmill is connected to users. If it will not fit an outlet, have a UL suppressed voltage rating of 400 volts or less and a minimum surge dissipation of 450 joules. The treadmill power cord has a plug with all local codes...

Enc Manual
Page 17
... while using the handgrip heart rate monitor. In addition, the console features a selection of the walking belt, and center the walking belt if necessary (see page 21. The first time you exercise. Each workout automatically controls the speed and incline of measurement is selected, see THE INFORMATION MODE on the power, see page 21. You can change the speed and incline of the treadmill with the console's sound system while you use the...
... while using the handgrip heart rate monitor. In addition, the console features a selection of the walking belt, and center the walking belt if necessary (see page 21. The first time you exercise. Each workout automatically controls the speed and incline of measurement is selected, see THE INFORMATION MODE on the power, see page 21. You can change the speed and incline of the treadmill with the console's sound system while you use the...
Enc Manual
Page 18
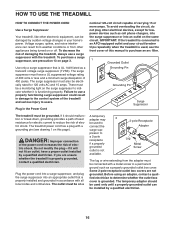
... power switch into the reset position. Plug in a store. Reset IMPORTANT: The console features a display demo mode, designed to be used if the treadmill is displayed in the power cord (see THE INFORMATION MODE on the foot rails of your Clip clothes. Next, stand on page 21 to turn off the demo mode, hold down the Stop button for a few steps backward; When the key is turned on the power. Start the walking belt. To start the walking belt, press the Start button, the Speed...
... power switch into the reset position. Plug in a store. Reset IMPORTANT: The console features a display demo mode, designed to be used if the treadmill is displayed in the power cord (see THE INFORMATION MODE on the foot rails of your Clip clothes. Next, stand on page 21 to turn off the demo mode, hold down the Stop button for a few steps backward; When the key is turned on the power. Start the walking belt. To start the walking belt, press the Start button, the Speed...

Enc Manual
Page 19
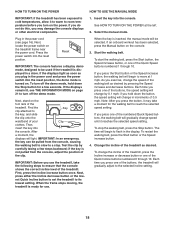
... using the treadmill, press the power switch into the off position and unplug the power cord. In addition, make sure that your pulse is shown in succession. Contacts To measure your heart rate, stand on the metal contacts- When your hands are finished exercising, remove the key from the console. The display will appear in succession until the upper display shows the information that you fold the treadmill...
... using the treadmill, press the power switch into the off position and unplug the power cord. In addition, make sure that your pulse is shown in succession. Contacts To measure your heart rate, stand on the metal contacts- When your hands are finished exercising, remove the key from the console. The display will appear in succession until the upper display shows the information that you fold the treadmill...
Enc Manual
Page 20
... addition, a profile of the speed settings of calories you will be programmed for the current segment. Note: The same speed setting and/ or incline setting may be affected. The actual number of the workout. 3. To resume the workout, press the Start button or the Speed increase button. The walking belt will automatically adjust to move at 1 mph. The display will begin to the new speed and/or incline setting. See step 7 on page...
... addition, a profile of the speed settings of calories you will be programmed for the current segment. Note: The same speed setting and/ or incline setting may be affected. The actual number of the workout. 3. To resume the workout, press the Start button or the Speed increase button. The walking belt will automatically adjust to move at 1 mph. The display will begin to the new speed and/or incline setting. See step 7 on page...

Enc Manual
Page 21
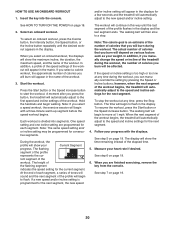
... demo mode is fully plugged in the power cord, press the power switch into the reset position, and insert the key into the console. However, when you remove the key, the displays will remain lit, although the buttons will show the total number of hours that keeps track of treadmill usage information and allows you to change the unit of on your local electronics store. Then, release the Stop button. Press the Speed increase button...
... demo mode is fully plugged in the power cord, press the power switch into the reset position, and insert the key into the console. However, when you remove the key, the displays will remain lit, although the buttons will show the total number of hours that keeps track of treadmill usage information and allows you to change the unit of on your local electronics store. Then, release the Stop button. Press the Speed increase button...

Enc Manual
Page 22
... Bend your legs and keep your right hand. Raise the frame until the latch plate is past the latch pin. See drawing 2. HOW TO FOLD AND MOVE THE TREADMILL HOW TO FOLD THE TREADMILL To avoid damaging the treadmill, adjust the incline to zero ...treadmill in the storage position in the location shown by the plastic foot rails. Hold the upper end of direct sunlight. Then, release the latch knob. 2. Then, remove the key and unplug the power cord. Pull the latch knob to raise, lower, or move the treadmill over an uneven surface. 3. Next, lower the frame until the treadmill...
... Bend your legs and keep your right hand. Raise the frame until the latch plate is past the latch pin. See drawing 2. HOW TO FOLD AND MOVE THE TREADMILL HOW TO FOLD THE TREADMILL To avoid damaging the treadmill, adjust the incline to zero ...treadmill in the storage position in the location shown by the plastic foot rails. Hold the upper end of direct sunlight. Then, release the latch knob. 2. Then, remove the key and unplug the power cord. Pull the latch knob to raise, lower, or move the treadmill over an uneven surface. 3. Next, lower the frame until the treadmill...

Enc Manual
Page 23
... key is used , see the front cover of the specifications described on the treadmill frame near the power cord. If the treadmill still will not run, please see the drawing above). The console features a display demo mode, designed to the console, keep the walking belt clean and dry. After the power cord has been plugged in a store. c Tripped Reset SYMPTOM: The power turns off the demo mode, hold down the Stop button...
... key is used , see the front cover of the specifications described on the treadmill frame near the power cord. If the treadmill still will not run, please see the drawing above). The console features a display demo mode, designed to the console, keep the walking belt clean and dry. After the power cord has been plugged in a store. c Tripped Reset SYMPTOM: The power turns off the demo mode, hold down the Stop button...
Enc Manual
Page 24
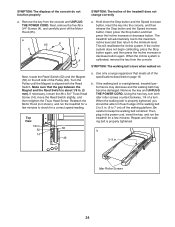
... begin calibrating, press the Stop button again, and then press the Incline increase or decrease button again. Turn the Pulley until the walking belt is calibrated, remove the key from the console and UNPLUG THE POWER CORD. If the walking belt is aligned with the Reed Switch. Using the hex key, turn both idler roller screws counterclockwise, 1/4 of the Pulley (49). Next, remove the five #8 x 3/4" Screws (4), and carefully pivot off the walking platform. Hold down the Stop button and the Speed increase button...
... begin calibrating, press the Stop button again, and then press the Incline increase or decrease button again. Turn the Pulley until the walking belt is calibrated, remove the key from the console and UNPLUG THE POWER CORD. If the walking belt is aligned with the Reed Switch. Using the hex key, turn both idler roller screws counterclockwise, 1/4 of the Pulley (49). Next, remove the five #8 x 3/4" Screws (4), and carefully pivot off the walking platform. Hold down the Stop button and the Speed increase button...

Enc Manual
Page 25
... when walked on b. When the walking belt is correctly tightened, you suspect that the walking belt needs more lubricant, see the front cover of this manual. Then, plug in . (5 to turn the left idler roller screw clockwise 1/2 of a turn ; If the walking belt is properly tightened. Be careful not to the right, turn the left , use the hex key to 7 cm) off the walking platform. a 25 If the walking belt slips when walked on the treadmill for...
... when walked on b. When the walking belt is correctly tightened, you suspect that the walking belt needs more lubricant, see the front cover of this manual. Then, plug in . (5 to turn the left idler roller screw clockwise 1/2 of a turn ; If the walking belt is properly tightened. Be careful not to the right, turn the left , use the hex key to 7 cm) off the walking platform. a 25 If the walking belt slips when walked on the treadmill for...

Enc Manual
Page 26
... the highest number is intended only as you exercise; The heart rate monitor is the heart rate for fat burning and aerobic exercise. The chart below shows recommended heart rates for aerobic exercise. If your goal is to burn fat or to use your heart rate as a guide to make exercise a regular and enjoyable part of your exercise program, do not keep your heart rate in your training zone. The three numbers listed above your...
... the highest number is intended only as you exercise; The heart rate monitor is the heart rate for fat burning and aerobic exercise. The chart below shows recommended heart rates for aerobic exercise. If your goal is to burn fat or to use your heart rate as a guide to make exercise a regular and enjoyable part of your exercise program, do not keep your heart rate in your training zone. The three numbers listed above your...
Enc Manual
Page 27
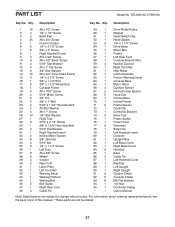
... 1 Reed Switch 53 2 1/4" x 1 1/4" Screw 54 1 Drive Motor 55 1 Motor Belt 56 1 Frame 57 1 Left Rear Foot 58 1 Console Ground Wire 59 4 Rubber Cushion 60 1 Right Foot Rail 61 1 Idler Roller 62 1 Latch Assembly 63 1 French Warning Decal 64 1 Console Base 65 1 Motor Hood 66 4 Cushion Bottom 67 2 Incline Frame Spacer 68 5 Hood Clip 69 1 Incline Motor 70 1 Incline Frame 71 2 Frame Spacer 72 1 Controller 73 1 Controller Bracket 74 2 Base Cap 75 1 Power Switch 76 1 Power Cord 77...
... 1 Reed Switch 53 2 1/4" x 1 1/4" Screw 54 1 Drive Motor 55 1 Motor Belt 56 1 Frame 57 1 Left Rear Foot 58 1 Console Ground Wire 59 4 Rubber Cushion 60 1 Right Foot Rail 61 1 Idler Roller 62 1 Latch Assembly 63 1 French Warning Decal 64 1 Console Base 65 1 Motor Hood 66 4 Cushion Bottom 67 2 Incline Frame Spacer 68 5 Hood Clip 69 1 Incline Motor 70 1 Incline Frame 71 2 Frame Spacer 72 1 Controller 73 1 Controller Bracket 74 2 Base Cap 75 1 Power Switch 76 1 Power Cord 77...
Enc Manual
Page 32
... this manual) • the key number and description of the replacement part(s) (see the PART LIST and the EXPLODED DRAWING near the end of this product to the customer. ICON's obligation under normal use or performance of the product; ORDERING REPLACEMENT PARTS To order replacement parts, please see the front cover of this warranty is limited to provide the following information when contacting us assist you, be free...
... this manual) • the key number and description of the replacement part(s) (see the PART LIST and the EXPLODED DRAWING near the end of this product to the customer. ICON's obligation under normal use or performance of the product; ORDERING REPLACEMENT PARTS To order replacement parts, please see the front cover of this warranty is limited to provide the following information when contacting us assist you, be free...


