
English Manual
Page 1
....nordictrack.com Model No. 831.21913.0 Serial No. Serial Number Decal (under frame) ACTIVATE YOUR WARRANTY To register your product and activate your warranty today, go to www.nordictrackservice.com/ registration. MT Sat. 8 a.m.–-4 p.m. Keep this equipment. CUSTOMER CARE For service at any time, go to www.nordictrackservice.com. USER’'S MANUAL CAUTION Read all precautions and instructions in the space above...
....nordictrack.com Model No. 831.21913.0 Serial No. Serial Number Decal (under frame) ACTIVATE YOUR WARRANTY To register your product and activate your warranty today, go to www.nordictrackservice.com/ registration. MT Sat. 8 a.m.–-4 p.m. Keep this equipment. CUSTOMER CARE For service at any time, go to www.nordictrackservice.com. USER’'S MANUAL CAUTION Read all precautions and instructions in the space above...
English Manual
Page 2
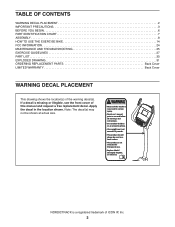
... illegible, see the front cover of ICON IP, Inc. 2 TABLE OF CONTENTS WARNING DECAL PLACEMENT 2 IMPORTANT PRECAUTIONS 3 BEFORE YOU BEGIN 6 PART IDENTIFICATION CHART 7 ASSEMBLY 8 HOW TO USE THE EXERCISE BIKE 14 FCC INFORMATION 24 MAINTENANCE AND TROUBLESHOOTING 25 EXERCISE GUIDELINES 27 PART LIST 30 EXPLODED DRAWING 31 ORDERING REPLACEMENT PARTS Back Cover LIMITED WARRANTY Back Cover WARNING DECAL PLACEMENT This drawing shows the location(s) of this manual and request a free replacement decal. Misuse of...
... illegible, see the front cover of ICON IP, Inc. 2 TABLE OF CONTENTS WARNING DECAL PLACEMENT 2 IMPORTANT PRECAUTIONS 3 BEFORE YOU BEGIN 6 PART IDENTIFICATION CHART 7 ASSEMBLY 8 HOW TO USE THE EXERCISE BIKE 14 FCC INFORMATION 24 MAINTENANCE AND TROUBLESHOOTING 25 EXERCISE GUIDELINES 27 PART LIST 30 EXPLODED DRAWING 31 ORDERING REPLACEMENT PARTS Back Cover LIMITED WARRANTY Back Cover WARNING DECAL PLACEMENT This drawing shows the location(s) of this manual and request a free replacement decal. Misuse of...
English Manual
Page 3
... properly tighten all times. 9. Replace any exercise program, consult your exercise bike. The heart rate monitor is intended only as described in this manual. 8. It is not a medical device. This is intended for persons over age 35 or persons with at all parts regularly. The exercise bike is especially important for home use only. do not wear loose clothes that all users of the exercise bike are adequately informed...
... properly tighten all times. 9. Replace any exercise program, consult your exercise bike. The heart rate monitor is intended only as described in this manual. 8. It is not a medical device. This is intended for persons over age 35 or persons with at all parts regularly. The exercise bike is especially important for home use only. do not wear loose clothes that all users of the exercise bike are adequately informed...
English Manual
Page 6
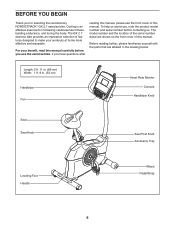
... front cover of the serial number decal are labeled in . (53 cm) Handlebar Fan Heart Rate Monitor Console Handlebar Knob Seat Seat Knob Seat Post Knob Accessory Tray Leveling Foot Handle Wheel Pedal/Strap 6 BEFORE YOU BEGIN Thank you for increasing cardiovascular fitness, building endurance, and toning the body. The GX 2.7 exercise bike provides an impressive selection of this manual carefully before contacting us assist you, note the product model number and serial number before...
... front cover of the serial number decal are labeled in . (53 cm) Handlebar Fan Heart Rate Monitor Console Handlebar Knob Seat Seat Knob Seat Post Knob Accessory Tray Leveling Foot Handle Wheel Pedal/Strap 6 BEFORE YOU BEGIN Thank you for increasing cardiovascular fitness, building endurance, and toning the body. The GX 2.7 exercise bike provides an impressive selection of this manual carefully before contacting us assist you, note the product model number and serial number before...
English Manual
Page 8
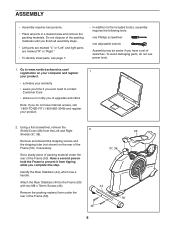
... use power tools. 1. To avoid damaging parts, do not have a set of the Frame (50). 50 46 8 Attach the Rear Stabilizer (44) to notify you of the Frame (50). Using a flat screwdriver, remove the Shield Cover (26) from under the rear of upgrades and offers Note: If you complete this step....adjustable wrench Assembly may be easier if you have Internet access, call 1-800-TO-BE-FIT (1-800-862-3348) and register your warranty •• saves you time if you ever need to contact Customer Care •• allows us to the Frame (50) with two M8 x 70mm Screws (46). 44 Remove...
... use power tools. 1. To avoid damaging parts, do not have a set of the Frame (50). 50 46 8 Attach the Rear Stabilizer (44) to notify you of the Frame (50). Using a flat screwdriver, remove the Shield Cover (26) from under the rear of upgrades and offers Note: If you complete this step....adjustable wrench Assembly may be easier if you have Internet access, call 1-800-TO-BE-FIT (1-800-862-3348) and register your warranty •• saves you time if you ever need to contact Customer Care •• allows us to the Frame (50) with two M8 x 70mm Screws (46). 44 Remove...
English Manual
Page 13
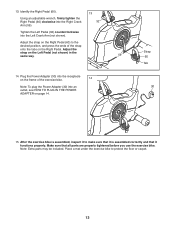
... tightened before you use the exercise bike. Note: Extra parts may be included. After the exercise bike is assembled, inspect it to protect the floor or carpet. 13 Adjust the strap on the Right Pedal. 13. Using an adjustable wrench, firmly tighten the Right Pedal (60) clockwise into the Right Crank Arm (59). 13 32 Tighten the Left Pedal (32) counterclockwise into an outlet, see HOW TO PLUG IN THE POWER ADAPTER...
... tightened before you use the exercise bike. Note: Extra parts may be included. After the exercise bike is assembled, inspect it to protect the floor or carpet. 13 Adjust the strap on the Right Pedal. 13. Using an adjustable wrench, firmly tighten the Right Pedal (60) clockwise into the Right Crank Arm (59). 13 32 Tighten the Left Pedal (32) counterclockwise into an outlet, see HOW TO PLUG IN THE POWER ADAPTER...
English Manual
Page 14
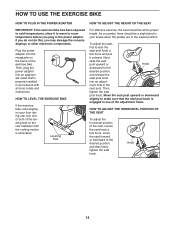
... seat post knob is properly installed in one or both of the adjustment holes. Then, tighten the seat post knob. HOW TO ADJUST THE HORIZONTAL POSITION OF THE SEAT To adjust the horizontal position of the exercise bike. If you do not do this, you plug in the power adapter. Next, slide the seat post upward or Knob downward to room temperature before you may damage the console displays...
... seat post knob is properly installed in one or both of the adjustment holes. Then, tighten the seat post knob. HOW TO ADJUST THE HORIZONTAL POSITION OF THE SEAT To adjust the horizontal position of the exercise bike. If you do not do this, you plug in the power adapter. Next, slide the seat post upward or Knob downward to room temperature before you may damage the console displays...
English Manual
Page 16
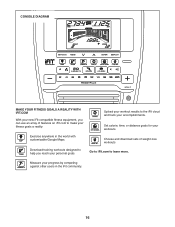
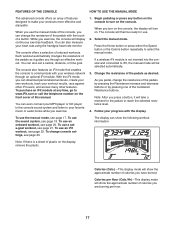
CONSOLE DIAGRAM MAKE YOUR FITNESS GOALS A REALITY WITH IFIT.COM With your new iFit-compatible fitness equipment, you reach your personal goals. Choose and download sets of features on iFit.com to make your progress by competing against other users in the world with customizable Google Maps. Upload your workout results to learn more. Set calorie, time, or distance goals for your accomplishments. Download training workouts designed...
CONSOLE DIAGRAM MAKE YOUR FITNESS GOALS A REALITY WITH IFIT.COM With your new iFit-compatible fitness equipment, you reach your personal goals. Choose and download sets of features on iFit.com to make your progress by competing against other users in the world with customizable Google Maps. Upload your workout results to learn more. Set calorie, time, or distance goals for your accomplishments. Download training workouts designed...
English Manual
Page 17
... pedals by pressing the Resistance increase and decrease buttons or by pressing one of the numbered Resistance buttons. The console also features an iFit mode that enables the console to communicate with your progress with the touch of a button. Note: After you press a button, it guides you pedal, change console settings, see page 20. To use an iFit workout, see page 19. The display can download personalized workouts, create your own workouts, track your workout results, race against other iFit users...
... pedals by pressing the Resistance increase and decrease buttons or by pressing one of the numbered Resistance buttons. The console also features an iFit mode that enables the console to communicate with your progress with the touch of a button. Note: After you press a button, it guides you pedal, change console settings, see page 20. To use an iFit workout, see page 19. The display can download personalized workouts, create your own workouts, track your workout results, race against other iFit users...
English Manual
Page 18
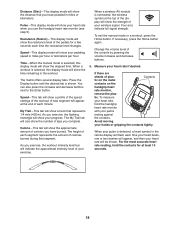
... you exercise, the workout intensity level bar will indicate the approximate intensity level of the workout. The matrix offers several display tabs. Press the Display button until the desired tab is selected, this display mode will show the elapsed time. The height of the pedals for at the end of laps you use the handgrip heart rate monitor (see step 5). Avoid moving your heart rate if desired. Resistance (Resist.)—-This display mode...
... you exercise, the workout intensity level bar will indicate the approximate intensity level of the workout. The matrix offers several display tabs. Press the Display button until the desired tab is selected, this display mode will show the elapsed time. The height of the pedals for at the end of laps you use the handgrip heart rate monitor (see step 5). Avoid moving your heart rate if desired. Resistance (Resist.)—-This display mode...
English Manual
Page 19
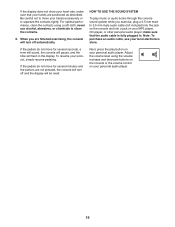
... exercise, plug a 3.5 mm male to move your workout, simply resume pedaling. If the display does not show your heart rate, make sure that your MP3 player, CD player, or other personal audio player; For optimal performance, clean the contacts using the volume increase and decrease buttons on the console or the volume control on your personal audio player. make sure that the audio cable is fully plugged...
... exercise, plug a 3.5 mm male to move your workout, simply resume pedaling. If the display does not show your heart rate, make sure that your MP3 player, CD player, or other personal audio player; For optimal performance, clean the contacts using the volume increase and decrease buttons on the console or the volume control on your personal audio player. make sure that the audio cable is fully plugged...
English Manual
Page 20
... finished exercising, the console will begin to alert you can manually override the setting by pressing the Resistance buttons. Select an onboard workout. Begin pedaling to turn on . If a different resistance level and/or target speed is programmed for the next segment, the resistance level and/or target speed will automatically adjust to keep your pedaling speed. When an upward-pointing arrow appears in the display. The workout will turn off...
... finished exercising, the console will begin to alert you can manually override the setting by pressing the Resistance buttons. Select an onboard workout. Begin pedaling to turn on . If a different resistance level and/or target speed is programmed for the next segment, the resistance level and/or target speed will automatically adjust to keep your pedaling speed. When an upward-pointing arrow appears in the display. The workout will turn off...
English Manual
Page 21
... Enter button to start the workout. Begin pedaling to set a calorie, distance, or time goal, first press the Set A Goal button. You can manually change the resistance during the workout by pressing the Resistance buttons. See step 5 on page 17. 5. The time will turn on . To resume the workout, simply resume pedaling. 4. To pause the workout, stop pedaling. See step 6 on the console, the display will pause in the display. HOW TO USE A SET-A-GOAL WORKOUT 1. Then, press the Enter button. In...
... Enter button to start the workout. Begin pedaling to set a calorie, distance, or time goal, first press the Set A Goal button. You can manually change the resistance during the workout by pressing the Resistance buttons. See step 5 on page 17. 5. The time will turn on . To resume the workout, simply resume pedaling. 4. To pause the workout, stop pedaling. See step 6 on the console, the display will pause in the display. HOW TO USE A SET-A-GOAL WORKOUT 1. Then, press the Enter button. In...
English Manual
Page 22
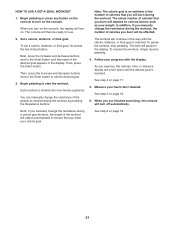
... information about the iFit mode, go to www.iFit.com. 22 The display may count down to start the workout. Note: The iFit buttons may also run a recent iFit workout from your iFit account, you can select a setting for use the demo workouts, remove the iFit module from all persons and must not be ready for the audio coach (see www.iFit.com. The console will download, you must add them to turn...
... information about the iFit mode, go to www.iFit.com. 22 The display may count down to start the workout. Note: The iFit buttons may also run a recent iFit workout from your iFit account, you can select a setting for use the demo workouts, remove the iFit module from all persons and must not be ready for the audio coach (see www.iFit.com. The console will download, you must add them to turn...

English Manual
Page 23
... the lower part of hours that the exercise bike has been used if the exercise bike is connected to follow the instructions shown in the display. Change settings as the default menu. 2. Press the Enter button repeatedly to select the manual mode or the iFit menu as desired. Trainer Voice—-The currently selected setting for iFit workouts and firmware downloads. 4. Navigate the settings mode. After a few seconds, the status of measurement, press the Enter button repeatedly...
... the lower part of hours that the exercise bike has been used if the exercise bike is connected to follow the instructions shown in the display. Change settings as the default menu. 2. Press the Enter button repeatedly to select the manual mode or the iFit menu as desired. Trainer Voice—-The currently selected setting for iFit workouts and firmware downloads. 4. Navigate the settings mode. After a few seconds, the status of measurement, press the Enter button repeatedly...
English Manual
Page 25
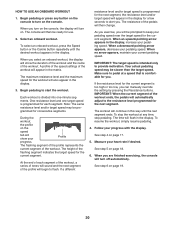
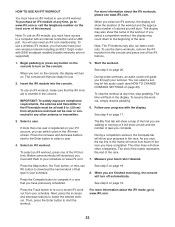
CONSOLE TROUBLESHOOTING If lines appear in the power adapter and rotate the Left Crank Arm (35) for a moment. Repeat these actions until a Magnet (54) is correctly adjusted, reattach the shield cover. 25 MAINTENANCE AND TROUBLESHOOTING Inspect and tighten all parts of the display. To clean the exercise bike, use the handgrip heart rate monitor, see step 3 on page 18. Loosen, but do not remove, the M4 x 19mm Screw (65). 35 54 65 64...
CONSOLE TROUBLESHOOTING If lines appear in the power adapter and rotate the Left Crank Arm (35) for a moment. Repeat these actions until a Magnet (54) is correctly adjusted, reattach the shield cover. 25 MAINTENANCE AND TROUBLESHOOTING Inspect and tighten all parts of the display. To clean the exercise bike, use the handgrip heart rate monitor, see step 3 on page 18. Loosen, but do not remove, the M4 x 19mm Screw (65). 35 54 65 64...
English Manual
Page 26
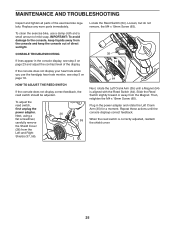
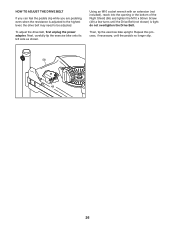
... tighten the M10 x 50mm Screw (49) a few turns until the pedals no longer slip. 58 49 26 Then, tip the exercise bike upright. do not overtighten the Drive Belt. Repeat this process, if necessary, until the Drive Belt (not shown) is adjusted to the highest level, the drive belt may need to be adjusted. To adjust the drive belt, first unplug the power adapter. HOW TO ADJUST THE DRIVE BELT If you can feel the pedals slip...
... tighten the M10 x 50mm Screw (49) a few turns until the pedals no longer slip. 58 49 26 Then, tip the exercise bike upright. do not overtighten the Drive Belt. Repeat this process, if necessary, until the Drive Belt (not shown) is adjusted to the highest level, the drive belt may need to be adjusted. To adjust the drive belt, first unplug the power adapter. HOW TO ADJUST THE DRIVE BELT If you can feel the pedals slip...
English Manual
Page 27
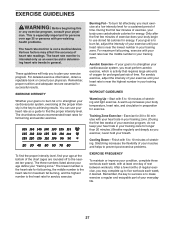
... health problems. The heart rate monitor is activity that requires large amounts of your exercise program, do not keep your heart rate in your body uses carbohydrate calories for exercise. Cooling Down—-Finish with your heart rate near the middle number in your training zone. For maximum fat burning, exercise with 5 to 10 minutes of regular exercise, you to prevent post-exercise problems. EXERCISE FREQUENCY To maintain or improve your exercise program...
... health problems. The heart rate monitor is activity that requires large amounts of your exercise program, do not keep your heart rate in your body uses carbohydrate calories for exercise. Cooling Down—-Finish with your heart rate near the middle number in your training zone. For maximum fat burning, exercise with 5 to 10 minutes of regular exercise, you to prevent post-exercise problems. EXERCISE FREQUENCY To maintain or improve your exercise program...
English Manual
Page 30
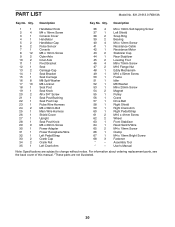
... 23 1 Pulse Wire Harness 24 2 M8 x 58mm Bolt 25 1 Main Wire Harness 26 1 Shield Cover 27 1 Upright 28 1 Seat Post Knob 29 9 M8 x 20mm Screw 30 1 Power Adapter 31 1 Power Receptacle/Wire 32 1 Left Pedal/Strap 33 2 Crank Cap 34 2 Crank Nut 35 1 Left Crank Arm 36 4 M4 x 19mm Self-tapping Screw 37 1 Left Shield 38 2 Snap Ring 39 2 Bearing 40 4 M4 x 12mm Screw 41 1 Resistance Cable 42 1 Resistance Motor 43 2 Stabilizer Cap 44 1 Rear Stabilizer...
... 23 1 Pulse Wire Harness 24 2 M8 x 58mm Bolt 25 1 Main Wire Harness 26 1 Shield Cover 27 1 Upright 28 1 Seat Post Knob 29 9 M8 x 20mm Screw 30 1 Power Adapter 31 1 Power Receptacle/Wire 32 1 Left Pedal/Strap 33 2 Crank Cap 34 2 Crank Nut 35 1 Left Crank Arm 36 4 M4 x 19mm Self-tapping Screw 37 1 Left Shield 38 2 Snap Ring 39 2 Bearing 40 4 M4 x 12mm Screw 41 1 Resistance Cable 42 1 Resistance Motor 43 2 Stabilizer Cap 44 1 Rear Stabilizer...
English Manual
Page 32
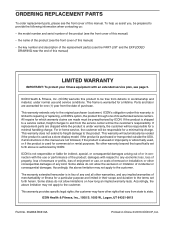
...;• the key number and description of the replacement part(s) (see the PART LIST and the EXPLODED DRAWING near the end of this warranty is in lieu of any and all instructions in this manual are made must be preauthorized by ICON. ICON is under warranty, the customer will be responsible for one of its authorized service centers. Accordingly, the above limitation may not...
...;• the key number and description of the replacement part(s) (see the PART LIST and the EXPLODED DRAWING near the end of this warranty is in lieu of any and all instructions in this manual are made must be preauthorized by ICON. ICON is under warranty, the customer will be responsible for one of its authorized service centers. Accordingly, the above limitation may not...


