
English Manual
Page 1
... missing parts, we will provide immediate assistance, free of charge to providing complete customer satisfaction. TO AVOID UNNECESSARY DELAYS, PLEASE CALL DIRECT TO OUR TOLL-FREE CUSTOMER HOT LINE. Save this equipment. Write the serial number in this manual before using this manual for reference. Serial Number Decal QUESTIONS? Model No. USER'S MANUAL Patent Pending Visit our website at www.nordictrack.com new products, prizes, fitness...
... missing parts, we will provide immediate assistance, free of charge to providing complete customer satisfaction. TO AVOID UNNECESSARY DELAYS, PLEASE CALL DIRECT TO OUR TOLL-FREE CUSTOMER HOT LINE. Save this equipment. Write the serial number in this manual before using this manual for reference. Serial Number Decal QUESTIONS? Model No. USER'S MANUAL Patent Pending Visit our website at www.nordictrack.com new products, prizes, fitness...

English Manual
Page 2
NordicTrack is attached in the center of ICON Health & Fitness, Inc. 2 Table of Contents Important Precautions 3 Before You Begin 4 Part Identification Chart 5 Assembly 6 Adjusting the Weight System 11 Ordering Replacement Parts Back Cover Limited Warranty Back Cover Note: A Part List/Exploded Drawing is a registered trademark of this manual. Remove the Part List/Exploded Drawing before beginning assembly.
NordicTrack is attached in the center of ICON Health & Fitness, Inc. 2 Table of Contents Important Precautions 3 Before You Begin 4 Part Identification Chart 5 Assembly 6 Adjusting the Weight System 11 Ordering Replacement Parts Back Cover Limited Warranty Back Cover Note: A Part List/Exploded Drawing is a registered trademark of this manual. Remove the Part List/Exploded Drawing before beginning assembly.

English Manual
Page 3
... dizziness while exercising, stop immediately and begin cooling down. tions before using the weight rack. 1. Use the weight rack only on the weight gliders and safety spotters. 13. Always wear athletic shoes for home use the weight rack in serious injury. • Read user's manual and follow all users of weight (not included) on the weight rack in the indicated location. ! Read all instructions before using . Keep children...
... dizziness while exercising, stop immediately and begin cooling down. tions before using the weight rack. 1. Use the weight rack only on the weight gliders and safety spotters. 13. Always wear athletic shoes for home use the weight rack in serious injury. • Read user's manual and follow all users of weight (not included) on the weight rack in the indicated location. ! Read all instructions before using . Keep children...
English Manual
Page 4
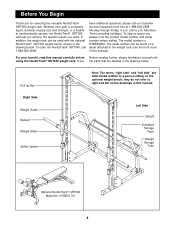
..., call our Customer Service Department toll-free at 1-888-825-2588 Monday through Friday, 6 a.m. The serial number can be found on a decal attached to the weight rack (see the front cover of this manual). For your goal is NTBE05902. Right Side Weight Guide Barbell Weight Glider Safety Spotter Left Side Upright Dumbbell Storage Rack Weight Storage Tube Optional NordicTrack® GRT340 Model No. The model number is a shapely figure...
..., call our Customer Service Department toll-free at 1-888-825-2588 Monday through Friday, 6 a.m. The serial number can be found on a decal attached to the weight rack (see the front cover of this manual). For your goal is NTBE05902. Right Side Weight Guide Barbell Weight Glider Safety Spotter Left Side Upright Dumbbell Storage Rack Weight Storage Tube Optional NordicTrack® GRT340 Model No. The model number is a shapely figure...

English Manual
Page 6
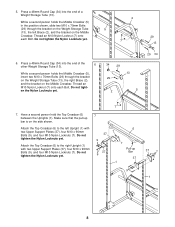
...) with two M10 x 70mm Bolts (29) and two M10 Nylon Locknuts (7). Press a 50mm Square Outer Cap (10) onto each end of the Right Base (4). Attach the Right Base (4) to the PART IDENTIFICATION CHART on top. Assembly Before beginning assembly, carefully read the following tools: A socket set, a set of open-end or closed-end wrenches or a set of time, and by anyone...
...) with two M10 x 70mm Bolts (29) and two M10 Nylon Locknuts (7). Press a 50mm Square Outer Cap (10) onto each end of the Right Base (4). Attach the Right Base (4) to the PART IDENTIFICATION CHART on top. Assembly Before beginning assembly, carefully read the following tools: A socket set, a set of open-end or closed-end wrenches or a set of time, and by anyone...

English Manual
Page 7
... Locknuts yet. Do not tighten the Nylon Locknuts yet. Do not tighten the Nylon Locknuts yet. Slide a Brace (2) onto the bracket on the other Upright (1). Attach the Brace to the Right Base (4) with 4 two M10 x 65mm Bolts (26), four M10 Washers (3), and two M10 Nylon Locknuts (7). Attach the Upright (1) to the Upright with two Lower Support Plates (15), four M10...
... Locknuts yet. Do not tighten the Nylon Locknuts yet. Do not tighten the Nylon Locknuts yet. Slide a Brace (2) onto the bracket on the other Upright (1). Attach the Brace to the Right Base (4) with 4 two M10 x 65mm Bolts (26), four M10 Washers (3), and two M10 Nylon Locknuts (7). Attach the Upright (1) to the Upright with two Lower Support Plates (15), four M10...
English Manual
Page 8
... the Uprights (1). Press a 48mm Round Cap (34) into the end of the 6 other Weight Storage Tube (13). Do not tighten the Nylon Locknuts yet. Do not tighten the Nylon Locknuts yet. 2 7 6. 5. While a second person holds the Middle Crossbar (5), insert two M10 x 70mm Bolts (29) through the bracket on the Weight Storage Tube 5 (13), the left Upright (1) with two Upper Support Plates...
... the Uprights (1). Press a 48mm Round Cap (34) into the end of the 6 other Weight Storage Tube (13). Do not tighten the Nylon Locknuts yet. Do not tighten the Nylon Locknuts yet. 2 7 6. 5. While a second person holds the Middle Crossbar (5), insert two M10 x 70mm Bolts (29) through the bracket on the Weight Storage Tube 5 (13), the left Upright (1) with two Upper Support Plates...
English Manual
Page 9
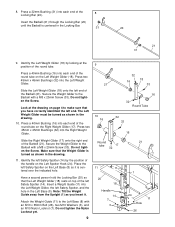
... with a M8 x 20mm Screw (33). Note: Tilt the Weight Guide away from the Upright (1) as shown in the Locking Bar. 31 20 21 31 9. Make sure that the Left Weight Glider (18) rests on the Left Spotter Hook (24). Do not tighten the Screw. Insert a Weight Guide (11) into each end ...Barbell with a M8 x 20mm Screw (33). Attach the Weight Guide (11) to the Barbell with an M10 x 65mm Bolt (26), two M10 Washers (3), and an M10 Nylon Locknut (7). Press two 45mm x 45mm Bushings (32) into each end of the handle on top of the 8 Locking Bar (20). Insert the Barbell ...
... with a M8 x 20mm Screw (33). Note: Tilt the Weight Guide away from the Upright (1) as shown in the Locking Bar. 31 20 21 31 9. Make sure that the Left Weight Glider (18) rests on the Left Spotter Hook (24). Do not tighten the Screw. Insert a Weight Guide (11) into each end ...Barbell with a M8 x 20mm Screw (33). Attach the Weight Guide (11) to the Barbell with an M10 x 65mm Bolt (26), two M10 Washers (3), and an M10 Nylon Locknut (7). Press two 45mm x 45mm Bushings (32) into each end of the handle on top of the 8 Locking Bar (20). Insert the Barbell ...

English Manual
Page 10
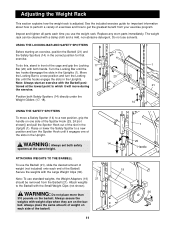
... future. Next, tighten the M8 x 20mm Screws (33) used in steps 9 and 10. 12. Fully engage the indicated hook on the Right Spotter Hook (25) must fit into the indentation in the 48mm Bushing in the direction shown. Make sure that it . Tighten all of the rack. The use of the Barbell (21) in the Weight Adapter. Attach the Weight Guide (11) to...
... future. Next, tighten the M8 x 20mm Screws (33) used in steps 9 and 10. 12. Fully engage the indicated hook on the Right Spotter Hook (25) must fit into the indentation in the 48mm Bushing in the direction shown. Make sure that it . Tighten all of the rack. The use of the Barbell (21) in the Weight Adapter. Attach the Weight Guide (11) to...
English Manual
Page 11
... Spotters (14) directly under the Weight Gliders (17, 18). 14 USING THE SAFETY SPOTTERS To move a Safety Spotter (14) to perform a variety of the slots in the Uprights (1). bell. See the included exercise guide for that exercise. The weight rack can be removed from your exercise program. Adjusting the Weight Rack This section explains how the weight rack is adjusted. Do not use standard weights, the Weight Adapters (19) 21...
... Spotters (14) directly under the Weight Gliders (17, 18). 14 USING THE SAFETY SPOTTERS To move a Safety Spotter (14) to perform a variety of the slots in the Uprights (1). bell. See the included exercise guide for that exercise. The weight rack can be removed from your exercise program. Adjusting the Weight Rack This section explains how the weight rack is adjusted. Do not use standard weights, the Weight Adapters (19) 21...

English Manual
Page 12
.... Qty. See the back cover of the user's manual for information about ordering replacement parts. NTBE05902 R0703A Key No. Description 1 2 Upright 2 2 Brace 3 12 M10 Washer 4 1 Right Base 5 1 Middle Crossbar 6 1 Top Crossbar 7 36 M10 Nylon Locknut 8 1 Left Base 9 8 M10 x 90mm Bolt 10 4 50mm Square Outer Cap 11 2 Weight Guide 12 1 Base Crossbar 13 2 Weight Storage Tube 14 2 Safety Spotter 15 4 Lower Support Plate 16 4 40mm Bushing...
.... Qty. See the back cover of the user's manual for information about ordering replacement parts. NTBE05902 R0703A Key No. Description 1 2 Upright 2 2 Brace 3 12 M10 Washer 4 1 Right Base 5 1 Middle Crossbar 6 1 Top Crossbar 7 36 M10 Nylon Locknut 8 1 Left Base 9 8 M10 x 90mm Bolt 10 4 50mm Square Outer Cap 11 2 Weight Guide 12 1 Base Crossbar 13 2 Weight Storage Tube 14 2 Safety Spotter 15 4 Lower Support Plate 16 4 40mm Bushing...

English Manual
Page 13
30 27 28 19 36 23 35 22 32 33 16 17 7 32 14 16 32 25 32 27 11 7 7 15 7 3 31 10 21 20 37 37 34 9 29 9 26 29 13 3 7 7 6 37 2 1 9 7 5 7 10 22 35 7 37 37 11 7 29 4 29 7 32 18 12 33 3 26 15 31 29 19 16 24 7 32 16 32 14 27 32 28 27 30 29 29 15 26 3 10 1 73 2 3 26 29 13 34 29 8 37 7 7 10 29 15 7 R0703A Exploded Drawing-Model No. NTBE05902
30 27 28 19 36 23 35 22 32 33 16 17 7 32 14 16 32 25 32 27 11 7 7 15 7 3 31 10 21 20 37 37 34 9 29 9 26 29 13 3 7 7 6 37 2 1 9 7 5 7 10 22 35 7 37 37 11 7 29 4 29 7 32 18 12 33 3 26 15 31 29 19 16 24 7 32 16 32 14 27 32 28 27 30 29 29 15 26 3 10 1 73 2 3 26 29 13 34 29 8 37 7 7 10 29 15 7 R0703A Exploded Drawing-Model No. NTBE05902
English Manual
Page 14
... of removal, installation or other warranties and any and all defects in the Manual to give the following information when calling: • The MODEL NUMBER of the product (NTBE05902) • The NAME of the product (NordicTrack® GRT380 weight rack) • The SERIAL NUMBER of the product (see the front cover of this manual) • The KEY NUMBER and DESCRIPTION of the desired part(s) (see the PART LIST...
... of removal, installation or other warranties and any and all defects in the Manual to give the following information when calling: • The MODEL NUMBER of the product (NTBE05902) • The NAME of the product (NordicTrack® GRT380 weight rack) • The SERIAL NUMBER of the product (see the front cover of this manual) • The KEY NUMBER and DESCRIPTION of the desired part(s) (see the PART LIST...


