
Uk Manual
Page 3
... carpet. It is the responsibility of the owner to ensure that there is used. 9. The weight bench is especially important for home use of the weight bench. 1. Note: The weight bench does not include weights. 4. Keep the weight bench indoors, away from the weight bench at all times. If the cables bind as described in this manual and all warnings on...
... carpet. It is the responsibility of the owner to ensure that there is used. 9. The weight bench is especially important for home use of the weight bench. 1. Note: The weight bench does not include weights. 4. Keep the weight bench indoors, away from the weight bench at all times. If the cables bind as described in this manual and all warnings on...
Uk Manual
Page 4
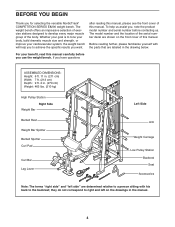
...The terms "right side" and "left on the front cover of the serial number decal are labeled in the manual. 4 The weight bench offers an impressive selection of exercise stations designed to the backrest; Before reading further, please familiarize yourself with his back to develop every ...manual. The model number and the location of this manual carefully before contacting us assist you for selecting the versatile NordicTrack® COMPETITION SERIES E8200 weight bench. Whether your goal is to a person sitting with the parts that are shown on the drawings in the drawing below.
...The terms "right side" and "left on the front cover of the serial number decal are labeled in the manual. 4 The weight bench offers an impressive selection of exercise stations designed to the backrest; Before reading further, please familiarize yourself with his back to develop every ...manual. The model number and the location of this manual carefully before contacting us assist you for selecting the versatile NordicTrack® COMPETITION SERIES E8200 weight bench. Whether your goal is to a person sitting with the parts that are shown on the drawings in the drawing below.
Uk Manual
Page 6
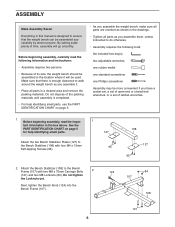
...tighten the Locknuts yet. Next, tighten the Bench Knob (124) into the Bench Frame (107). 124 84 107 108 121 6 Attach the Bench Stabilizer (108) to walk around the weight bench as you assemble it will go smoothly. Make sure that the weight bench can be assembled in the box above. ...PART IDENTIFICATION CHART on page 5 for help identifying small parts, use the PART IDENTIFICATION CHART on page 5. • As you assemble the weight bench, make sure all parts as shown in a cleared area and remove the packing materials. Before beginning assembly, read the following tools: the ...
...tighten the Locknuts yet. Next, tighten the Bench Knob (124) into the Bench Frame (107). 124 84 107 108 121 6 Attach the Bench Stabilizer (108) to walk around the weight bench as you assemble it will go smoothly. Make sure that the weight bench can be assembled in the box above. ...PART IDENTIFICATION CHART on page 5 for help identifying small parts, use the PART IDENTIFICATION CHART on page 5. • As you assemble the weight bench, make sure all parts as shown in a cleared area and remove the packing materials. Before beginning assembly, read the following tools: the ...
Uk Manual
Page 7
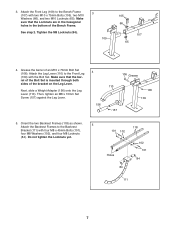
Attach the Front Leg (109) to the Bench Frame (107) with the Bolt Set. Attach the Leg Lever (110) to the Backrest Bracket (...Locknuts (84). 109 105 66 107 65 4. Make sure that the Locknuts are in the hexagonal holes in the bottom of the Bench Frame. See step 2. Orient the two Backrest Frames (118) as shown. 5 Attach the Backrest Frames to the Front Leg (... with two M10 x 75mm Bolts (105), two M10 3 Washers (66), and two M10 Locknuts (65). Next, slide a Weight Adapter (156) onto the Leg Lever (110). Grease the barrel of the bracket on the Leg Lever. Make sure that the ...
Attach the Front Leg (109) to the Bench Frame (107) with the Bolt Set. Attach the Leg Lever (110) to the Backrest Bracket (...Locknuts (84). 109 105 66 107 65 4. Make sure that the Locknuts are in the hexagonal holes in the bottom of the Bench Frame. See step 2. Orient the two Backrest Frames (118) as shown. 5 Attach the Backrest Frames to the Front Leg (... with two M10 x 75mm Bolts (105), two M10 3 Washers (66), and two M10 Locknuts (65). Next, slide a Weight Adapter (156) onto the Leg Lever (110). Grease the barrel of the bracket on the Leg Lever. Make sure that the ...
Uk Manual
Page 13
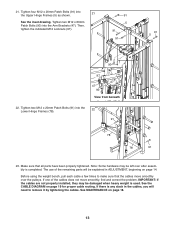
... M12 x 20mm Patch Bolts (91) into the Upper Hinge Frames (5) as shown. 21 See the inset drawing. Note: Some hardware may be damaged when heavy weight is used. See MAINTENANCE on page 14. Make sure that the cables move smoothly, find and correct the problem. If one of the remaining parts... installed, they may be explained in the cables, you will need to make sure that all parts have been properly tightened. 21. Before using the weight bench, pull each cable a few times to remove it by tightening the cables.
... M12 x 20mm Patch Bolts (91) into the Upper Hinge Frames (5) as shown. 21 See the inset drawing. Note: Some hardware may be damaged when heavy weight is used. See MAINTENANCE on page 14. Make sure that the cables move smoothly, find and correct the problem. If one of the remaining parts... installed, they may be explained in the cables, you will need to make sure that all parts have been properly tightened. 21. Before using the weight bench, pull each cable a few times to remove it by tightening the cables.
Uk Manual
Page 14
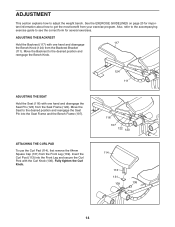
... (124) from your exercise program. Move the Seat to the desired position and reengage the Bench Knob. Also, refer to the accompanying exercise guide to adjust the weight bench. ADJUSTING THE BACKREST Hold the Backrest (117) with one hand and disengage the Seat Pin (123) from the Front Leg (109). ADJUSTING ...Knob. 124 111 116 107 122 123 114 113 131 109 136 14 Insert the Curl Post (113) into the Seat Frame and the Bench Frame (107). ADJUSTMENT This section explains how to see the correct form for important information about how to get the most benefit from the Backrest...
... (124) from your exercise program. Move the Seat to the desired position and reengage the Bench Knob. Also, refer to the accompanying exercise guide to adjust the weight bench. ADJUSTING THE BACKREST Hold the Backrest (117) with one hand and disengage the Seat Pin (123) from the Front Leg (109). ADJUSTING ...Knob. 124 111 116 107 122 123 114 113 131 109 136 14 Insert the Curl Post (113) into the Seat Frame and the Bench Frame (107). ADJUSTMENT This section explains how to see the correct form for important information about how to get the most benefit from the Backrest...
Uk Manual
Page 18
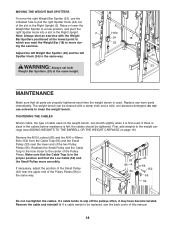
... Trap (55) and the Small Pulley (33) near the upper end of the Pulley Plates. MOVING THE WEIGHT BAR SPOTTERS To move the right Weight Bar Spotter (23), use solvents to clean the weight bench. ing the exercise. MAINTENANCE Make sure that all parts are properly tightened each time the...two Pulley Plates (56). do not use the indicated hole to the weight carriage (see the back cover of cable used . The weight bench can be replaced, see ADDING WEIGHTS TO THE BARBELL OR THE WEIGHT CARRIAGE on the weight bench, can stretch slightly when it is in the Right Upright (2). Remove ...
... Trap (55) and the Small Pulley (33) near the upper end of the Pulley Plates. MOVING THE WEIGHT BAR SPOTTERS To move the right Weight Bar Spotter (23), use solvents to clean the weight bench. ing the exercise. MAINTENANCE Make sure that all parts are properly tightened each time the...two Pulley Plates (56). do not use the indicated hole to the weight carriage (see the back cover of cable used . The weight bench can be replaced, see ADDING WEIGHTS TO THE BARBELL OR THE WEIGHT CARRIAGE on the weight bench, can stretch slightly when it is in the Right Upright (2). Remove ...
Uk Manual
Page 19
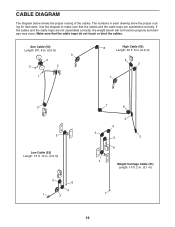
... ft. 2 in each drawing show the proper routing for that cable. Make sure that the cables and the cable traps are not assembled correctly, the weight bench will not function properly and damage may occur. CABLE DIAGRAM The diagram below shows the proper routing of the cables. The numbers in . (3.1 m) 1 19 If...
... ft. 2 in each drawing show the proper routing for that cable. Make sure that the cables and the cable traps are not assembled correctly, the weight bench will not function properly and damage may occur. CABLE DIAGRAM The diagram below shows the proper routing of the cables. The numbers in . (3.1 m) 1 19 If...
Uk Manual
Page 23
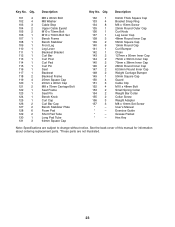
... 2 128 6 129 2 130 1 131 3 Description M8 x 45mm Bolt M8 Washer Cable Stop Upper Cable Eyelet M10 x 75mm Bolt M10 x 70mm Bolt Set Bench Frame Bench Stabilizer Front Leg Leg Lever Backrest Bracket Curl Bar Curl Post Curl Pad Curl Pin Seat Backrest Backrest Frame 25mm Square Cap 20mm x 40mm Cap...Inner Cap 75mm x 38mm Inner Cap 28mm Round Inner Cap 63.5mm Round Inner Cap Weight Carriage Bumper 50mm Square Cap Guard Cable Clip M10 x 48mm Bolt Small Spring Collar Weight Bar Collar Collar Screw Weight Adapter M8 x 10mm Set Screw Userʼs Manual Exercise Guide Grease Packet Hex Key Note...
... 2 128 6 129 2 130 1 131 3 Description M8 x 45mm Bolt M8 Washer Cable Stop Upper Cable Eyelet M10 x 75mm Bolt M10 x 70mm Bolt Set Bench Frame Bench Stabilizer Front Leg Leg Lever Backrest Bracket Curl Bar Curl Post Curl Pad Curl Pin Seat Backrest Backrest Frame 25mm Square Cap 20mm x 40mm Cap...Inner Cap 75mm x 38mm Inner Cap 28mm Round Inner Cap 63.5mm Round Inner Cap Weight Carriage Bumper 50mm Square Cap Guard Cable Clip M10 x 48mm Bolt Small Spring Collar Weight Bar Collar Collar Screw Weight Adapter M8 x 10mm Set Screw Userʼs Manual Exercise Guide Grease Packet Hex Key Note...


