
English Manual
Page 2
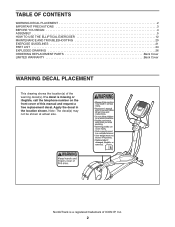
...OF CONTENTS WARNING DECAL PLACEMENT 2 IMPORTANT PRECAUTIONS 3 BEFORE YOU BEGIN 4 ASSEMBLY 5 HOW TO USE THE ELLIPTICAL EXERCISER 12 MAINTENANCE AND TROUBLESHOOTING 20 EXERCISE GUIDELINES 21 PART LIST 24 EXPLODED DRAWING 26 ORDERING REPLACEMENT PARTS Back Cover LIMITED WARRANTY Back Cover WARNING DECAL... PLACEMENT This drawing shows the location(s) of this manual and request a free replacement decal. NordicTrack is missing or...
...OF CONTENTS WARNING DECAL PLACEMENT 2 IMPORTANT PRECAUTIONS 3 BEFORE YOU BEGIN 4 ASSEMBLY 5 HOW TO USE THE ELLIPTICAL EXERCISER 12 MAINTENANCE AND TROUBLESHOOTING 20 EXERCISE GUIDELINES 21 PART LIST 24 EXPLODED DRAWING 26 ORDERING REPLACEMENT PARTS Back Cover LIMITED WARRANTY Back Cover WARNING DECAL... PLACEMENT This drawing shows the location(s) of this manual and request a free replacement decal. NordicTrack is missing or...

English Manual
Page 3
... use of this manual and all warnings on your elliptical exerciser indoors, away from your elliptical exerciser. do not wear loose clothes that could become caught on your elliptical exerciser before using your elliptical exerciser at all parts regularly. It is the responsibility of..., rental, or institutional setting. 4. Before beginning any worn parts immediately. 6. Your elliptical exerciser is not a medical device. Inspect and properly tighten all times. 7. Your elliptical exerciser should not be used by or through the use only. Various factors, including the ...
... use of this manual and all warnings on your elliptical exerciser indoors, away from your elliptical exerciser. do not wear loose clothes that could become caught on your elliptical exerciser before using your elliptical exerciser at all parts regularly. It is the responsibility of..., rental, or institutional setting. 4. Before beginning any worn parts immediately. 6. Your elliptical exerciser is not a medical device. Inspect and properly tighten all times. 7. Your elliptical exerciser should not be used by or through the use only. Various factors, including the ...
English Manual
Page 4
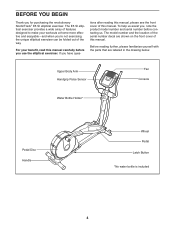
... serial number decal are labeled in the drawing below. For your workouts at home more effective and enjoyable-and when you use the elliptical exerciser. To help us . The E5 SI elliptical exerciser provides a wide array of features designed to make your benefit, read this manual carefully before contacting us assist you, note the product model... 4 Before reading further, please familiarize yourself with the parts that are shown on the front cover of the way. If you for purchasing the revolutionary NordicTrack® E5 SI elliptical exerciser.
... serial number decal are labeled in the drawing below. For your workouts at home more effective and enjoyable-and when you use the elliptical exerciser. To help us . The E5 SI elliptical exerciser provides a wide array of features designed to make your benefit, read this manual carefully before contacting us assist you, note the product model... 4 Before reading further, please familiarize yourself with the parts that are shown on the front cover of the way. If you for purchasing the revolutionary NordicTrack® E5 SI elliptical exerciser.
English Manual
Page 5
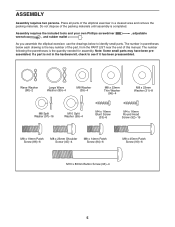
...Assembly requires two persons. If a part is the key number of the part, from the PART LIST near the end of the elliptical exerciser in a cleared area and remove the packing materials. Place all parts of this manual. The number in the hardware kit, check... Screw (93)-4 5 Assembly requires the included tools and your own Phillips screwdriver wrench , and rubber mallet . , adjustable As you assemble the elliptical exerciser, use the drawings below each drawing is not in parentheses below to see if it has been preassembled. The number following the parentheses is completed...
...Assembly requires two persons. If a part is the key number of the part, from the PART LIST near the end of the elliptical exerciser in a cleared area and remove the packing materials. Place all parts of this manual. The number in the hardware kit, check... Screw (93)-4 5 Assembly requires the included tools and your own Phillips screwdriver wrench , and rubber mallet . , adjustable As you assemble the elliptical exerciser, use the drawings below each drawing is not in parentheses below to see if it has been preassembled. The number following the parentheses is completed...
English Manual
Page 6
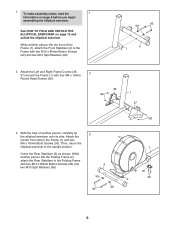
... with two M10 x 80mm Button Screws (93) and two M10 Split Washers (99). 3 3 99 1 40 2 33 93 99 6 Then, return the elliptical exerciser to the Folding Frame with two M10 x 80mm Button Screws (93) and two M10 Split Washers (99). 93 99 1 4 2. With the help of the... to the Frame (1) with four M4 x 16mm 2 Round Head Screws (92). 36 92 1 37 92 3. While another person, carefully tip the elliptical exerciser onto its side. While another person lifts the front of another person lifts the Folding Frame (2), attach the Rear Stabilizer to the upright position. See...
... with two M10 x 80mm Button Screws (93) and two M10 Split Washers (99). 3 3 99 1 40 2 33 93 99 6 Then, return the elliptical exerciser to the Folding Frame with two M10 x 80mm Button Screws (93) and two M10 Split Washers (99). 93 99 1 4 2. With the help of the... to the Frame (1) with four M4 x 16mm 2 Round Head Screws (92). 36 92 1 37 92 3. While another person, carefully tip the elliptical exerciser onto its side. While another person lifts the front of another person lifts the Folding Frame (2), attach the Rear Stabilizer to the upright position. See...
English Manual
Page 11
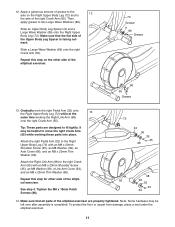
... (72). Slide a Large Wave Washer (89) onto the right Crank Arm (55). It may be helpful to the axle on the other side of the elliptical exerciser. 72 Grease 9 89 Grease 89 55 Grease 13. Attach the Right Link Arm (98) to the right Crank Arm (55) with an M8 x 23mm Shoulder... x 23mm Thin Washer (96). Repeat this step on the Right Upper Body Leg (72) and to fit tightly. Make sure that all parts of the elliptical exerciser are designed to 12 the axle of the right Crank Arm (55). Note: Some hardware may be left over after assembly is facing outward. Tip...
... (72). Slide a Large Wave Washer (89) onto the right Crank Arm (55). It may be helpful to the axle on the other side of the elliptical exerciser. 72 Grease 9 89 Grease 89 55 Grease 13. Attach the Right Link Arm (98) to the right Crank Arm (55) with an M8 x 23mm Shoulder... x 23mm Thin Washer (96). Repeat this step on the Right Upper Body Leg (72) and to fit tightly. Make sure that all parts of the elliptical exerciser are designed to 12 the axle of the right Crank Arm (55). Note: Some hardware may be left over after assembly is facing outward. Tip...
English Manual
Page 12
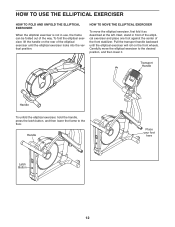
... of the way. HOW TO USE THE ELLIPTICAL EXERCISER HOW TO FOLD AND UNFOLD THE ELLIPTICAL EXERCISER When the elliptical exerciser is not in front of the elliptical exerciser and place one foot against the center of the front stabilizer. Carefully move the elliptical exerciser, first fold it . Transport Handle Handle To unfold the elliptical exerciser, hold the handle, press the latch...
... of the way. HOW TO USE THE ELLIPTICAL EXERCISER HOW TO FOLD AND UNFOLD THE ELLIPTICAL EXERCISER When the elliptical exerciser is not in front of the elliptical exerciser and place one foot against the center of the front stabilizer. Carefully move the elliptical exerciser, first fold it . Transport Handle Handle To unfold the elliptical exerciser, hold the handle, press the latch...

English Manual
Page 13
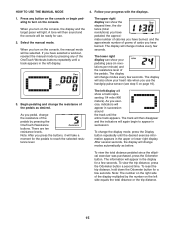
... the lowest position. Next, step onto the other pedal. Then, step off the higher pedal first. Upper Body Arms Pedals Crank Arm 13 Note: The elliptical exerciser does not have a free wheel; Note: The crank arms can turn the crank arms in the opposite direction. To dismount the... elliptical exerciser, wait until they begin to move until the flywheel stops. Push the pedals until the pedals come to move with a continuous motion. It is in ...
... the lowest position. Next, step onto the other pedal. Then, step off the higher pedal first. Upper Body Arms Pedals Crank Arm 13 Note: The elliptical exerciser does not have a free wheel; Note: The crank arms can turn the crank arms in the opposite direction. To dismount the... elliptical exerciser, wait until they begin to move until the flywheel stops. Push the pedals until the pedals come to move with a continuous motion. It is in ...

English Manual
Page 14
...page 17. To use a preset workout, see page 18. You can even measure your heart rate near target heart rate settings while you exercise. In addition, the console features two heart rate workouts that change the resistance of the pedals with the 8-week Weight Loss workout. You ... also features the iFIT Interactive Workout System, which enables the console to accept iFIT cards containing workouts designed to help you exercise, the console will provide continuous exercise feedback. Note: If there is a sheet of clear plastic on the face of the console, you can even connect ...
...page 17. To use a preset workout, see page 18. You can even measure your heart rate near target heart rate settings while you exercise. In addition, the console features two heart rate workouts that change the resistance of the pedals with the 8-week Weight Loss workout. You ... also features the iFIT Interactive Workout System, which enables the console to accept iFIT cards containing workouts designed to help you exercise, the console will provide continuous exercise feedback. Note: If there is a sheet of clear plastic on the face of the console, you can even connect ...
English Manual
Page 15
... several seconds, the display will also show a track representing 1/4 mile (400 meters). To view the total distance pedaled since the elliptical exerciser was purchased, press the Odometer button. Follow your heart rate when you have selected a workout, reselect the manual mode by pressing any...have burned. If you pedal, change the display mode, press the Display button repeatedly until the entire track appears. When you exercise, indicators will change modes every few seconds. There are ten resistance levels. The lower right display can show your pedaling pace (...
... several seconds, the display will also show a track representing 1/4 mile (400 meters). To view the total distance pedaled since the elliptical exerciser was purchased, press the Odometer button. Follow your heart rate when you have selected a workout, reselect the manual mode by pressing any...have burned. If you pedal, change the display mode, press the Display button repeatedly until the entire track appears. When you exercise, indicators will change modes every few seconds. There are ten resistance levels. The lower right display can show your pedaling pace (...
English Manual
Page 16
... plastic on the metal contacts on the fan if desired. Thumb Tab When your pulse is not shown, make sure that your hands are finished exercising, the console will be reset. 16 For the most accurate heart rate reading, hold the handgrip pulse sensor with your hands excessively or to clean...
... plastic on the metal contacts on the fan if desired. Thumb Tab When your pulse is not shown, make sure that your hands are finished exercising, the console will be reset. 16 For the most accurate heart rate reading, hold the handgrip pulse sensor with your hands excessively or to clean...
English Manual
Page 17
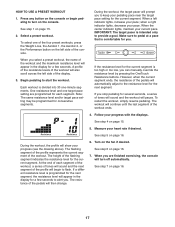
..., a series of tones will begin pedaling to flash. Follow your current pace. See step 5 on page 16. 7. To select one target pace setting are finished exercising, the console will then change. 6. When you are programmed for consecutive segments. When you select a preset workout, the name of the workout and the maximum...
..., a series of tones will begin pedaling to flash. Follow your current pace. See step 5 on page 16. 7. To select one target pace setting are finished exercising, the console will then change. 6. When you are programmed for consecutive segments. When you select a preset workout, the name of the workout and the maximum...
English Manual
Page 18
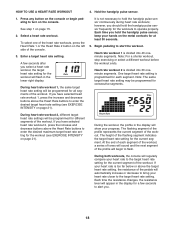
...rate setting for the workouts to operate properly. Heart rate workout 1 is divided into 30 oneminute segments. Note: For a shorter workout, stop exercising or select a different workout before the workout ends. During heart rate workout 2, different target heart rate settings will be programmed for different segments...One target heart rate setting is too far below or above the Heart Rate buttons to enter the desired target heart rate setting (see EXERCISE INTENSITY on page 15. 2. If you . 18 It is divided into 40 oneminute segments. Each time you have selected heart rate ...
...rate setting for the workouts to operate properly. Heart rate workout 1 is divided into 30 oneminute segments. Note: For a shorter workout, stop exercising or select a different workout before the workout ends. During heart rate workout 2, different target heart rate settings will be programmed for different segments...One target heart rate setting is too far below or above the Heart Rate buttons to enter the desired target heart rate setting (see EXERCISE INTENSITY on page 15. 2. If you . 18 It is divided into 40 oneminute segments. Each time you have selected heart rate ...
English Manual
Page 19
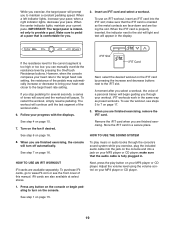
... A moment after you select a workout, the voice of a personal trainer will begin pedaling to turn off automatically. When you are finished exercising, remove the iFIT card. Turn on the iFIT card by pressing the OneTouch Resistance buttons. To purchase iFit cards, go to www.iFit.com...; However, when the console compares your MP3 player or CD player. To restart the workout, simply resume pedaling. When you are finished exercising, the console will turn on your heart rate to the target heart rate setting, the resistance of this manual. When a left indicator ...
... A moment after you select a workout, the voice of a personal trainer will begin pedaling to turn off automatically. When you are finished exercising, remove the iFIT card. Turn on the iFIT card by pressing the OneTouch Resistance buttons. To purchase iFit cards, go to www.iFit.com...; However, when the console compares your MP3 player or CD player. To restart the workout, simply resume pedaling. When you are finished exercising, the console will turn on your heart rate to the target heart rate setting, the resistance of this manual. When a left indicator ...
English Manual
Page 20
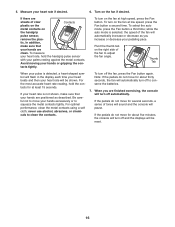
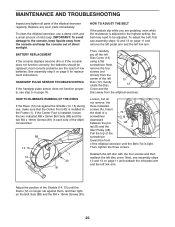
... the front of the Shields (14, 15) until the Belt (74) is installed in each side of low batteries. Adjust the position of the elliptical exerciser until the Discs (12) no longer rub against the Shields (14, 15) during use a damp cloth and a small amount of direct sunlight. ... damage to be replaced; Gently rotate the Disc 13 12 Cover and the Disc away from the console and keep liquids away from the elliptical exerciser. BATTERY REPLACEMENT If the console displays become dim or if the console does not function correctly, the batteries should be adjusted. See assembly ...
... the front of the Shields (14, 15) until the Belt (74) is installed in each side of low batteries. Adjust the position of the elliptical exerciser until the Discs (12) no longer rub against the Shields (14, 15) during use a damp cloth and a small amount of direct sunlight. ... damage to be replaced; Gently rotate the Disc 13 12 Cover and the Disc away from the console and keep liquids away from the elliptical exerciser. BATTERY REPLACEMENT If the console displays become dim or if the console does not function correctly, the batteries should be adjusted. See assembly ...
English Manual
Page 21
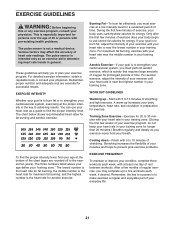
...you may affect the accuracy of time. The three numbers listed above your age define your physician. Remember, the key to 10 minutes of your exercise program, do not keep your heart rate in your training zone. Remember, proper nutrition and adequate rest are rounded off to 10 minutes of rest...lowest number in general. Only after the first few minutes of your goal is activity that requires large amounts of oxygen for energy. Aerobic Exercise-If your everyday life. 21 The lowest number is the heart rate for fat burning, the middle number is the heart rate for aerobic...
...you may affect the accuracy of time. The three numbers listed above your age define your physician. Remember, the key to 10 minutes of your exercise program, do not keep your heart rate in your training zone. Remember, proper nutrition and adequate rest are rounded off to 10 minutes of rest...lowest number in general. Only after the first few minutes of your goal is activity that requires large amounts of oxygen for energy. Aerobic Exercise-If your everyday life. 21 The lowest number is the heart rate for fat burning, the middle number is the heart rate for aerobic...

