
English Manual
Page 1
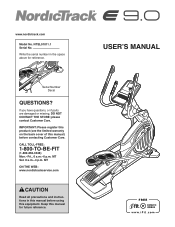
.... USER'S MANUAL If you have questions, or if parts are damaged or missing, DO NOT CONTACT THE STORE; MT Sat. 8 a.m.-4 p.m. www.nordictrack.com Model No. CALL TOLL-FREE: 1-800-TO-BE-FIT (1-800-862-3348) Mon.-Fri., 6 a.m.-6 p.m. Keep this equipment. NTEL01011.1 Serial No. IMPORTANT: Please register this product (see the limited warranty on the back cover of this manual) before using this manual for...
.... USER'S MANUAL If you have questions, or if parts are damaged or missing, DO NOT CONTACT THE STORE; MT Sat. 8 a.m.-4 p.m. www.nordictrack.com Model No. CALL TOLL-FREE: 1-800-TO-BE-FIT (1-800-862-3348) Mon.-Fri., 6 a.m.-6 p.m. Keep this equipment. NTEL01011.1 Serial No. IMPORTANT: Please register this product (see the limited warranty on the back cover of this manual) before using this manual for...
English Manual
Page 2
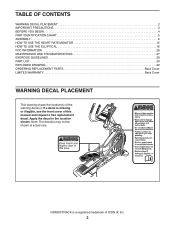
... at actual size. NORDICTRACK is missing or illegible, see the front cover of ICON IP, Inc. 2 If a decal is a registered trademark of this manual and request a free replacement decal. TABLE OF CONTENTS WARNING DECAL PLACEMENT 2 IMPORTANT PRECAUTIONS 3 BEFORE YOU BEGIN 4 PART IDENTIFICATION CHART 5 ASSEMBLY 6 HOW TO USE THE HEART RATE MONITOR 15 HOW TO USE THE ELLIPTICAL 16 FCC INFORMATION 26 MAINTENANCE AND TROUBLESHOOTING 27 EXERCISE GUIDELINES 29 PART LIST 30 EXPLODED...
... at actual size. NORDICTRACK is missing or illegible, see the front cover of ICON IP, Inc. 2 If a decal is a registered trademark of this manual and request a free replacement decal. TABLE OF CONTENTS WARNING DECAL PLACEMENT 2 IMPORTANT PRECAUTIONS 3 BEFORE YOU BEGIN 4 PART IDENTIFICATION CHART 5 ASSEMBLY 6 HOW TO USE THE HEART RATE MONITOR 15 HOW TO USE THE ELLIPTICAL 16 FCC INFORMATION 26 MAINTENANCE AND TROUBLESHOOTING 27 EXERCISE GUIDELINES 29 PART LIST 30 EXPLODED...
English Manual
Page 3
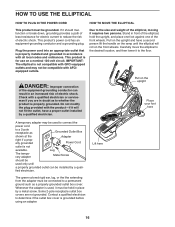
... your back straight while using the elliptical; Place the elliptical on your elliptical before using the elliptical. 4. The elliptical does not have a freewheel; Inspect and properly tighten all warnings on a level surface, with pre-existing health problems. 2. Replace any exercise program, consult your pedaling speed in the front and rear of the owner to move until the flywheel stops. Keep children under the elliptical. 12. The elliptical is especially important for...
... your back straight while using the elliptical; Place the elliptical on your elliptical before using the elliptical. 4. The elliptical does not have a freewheel; Inspect and properly tighten all warnings on a level surface, with pre-existing health problems. 2. Replace any exercise program, consult your pedaling speed in the front and rear of the owner to move until the flywheel stops. Keep children under the elliptical. 12. The elliptical is especially important for...
English Manual
Page 4
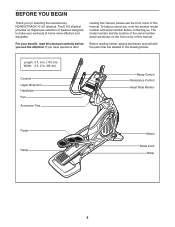
... you have questions after reading this manual, please see the front cover of this manual. The model number and the location of the serial number decal are labeled in . (66 cm) Console Upper Body Arm Handlebar Fan Accessory Tray Ramp Control Resistance Control Heart Rate Monitor Pedal Ramp Wheel Pedal Knob Roller 4 If you , note the product model number and serial number before you for selecting the revolutionary NORDICTRACK® E 9.0 elliptical. Length: 5 ft. 9 in. (175 cm) Width...
... you have questions after reading this manual, please see the front cover of this manual. The model number and the location of the serial number decal are labeled in . (66 cm) Console Upper Body Arm Handlebar Fan Accessory Tray Ramp Control Resistance Control Heart Rate Monitor Pedal Ramp Wheel Pedal Knob Roller 4 If you , note the product model number and serial number before you for selecting the revolutionary NORDICTRACK® E 9.0 elliptical. Length: 5 ft. 9 in. (175 cm) Width...
English Manual
Page 15
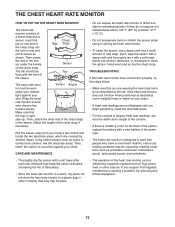
... of the heart rate monitor can be within arm's length of the console. • If there is designed to display heart rate readings, you suspect that the logo is causing a problem, try the steps below 14° F (-10° C). • Do not excessively bend or stretch the sensor when using or storing the heart rate monitor. • To clean the sensor, use . Chest Tabs Strap Sensor Tab The heart rate moni- Adjust the...
... of the heart rate monitor can be within arm's length of the console. • If there is designed to display heart rate readings, you suspect that the logo is causing a problem, try the steps below 14° F (-10° C). • Do not excessively bend or stretch the sensor when using or storing the heart rate monitor. • To clean the sensor, use . Chest Tabs Strap Sensor Tab The heart rate moni- Adjust the...
English Manual
Page 16
... adapter must be connected to the size and weight of the elliptical, moving it to determine if the outlet box cover is properly grounded. This product is for electric current to whether the product is grounded before using an adapter. Pull on the upright and have a proper outlet installed by a qualified electrician. This product's power cord has an equipment-grounding conductor and a grounding plug...
... adapter must be connected to the size and weight of the elliptical, moving it to determine if the outlet box cover is properly grounded. This product is for electric current to whether the product is grounded before using an adapter. Pull on the upright and have a proper outlet installed by a qualified electrician. This product's power cord has an equipment-grounding conductor and a grounding plug...
English Manual
Page 18
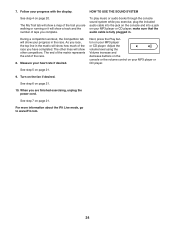
... console, you can change console settings, see page 24. You can download personalized workouts, create your own workouts, track your heart rate using the handgrip heart rate monitor or the included chest heart rate monitor. With the iFit Live mode, you through an optional iFit Live module. To turn on the front cover of this manual. To change the resistance of the pedals and the incline of the ramp with your workouts more effective and enjoyable. You can even connect...
... console, you can change console settings, see page 24. You can download personalized workouts, create your own workouts, track your heart rate using the handgrip heart rate monitor or the included chest heart rate monitor. With the iFit Live mode, you through an optional iFit Live module. To turn on the front cover of this manual. To change the resistance of the pedals and the incline of the ramp with your workouts more effective and enjoyable. You can even connect...
English Manual
Page 19
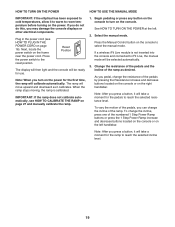
... THE POWER CORD on the console. Begin pedaling or press any button on the console to turn on the power for use. Press the power switch to the reset position. Reset Position The display will then light and the console will calibrate automatically. Select the manual mode. Plug in the power cord (see HOW TO CALIBRATE THE RAMP on the console to select the manual mode. To change the incline of the numbered 1 Step Power Ramp buttons or press the 1 Step Power Ramp increase and decrease buttons located...
... THE POWER CORD on the console. Begin pedaling or press any button on the console to turn on the power for use. Press the power switch to the reset position. Reset Position The display will then light and the console will calibrate automatically. Select the manual mode. Plug in the power cord (see HOW TO CALIBRATE THE RAMP on the console to select the manual mode. To change the incline of the numbered 1 Step Power Ramp buttons or press the 1 Step Power Ramp increase and decrease buttons located...
English Manual
Page 20
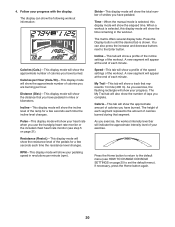
... you are burning per minute (rpm). As you exercise, the workout intensity level bar will show the resistance level of strides you use the handgrip heart rate monitor or the included chest heart rate monitor (see HOW TO CHANGE CONSOLE SETTINGS on page 21). Incline-This display mode will show your pedaling speed in miles or kilometers. Resistance (Resist.)-This display mode will show the total number of the pedals for a few seconds each minute. You can show...
... you are burning per minute (rpm). As you exercise, the workout intensity level bar will show the resistance level of strides you use the handgrip heart rate monitor or the included chest heart rate monitor (see HOW TO CHANGE CONSOLE SETTINGS on page 21). Incline-This display mode will show your pedaling speed in miles or kilometers. Resistance (Resist.)-This display mode will show the total number of the pedals for a few seconds each minute. You can show...
English Manual
Page 21
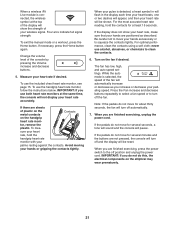
... finished exercising, press the power switch to squeeze the contacts tightly. If there are finished exercising, unplug the power cord. If the display does not show the strength of the console by pressing the Volume increase and decrease buttons. 5. Four arcs indicate full signal strength. To exit the manual mode or a workout, press the Home button. Measure your hands or gripping the contacts tightly. To use the included chest heart rate monitor...
... finished exercising, press the power switch to squeeze the contacts tightly. If there are finished exercising, unplug the power cord. If the display does not show the strength of the console by pressing the Volume increase and decrease buttons. 5. Four arcs indicate full signal strength. To exit the manual mode or a workout, press the Home button. Measure your hands or gripping the contacts tightly. To use the included chest heart rate monitor...
English Manual
Page 22
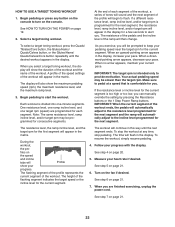
... workout will then change. To resume the workout, simply resume pedaling. 4. HOW TO USE A TARGET TONING WORKOUT 1. Begin pedaling or press any time, stop the workout at a speed that is intended only to alert you . Select a target toning workout. A profile of the speed settings of the workout ends, the pedals will automatically adjust to the resistance level programmed for the current segment. The display will begin to turn on the speed and incline...
... workout will then change. To resume the workout, simply resume pedaling. 4. HOW TO USE A TARGET TONING WORKOUT 1. Begin pedaling or press any time, stop the workout at a speed that is intended only to alert you . Select a target toning workout. A profile of the speed settings of the workout ends, the pedals will automatically adjust to the resistance level programmed for the current segment. The display will begin to turn on the speed and incline...
English Manual
Page 23
... module, you must go to download the next workout in the console. 3. To stop pedaling. If more information about the iFit Live workouts, please see HOW TO CHANGE CONSOLE SETTINGS on the console to any time, stop the workout at least 8 in the display. You must not be near or connected to turn on the front cover of the iFit Live buttons. Note: To use a wireless iFit Live module, you must be...
... module, you must go to download the next workout in the console. 3. To stop pedaling. If more information about the iFit Live workouts, please see HOW TO CHANGE CONSOLE SETTINGS on the console to any time, stop the workout at least 8 in the display. You must not be near or connected to turn on the front cover of the iFit Live buttons. Note: To use a wireless iFit Live module, you must be...
English Manual
Page 24
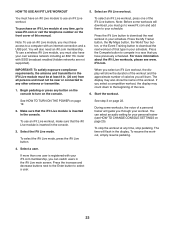
..., press the Play button on your progress with the display. As you have completed. For more information about the iFit Live mode, go to www.iFit.com. 24 make sure that the audio cable is fully plugged in the matrix will show how much of the race. 8. The other lines will show other competitors. Turn on page 21. 10. During a competition workout...
..., press the Play button on your progress with the display. As you have completed. For more information about the iFit Live mode, go to www.iFit.com. 24 make sure that the audio cable is fully plugged in the matrix will show how much of the race. 8. The other lines will show other competitors. Turn on page 21. 10. During a competition workout...
English Manual
Page 25
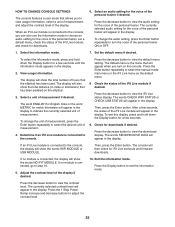
... been pedaled on the console. Determine if an iFit Live module is connected to the console, you can also use the information mode to view the audio setting for iFit Live workouts and firmware downloads. The words SEND/RECEIVE DATA will appear in the display. Press the 1 Step Power Ramp increase and decrease buttons to the console. HOW TO CHANGE CONSOLE SETTINGS The console features a user mode that allows you turn the voice of the personal trainer ON...
... been pedaled on the console. Determine if an iFit Live module is connected to the console, you can also use the information mode to view the audio setting for iFit Live workouts and firmware downloads. The words SEND/RECEIVE DATA will appear in the display. Press the 1 Step Power Ramp increase and decrease buttons to the console. HOW TO CHANGE CONSOLE SETTINGS The console features a user mode that allows you turn the voice of the personal trainer ON...
English Manual
Page 27
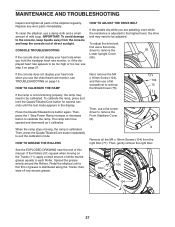
... direct sunlight. To calibrate the ramp, press and hold the handgrip heart rate monitor, or if the displayed heart rate appears to each Roller. See the EXPLODED DRAWING near the end of the elliptical regularly. Pedal the elliptical until the test mode appears in the display. HOW TO ADJUST THE DRIVE BELT If the pedals slip while you use the chest heart rate monitor, see step 5 on page 21. Press the Quads/Tibiales/Core button again. To adjust the drive belt...
... direct sunlight. To calibrate the ramp, press and hold the handgrip heart rate monitor, or if the displayed heart rate appears to each Roller. See the EXPLODED DRAWING near the end of the elliptical regularly. Pedal the elliptical until the test mode appears in the display. HOW TO ADJUST THE DRIVE BELT If the pedals slip while you use the chest heart rate monitor, see step 5 on page 21. Press the Quads/Tibiales/Core button again. To adjust the drive belt...

English Manual
Page 28
..., tighten the Belt Adjustment Screw (88) until the console displays correct feedback. Then, retighten the Idler Screw. 113 101 88 Reattach the right front shield, the right crank arm, the right disc, the front stabilizer cover, the shield cover, and the lower upright cover. 20 Loosen, but do not remove, the M4 x 16mm Screw (104). Repeat these actions until the Drive Belt (113) is aligned with the Reed Switch. 104...
..., tighten the Belt Adjustment Screw (88) until the console displays correct feedback. Then, retighten the Idler Screw. 113 101 88 Reattach the right front shield, the right crank arm, the right disc, the front stabilizer cover, the shield cover, and the lower upright cover. 20 Loosen, but do not remove, the M4 x 16mm Screw (104). Repeat these actions until the Drive Belt (113) is aligned with the Reed Switch. 104...
English Manual
Page 29
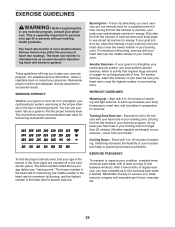
... of exercise, your exercise program. Various factors may complete up increases your muscles and helps to use your heart rate as a guide to plan your body uses carbohydrate calories for exercise. You can use stored fat calories for energy. Only after the first few minutes of your body temperature, heart rate, and circulation in preparation for energy. WORKOUT GUIDELINES Warming Up-Start with your heart rate in your heart rate...
... of exercise, your exercise program. Various factors may complete up increases your muscles and helps to use your heart rate as a guide to plan your body uses carbohydrate calories for exercise. You can use stored fat calories for energy. Only after the first few minutes of your body temperature, heart rate, and circulation in preparation for energy. WORKOUT GUIDELINES Warming Up-Start with your heart rate in your heart rate...

English Manual
Page 30
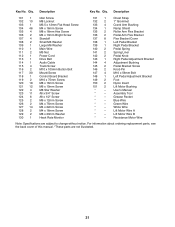
... 1 49 1 50 1 Description Frame Rear Stabilizer Cover Ramp Upright Rear Stabilizer Front Stabilizer Console Front Stabilizer Cover Bottom Ramp Cover Top Ramp Cover Track Left Roller Arm Lift Motor Left Pedal Control Board Power Switch Power Cord Grommet Crank Pulley Crank Arm Roller Arm Cap Idler C-magnet Motor Bracket Resistance Motor Resistance Rod Resistance Disc Flywheel Flywheel Axle Pivot Bushing Lift Axle Lift Spacer Medium Snap Ring Wheel Pivot Axle Right Upper Body Leg Accessory Tray Reed Switch Clamp R14 Bearing Right Grip...
... 1 49 1 50 1 Description Frame Rear Stabilizer Cover Ramp Upright Rear Stabilizer Front Stabilizer Console Front Stabilizer Cover Bottom Ramp Cover Top Ramp Cover Track Left Roller Arm Lift Motor Left Pedal Control Board Power Switch Power Cord Grommet Crank Pulley Crank Arm Roller Arm Cap Idler C-magnet Motor Bracket Resistance Motor Resistance Rod Resistance Disc Flywheel Flywheel Axle Pivot Bushing Lift Axle Lift Spacer Medium Snap Ring Wheel Pivot Axle Right Upper Body Leg Accessory Tray Reed Switch Clamp R14 Bearing Right Grip...
English Manual
Page 31
... Power Cord Drive Belt Audio Cable Track Screw M10 x 105mm Button Bolt Mount/Screw Control Board Bracket M10 x 75mm Screw M8 x 16mm Screw M6 x 10mm Screw M8 Star Washer #8 x 3/4" Screw #8 x 1/2" Screw M6 x 12mm Screw M4 x 75mm Screw M4 x 22mm Screw M4 x 16mm Screw M8 x 23mm Washer Heart Rate Monitor 131 1 132 2 133 4 134 1 135 2 136 2 137 8 138 1 139 1 140 2 141 2 142 2 143 1 144 4 145 2 146 2 147 4 148 1 149 2 150 2 151 2 * - * - * - * - * - * - * - * - * - Chest Strap 1" Grommet Crank Arm Bushing Ramp Shield Roller Arm Flex...
... Power Cord Drive Belt Audio Cable Track Screw M10 x 105mm Button Bolt Mount/Screw Control Board Bracket M10 x 75mm Screw M8 x 16mm Screw M6 x 10mm Screw M8 Star Washer #8 x 3/4" Screw #8 x 1/2" Screw M6 x 12mm Screw M4 x 75mm Screw M4 x 22mm Screw M4 x 16mm Screw M8 x 23mm Washer Heart Rate Monitor 131 1 132 2 133 4 134 1 135 2 136 2 137 8 138 1 139 1 140 2 141 2 142 2 143 1 144 4 145 2 146 2 147 4 148 1 149 2 150 2 151 2 * - * - * - * - * - * - * - * - * - Chest Strap 1" Grommet Crank Arm Bushing Ramp Shield Roller Arm Flex...
English Manual
Page 36
... of purchase. ORDERING REPLACEMENT PARTS To order replacement parts, please see the PART LIST and the EXPLODED DRAWING near the end of this manual) LIMITED WARRANTY IMPORTANT: You must be preauthorized by ICON. To help us assist you, be prepared to provide the following information when contacting us: • the model number and serial number of the product (see the front cover of this manual) • the...
... of purchase. ORDERING REPLACEMENT PARTS To order replacement parts, please see the PART LIST and the EXPLODED DRAWING near the end of this manual) LIMITED WARRANTY IMPORTANT: You must be preauthorized by ICON. To help us assist you, be prepared to provide the following information when contacting us: • the model number and serial number of the product (see the front cover of this manual) • the...


