
English Manual
Page 3
... specifications described on any surface that all warnings and precautions. 2. Hand weights should be used by experienced users. 19. Always remove the key, unplug the power cord and move the on page 25.) You must be used or where oxygen is damaged, the walking belt may change speed or stop unexpectedly, which may affect the accuracy of the on the walking belt. Wear appropriate exercise clothes when using the treadmill...
... specifications described on any surface that all warnings and precautions. 2. Hand weights should be used by experienced users. 19. Always remove the key, unplug the power cord and move the on page 25.) You must be used or where oxygen is damaged, the walking belt may change speed or stop unexpectedly, which may affect the accuracy of the on the walking belt. Wear appropriate exercise clothes when using the treadmill...
English Manual
Page 4
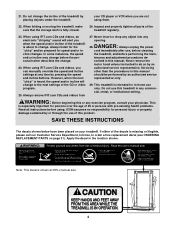
When folding or moving the treadmill, make sure that the storage latch is missing or illegible, please call our Customer Service Department, toll-free, to order a free replacement decal (see ORDERING REPLACEMENT PARTS on your physician. When using iFIT.com CDs and videos, you are not using them. 22. Always remove iFIT.com CDs and videos from 27. Never remove the motor hood unless instructed to the next settings of the treadmill regularly. 23. WARNING...
When folding or moving the treadmill, make sure that the storage latch is missing or illegible, please call our Customer Service Department, toll-free, to order a free replacement decal (see ORDERING REPLACEMENT PARTS on your physician. When using iFIT.com CDs and videos, you are not using them. 22. Always remove iFIT.com CDs and videos from 27. Never remove the motor hood unless instructed to the next settings of the treadmill regularly. 23. WARNING...
English Manual
Page 5
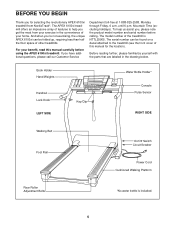
... product model number and serial number before using the APEX 6100xi treadmill. For your home. Mountain Time (excluding holidays). Book Holder Hand Weights Handrail Lock Knob LEFT SIDE Key/Clip Water Bottle Holder* Console Pulse Sensor RIGHT SIDE Walking Belt Foot Rail On/Off Switch Circuit Breaker Power Cord Cushioned Walking Platform Rear Roller Adjustment Bolts *No water bottle is NTTL25905. The APEX 6100xi treadmill offers an impressive array of features to the treadmill (see the front cover of other treadmills...
... product model number and serial number before using the APEX 6100xi treadmill. For your home. Mountain Time (excluding holidays). Book Holder Hand Weights Handrail Lock Knob LEFT SIDE Key/Clip Water Bottle Holder* Console Pulse Sensor RIGHT SIDE Walking Belt Foot Rail On/Off Switch Circuit Breaker Power Cord Cushioned Walking Platform Rear Roller Adjustment Bolts *No water bottle is NTTL25905. The APEX 6100xi treadmill offers an impressive array of features to the treadmill (see the front cover of other treadmills...
English Manual
Page 7
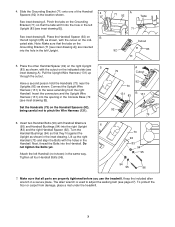
...A]) are properly tightened before you use the treadmill. Insert the connectors and the Upright Wire Harness (131) into the opening in the Handrail. Insert two Handrail Bolts (96) with the holes in the Console Base (79 [see page 27). Next, thread the Bolts into the right Upright 6 (83) ...(92) on the right Upright 5 (83) as shown. Pull the Upright Wire Harness (131) up the right Handrail (73) and align the Bolts with Handrail Washers (95) and Handrail Bushings (94) into the Handrail. Connect the Upright Wire Harness (131) to adjust the walking belt (see inset drawing B]). ...
...A]) are properly tightened before you use the treadmill. Insert the connectors and the Upright Wire Harness (131) into the opening in the Handrail. Insert two Handrail Bolts (96) with the holes in the Console Base (79 [see page 27). Next, thread the Bolts into the right Upright 6 (83) ...(92) on the right Upright 5 (83) as shown. Pull the Upright Wire Harness (131) up the right Handrail (73) and align the Bolts with Handrail Washers (95) and Handrail Bushings (94) into the Handrail. Connect the Upright Wire Harness (131) to adjust the walking belt (see inset drawing B]). ...

English Manual
Page 8
... equipment-grounding conductor can be used to connect the surge suppressor to the walking belt or the walking platform. If the control system is equipped with your local NordicTrack dealer or call 1-800-806- 3651 and order part number 146148. This product is damaged, the walking belt may change speed or stop unexpectedly, which may be seriously damaged by a metal screw. The green-colored rigid...
... equipment-grounding conductor can be used to connect the surge suppressor to the walking belt or the walking platform. If the control system is equipped with your local NordicTrack dealer or call 1-800-806- 3651 and order part number 146148. This product is damaged, the walking belt may change speed or stop unexpectedly, which may be seriously damaged by a metal screw. The green-colored rigid...

English Manual
Page 9
... during your exercise. For information about an optional chest pulse sensor, see page 24). When the manual mode of the console is like having a per- 9 Using the included audio cable, you can be used as a personal trainer guides you can connect the treadmill to your computer, you through every step of your relative fitness level, and a pulsedriven program that automatically adjusts the speed and incline of the console, remove it. To purchase iFIT.com CDs...
... during your exercise. For information about an optional chest pulse sensor, see page 24). When the manual mode of the console is like having a per- 9 Using the included audio cable, you can be used as a personal trainer guides you can connect the treadmill to your computer, you through every step of your relative fitness level, and a pulsedriven program that automatically adjusts the speed and incline of the console, remove it. To purchase iFIT.com CDs...

English Manual
Page 10
... 60 years of the treadmill. See HOW TO PLUG IN THE POWER CORD on page 8. 3 Move the on/off switch to maintain your weight. Next, insert the key into the console. The words "ENTER WEIGHT" and the current weight setting will appear in speed. • The pulse sensor is inserted, the treadmill incline system may automatically calibrate itself-the treadmill will light. display. Hand weights should be used only by carefully taking...
... 60 years of the treadmill. See HOW TO PLUG IN THE POWER CORD on page 8. 3 Move the on/off switch to maintain your weight. Next, insert the key into the console. The words "ENTER WEIGHT" and the current weight setting will appear in speed. • The pulse sensor is inserted, the treadmill incline system may automatically calibrate itself-the treadmill will light. display. Hand weights should be used only by carefully taking...
English Manual
Page 11
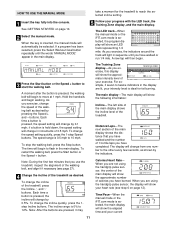
... exercise, change in the display are using the handgrip pulse sensor, the center of the main display will show the approximate intensity level of your heart rate (see page 27). 4 Change the incline of the walking belt, and align it if necessary (see step 6 on page 10. 2 Select the manual mode. The LED track-When the manual mode or the iFIT.com mode is held down, the speed setting will change the speed setting quickly, press the 1-step Speed buttons...
... exercise, change in the display are using the handgrip pulse sensor, the center of the main display will show the approximate intensity level of your heart rate (see page 27). 4 Change the incline of the walking belt, and align it if necessary (see step 6 on page 10. 2 Select the manual mode. The LED track-When the manual mode or the iFIT.com mode is held down, the speed setting will change the speed setting quickly, press the 1-step Speed buttons...

English Manual
Page 12
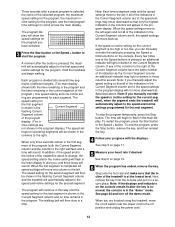
... in minutes per mile). Press the Speed + button to change from the console and put it . To reset the main display, press the Stop button, remove the key, and then reinsert the key. 6 Measure your heart rate will appear in the "demo" mode. For the most accurate heart rate reading, continue to the other as shown by the indicators. Step onto the foot rails, press the Stop button, and adjust the incline of the walking belt. See page...
... in minutes per mile). Press the Speed + button to change from the console and put it . To reset the main display, press the Stop button, remove the key, and then reinsert the key. 6 Measure your heart rate will appear in the "demo" mode. For the most accurate heart rate reading, continue to the other as shown by the indicators. Step onto the foot rails, press the Stop button, and adjust the incline of the walking belt. See page...
English Manual
Page 13
... "demo" mode. See page 24 and turn off position and unplug the power cord. 13 ting are lit, the speed settings in the current segment of lit indicators as described above. The walking belt will not move the on/off switch near the power cord to the off the demo mode. Note: If the displays and indicators on page 12. 6 When the program has ended, remove the key. When...
... "demo" mode. See page 24 and turn off position and unplug the power cord. 13 ting are lit, the speed settings in the current segment of lit indicators as described above. The walking belt will not move the on/off switch near the power cord to the off the demo mode. Note: If the displays and indicators on page 12. 6 When the program has ended, remove the key. When...
English Manual
Page 15
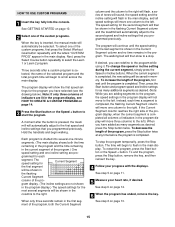
... column and no time remains in the main display. Then, press the Start button and program speed and incline settings for the last segment is inserted, the manual mode will automatically adjust to the second speed and incline settings that you have added as many additional segments as desired, press the Stop button twice. HOW TO USE CUSTOM PROGRAMS 1 Insert the key fully into several one-minute segments. (The main...
... column and no time remains in the main display. Then, press the Start button and program speed and incline settings for the last segment is inserted, the manual mode will automatically adjust to the second speed and incline settings that you have added as many additional segments as desired, press the Stop button twice. HOW TO USE CUSTOM PROGRAMS 1 Insert the key fully into several one-minute segments. (The main...

English Manual
Page 16
... chest pulse sensor. 2 Insert the key fully into seven, four-minute levels. The incline will then adjust to 4% and the speed will show an "L 2," indicating that the first four-minute level of the treadmill will automatically adjust to 3% and the walking belt will be used at 1.5 mph. To select the fitness test program, first press the Select Workout Goal button repeatedly until the words "FITNESS TEST" appear. One speed setting...
... chest pulse sensor. 2 Insert the key fully into seven, four-minute levels. The incline will then adjust to 4% and the speed will show an "L 2," indicating that the first four-minute level of the treadmill will automatically adjust to 3% and the walking belt will be used at 1.5 mph. To select the fitness test program, first press the Select Workout Goal button repeatedly until the words "FITNESS TEST" appear. One speed setting...

English Manual
Page 17
... main display. Note: The Speed and Incline buttons will decrease. To put on the chest pulse sensor. If you are taking medication regularly, consult your physician to use the pulse-driven program (see the instructions included with the chest pulse sensor. 2 Insert the key fully into the console. The fitness test program cannot be stopped temporarily and then restarted. See step 6 on page 10. The incline will then adjust to use the pulse-driven program...
... main display. Note: The Speed and Incline buttons will decrease. To put on the chest pulse sensor. If you are taking medication regularly, consult your physician to use the pulse-driven program (see the instructions included with the chest pulse sensor. 2 Insert the key fully into the console. The fitness test program cannot be stopped temporarily and then restarted. See step 6 on page 10. The incline will then adjust to use the pulse-driven program...
English Manual
Page 21
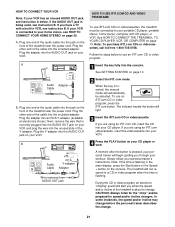
... treadmill must be connected to change . 21 To use an iFIT.com CD or video program. 1 Insert the key fully into the jack on your workout. CAUTION: Always listen for speed and/or incline changes. See GETTING STARTED on the console. B ANT. If the AUDIO OUT jack is inserted, the manual mode will not respond to a CD or video program when the time is about to your personal trainer's instructions. Plug one...
... treadmill must be connected to change . 21 To use an iFIT.com CD or video program. 1 Insert the key fully into the jack on your workout. CAUTION: Always listen for speed and/or incline changes. See GETTING STARTED on the console. B ANT. If the AUDIO OUT jack is inserted, the manual mode will not respond to a CD or video program when the time is about to your personal trainer's instructions. Plug one...
English Manual
Page 22
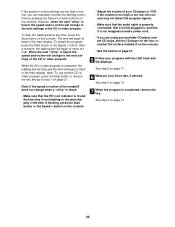
... that the audio cable is properly connected, that the time is flashing, press the Start button or the Speed + button on the console. • Adjust the volume of page 27. 5 Follow your progress with the LED track and the displays. See step 6 on page 11. 6 Measure your heart rate, if desired. The time will begin to flash in the main display. If the speed or incline settings are using your...
... that the audio cable is properly connected, that the time is flashing, press the Start button or the Speed + button on the console. • Adjust the volume of page 27. 5 Follow your progress with the LED track and the displays. See step 6 on page 11. 6 Measure your heart rate, if desired. The time will begin to flash in the main display. If the speed or incline settings are using your...
English Manual
Page 23
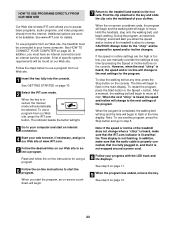
... display. To use a program from the internet. HOW TO USE PROGRAMS DIRECTLY FROM OUR WEB SITE Our Web site at any time by pressing the Speed or Incline buttons on page 13. 23 See HOW TO CONNECT YOUR COMPUTER on page 10. 2 Select the iFIT.com mode. In addition, you can manually override the settings at 1 mph. See GETTING STARTED on page 20. The time will change...
... display. To use a program from the internet. HOW TO USE PROGRAMS DIRECTLY FROM OUR WEB SITE Our Web site at any time by pressing the Speed or Incline buttons on page 13. 23 See HOW TO CONNECT YOUR COMPUTER on page 10. 2 Select the iFIT.com mode. In addition, you can manually override the settings at 1 mph. See GETTING STARTED on page 20. The time will change...

English Manual
Page 24
... total number of hours that the walking belt has moved. To exit the information mode, remove the key from the console, and the displays and indicators on the console will automatically light in a preset sequence, although the buttons on the console will appear on and turn off the demo mode. THE INFORMATION MODE/DEMO MODE THE OPTIONAL CHEST PULSE SENSOR The console features an information mode that keeps track of the total number of hours that the treadmill has...
... total number of hours that the walking belt has moved. To exit the information mode, remove the key from the console, and the displays and indicators on the console will automatically light in a preset sequence, although the buttons on the console will appear on and turn off the demo mode. THE INFORMATION MODE/DEMO MODE THE OPTIONAL CHEST PULSE SENSOR The console features an information mode that keeps track of the total number of hours that the treadmill has...
English Manual
Page 27
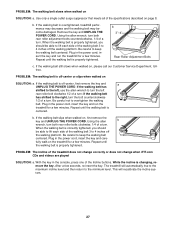
Plug in the console, press one of a turn both rear roller adjustment bolts counterclockwise, 1/4 of the specifications described on the treadmill for a few minutes. b 3"-4" Rear Roller Adjustment Bolts c. b. Using the allen b wrench, turn . Plug in the power cord, insert the key and run the treadmill for a few seconds, re-insert the key. fully walk on page 8. Repeat until the walking belt is centered. Remove the key and UNPLUG THE POWER CORD. If the walking belt is properly tightened. Plug in the power cord, insert the key and...
Plug in the console, press one of a turn both rear roller adjustment bolts counterclockwise, 1/4 of the specifications described on the treadmill for a few minutes. b 3"-4" Rear Roller Adjustment Bolts c. b. Using the allen b wrench, turn . Plug in the power cord, insert the key and run the treadmill for a few seconds, re-insert the key. fully walk on page 8. Repeat until the walking belt is centered. Remove the key and UNPLUG THE POWER CORD. If the walking belt is properly tightened. Plug in the power cord, insert the key and...
English Manual
Page 31
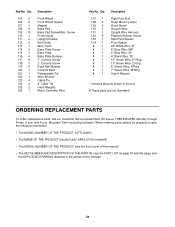
... parts are not illustrated ORDERING REPLACEMENT PARTS To order replacement parts, call our Customer Service Department toll-free at 1-888-825-2588, Monday through Friday, 6 a.m. When ordering parts, please be prepared to give the following information: • The MODEL NUMBER OF THE PRODUCT (NTTL25905) • The NAME OF THE PRODUCT (NordicTrack® APEX 6100xi treadmill) • The SERIAL NUMBER OF THE PRODUCT (see the front cover of this manual...
... parts are not illustrated ORDERING REPLACEMENT PARTS To order replacement parts, call our Customer Service Department toll-free at 1-888-825-2588, Monday through Friday, 6 a.m. When ordering parts, please be prepared to give the following information: • The MODEL NUMBER OF THE PRODUCT (NTTL25905) • The NAME OF THE PRODUCT (NordicTrack® APEX 6100xi treadmill) • The SERIAL NUMBER OF THE PRODUCT (see the front cover of this manual...
English Manual
Page 32
LIMITED WARRANTY WHAT IS COVERED-The entire NordicTrack® APEX 6100xi treadmill ("Product") is warranted to be free of purchase. WHO IS COVERED-The original purchaser or any defected part for replacement or, if necessary, the entire product, for three years after discovery of your Product. HOW LONG IS IT COVERED-ICON Health & Fitness, Inc. ("ICON"), warrants the motor for repair. Labor is covered for service. WHAT IS NOT COVERED-Any failures...
LIMITED WARRANTY WHAT IS COVERED-The entire NordicTrack® APEX 6100xi treadmill ("Product") is warranted to be free of purchase. WHO IS COVERED-The original purchaser or any defected part for replacement or, if necessary, the entire product, for three years after discovery of your Product. HOW LONG IS IT COVERED-ICON Health & Fitness, Inc. ("ICON"), warrants the motor for repair. Labor is covered for service. WHAT IS NOT COVERED-Any failures...


