
English Manual
Page 3
... user's movement, may result in - It is especially important for both men and women. Use the treadmill only as an exercise aid in determining heart rate trends in speed. 19. Never move the walking belt while the power is not a medical device. Do not operate the treadmill if the power cord or plug is damaged, or if the treadmill is damaged, the walking belt may slow, accelerate, or stop...
... user's movement, may result in - It is especially important for both men and women. Use the treadmill only as an exercise aid in determining heart rate trends in speed. 19. Never move the walking belt while the power is not a medical device. Do not operate the treadmill if the power cord or plug is damaged, or if the treadmill is damaged, the walking belt may slow, accelerate, or stop...

English Manual
Page 4
... adjustment procedures described in -home use this manual. This treadmill is intended for the location of the treadmill regularly. SAVE THESE INSTRUCTIONS 4 Do not attempt to do so by an authorized service representative only. 26. vice representative. Do not use only. DANGER: 25. Over exercising may result in a commercial, rental, or institutional setting. 27. Always remove the key, unplug the power cord, and press the power switch into any opening...
... adjustment procedures described in -home use this manual. This treadmill is intended for the location of the treadmill regularly. SAVE THESE INSTRUCTIONS 4 Do not attempt to do so by an authorized service representative only. 26. vice representative. Do not use only. DANGER: 25. Over exercising may result in a commercial, rental, or institutional setting. 27. Always remove the key, unplug the power cord, and press the power switch into any opening...

English Manual
Page 5
... cover of this manual. Accessory Tray Handrail Upright Walking Belt Foot Rail Console Book Holder Pulse Sensor Key/Clip Power Switch Power Cord Idler Roller Adjustment Bolts Platform Cushion 5 To help us . The A2750 PRO treadmill offers an impressive selection of this manual. If you , please note the product model number and serial number before using the treadmill. Before reading further, please review the drawing below and familiarize yourself with the labeled parts. The model number and the location of the serial number...
... cover of this manual. Accessory Tray Handrail Upright Walking Belt Foot Rail Console Book Holder Pulse Sensor Key/Clip Power Switch Power Cord Idler Roller Adjustment Bolts Platform Cushion 5 To help us . The A2750 PRO treadmill offers an impressive selection of this manual. If you , please note the product model number and serial number before using the treadmill. Before reading further, please review the drawing below and familiarize yourself with the labeled parts. The model number and the location of the serial number...
English Manual
Page 11
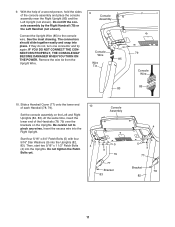
... the console wire. Start four 5/16" x 3/4" Patch Bolts (5) with four 5/16" Star Washers (9) into the Right Upright. Connect the Upright Wire (85) to pinch any wires. If they do not, turn one connector and try again. Slide a Handrail Cover (77) onto the lower end of the console assembly and place the console assembly near the Right Upright (83) and the Left Upright (not shown). Set the console assembly on the Uprights. IF...
... the console wire. Start four 5/16" x 3/4" Patch Bolts (5) with four 5/16" Star Washers (9) into the Right Upright. Connect the Upright Wire (85) to pinch any wires. If they do not, turn one connector and try again. Slide a Handrail Cover (77) onto the lower end of the console assembly and place the console assembly near the Right Upright (83) and the Left Upright (not shown). Set the console assembly on the Uprights. IF...

English Manual
Page 12
Start two 1/4" x 1/2" Patch Bolts (8) into the lower ends of both Handrails (78, 79). Console Assembly 4 58 79 77 8 83 4 5 8 77 8 78 82 12. Tighten the 3/8" x 5 1/2" Patch Bolts (7) used in these steps. 12 Attach the Left Accessory Tray (101) and the Right Accessory Tray (104) to the console assembly with eight #8 x 1/2" Screws (1). See steps 5 and 6. Tighten 11 all sixteen Patch Bolts (4, 5, 8). Console Assembly 104 1 1 101 1 1 12 11. Slide the Handrail Covers (77) against the Uprights (82, 83).
Start two 1/4" x 1/2" Patch Bolts (8) into the lower ends of both Handrails (78, 79). Console Assembly 4 58 79 77 8 83 4 5 8 77 8 78 82 12. Tighten the 3/8" x 5 1/2" Patch Bolts (7) used in these steps. 12 Attach the Left Accessory Tray (101) and the Right Accessory Tray (104) to the console assembly with eight #8 x 1/2" Screws (1). See steps 5 and 6. Tighten 11 all sixteen Patch Bolts (4, 5, 8). Console Assembly 104 1 1 101 1 1 12 11. Slide the Handrail Covers (77) against the Uprights (82, 83).
English Manual
Page 13
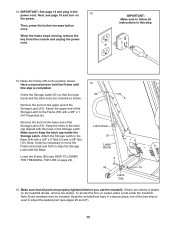
... included hex keys in the power cord. IMPORTANT: See page 14 and plug in a secure place; When the frame stops moving, remove the key from the lower end of the hex keys is completed. Keep the holes in the Storage Latch. Make sure to the position shown. IMPORTANT: Make sure to adjust the walking belt (see HOW TO LOWER THE TREADMILL FOR USE on 15 the power. Make sure...
... included hex keys in the power cord. IMPORTANT: See page 14 and plug in a secure place; When the frame stops moving, remove the key from the lower end of the hex keys is completed. Keep the holes in the Storage Latch. Make sure to the position shown. IMPORTANT: Make sure to adjust the walking belt (see HOW TO LOWER THE TREADMILL FOR USE on 15 the power. Make sure...
English Manual
Page 14
... listed as a properly grounded outlet box cover. Plug the power cord into a surge suppressor, and plug the surge suppressor into an appropriate outlet that is grounded before using an adapter. 14 Such substances will not fit the outlet, have a UL-suppressed voltage rating of 400 volts or less and a minimum surge dissipation of damaging your 2 treadmill, always use a surge suppressor with highperformance lubricant...
... listed as a properly grounded outlet box cover. Plug the power cord into a surge suppressor, and plug the surge suppressor into an appropriate outlet that is grounded before using an adapter. 14 Such substances will not fit the outlet, have a UL-suppressed voltage rating of 400 volts or less and a minimum surge dissipation of damaging your 2 treadmill, always use a surge suppressor with highperformance lubricant...

English Manual
Page 15
... treadmill as it guides you to download personalized workouts, to track and analyze your wireless network through an effective exercise session. You can display speed and distance in this manual. To use the information mode, see page 22. In addition, the console features twenty-two preset workouts-sixteen performance workouts and six weight loss workouts. The console also features an iFit Live mode that allows your workouts more effective and enjoyable. The iFit...
... treadmill as it guides you to download personalized workouts, to track and analyze your wireless network through an effective exercise session. You can display speed and distance in this manual. To use the information mode, see page 22. In addition, the console features twenty-two preset workouts-sixteen performance workouts and six weight loss workouts. The console also features an iFit Live mode that allows your workouts more effective and enjoyable. The iFit...
English Manual
Page 16
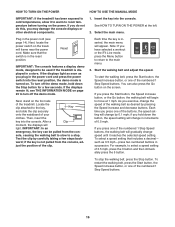
...-press two numbered buttons in the power cord and press the power switch into the reset position, the demo mode is inserted, the main menu will light. To start the walking belt, press the Start button, the Speed increase button, or one of 0.5 mph. Each time you may damage the console displays or other electrical components. 1. Insert the key into the console. HOW TO TURN ON THE POWER HOW TO USE THE MANUAL MODE IMPORTANT: If the treadmill has...
...-press two numbered buttons in the power cord and press the power switch into the reset position, the demo mode is inserted, the main menu will light. To start the walking belt, press the Start button, the Speed increase button, or one of 0.5 mph. Each time you may damage the console displays or other electrical components. 1. Insert the key into the console. HOW TO TURN ON THE POWER HOW TO USE THE MANUAL MODE IMPORTANT: If the treadmill has...

English Manual
Page 17
... the walking belt is shown. 4. Change the incline of the treadmill to hold the contacts-avoid moving your heart rate if desired. Select a display mode and monitor your heart rate will be at the lowest setting when you fold the treadmill to 12. Contacts To measure your heart rate, stand on the treadmill, the display can show the following workout information: Before using the treadmill, press the power switch into the off position and unplug the power cord. Turn on...
... the walking belt is shown. 4. Change the incline of the treadmill to hold the contacts-avoid moving your heart rate if desired. Select a display mode and monitor your heart rate will be at the lowest setting when you fold the treadmill to 12. Contacts To measure your heart rate, stand on the treadmill, the display can show the following workout information: Before using the treadmill, press the power switch into the off position and unplug the power cord. Turn on...

English Manual
Page 18
... console. During the workout, the profile will automatically adjust to the first speed and incline settings of the flashing segment indicates the speed setting for a few seconds and the treadmill will begin walking. HOW TO USE A PRESET WORKOUT 3. Select a preset workout. The height of the workout. Press the Select button. A moment after you have selected the manual mode, a workout, or the iFit Live mode, press the Menu button to return to flash. Press the Display button...
... console. During the workout, the profile will automatically adjust to the first speed and incline settings of the flashing segment indicates the speed setting for a few seconds and the treadmill will begin walking. HOW TO USE A PRESET WORKOUT 3. Select a preset workout. The height of the workout. Press the Select button. A moment after you have selected the manual mode, a workout, or the iFit Live mode, press the Menu button to return to flash. Press the Display button...

English Manual
Page 19
... any time, press the Stop button. See step 5 on your weight. When you select a calorie workout, the display will burn during the workout, you will show a track representing 1/4 mile (400 meters). Select a display mode and monitor your heart rate if desired. When the next segment of calories that you can manually override the setting by a cool down period. If you are finished exercising, remove the key from the console. To stop . Measure...
... any time, press the Stop button. See step 5 on your weight. When you select a calorie workout, the display will burn during the workout, you will show a track representing 1/4 mile (400 meters). Select a display mode and monitor your heart rate if desired. When the next segment of calories that you can manually override the setting by a cool down period. If you are finished exercising, remove the key from the console. To stop . Measure...

English Manual
Page 22
... buttons on the front cover of this manual. If you must have your own wireless network including an 802.11b router with an internet connection and a USB port. To purchase an iFit Live module at any time, go to use an iFit Live module, you can download personalized workouts and track and analyze your workout results on the screen. Locate the audio wire and plug...
... buttons on the front cover of this manual. If you must have your own wireless network including an 802.11b router with an internet connection and a USB port. To purchase an iFit Live module at any time, go to use an iFit Live module, you can download personalized workouts and track and analyze your workout results on the screen. Locate the audio wire and plug...

English Manual
Page 23
... you plug in the power cord, press the power switch into the reset position, and insert the key into the console, and then release the Stop button. While the demo mode is turned on , the word ON will appear while the information mode is turned on , the console will also show the selected unit of the display. The display will appear in miles, select ENGLISH. To view distance in a store. If the demo mode...
... you plug in the power cord, press the power switch into the reset position, and insert the key into the console, and then release the Stop button. While the demo mode is turned on , the word ON will appear while the information mode is turned on , the console will also show the selected unit of the display. The display will appear in miles, select ENGLISH. To view distance in a store. If the demo mode...
English Manual
Page 24
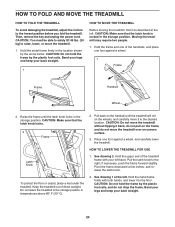
... location. Place one foot against a wheel, and carefully lower the treadmill. HOW TO LOWER THE TREADMILL FOR USE 1. Pull the latch knob to raise, lower, or move the treadmill. 1. Bend your legs and keep your back straight. 1 HOW TO MOVE THE TREADMILL Before moving the treadmill, fold it to the lowest position before you fold the treadmill. Bend your legs and keep your left hand. Then, remove the key and unplug the power cord...
... location. Place one foot against a wheel, and carefully lower the treadmill. HOW TO LOWER THE TREADMILL FOR USE 1. Pull the latch knob to raise, lower, or move the treadmill. 1. Bend your legs and keep your back straight. 1 HOW TO MOVE THE TREADMILL Before moving the treadmill, fold it to the lowest position before you fold the treadmill. Bend your legs and keep your left hand. Then, remove the key and unplug the power cord...

English Manual
Page 25
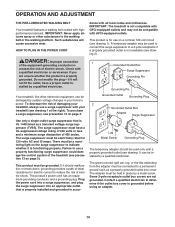
... manual. b. c. c Tripped Reset PROBLEM: The power turns off the demo mode, hold down the Stop button for five minutes, and then plug it , wait for a few seconds. c. The console features a display demo mode, designed to turn on page 14. If the displays remain lit when you remove the key from the console. To turn off during use SOLUTION: a. Place the treadmill in a store. Then, lower the treadmill (see the drawing above). PROBLEM: The power does not turn...
... manual. b. c. c Tripped Reset PROBLEM: The power turns off the demo mode, hold down the Stop button for five minutes, and then plug it , wait for a few seconds. c. The console features a display demo mode, designed to turn on page 14. If the displays remain lit when you remove the key from the console. To turn off during use SOLUTION: a. Place the treadmill in a store. Then, lower the treadmill (see the drawing above). PROBLEM: The power does not turn...
English Manual
Page 26
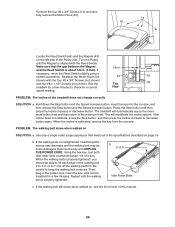
... Pulley (42). Turn the Pulley until the walking belt is aligned with the four #8 x 3/4" Screws (not shown) and two #8 x 1 1/2" Screws (not shown). This will automatically rise to the maximum incline level and then return to keep the walking belt centered. Remove the key and UNPLUG THE POWER CORD. Repeat until the Magnet is properly tightened. Remove the four #8 x 3/4" Screws (14) and carefully remove the Motor Hood (61). 14 61 Locate the Reed Switch...
... Pulley (42). Turn the Pulley until the walking belt is aligned with the four #8 x 3/4" Screws (not shown) and two #8 x 1 1/2" Screws (not shown). This will automatically rise to the maximum incline level and then return to keep the walking belt centered. Remove the key and UNPLUG THE POWER CORD. Repeat until the Magnet is properly tightened. Remove the four #8 x 3/4" Screws (14) and carefully remove the Motor Hood (61). 14 61 Locate the Reed Switch...
English Manual
Page 27
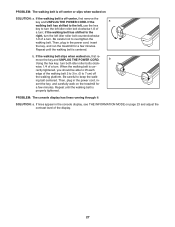
... right, turn . If lines appear in . (5 to 3 in the console display, see THE INFORMATION MODE on , first re- rectly tightened, you should be able to lift each edge of a turn both idler roller bolts clock- If the walking belt is cor- move the key and UNPLUG THE POWER CORD. sert the key, and carefully walk on SOLUTION: a. PROBLEM: The walking belt is off-center or slips when walked on the treadmill for a few...
... right, turn . If lines appear in . (5 to 3 in the console display, see THE INFORMATION MODE on , first re- rectly tightened, you should be able to lift each edge of a turn both idler roller bolts clock- If the walking belt is cor- move the key and UNPLUG THE POWER CORD. sert the key, and carefully walk on SOLUTION: a. PROBLEM: The walking belt is off-center or slips when walked on the treadmill for a few...
English Manual
Page 28
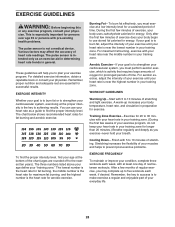
... lowest number in your heart rate near the highest number in your body uses carbohydrate calories for exercise. A warm-up to make exercise a regular and enjoyable part of your exercise until your heart rate is to prevent post-exercise problems. EXERCISE FREQUENCY To maintain or improve your training zone. After a few minutes of your exercise until your heart rate is to five workouts each week, with pre-existing health problems. The pulse sensor is...
... lowest number in your heart rate near the highest number in your body uses carbohydrate calories for exercise. A warm-up to make exercise a regular and enjoyable part of your exercise until your heart rate is to prevent post-exercise problems. EXERCISE FREQUENCY To maintain or improve your training zone. After a few minutes of your exercise until your heart rate is to five workouts each week, with pre-existing health problems. The pulse sensor is...

English Manual
Page 36
... and duration to you specific legal rights. ICON Health & Fitness, Inc., 1500 S. 1000 W., Logan, UT 84321-9813 Part No. 310256 R0111A Printed in -home service, the customer will be prepared to provide the following information when contacting us assist you . To help us : • the model number and serial number of the product (see the front cover of this manual) • the name of...
... and duration to you specific legal rights. ICON Health & Fitness, Inc., 1500 S. 1000 W., Logan, UT 84321-9813 Part No. 310256 R0111A Printed in -home service, the customer will be prepared to provide the following information when contacting us assist you . To help us : • the model number and serial number of the product (see the front cover of this manual) • the name of...


