
User Manual
Page 3
...NordicTrack dealer or call the telephone number on the same circuit. Never start the treadmill while you are used only by or through the use the treadmill with at least 8 ft. (2.4 m) of clearance behind it and 2 ft. (0.6 m) on the walking belt. Do not place the treadmill on the treadmill ... of all of the specifications described on page 16). 17. structions in - To purchase a surge suppressor, see your treadmill. Never move the walking belt while the power is especially important for persons over age 35 or persons with pre-existing health problems. 2. Always wear ...
...NordicTrack dealer or call the telephone number on the same circuit. Never start the treadmill while you are used only by or through the use the treadmill with at least 8 ft. (2.4 m) of clearance behind it and 2 ft. (0.6 m) on the walking belt. Do not place the treadmill on the treadmill ... of all of the specifications described on page 16). 17. structions in - To purchase a surge suppressor, see your treadmill. Never move the walking belt while the power is especially important for persons over age 35 or persons with pre-existing health problems. 2. Always wear ...
User Manual
Page 5
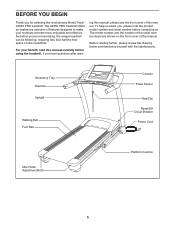
... number before using the treadmill. Accessory Tray Handrail Upright Walking Belt Foot Rail Console Pulse Sensor Key/Clip Reset/Off Circuit Breaker Power Cord Idler Roller Adjustment Bolts Platform Cushion 5 ing this manual, please see the front cover of this manual. And when you for selecting the revolutionary NordicTrack® A2550 PRO treadmill. BEFORE YOU BEGIN...
... number before using the treadmill. Accessory Tray Handrail Upright Walking Belt Foot Rail Console Pulse Sensor Key/Clip Reset/Off Circuit Breaker Power Cord Idler Roller Adjustment Bolts Platform Cushion 5 ing this manual, please see the front cover of this manual. And when you for selecting the revolutionary NordicTrack® A2550 PRO treadmill. BEFORE YOU BEGIN...
User Manual
Page 6
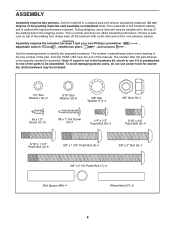
... materials until assembly is the quantity needed for assembly. Note: The underside of the treadmill walking belt is the key number of the part, from the PART LIST near the end of the walking belt, simply wipe off the lubricant with high-performance lubricant. Use the drawings below each ... a cleared area and remove all packing materials. This is lubricant on top of this manual. Set the treadmill in the hardware kit, check to see if it is preattached to one of the walking belt or the shipping carton. Extra hardware may be included. 1/4" Star Washer (12)-2 5/16" Star Washer ...
... materials until assembly is the quantity needed for assembly. Note: The underside of the treadmill walking belt is the key number of the part, from the PART LIST near the end of the walking belt, simply wipe off the lubricant with high-performance lubricant. Use the drawings below each ... a cleared area and remove all packing materials. This is lubricant on top of this manual. Set the treadmill in the hardware kit, check to see if it is preattached to one of the walking belt or the shipping carton. Extra hardware may be included. 1/4" Star Washer (12)-2 5/16" Star Washer ...

User Manual
Page 13
... position shown. Orient the Storage Latch (51) so that all parts are positioned as shown. To protect the floor or carpet, place a mat under the treadmill. Remove the key from the console, switch 55 6 the reset/off " position, and unplug the power cord. Attach the lower end of clear plastic on... page 21). 52 51 Large Barrel 10 94 3 14. If there are sheets of the Storage Latch (51) to adjust the walking belt (see pages 23 and 24). 13 Note: Extra hardware may be included. 13. Make sure that the large barrel and the Latch Knob (52) are...
... position shown. Orient the Storage Latch (51) so that all parts are positioned as shown. To protect the floor or carpet, place a mat under the treadmill. Remove the key from the console, switch 55 6 the reset/off " position, and unplug the power cord. Attach the lower end of clear plastic on... page 21). 52 51 Large Barrel 10 94 3 14. If there are sheets of the Storage Latch (51) to adjust the walking belt (see pages 23 and 24). 13 Note: Extra hardware may be included. 13. Make sure that the large barrel and the Latch Knob (52) are...
User Manual
Page 14
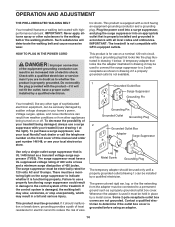
...146148, or see drawing 1 at the right). To purchase a surge suppressor, see your local NordicTrack dealer or call the telephone number on the front cover of your treadmill being turned on a nominal 120-volt circuit, and has a grounding plug that is functioning properly.... to whether the product is grounded before using an adapter. 14 OPERATION AND ADJUSTMENT THE PRE-LUBRICATED WALKING BELT Your treadmill features a walking belt coated with your treadmill (see your local electronics store. Plug the power cord into a surge suppressor, and plug the surge ...
...146148, or see drawing 1 at the right). To purchase a surge suppressor, see your local NordicTrack dealer or call the telephone number on the front cover of your treadmill being turned on a nominal 120-volt circuit, and has a grounding plug that is functioning properly.... to whether the product is grounded before using an adapter. 14 OPERATION AND ADJUSTMENT THE PRE-LUBRICATED WALKING BELT Your treadmill features a walking belt coated with your treadmill (see your local electronics store. Plug the power cord into a surge suppressor, and plug the surge ...
User Manual
Page 15
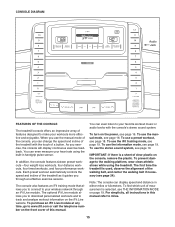
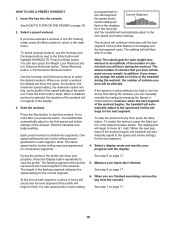
... a button. When you use the iFit training mode, see page 19. Each preset workout automatically controls the speed and incline of the treadmill as it guides you to download personalized workouts and to track and analyze workout information on page 19. To use the manual mode of ...of measurement is a sheet of clear plastic on the front cover of the walking belt, and center the walking belt if necessary (see page 16. CONSOLE DIAGRAM Audio Jack FEATURES OF THE CONSOLE The treadmill console offers an impressive array of features designed to make your wireless network through an...
... a button. When you use the iFit training mode, see page 19. Each preset workout automatically controls the speed and incline of the treadmill as it guides you to download personalized workouts and to track and analyze workout information on page 19. To use the manual mode of ...of measurement is a sheet of clear plastic on the front cover of the walking belt, and center the walking belt if necessary (see page 16. CONSOLE DIAGRAM Audio Jack FEATURES OF THE CONSOLE The treadmill console offers an impressive array of features designed to make your wireless network through an...
User Manual
Page 16
... the key is not pulled from the console, causing the walking belt to slow to be used if the treadmill is turned on the power. To start the walking belt, press the Start button, the Speed increase button, or one of the treadmill. If you press one of the clip. Select the manual mode.... If the displays light as soon as desired by carefully tak- Next, stand on the treadmill frame near the power cord. if...
... the key is not pulled from the console, causing the walking belt to slow to be used if the treadmill is turned on the power. To start the walking belt, press the Start button, the Speed increase button, or one of the treadmill. If you press one of the clip. Select the manual mode.... If the displays light as soon as desired by carefully tak- Next, stand on the treadmill frame near the power cord. if...

User Manual
Page 17
...will appear in the speed and incline displays. Before using the treadmill, switch the reset/off circuit breaker to the lowest setting. When you are finished using the handgrip pulse sensor, remove the sheets of the walking belt. • The distance that you have burned. 4. Change... the incline of the treadmill to the "off" position and unplug the power cord. Each time you are finished exercising, ...
...will appear in the speed and incline displays. Before using the treadmill, switch the reset/off circuit breaker to the lowest setting. When you are finished using the handgrip pulse sensor, remove the sheets of the walking belt. • The distance that you have burned. 4. Change... the incline of the treadmill to the "off" position and unplug the power cord. Each time you are finished exercising, ...
User Manual
Page 18
... the profile flashes in the displays for a few seconds and the treadmill will show the name, the duration, the maximum speed setting, the maximum incline setting, and a profile of the speed settings of the workout. To stop . The walking belt will begin walking. The flashing segment of the profile represents the current...
... the profile flashes in the displays for a few seconds and the treadmill will show the name, the duration, the maximum speed setting, the maximum incline setting, and a profile of the speed settings of the workout. To stop . The walking belt will begin walking. The flashing segment of the profile represents the current...

User Manual
Page 19
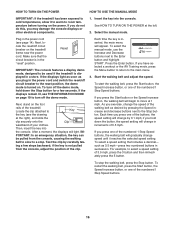
... your wireless network and unlocks exciting new features. HOW TO USE THE IFIT TRAINING MODE The optional iFit Live module allows you to connect your treadmill to your MP3 player, CD player, or other personal audio player. THE INFORMATION MODE The console features an information mode that keeps track of the... mode, hold down the Stop button, insert the key into the audio jack on the console. To change the unit of hours that the walking belt has moved and the total number of measurement, press the Speed increase button. If the iFit Live module is plugged into the console. For example...
... your wireless network and unlocks exciting new features. HOW TO USE THE IFIT TRAINING MODE The optional iFit Live module allows you to connect your treadmill to your MP3 player, CD player, or other personal audio player. THE INFORMATION MODE The console features an information mode that keeps track of the... mode, hold down the Stop button, insert the key into the audio jack on the console. To change the unit of hours that the walking belt has moved and the total number of measurement, press the Speed increase button. If the iFit Live module is plugged into the console. For example...
User Manual
Page 23
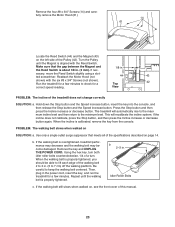
...the walking belt 2 to 3 in. (5 to keep the walking belt centered. If nec- 1/8 in . Run the treadmill for a few minutes to the minimum level. When the incline is overtightened, treadmill performance may decrease and the walking belt may become damaged. When the walking belt is about... 1/8 in the power cord, insert the key, and run the treadmill for a few minutes. b 2-3 in . ted screwdriver. ...
...the walking belt 2 to 3 in. (5 to keep the walking belt centered. If nec- 1/8 in . Run the treadmill for a few minutes to the minimum level. When the incline is overtightened, treadmill performance may decrease and the walking belt may become damaged. When the walking belt is about... 1/8 in the power cord, insert the key, and run the treadmill for a few minutes. b 2-3 in . ted screwdriver. ...

User Manual
Page 24
...UNPLUG THE POWER CORD. Then, plug in the power cord, insert the key, and run the treadmill for a few minutes. sert the key, and carefully walk on , first re- Repeat until the walking belt is centered. b Using the hex key, turn . rectly tightened, you should be able to ...lift each edge of a turn . Repeat until the walking belt is properly tightened. 24 If the walking belt slips when walked on the treadmill for a few minutes. b. Then, plug in the power cord, in . (5 to 3 in - move the key and...
...UNPLUG THE POWER CORD. Then, plug in the power cord, insert the key, and run the treadmill for a few minutes. sert the key, and carefully walk on , first re- Repeat until the walking belt is centered. b Using the hex key, turn . rectly tightened, you should be able to ...lift each edge of a turn . Repeat until the walking belt is properly tightened. 24 If the walking belt slips when walked on the treadmill for a few minutes. b. Then, plug in the power cord, in . (5 to 3 in - move the key and...

User Manual
Page 26
...x 1/2" Patch Bolt 5/16" Star Washer 3/8" Nut 3/8" Star Washer 1/4" Star Washer Pulse Crossbar #8 x 3/4" Screw 1/4" x 1 3/4" Bolt 3/8" x 1 3/4" Bolt #8 x 1/2" Washer Head Screw #12 x 1/2" Screw Belt Guide Screw Drive Motor Bolt 3/8" x 2 1/8" Bolt 3/8" x 1 3/8" Bolt 5/16" x 1 1/4" Bolt Drive Roller Bolt 1/4" Flat Washer 1/4" Lock Washer U-nut #8 x 3/4" Truss Head Screw 3/8" Jam Nut 5/16"... #8 x 1" Truss Head Screw Left Foot Rail Warning Decal Platform Cushion Walking Platform Belt Guide Left Foot Rail Cover Right Foot Rail Cover Drive Roller/Pulley Magnet Reed Switch Reed Switch Clamp Drive Motor...
...x 1/2" Patch Bolt 5/16" Star Washer 3/8" Nut 3/8" Star Washer 1/4" Star Washer Pulse Crossbar #8 x 3/4" Screw 1/4" x 1 3/4" Bolt 3/8" x 1 3/4" Bolt #8 x 1/2" Washer Head Screw #12 x 1/2" Screw Belt Guide Screw Drive Motor Bolt 3/8" x 2 1/8" Bolt 3/8" x 1 3/8" Bolt 5/16" x 1 1/4" Bolt Drive Roller Bolt 1/4" Flat Washer 1/4" Lock Washer U-nut #8 x 3/4" Truss Head Screw 3/8" Jam Nut 5/16"... #8 x 1" Truss Head Screw Left Foot Rail Warning Decal Platform Cushion Walking Platform Belt Guide Left Foot Rail Cover Right Foot Rail Cover Drive Roller/Pulley Magnet Reed Switch Reed Switch Clamp Drive Motor...


