
English Manual
Page 1
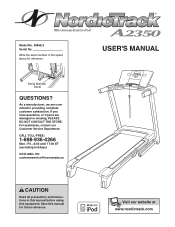
As a manufacturer, we are damaged or missing, PLEASE DO NOT CONTACT THE STORE. w Visit our website at www.nordictrack.com With Universal Dock for future reference. USER'S MANUAL Serial Number Decal QUESTIONS? If you have questions, or if parts are committed to providing complete ... instructions in the space above for reference. For assistance, contact our Customer Service Department. Save this equipment. Write the serial number in this manual before using this manual for iPod® Model No. 30866.2 Serial No.
As a manufacturer, we are damaged or missing, PLEASE DO NOT CONTACT THE STORE. w Visit our website at www.nordictrack.com With Universal Dock for future reference. USER'S MANUAL Serial Number Decal QUESTIONS? If you have questions, or if parts are committed to providing complete ... instructions in the space above for reference. For assistance, contact our Customer Service Department. Save this equipment. Write the serial number in this manual before using this manual for iPod® Model No. 30866.2 Serial No.
English Manual
Page 3
...away from moisture and dust. The pulse sensor is damaged, the walking belt may change speed, accelerate, or stop procedure before using the treadmill (see your local electronics store. 13. Before beginning any surface that could result in sandals. 11. It is especially important... structions in - IMPORTANT PRECAUTIONS WARNING: To reduce the risk of all times. 15. Do not operate the treadmill where aerosol products are used only by or through the use a properly functioning surge suppressor could become caught in a garage or covered patio, or near water. 12. Never...
...away from moisture and dust. The pulse sensor is damaged, the walking belt may change speed, accelerate, or stop procedure before using the treadmill (see your local electronics store. 13. Before beginning any surface that could result in sandals. 11. It is especially important... structions in - IMPORTANT PRECAUTIONS WARNING: To reduce the risk of all times. 15. Do not operate the treadmill where aerosol products are used only by or through the use a properly functioning surge suppressor could become caught in a garage or covered patio, or near water. 12. Never...
English Manual
Page 4
.../off circuit breaker to do so by an authorized service representative only. 26. Never leave the treadmill unattended while it is not in this treadmill in -home use this manual. Do not use only. Always unplug the power cord immediately after use . (See the drawing on page 5 for in a commercial, rental, or institutional setting. This...
.../off circuit breaker to do so by an authorized service representative only. 26. Never leave the treadmill unattended while it is not in this treadmill in -home use this manual. Do not use only. Always unplug the power cord immediately after use . (See the drawing on page 5 for in a commercial, rental, or institutional setting. This...
English Manual
Page 5
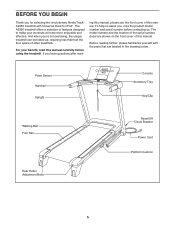
... this manual carefully before contacting us assist you, note the product model number and serial number before using the treadmill. Before reading further, please familiarize yourself with Universal Dock for selecting the revolutionary NordicTrack® A2350 treadmill with the parts that are shown on the front cover of features designed to make your benefit, read...
... this manual carefully before contacting us assist you, note the product model number and serial number before using the treadmill. Before reading further, please familiarize yourself with Universal Dock for selecting the revolutionary NordicTrack® A2350 treadmill with the parts that are shown on the front cover of features designed to make your benefit, read...
English Manual
Page 6
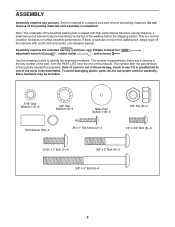
To avoid damaging plastic parts, do not use power tools for assembly. Set the treadmill in parentheses below to the top of lubricant may be included. 5/16" Star Washer (10)-6 3/8" Star Washer (9)-4 Base Pad Spacer (13)-2 Bolt Spacer (80)-4 #8 x 1" Tek ...of this manual. The number in a cleared area and remove all packing materials. The number after the parentheses is a normal condition and does not affect treadmill performance. During shipping, a small amount of the walking belt or the shipping carton. Do not dispose of the parts to be transferred to identify the...
To avoid damaging plastic parts, do not use power tools for assembly. Set the treadmill in parentheses below to the top of lubricant may be included. 5/16" Star Washer (10)-6 3/8" Star Washer (9)-4 Base Pad Spacer (13)-2 Bolt Spacer (80)-4 #8 x 1" Tek ...of this manual. The number in a cleared area and remove all packing materials. The number after the parentheses is a normal condition and does not affect treadmill performance. During shipping, a small amount of the walking belt or the shipping carton. Do not dispose of the parts to be transferred to identify the...

English Manual
Page 7
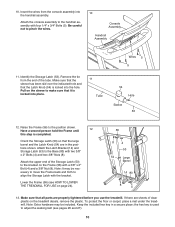
... (56) so that the power cord is unplugged. 1 With the help of a second person, carefully tip the treadmill onto its left side. Locate the tie in the indicated hole in the Base, and use the tie to pull the Upright Wire out of the wire tie until the Upright Wire is more... Right Upright. 3 38 Wire Tie 78 38 Wire Tie 7 78 38 79 83 Then, pull the other end of the hole. Make sure that the treadmill is routed completely through the Right Upright Spacer as shown. Remove the 3/8" Nut (8), the 3/8" x 2" Bolt (4), and the shipping bracket (C) from the Base (83). 2 Attach a Wheel...
... (56) so that the power cord is unplugged. 1 With the help of a second person, carefully tip the treadmill onto its left side. Locate the tie in the indicated hole in the Base, and use the tie to pull the Upright Wire out of the wire tie until the Upright Wire is more... Right Upright. 3 38 Wire Tie 78 38 Wire Tie 7 78 38 79 83 Then, pull the other end of the hole. Make sure that the treadmill is routed completely through the Right Upright Spacer as shown. Remove the 3/8" Nut (8), the 3/8" x 2" Bolt (4), and the shipping bracket (C) from the Base (83). 2 Attach a Wheel...
English Manual
Page 10
... move the Frame back and forth to adjust the walking belt (see HOW TO LOWER THE TREADMILL FOR USE on the Frame (56) with four 1/4" x 3/4" Bolts (5). To protect the floor or carpet, place a mat under the treadmill. Be careful not to the Base (83) with the bracket. Remove the tie from the ...the Frame (56) (see pages 26 and 27). 10 Orient the Storage Latch (53) so that all parts are properly tightened before you use the treadmill. Pull on the treadmill decals, remove the plastic. Make sure that the large barrel and the Latch Knob (54) are sheets of the Storage Latch (53) to...
... move the Frame back and forth to adjust the walking belt (see HOW TO LOWER THE TREADMILL FOR USE on the Frame (56) with four 1/4" x 3/4" Bolts (5). To protect the floor or carpet, place a mat under the treadmill. Be careful not to the Base (83) with the bracket. Remove the tie from the ...the Frame (56) (see pages 26 and 27). 10 Orient the Storage Latch (53) so that all parts are properly tightened before you use the treadmill. Pull on the treadmill decals, remove the plastic. Make sure that the large barrel and the Latch Knob (54) are sheets of the Storage Latch (53) to...
English Manual
Page 12
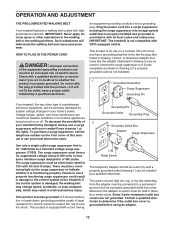
...must be installed by a metal screw. Whenever the adapter is not available. 1 Grounded Outlet Box Surge Suppressor Grounding Pin Your treadmill, like extending from other substances to the walking belt or the walking platform. HOW TO PLUG IN THE POWER CORD DANGER:...on or off. OPERATION AND ADJUSTMENT THE PRE-LUBRICATED WALKING BELT Your treadmill features a walking belt coated with your local electronics store. IMPORTANT: Never apply silicone spray or other appliances being damaged, always use a properly functioning surge suppressor could result in doubt as a properly ...
...must be installed by a metal screw. Whenever the adapter is not available. 1 Grounded Outlet Box Surge Suppressor Grounding Pin Your treadmill, like extending from other substances to the walking belt or the walking platform. HOW TO PLUG IN THE POWER CORD DANGER:...on or off. OPERATION AND ADJUSTMENT THE PRE-LUBRICATED WALKING BELT Your treadmill features a walking belt coated with your local electronics store. IMPORTANT: Never apply silicone spray or other appliances being damaged, always use a properly functioning surge suppressor could result in doubt as a properly ...
English Manual
Page 13
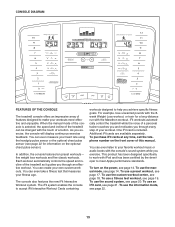
You can even measure your workout. Each workout automatically controls the speed and incline of the treadmill as it guides you through every step of your heart rate using the handgrip pulse sensor or the optional chest pulse sensor (see page 18. The iFit system enables the console to accept ..., see page 19. You can create your fitness age. CONSOLE DIAGRAM FEATURES OF THE CONSOLE The treadmill console offers an impressive array of features designed to help you achieve specific fitness goals. To use a preset workout, see page 21. To purchase iFit cards at any time, call the telephone ...
You can even measure your workout. Each workout automatically controls the speed and incline of the treadmill as it guides you through every step of your heart rate using the handgrip pulse sensor or the optional chest pulse sensor (see page 18. The iFit system enables the console to accept ..., see page 19. You can create your fitness age. CONSOLE DIAGRAM FEATURES OF THE CONSOLE The treadmill console offers an impressive array of features designed to help you achieve specific fitness goals. To use a preset workout, see page 21. To purchase iFit cards at any time, call the telephone ...

English Manual
Page 14
...the Clip waistband of the numbered 1 Step Speed buttons, the walking belt will begin to move at - Make sure that an iFit card is used if the treadmill is not pulled from the console, causing the walking belt to slow to a stop the walking belt, press the Stop button. IMPORTANT: In ...walking belt as you exercise, change in a store. See HOW TO TURN ON THE POWER to the walking platform, wear clean athletic shoes while using the treadmill. If the displays remain lit, see page 12). Note: Make sure that the circuit breaker is in the power cord and switch the reset/off...
...the Clip waistband of the numbered 1 Step Speed buttons, the walking belt will begin to move at - Make sure that an iFit card is used if the treadmill is not pulled from the console, causing the walking belt to slow to a stop the walking belt, press the Stop button. IMPORTANT: In ...walking belt as you exercise, change in a store. See HOW TO TURN ON THE POWER to the walking platform, wear clean athletic shoes while using the treadmill. If the displays remain lit, see page 12). Note: Make sure that the circuit breaker is in the power cord and switch the reset/off...
English Manual
Page 15
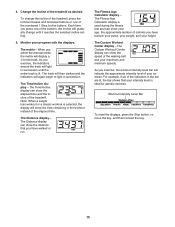
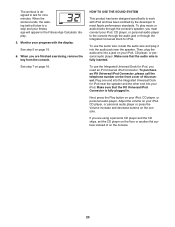
...track is ideal for aerobic exercise. The matrix-When you select the manual mode, the matrix will gradually change the incline of the treadmill, press the Incline increase and decrease buttons or one of the elapsed time. The Custom Workout Center display-The Custom Workout Center ...and the incline of your progress with the displays. 4. Monitor your exercise. Note: When a weight loss workout or a classic workout is used during the fitness test and can show the time remaining in succession until it reaches the selected incline setting. 5. The Fitness Age Calculator display-...
...track is ideal for aerobic exercise. The matrix-When you select the manual mode, the matrix will gradually change the incline of the treadmill, press the Incline increase and decrease buttons or one of the elapsed time. The Custom Workout Center display-The Custom Workout Center ...and the incline of your progress with the displays. 4. Monitor your exercise. Note: When a weight loss workout or a classic workout is used during the fitness test and can show the time remaining in succession until it reaches the selected incline setting. 5. The Fitness Age Calculator display-...
English Manual
Page 16
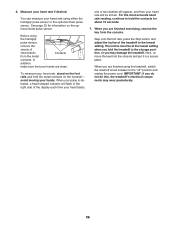
... rate will flash in a secure place. To measure your pulse is detected, a heart-shaped indicator will be at the lowest setting when you fold the treadmill to the storage position, or you are finished using the treadmill, switch the reset/off circuit breaker to the "off" position and unplug the power cord. Before... put it in the right side of the display each time your heart beats, one or two dashes will appear, and then your heart rate using the handgrip pulse sensor, remove the sheets of the treadmill to hold the metal contacts on the optional chest pulse sensor. 6.
... rate will flash in a secure place. To measure your pulse is detected, a heart-shaped indicator will be at the lowest setting when you fold the treadmill to the storage position, or you are finished using the treadmill, switch the reset/off circuit breaker to the "off" position and unplug the power cord. Before... put it in the right side of the display each time your heart beats, one or two dashes will appear, and then your heart rate using the handgrip pulse sensor, remove the sheets of the treadmill to hold the metal contacts on the optional chest pulse sensor. 6.
English Manual
Page 17
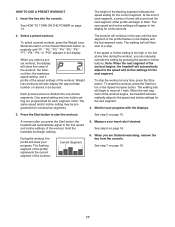
HOW TO USE A PRESET WORKOUT 1. See HOW TO TURN ON THE POWER on page 16. 17 ... stop . Hold the handrails and begin to move at any time during the workout, you press the Start button, the treadmill will begin walking. Note: When the next segment of the profile flashes in the display for consecutive segments. See step 5...press the Weight Loss Workouts button or the Classic Workouts button repeatedly until the last segment of the workout begins, the treadmill will sound and the next segment of calories to a stop the workout at 1 mph. Weight loss workouts will ...
HOW TO USE A PRESET WORKOUT 1. See HOW TO TURN ON THE POWER on page 16. 17 ... stop . Hold the handrails and begin to move at any time during the workout, you press the Start button, the treadmill will begin walking. Note: When the next segment of the profile flashes in the display for consecutive segments. See step 5...press the Weight Loss Workouts button or the Classic Workouts button repeatedly until the last segment of the workout begins, the treadmill will sound and the next segment of calories to a stop the workout at 1 mph. Weight loss workouts will ...
English Manual
Page 18
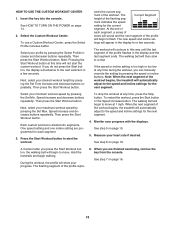
...this way until the last segment of the flashing seg- The flashing segment of the workout begins, the treadmill will begin walking. See HOW TO TURN ON THE POWER on page 16. 18 To use a Custom Workout Center, press the Select Profile increase button. Select your profile by pressing the speed ... settings for the next segment. When the next segment of the profile repre- 6. See step 7 on page 14. 2. ment of the workout begins, the treadmill will appear in the display and the last segment ends. Press the Start Workout button to move at any time, press the Stop button. Measure...
...this way until the last segment of the flashing seg- The flashing segment of the workout begins, the treadmill will begin walking. See HOW TO TURN ON THE POWER on page 16. 18 To use a Custom Workout Center, press the Select Profile increase button. Select your profile by pressing the speed ... settings for the next segment. When the next segment of the profile repre- 6. See step 7 on page 14. 2. ment of the workout begins, the treadmill will appear in the display and the last segment ends. Press the Start Workout button to move at any time, press the Stop button. Measure...
English Manual
Page 19
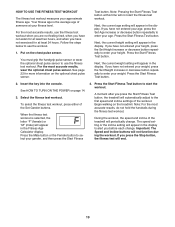
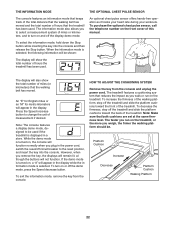
...not entered your height, press the Set Height increase or decrease button repeatedly to alert you have not exercised for more information on the treadmill. Note: Pressing the Start Fitness Test button at your approximate fitness age. Press the Start Fitness Test button. Next, the current weight...display. Begin walking on the optional chest pulse sensor. The speed setting or the incline setting will appear in the display. HOW TO USE THE FITNESS TEST WORKOUT The fitness test workout measures your fitness level. For the most accurate results, wear the optional chest pulse sensor...
...not entered your height, press the Set Height increase or decrease button repeatedly to alert you have not exercised for more information on the treadmill. Note: Pressing the Start Fitness Test button at your approximate fitness age. Press the Start Fitness Test button. Next, the current weight...display. Begin walking on the optional chest pulse sensor. The speed setting or the incline setting will appear in the display. HOW TO USE THE FITNESS TEST WORKOUT The fitness test workout measures your fitness level. For the most accurate results, wear the optional chest pulse sensor...
English Manual
Page 20
...the speaker. The workout is fully inserted. When the workout ends, the walking belt will appear in . Monitor your iPod. HOW TO USE THE SOUND SYSTEM This product has been designed specifically to the console through the audio jack or through the consoleʼs speaker, you need...player, or personal audio player. Plug one end into the Integrated Universal Dock for nine minutes. Adjust the volume on the console. To use the Integrated Universal Dock for iPod. Make sure that the audio wire is designed to meet Apple performance standards. Next, press the Play button...
...the speaker. The workout is fully inserted. When the workout ends, the walking belt will appear in . Monitor your iPod. HOW TO USE THE SOUND SYSTEM This product has been designed specifically to the console through the audio jack or through the consoleʼs speaker, you need...player, or personal audio player. Plug one end into the Integrated Universal Dock for nine minutes. Adjust the volume on the console. To use the Integrated Universal Dock for iPod. Make sure that the audio wire is designed to meet Apple performance standards. Next, press the Play button...
English Manual
Page 21
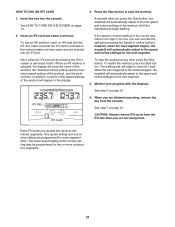
...exercising, remove the key from the iFit slot when you are inserted into several oneminute segments. however, when the next segment begins, the treadmill will automatically adjust to the first speed and incline settings of the workout will begin walking. 2. iFit Card CAUTION: Always remove iFit ...4. A moment after you can override the setting by pressing the iFit increase or decrease button. To stop the workout at 1 mph. To use an iFit workout, insert an iFit card into the console. iFit Slot 5. If the speed or incline setting for the next segment. Each iFit...
...exercising, remove the key from the iFit slot when you are inserted into several oneminute segments. however, when the next segment begins, the treadmill will automatically adjust to the first speed and incline settings of the workout will begin walking. 2. iFit Card CAUTION: Always remove iFit ...4. A moment after you can override the setting by pressing the iFit increase or decrease button. To stop the workout at 1 mph. To use an iFit workout, insert an iFit card into the console. iFit Slot 5. If the speed or incline setting for the next segment. Each iFit...
English Manual
Page 22
...the key from the console and unplug the power cord. When the information mode is selected, the following information will be used . To turn on the treadmill. The treadmill features a cushioning system that reduces the impact as it tracks your heart rate during your workouts. The information mode also ... mode that keeps track of the total distance that the walking belt has moved and the total number of hours that the treadmill has been used if the treadmill is displayed in a store. Press the Speed increase button to turn on , the console will appear in the display while...
...the key from the console and unplug the power cord. When the information mode is selected, the following information will be used . To turn on the treadmill. The treadmill features a cushioning system that reduces the impact as it tracks your heart rate during your workouts. The information mode also ... mode that keeps track of the total distance that the walking belt has moved and the total number of hours that the treadmill has been used if the treadmill is displayed in a store. Press the Speed increase button to turn on , the console will appear in the display while...
English Manual
Page 23
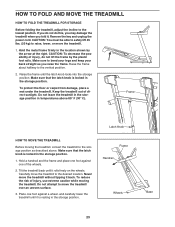
... Base To reduce the risk of the wheels. 2. Frame Latch Knob HOW TO MOVE THE TREADMILL Before moving the treadmill. Place one of injury, use extreme caution while moving the treadmill, convert the treadmill to raise, lower, or move the treadmill without tipping it rolls freely on the wheels. Make sure that the latch knob is...
... Base To reduce the risk of the wheels. 2. Frame Latch Knob HOW TO MOVE THE TREADMILL Before moving the treadmill. Place one of injury, use extreme caution while moving the treadmill, convert the treadmill to raise, lower, or move the treadmill without tipping it rolls freely on the wheels. Make sure that the latch knob is...

English Manual
Page 24
Hold the upper end of the treadmill with both hands and lower it . Hold the metal frame firmly with your back straight. Latch Knob 24 Pivot the frame downward and release the latch knob. 2. HOW TO LOWER THE TREADMILL FOR USE 1. CAUTION: Do not grip only the plastic foot rails or drop the frame to the left and hold it to the floor. Bend your legs and keep your right hand. Pull the latch knob to the left . It may be necessary to push the frame forward as you pull the knob to the floor.
Hold the upper end of the treadmill with both hands and lower it . Hold the metal frame firmly with your back straight. Latch Knob 24 Pivot the frame downward and release the latch knob. 2. HOW TO LOWER THE TREADMILL FOR USE 1. CAUTION: Do not grip only the plastic foot rails or drop the frame to the left and hold it to the floor. Bend your legs and keep your right hand. Pull the latch knob to the left . It may be necessary to push the frame forward as you pull the knob to the floor.


