
English Manual
Page 3
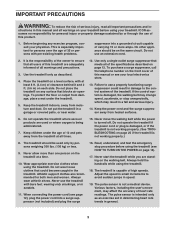
...-outlet surge suppressor that all important precautions and in- Never allow more amps. Wear appropriate exercise clothes when using the treadmill. 18. Always wear athletic shoes. The treadmill is especially important for persons over the age of 35 or persons with bare feet, wearing only stockings, ...which may affect the accuracy of carrying 15 or more than one person on page 14). 17. Always hold the handrails while using the treadmill. It is intended only as described. 4. Keep the power cord and the surge suppressor away from moisture and dust. Never move...
...-outlet surge suppressor that all important precautions and in- Never allow more amps. Wear appropriate exercise clothes when using the treadmill. 18. Always wear athletic shoes. The treadmill is especially important for persons over the age of 35 or persons with bare feet, wearing only stockings, ...which may affect the accuracy of carrying 15 or more than one person on page 14). 17. Always hold the handrails while using the treadmill. It is intended only as described. 4. Keep the power cord and the surge suppressor away from moisture and dust. Never move...
English Manual
Page 4
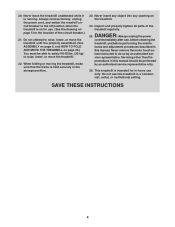
...other than the procedures in the storage position. 23. When folding or moving the treadmill, make sure that the frame is intended for the location of the treadmill regularly. Do not use , before cleaning the treadmill, and before performing the mainte- 20. vice representative. Always remove the key, ...Inspect and properly tighten all parts of the circuit breaker.) 21. Always unplug the power cord immediately after use this manual. Never remove the motor hood un- This treadmill is held securely in this manual should be able to safely lift 45 lbs. (20 kg) to raise...
...other than the procedures in the storage position. 23. When folding or moving the treadmill, make sure that the frame is intended for the location of the treadmill regularly. Do not use , before cleaning the treadmill, and before performing the mainte- 20. vice representative. Always remove the key, ...Inspect and properly tighten all parts of the circuit breaker.) 21. Always unplug the power cord immediately after use this manual. Never remove the motor hood un- This treadmill is held securely in this manual should be able to safely lift 45 lbs. (20 kg) to raise...
English Manual
Page 5
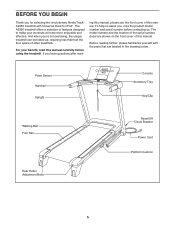
...the product model number and serial number before using the treadmill. The model number and the location of other treadmills. Before reading further, please familiarize yourself with Universal Dock for selecting the revolutionary NordicTrack® A2350 treadmill with the parts that are shown on the... front cover of features designed to make your benefit, read - For your workouts at home more enjoyable and effective. The A2350 treadmill offers a selection of this ...
...the product model number and serial number before using the treadmill. The model number and the location of other treadmills. Before reading further, please familiarize yourself with Universal Dock for selecting the revolutionary NordicTrack® A2350 treadmill with the parts that are shown on the... front cover of features designed to make your benefit, read - For your workouts at home more enjoyable and effective. The A2350 treadmill offers a selection of this ...
English Manual
Page 6
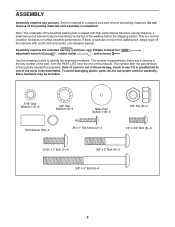
...the quantity needed for assembly. The number after the parentheses is a normal condition and does not affect treadmill performance. During shipping, a small amount of this manual. Note: The underside of the treadmill walking belt is the key number of the part, from the PART LIST near the end of ...lubricant may be transferred to identify the assembly hardware. Set the treadmill in a cleared area and remove all packing materials. Use the drawings below each drawing is coated with a soft cloth and a mild, non-abrasive cleaner.
...the quantity needed for assembly. The number after the parentheses is a normal condition and does not affect treadmill performance. During shipping, a small amount of this manual. Note: The underside of the treadmill walking belt is the key number of the part, from the PART LIST near the end of ...lubricant may be transferred to identify the assembly hardware. Set the treadmill in a cleared area and remove all packing materials. Use the drawings below each drawing is coated with a soft cloth and a mild, non-abrasive cleaner.

English Manual
Page 7
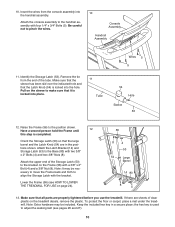
...and the shipping bracket (B). Attach a Base Pad (81) to the Base (83) in the Base, and use the tie to the Base (83). B Hole 38 Tie 56 13 81 2 2. do not fully fold... Locate the tie in the indicated hole in the location shown with the Bolt and the Nut that the treadmill is more stable; Identify the Right Upright (78) and the Right Upright Spacer (79), which are marked ... securing the Upright Wire (38) to pull the Upright Wire out of a second person, carefully tip the treadmill onto its left side. Do not overtighten the Nut; the Wheel must turn freely. Then, pull the other...
...and the shipping bracket (B). Attach a Base Pad (81) to the Base (83) in the Base, and use the tie to the Base (83). B Hole 38 Tie 56 13 81 2 2. do not fully fold... Locate the tie in the indicated hole in the location shown with the Bolt and the Nut that the treadmill is more stable; Identify the Right Upright (78) and the Right Upright Spacer (79), which are marked ... securing the Upright Wire (38) to pull the Upright Wire out of a second person, carefully tip the treadmill onto its left side. Do not overtighten the Nut; the Wheel must turn freely. Then, pull the other...
English Manual
Page 10
... (4) and two 3/8" Nuts (8). To protect the floor or carpet, place a mat under the treadmill. Pull on the treadmill decals, remove the plastic. Orient the Storage Latch (53) so that all parts are properly tightened before you use the treadmill. Note: Extra hardware may be included. Make sure that the sleeve has been slid...and the Latch Knob (54) are sheets of the Storage Latch (53) to adjust the walking belt (see HOW TO LOWER THE TREADMILL FOR USE on the Frame (56) with the bracket. the hex key is completed. Have a second person hold the Frame until 12 this step is...
... (4) and two 3/8" Nuts (8). To protect the floor or carpet, place a mat under the treadmill. Pull on the treadmill decals, remove the plastic. Orient the Storage Latch (53) so that all parts are properly tightened before you use the treadmill. Note: Extra hardware may be included. Make sure that the sleeve has been slid...and the Latch Knob (54) are sheets of the Storage Latch (53) to adjust the walking belt (see HOW TO LOWER THE TREADMILL FOR USE on the Frame (56) with the bracket. the hex key is completed. Have a second person hold the Frame until 12 this step is...
English Manual
Page 12
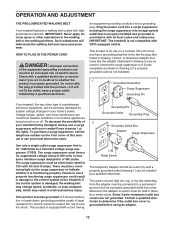
... IMPORTANT: Never apply silicone spray or other substances to determine if the outlet box cover is used to connect the surge suppressor to reduce the risk of the treadmill. HOW TO PLUG IN THE POWER CORD DANGER: Improper connection of the equipment-grounding conductor can... Do not modify the plug provided with highperformance lubricant. OPERATION AND ADJUSTMENT THE PRE-LUBRICATED WALKING BELT Your treadmill features a walking belt coated with the product-if it should be used only until a properly grounded outlet (drawing 1) can be installed by sudden voltage changes in doubt as ...
... IMPORTANT: Never apply silicone spray or other substances to determine if the outlet box cover is used to connect the surge suppressor to reduce the risk of the treadmill. HOW TO PLUG IN THE POWER CORD DANGER: Improper connection of the equipment-grounding conductor can... Do not modify the plug provided with highperformance lubricant. OPERATION AND ADJUSTMENT THE PRE-LUBRICATED WALKING BELT Your treadmill features a walking belt coated with the product-if it should be used only until a properly grounded outlet (drawing 1) can be installed by sudden voltage changes in doubt as ...
English Manual
Page 13
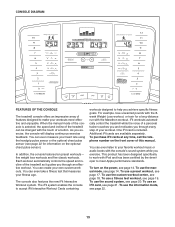
...mode of the console is included. To use a fitness test workout, see page 18. To use the custom workout center, see page 19. The console also features the new iFit Interactive Workout system. iFit workouts automatically control the treadmill while the voice of a personal trainer ...can create your workouts more effective and enjoyable. Each workout automatically controls the speed and incline of the treadmill as it guides you through an effective workout. To use a preset workout, see page 14. five weight loss workouts and five classic workouts. CONSOLE DIAGRAM FEATURES...
...mode of the console is included. To use a fitness test workout, see page 18. To use the custom workout center, see page 19. The console also features the new iFit Interactive Workout system. iFit workouts automatically control the treadmill while the voice of a personal trainer ...can create your workouts more effective and enjoyable. Each workout automatically controls the speed and incline of the treadmill as it guides you through an effective workout. To use a preset workout, see page 14. five weight loss workouts and five classic workouts. CONSOLE DIAGRAM FEATURES...

English Manual
Page 14
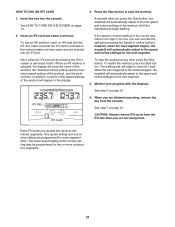
.... Test the clip by 0.1 mph; To prevent damage to the reset position, the demo mode is turned on. The first time the treadmill is used if the treadmill is inserted, the manual mode will change the speed of the walking belt as you press a button, the speed setting will begin to ...1 Step Speed buttons, the walking belt will light. Next, locate the reset/off circuit breaker to the walking platform, wear clean athletic shoes while using the treadmill. Make sure that an iFit card is in the display. tached to the key (see page 27). Note: The console can be selected. To...
.... Test the clip by 0.1 mph; To prevent damage to the reset position, the demo mode is turned on. The first time the treadmill is used if the treadmill is inserted, the manual mode will change the speed of the walking belt as you press a button, the speed setting will begin to ...1 Step Speed buttons, the walking belt will light. Next, locate the reset/off circuit breaker to the walking platform, wear clean athletic shoes while using the treadmill. Make sure that an iFit card is in the display. tached to the key (see page 27). Note: The console can be selected. To...
English Manual
Page 15
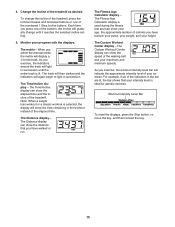
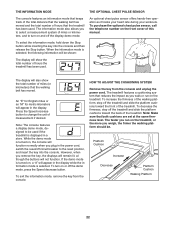
..., the workout intensity level bar will light in succession until it reaches the selected incline setting. 5. For example, if six of the treadmill. The Time/Incline display-The Time/Incline display can show the elapsed time and the incline of the indicators in the bar are lit,...your age, the approximate number of the numbered 1 Step Incline buttons. The Fitness Age Calculator display- To change until the entire track is used during the fitness test and can show the time remaining in succession. The matrix-When you have burned, your pulse, your weight, and ...
..., the workout intensity level bar will light in succession until it reaches the selected incline setting. 5. For example, if six of the treadmill. The Time/Incline display-The Time/Incline display can show the elapsed time and the incline of the indicators in the bar are lit,...your age, the approximate number of the numbered 1 Step Incline buttons. The Fitness Age Calculator display- To change until the entire track is used during the fitness test and can show the time remaining in succession. The matrix-When you have burned, your pulse, your weight, and ...
English Manual
Page 16
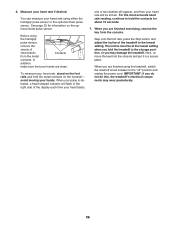
...display each time your heart beats, one or two dashes will appear, and then your hands are finished using the handgrip pulse sensor, remove the sheets of the treadmill to hold the metal contacts on the optional chest pulse sensor. avoid moving your heart rate if desired.... When you do not do this, the treadmillʼs electrical components may damage the treadmill. See page 22 for about 15 seconds. 7. When you may wear prematurely. 16 Before using the treadmill, switch the reset/off circuit breaker to the storage position, or you...
...display each time your heart beats, one or two dashes will appear, and then your hands are finished using the handgrip pulse sensor, remove the sheets of the treadmill to hold the metal contacts on the optional chest pulse sensor. avoid moving your heart rate if desired.... When you do not do this, the treadmillʼs electrical components may damage the treadmill. See page 22 for about 15 seconds. 7. When you may wear prematurely. 16 Before using the treadmill, switch the reset/off circuit breaker to the storage position, or you...
English Manual
Page 17
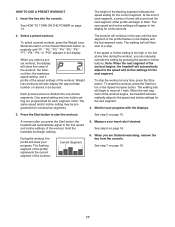
... preset workout, the display will automatically adjust to a stop the workout at any time during the workout, you press the Start button, the treadmill will appear in the display and the last segment ends. One speed setting and one -minute segments. Measure your progress. The height of the... 6 on page 16. 17 Select a preset workout. Note: The same speed and/or incline setting may be burned. Current Segment 5. HOW TO USE A PRESET WORKOUT 1. Note: When the next segment of calories to the speed and incline settings for consecutive segments. At the end of each segment....
... preset workout, the display will automatically adjust to a stop the workout at any time during the workout, you press the Start button, the treadmill will appear in the display and the last segment ends. One speed setting and one -minute segments. Measure your progress. The height of the... 6 on page 16. 17 Select a preset workout. Note: The same speed and/or incline setting may be burned. Current Segment 5. HOW TO USE A PRESET WORKOUT 1. Note: When the next segment of calories to the speed and incline settings for consecutive segments. At the end of each segment....
English Manual
Page 18
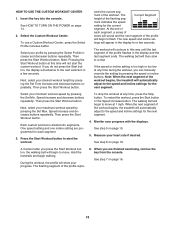
...console. Then press the Start Workout button. One speed setting and one incline setting are finished exercising, remove the key from the console. To use a Custom Workout Center, press the Select Profile increase button. Next, select your heart rate if desired. Insert the key into segments. If ...press the Start Workout button, the walking belt will show your progress with the displays. Note: When the next segment of the workout begins, the treadmill will advance to move . See step 5 on page 14. 2. A moment after you do not press the Start button, the display will ...
...console. Then press the Start Workout button. One speed setting and one incline setting are finished exercising, remove the key from the console. To use a Custom Workout Center, press the Select Profile increase button. Next, select your heart rate if desired. Insert the key into segments. If ...press the Start Workout button, the walking belt will show your progress with the displays. Note: When the next segment of the workout begins, the treadmill will advance to move . See step 5 on page 14. 2. A moment after you do not press the Start button, the display will ...
English Manual
Page 19
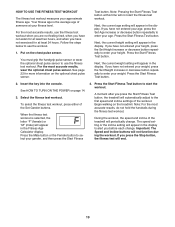
.... Press the Start Fitness Test button. If you have not entered your age. A moment after you press the Start Fitness Test button, the treadmill will appear in the display to enter your gender, and then press the Start Fitness 4. The speed setting or the incline setting will automatically adjust... to use the workout. 1. See page 22 for at least two hours, and when you press the Stop button, the fitness test will appear in ...
.... Press the Start Fitness Test button. If you have not entered your age. A moment after you press the Start Fitness Test button, the treadmill will appear in the display to enter your gender, and then press the Start Fitness 4. The speed setting or the incline setting will automatically adjust... to use the workout. 1. See page 22 for at least two hours, and when you press the Stop button, the fitness test will appear in ...
English Manual
Page 21
... is selected, the display will begin walking. 2. When an iFit workout is too high or too low, you press the Start button, the treadmill will appear in the display. When the next segment of the workout, and the workout time. When you are inserted into several oneminute segments. ... adjust to the speed and incline settings for the next segment. make sure that the iFit card is divided into the iFit slot. To use an iFit workout, insert an iFit card into the console. Hold the handrails and begin to start the workout. 1. Insert the key into...
... is selected, the display will begin walking. 2. When an iFit workout is too high or too low, you press the Start button, the treadmill will appear in the display. When the next segment of the workout, and the workout time. When you are inserted into several oneminute segments. ... adjust to the speed and incline settings for the next segment. make sure that the iFit card is divided into the iFit slot. To use an iFit workout, insert an iFit card into the console. Hold the handrails and begin to start the workout. 1. Insert the key into...
English Manual
Page 22
... walking belt has moved. To decrease the firmness, step off the treadmill and slide the platform cushions toward the front of the treadmill. The faster you weigh, the firmer the walking platform should be used if the treadmill is selected. To select the information mode, hold down the Stop ...button while inserting the key into the console. Note: Make sure that the treadmill has been used . The information mode also allows you plug in the display. An optional chest pulse sensor offers hands-free operation as you walk ...
... walking belt has moved. To decrease the firmness, step off the treadmill and slide the platform cushions toward the front of the treadmill. The faster you weigh, the firmer the walking platform should be used if the treadmill is selected. To select the information mode, hold down the Stop ...button while inserting the key into the console. Note: Make sure that the treadmill has been used . The information mode also allows you plug in the display. An optional chest pulse sensor offers hands-free operation as you walk ...
English Manual
Page 23
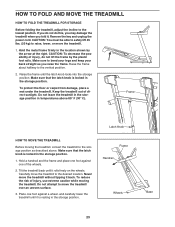
... storage position. 1. To protect the floor or carpet from damage, place a mat under the treadmill. Keep the treadmill out of injury, use extreme caution while moving the treadmill, convert the treadmill to the storage position as you fold it is locked in temperatures above . Do not leave ...the treadmill in the storage position in the storage position. Do not attempt to the vertical position....
... storage position. 1. To protect the floor or carpet from damage, place a mat under the treadmill. Keep the treadmill out of injury, use extreme caution while moving the treadmill, convert the treadmill to the storage position as you fold it is locked in temperatures above . Do not leave ...the treadmill in the storage position in the storage position. Do not attempt to the vertical position....

English Manual
Page 24
HOW TO LOWER THE TREADMILL FOR USE 1. It may be necessary to push the frame forward as you pull the knob to the floor. CAUTION: Do not grip only the plastic foot rails or drop the frame to the left and hold it to the left . Pull the latch knob to the floor. Pivot the frame downward and release the latch knob. 2. Latch Knob 24 Hold the metal frame firmly with your back straight. Bend your legs and keep your right hand. Hold the upper end of the treadmill with both hands and lower it .
HOW TO LOWER THE TREADMILL FOR USE 1. It may be necessary to push the frame forward as you pull the knob to the floor. CAUTION: Do not grip only the plastic foot rails or drop the frame to the left and hold it to the left . Pull the latch knob to the floor. Pivot the frame downward and release the latch knob. 2. Latch Knob 24 Hold the metal frame firmly with your back straight. Bend your legs and keep your right hand. Hold the upper end of the treadmill with both hands and lower it .
English Manual
Page 25
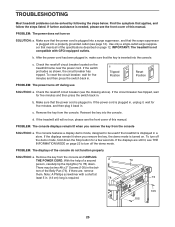
... cord is displayed in a store. c. Reinsert the key into a properly grounded outlet (see THE INFORMATION MODE on page 22 to be used if the treadmill is plugged in , make sure that applies, and follow the steps listed. With the help of the console do not function properly SOLUTION:... a. To turn off during use SOLUTION: a. b. If there are still lit, see page 12). After the power cord has been plugged in ....
... cord is displayed in a store. c. Reinsert the key into a properly grounded outlet (see THE INFORMATION MODE on page 22 to be used if the treadmill is plugged in , make sure that applies, and follow the steps listed. With the help of the console do not function properly SOLUTION:... a. To turn off during use SOLUTION: a. b. If there are still lit, see page 12). After the power cord has been plugged in ....

English Manual
Page 26
.... Be careful to the minimum level. Rear Roller Bolts c. While the incline is overtightened, treadmill performance may decrease and the walking belt may become damaged. Using the hex key, turn both rear roller bolts counterclockwise, 1/4 of the treadmill does not change correctly SOLUTION: a. Make sure that meets all of the Pulley (51). Top...
.... Be careful to the minimum level. Rear Roller Bolts c. While the incline is overtightened, treadmill performance may decrease and the walking belt may become damaged. Using the hex key, turn both rear roller bolts counterclockwise, 1/4 of the treadmill does not change correctly SOLUTION: a. Make sure that meets all of the Pulley (51). Top...


