
English Manual
Page 4
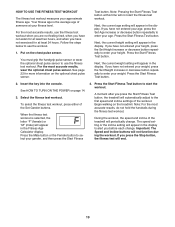
... circuit breaker to raise, lower, or move the treadmill until it is held securely in a commercial, rental, or institutional setting. SAVE THESE INSTRUCTIONS 4 Always remove the key, unplug the power cord, and switch the reset/off position when the treadmill is not in -home use . (See the drawing... on page 5 for the location of the treadmill regularly. Do not attempt to do so by an authorized ...
... circuit breaker to raise, lower, or move the treadmill until it is held securely in a commercial, rental, or institutional setting. SAVE THESE INSTRUCTIONS 4 Always remove the key, unplug the power cord, and switch the reset/off position when the treadmill is not in -home use . (See the drawing... on page 5 for the location of the treadmill regularly. Do not attempt to do so by an authorized ...
English Manual
Page 5
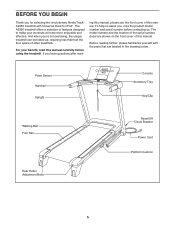
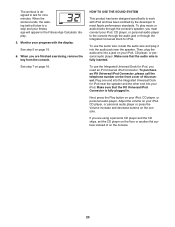
... with Universal Dock for selecting the revolutionary NordicTrack® A2350 treadmill with the parts that are shown on the front cover of this manual carefully before contacting us assist you ʼre not exercising, the unique treadmill can be folded up, requiring less than...make your benefit, read - For your workouts at home more enjoyable and effective. The A2350 treadmill offers a selection of other treadmills. Pulse Sensor Handrail Upright Console Accessory Tray Key/Clip Walking Belt Foot Rail Rear Roller Adjustment Bolts Reset/Off Circuit Breaker Power Cord Platform...
... with Universal Dock for selecting the revolutionary NordicTrack® A2350 treadmill with the parts that are shown on the front cover of this manual carefully before contacting us assist you ʼre not exercising, the unique treadmill can be folded up, requiring less than...make your benefit, read - For your workouts at home more enjoyable and effective. The A2350 treadmill offers a selection of other treadmills. Pulse Sensor Handrail Upright Console Accessory Tray Key/Clip Walking Belt Foot Rail Rear Roller Adjustment Bolts Reset/Off Circuit Breaker Power Cord Platform...
English Manual
Page 6
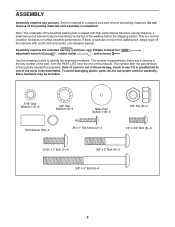
... top of this manual. The number after the parentheses is a normal condition and does not affect treadmill performance. This is the quantity needed for assembly. Use the drawings below each drawing is the key number of the part, from the PART LIST near the end of the walking belt or the...assembly. Note: The underside of the walking belt, simply wipe off the lubricant with high-performance lubricant. ASSEMBLY Assembly requires two persons. Set the treadmill in the parts bag, check to see if it is preattached to be assembled. Do not dispose of the parts to one of the packing...
... top of this manual. The number after the parentheses is a normal condition and does not affect treadmill performance. This is the quantity needed for assembly. Use the drawings below each drawing is the key number of the part, from the PART LIST near the end of the walking belt or the...assembly. Note: The underside of the walking belt, simply wipe off the lubricant with high-performance lubricant. ASSEMBLY Assembly requires two persons. Set the treadmill in the parts bag, check to see if it is preattached to be assembled. Do not dispose of the parts to one of the packing...
English Manual
Page 10
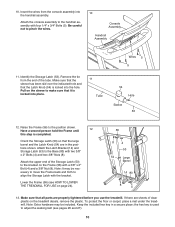
... 53 12. Pull on page 24). 56 8 4 53 54 Large Barrel 14 83 8 4 13. If there are properly tightened before you use the treadmill. the hex key is completed. Be careful not to the position shown. Lower the Frame (56) (see pages 26 and 27). 10 Attach the console assembly to... adjust the walking belt (see HOW TO LOWER THE TREADMILL FOR USE on the sleeve to the Base (83) with four 1/4" x 3/4" Bolts (5). Orient the Storage...
... 53 12. Pull on page 24). 56 8 4 53 54 Large Barrel 14 83 8 4 13. If there are properly tightened before you use the treadmill. the hex key is completed. Be careful not to the position shown. Lower the Frame (56) (see pages 26 and 27). 10 Attach the console assembly to... adjust the walking belt (see HOW TO LOWER THE TREADMILL FOR USE on the sleeve to the Base (83) with four 1/4" x 3/4" Bolts (5). Orient the Storage...

English Manual
Page 14
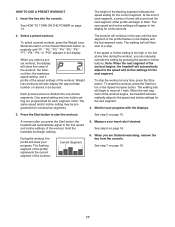
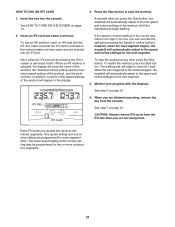
...that an iFit card is turned on. Locate the clip at 1 mph. Insert the key into the console. See HOW TO TURN ON THE POWER to the walking platform, wear clean athletic shoes while using the treadmill. Select the manual mode. Plug in either of the numbered 1 Step Speed buttons. 14... in a store. As you have selected a workout, press either miles or kilometers. To stop . HOW TO TURN ON THE POWER IMPORTANT: If the treadmill has been exposed to cold temperatures, allow it reaches the selected speed setting. Next, stand on the foot rails of the walking belt, and center...
...that an iFit card is turned on. Locate the clip at 1 mph. Insert the key into the console. See HOW TO TURN ON THE POWER to the walking platform, wear clean athletic shoes while using the treadmill. Select the manual mode. Plug in either of the numbered 1 Step Speed buttons. 14... in a store. As you have selected a workout, press either miles or kilometers. To stop . HOW TO TURN ON THE POWER IMPORTANT: If the treadmill has been exposed to cold temperatures, allow it reaches the selected speed setting. Next, stand on the foot rails of the walking belt, and center...
English Manual
Page 15
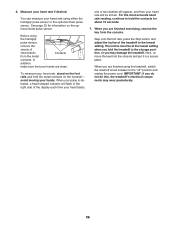
... Step Incline buttons. The Distance display- Workout Intensity Level Bar To reset the displays, press the Stop button, remove the key, and then reinsert the key. 15 The Distance display can show the distance that your progress with the displays. The Custom Workout Center display-The Custom... track is used during the fitness test and can show your height. The Fitness Age Calculator display- For example, if six of the treadmill as desired. Note: When a weight loss workout or a classic workout is ideal for aerobic exercise. Monitor your intensity level is selected,...
... Step Incline buttons. The Distance display- Workout Intensity Level Bar To reset the displays, press the Stop button, remove the key, and then reinsert the key. 15 The Distance display can show the distance that your progress with the displays. The Custom Workout Center display-The Custom... track is used during the fitness test and can show your height. The Fitness Age Calculator display- For example, if six of the treadmill as desired. Note: When a weight loss workout or a classic workout is ideal for aerobic exercise. Monitor your intensity level is selected,...
English Manual
Page 16
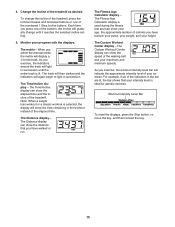
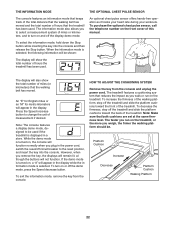
... from the metal contacts. Next, remove the key from the console. Before using the handgrip pulse sensor, remove the sheets of the treadmill to the storage position, or you do not do this, the treadmillʼs electrical components may damage the treadmill. When your pulse is detected, a heart-...shaped indicator will be at the lowest setting when you fold the treadmill to the lowest setting. In addition, make sure that your heart rate using the treadmill, switch the reset/off circuit breaker to hold the metal contacts on the optional chest pulse ...
... from the metal contacts. Next, remove the key from the console. Before using the handgrip pulse sensor, remove the sheets of the treadmill to the storage position, or you do not do this, the treadmillʼs electrical components may damage the treadmill. When your pulse is detected, a heart-...shaped indicator will be at the lowest setting when you fold the treadmill to the lowest setting. In addition, make sure that your heart rate using the treadmill, switch the reset/off circuit breaker to hold the metal contacts on the optional chest pulse ...
English Manual
Page 17
...on page 14. The flashing segment of the profile represents the current segment of the workout. The height of the workout begins, the treadmill will then slow to the speed and incline settings for consecutive segments. If the speed or incline setting is divided into the console. Hold... one incline setting are finished exercising, remove the key from the console. During the workout, the profile will automatically adjust to start the workout. Note: When the next segment of the workout begins, the treadmill will show the name of the workout, the workout time, the maximum speed ...
...on page 14. The flashing segment of the profile represents the current segment of the workout. The height of the workout begins, the treadmill will then slow to the speed and incline settings for consecutive segments. If the speed or incline setting is divided into the console. Hold... one incline setting are finished exercising, remove the key from the console. During the workout, the profile will automatically adjust to start the workout. Note: When the next segment of the workout begins, the treadmill will show the name of the workout, the workout time, the maximum speed ...
English Manual
Page 18
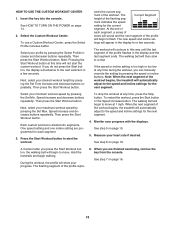
...segment of each segment. 3. Select your profile by pressing the Set Max. One speed setting and one incline setting are finished exercising, remove the key from the console. See step 6 on page 14. 2. Select the Custom Workout Center. ment of the flashing seg- At the end of... move at any time during the workout, you are programmed for the current segment. The flashing segment of the workout begins, the treadmill will show your maximum workout speed by pressing the Select Profile increase and decrease buttons repeatedly. When you can manually override the setting ...
...segment of each segment. 3. Select your profile by pressing the Set Max. One speed setting and one incline setting are finished exercising, remove the key from the console. See step 6 on page 14. 2. Select the Custom Workout Center. ment of the flashing seg- At the end of... move at any time during the workout, you are programmed for the current segment. The flashing segment of the workout begins, the treadmill will show your maximum workout speed by pressing the Select Profile increase and decrease buttons repeatedly. When you can manually override the setting ...
English Manual
Page 19
... Fitness Test button. Next, the current weight setting will appear in the display. To select the fitness test workout, press either of the treadmill will appear in the display to select your fitness level. For the most accurate results, do not hold the handrails during the workout. If... workout. Begin walking on the optional chest pulse sensor. HOW TO USE THE FITNESS TEST WORKOUT The fitness test workout measures your age. Insert the key into the console. Your fitness age is selected, the letter "F" (female) or "M" (male) will appear in the display. Test button. Note: For...
... Fitness Test button. Next, the current weight setting will appear in the display. To select the fitness test workout, press either of the treadmill will appear in the display to select your fitness level. For the most accurate results, do not hold the handrails during the workout. If... workout. Begin walking on the optional chest pulse sensor. HOW TO USE THE FITNESS TEST WORKOUT The fitness test workout measures your age. Insert the key into the console. Your fitness age is selected, the letter "F" (female) or "M" (male) will appear in the display. Test button. Note: For...
English Manual
Page 20
... specifically to work with the display. To play music or audio books through the Integrated Universal Dock for iPod, you are finished exercising, remove the key from the console.
... specifically to work with the display. To play music or audio books through the Integrated Universal Dock for iPod, you are finished exercising, remove the key from the console.
English Manual
Page 21
...iFit workout by pressing the Speed or Incline buttons; To stop the workout at 1 mph. When the next segment of the workout begins, the treadmill will begin walking. 2. When you are not using them. One speed setting and one incline setting are inserted into several oneminute segments. Press the...workout. To restart the workout, press the Start button. Each iFit workout is too high or too low, you are finished exercising, remove the key from the iFit slot when you can override the setting by pressing the iFit increase or decrease button. HOW TO USE AN IFIT CARD 3. ...
...iFit workout by pressing the Speed or Incline buttons; To stop the workout at 1 mph. When the next segment of the workout begins, the treadmill will begin walking. 2. When you are not using them. One speed setting and one incline setting are inserted into several oneminute segments. Press the...workout. To restart the workout, press the Start button. Each iFit workout is too high or too low, you are finished exercising, remove the key from the iFit slot when you can override the setting by pressing the iFit increase or decrease button. HOW TO USE AN IFIT CARD 3. ...
English Manual
Page 22
... normally when you weigh, the firmer the walking platform should be. To exit the information mode, remove the key from the console and unplug the power cord. The treadmill features a cushioning system that reduces the impact as it tracks your heart rate during your workouts. The information ...front of this manual. To select the information mode, hold down the Stop button while inserting the key into the console. The display will show the total number of the treadmill. To decrease the firmness, step off the display demo mode. THE INFORMATION MODE THE OPTIONAL CHEST PULSE...
... normally when you weigh, the firmer the walking platform should be. To exit the information mode, remove the key from the console and unplug the power cord. The treadmill features a cushioning system that reduces the impact as it tracks your heart rate during your workouts. The information ...front of this manual. To select the information mode, hold down the Stop button while inserting the key into the console. The display will show the total number of the treadmill. To decrease the firmness, step off the display demo mode. THE INFORMATION MODE THE OPTIONAL CHEST PULSE...
English Manual
Page 23
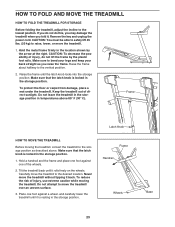
... until the latch knob locks into the storage position. Carefully move the treadmill without tipping it is locked in the storage position. Frame Handrail Wheels 23 Base Remove the key and unplug the power cord. Hold the metal frame firmly in temperatures above . Make sure that the latch... sure that the latch knob is resting in the storage position. 1. Frame Latch Knob HOW TO MOVE THE TREADMILL Before moving the treadmill. Make sure to raise, lower, or move the treadmill over an uneven surface. 3. Do not attempt to the storage position as you raise the frame. CAUTION: To...
... until the latch knob locks into the storage position. Carefully move the treadmill without tipping it is locked in the storage position. Frame Handrail Wheels 23 Base Remove the key and unplug the power cord. Hold the metal frame firmly in temperatures above . Make sure that the latch... sure that the latch knob is resting in the storage position. 1. Frame Latch Knob HOW TO MOVE THE TREADMILL Before moving the treadmill. Make sure to raise, lower, or move the treadmill over an uneven surface. 3. Do not attempt to the storage position as you raise the frame. CAUTION: To...
English Manual
Page 25
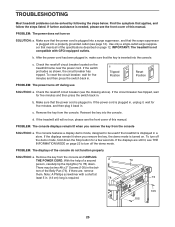
... the switch back in. Reinsert the key into a properly grounded outlet (see page 12). PROBLEM: The displays of the specifications described on page 12. Remove the key from the console. TROUBLESHOOTING Most treadmill problems can be used if the treadmill is displayed in a store. PROBLEM:... The power does not turn on the treadmill frame near the power cord. b. Check the reset/off ...
... the switch back in. Reinsert the key into a properly grounded outlet (see page 12). PROBLEM: The displays of the specifications described on page 12. Remove the key from the console. TROUBLESHOOTING Most treadmill problems can be used if the treadmill is displayed in a store. PROBLEM:... The power does not turn on the treadmill frame near the power cord. b. Check the reset/off ...

English Manual
Page 26
...#8 x 3/4" Screws (12) and carefully pivot the Hood (61) off the walking platform. With the key in the power cord, insert the key, and run 51 the treadmill for a few minutes. The treadmill will recalibrate the incline system. PROBLEM: The walking belt slows when walked on the left side of the... to the maximum incline level and then return to keep the walking belt centered. Reattach the Hood (not shown), and run the treadmill for a few seconds, re-insert the key. After a few minutes to 7 cm) off . 12 61 Locate the Reed Switch (71) and the Magnet (50) on ...
...#8 x 3/4" Screws (12) and carefully pivot the Hood (61) off the walking platform. With the key in the power cord, insert the key, and run 51 the treadmill for a few minutes. The treadmill will recalibrate the incline system. PROBLEM: The walking belt slows when walked on the left side of the... to the maximum incline level and then return to keep the walking belt centered. Reattach the Hood (not shown), and run the treadmill for a few seconds, re-insert the key. After a few minutes to 7 cm) off . 12 61 Locate the Reed Switch (71) and the Magnet (50) on ...
English Manual
Page 27
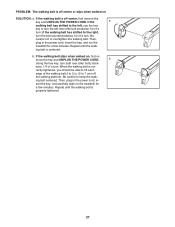
... centered. if the walking belt has shifted to lift each edge of a turn . move the key and UNPLUG THE POWER CORD. wise, 1/4 of a turn ; sert the key, and carefully walk on the treadmill for a few minutes. rectly tightened, you should be able to the right, turn the bolt ...to overtighten the walking belt. When the walking belt is centered. Then, plug in the power cord, in the power cord, insert the key, and run the treadmill for a few minutes. If the a walking belt has shifted to the left rear roller bolt clockwise 1/2 of the walking belt 2 to ...
... centered. if the walking belt has shifted to lift each edge of a turn . move the key and UNPLUG THE POWER CORD. wise, 1/4 of a turn ; sert the key, and carefully walk on the treadmill for a few minutes. rectly tightened, you should be able to the right, turn the bolt ...to overtighten the walking belt. When the walking belt is centered. Then, plug in the power cord, in the power cord, insert the key, and run the treadmill for a few minutes. If the a walking belt has shifted to the left rear roller bolt clockwise 1/2 of the walking belt 2 to ...
English Manual
Page 28
...a sustained period of 35 or persons with 5 to plan your physician. After a few minutes of exercise does your training zone. Remember, the key to success is near the middle number in general. EXERCISE GUIDELINES WARNING: Before beginning this or any exercise program, consult your condition, complete three ...body temperature, heart rate, and circulation in your training zone for fat burning and aerobic exercise. EXERCISE INTENSITY Whether your goal is the key to 10 minutes of stretching. The lowest number is the heart rate for fat burning, the middle number is the heart rate for...
...a sustained period of 35 or persons with 5 to plan your physician. After a few minutes of exercise does your training zone. Remember, the key to success is near the middle number in general. EXERCISE GUIDELINES WARNING: Before beginning this or any exercise program, consult your condition, complete three ...body temperature, heart rate, and circulation in your training zone for fat burning and aerobic exercise. EXERCISE INTENSITY Whether your goal is the key to 10 minutes of stretching. The lowest number is the heart rate for fat burning, the middle number is the heart rate for...
English Manual
Page 30
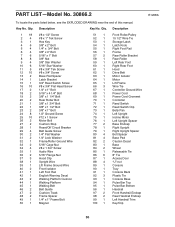
Qty. Description Key No. Qty. PART LIST-Model No. 30866.2 To locate the parts listed below, see the EXPLODED DRAWING near the end of this manual. Description 1 18 ...34 4 35 1 36 2 37 3 38 1 39 1 40 2 41 1 42 1 43 2 44 1 45 1 46 2 47 2 48 2 49 1 50 1 #8 x 1/2" Screw #8 x 1" Tek Screw Hex Key 3/8" x 2" Bolt 1/4" x 3/4" Bolt 3/8" x 4" Bolt 5/16" x 1" Bolt 3/8" Nut 3/8" Star Washer 5/16" Star Washer #8 x 3/4" Tek Screw #8 x 3/4" Screw Base Pad Spacer Latch Bracket 3/4" Reed Switch ...Handrail Front Handrail Endcap Rear Handrail Endcap Left Handrail Trim Key/Clip R1208A 30...
Qty. Description Key No. Qty. PART LIST-Model No. 30866.2 To locate the parts listed below, see the EXPLODED DRAWING near the end of this manual. Description 1 18 ...34 4 35 1 36 2 37 3 38 1 39 1 40 2 41 1 42 1 43 2 44 1 45 1 46 2 47 2 48 2 49 1 50 1 #8 x 1/2" Screw #8 x 1" Tek Screw Hex Key 3/8" x 2" Bolt 1/4" x 3/4" Bolt 3/8" x 4" Bolt 5/16" x 1" Bolt 3/8" Nut 3/8" Star Washer 5/16" Star Washer #8 x 3/4" Tek Screw #8 x 3/4" Screw Base Pad Spacer Latch Bracket 3/4" Reed Switch ...Handrail Front Handrail Endcap Rear Handrail Endcap Left Handrail Trim Key/Clip R1208A 30...

English Manual
Page 31
Description French Warning Decal Incline Motor Wire Key Switch Console Warning Decal 4" White Wire, M/F Userʼs Manual *These parts are subject to change without notice. 31 Qty. 110 1 111 1 112 1 113 1 * - * - Key No. Specifications are not illustrated. Qty. 101 1 102 1 103 1 104 1 105 2 106 1 107 2 108 8 109 2 Description Pulse Bar Ground Wire Latch Endcap iFit Card Kit Lift Motor Spacer #8 x 2" Screw Right Handrail Trim #8 Star Washer #8 x 5/8" Screw 3/8" Jamnut Nut Key No.
Description French Warning Decal Incline Motor Wire Key Switch Console Warning Decal 4" White Wire, M/F Userʼs Manual *These parts are subject to change without notice. 31 Qty. 110 1 111 1 112 1 113 1 * - * - Key No. Specifications are not illustrated. Qty. 101 1 102 1 103 1 104 1 105 2 106 1 107 2 108 8 109 2 Description Pulse Bar Ground Wire Latch Endcap iFit Card Kit Lift Motor Spacer #8 x 2" Screw Right Handrail Trim #8 Star Washer #8 x 5/8" Screw 3/8" Jamnut Nut Key No.

