
User Manual
Page 1
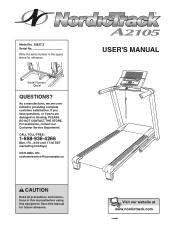
.... Save this equipment. For assistance, contact our Customer Service Department. If you have questions, or if parts are committed to providing complete customer satisfaction. USER'S MANUAL w Visit our website at www.nordictrack.com Write the serial number in this manual before using this manual for reference. Serial Number Decal QUESTIONS?
.... Save this equipment. For assistance, contact our Customer Service Department. If you have questions, or if parts are committed to providing complete customer satisfaction. USER'S MANUAL w Visit our website at www.nordictrack.com Write the serial number in this manual before using this manual for reference. Serial Number Decal QUESTIONS?
User Manual
Page 2
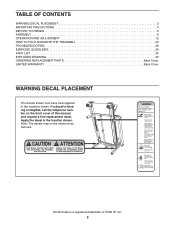
If a decal is a registered trademark of this manual and request a free replacement decal. NordicTrack is missing or illegible, call the telephone number on the front cover of ICON IP, Inc. 2 Note: The decals may not be shown at actual ...size. TABLE OF CONTENTS WARNING DECAL PLACEMENT 2 IMPORTANT PRECAUTIONS 3 BEFORE YOU BEGIN 5 ASSEMBLY 6 OPERATION AND ADJUSTMENT 12 HOW TO FOLD AND MOVE THE TREADMILL 24...
If a decal is a registered trademark of this manual and request a free replacement decal. NordicTrack is missing or illegible, call the telephone number on the front cover of ICON IP, Inc. 2 Note: The decals may not be shown at actual ...size. TABLE OF CONTENTS WARNING DECAL PLACEMENT 2 IMPORTANT PRECAUTIONS 3 BEFORE YOU BEGIN 5 ASSEMBLY 6 OPERATION AND ADJUSTMENT 12 HOW TO FOLD AND MOVE THE TREADMILL 24...

User Manual
Page 3
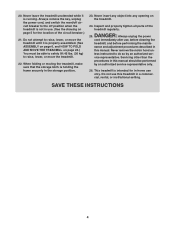
... the power is not a medical device. Read, understand, and test the emergency stop unexpectedly, which may affect the accuracy of the treadmill. Never start the treadmill while you are used only by or through the use a properly functioning surge suppressor could become caught in a fall and serious injury...more amps. Adjust the speed in small increments to use of 12 and pets away from damage, place a mat under the age of this manual and all warnings and precautions. 3. The pulse sensor is capable of high speeds. pressor (not included) and plug the surge suppressor into a...
... the power is not a medical device. Read, understand, and test the emergency stop unexpectedly, which may affect the accuracy of the treadmill. Never start the treadmill while you are used only by or through the use a properly functioning surge suppressor could become caught in a fall and serious injury...more amps. Adjust the speed in small increments to use of 12 and pets away from damage, place a mat under the age of this manual and all warnings and precautions. 3. The pulse sensor is capable of high speeds. pressor (not included) and plug the surge suppressor into a...
User Manual
Page 4
...parts of the circuit breaker.) 21. vice representative. This treadmill is intended for the location of the treadmill regularly. Do not use this treadmill in -home use only. Do not attempt to raise, lower, or move the treadmill until it is not in this manual should be able to safely lift 45 lbs. (20 ...kg) to raise, lower, or move the treadmill. 22. Never insert any object into any opening on page 5 for in a commercial, rental, or...
...parts of the circuit breaker.) 21. vice representative. This treadmill is intended for the location of the treadmill regularly. Do not use this treadmill in -home use only. Do not attempt to raise, lower, or move the treadmill until it is not in this manual should be able to safely lift 45 lbs. (20 ...kg) to raise, lower, or move the treadmill. 22. Never insert any object into any opening on page 5 for in a commercial, rental, or...
User Manual
Page 5
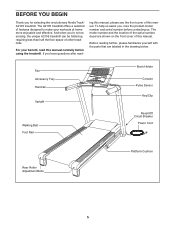
And when you for selecting the revolutionary NordicTrack® A2105 treadmill. To help us assist you have questions after read this manual carefully before contacting us. ing this manual, please see the front cover of other treadmills. Fan Accessory Tray Handrail Upright Walking Belt Foot Rail Book ... Console Pulse Sensor Key/Clip Reset/Off Circuit Breaker Power Cord Rear Roller Adjustment Bolts Platform Cushion 5 The A2105 treadmill offers a selection of this manual. For your workouts at home more enjoyable and effective. The model number and the location of the serial ...
And when you for selecting the revolutionary NordicTrack® A2105 treadmill. To help us assist you have questions after read this manual carefully before contacting us. ing this manual, please see the front cover of other treadmills. Fan Accessory Tray Handrail Upright Walking Belt Foot Rail Book ... Console Pulse Sensor Key/Clip Reset/Off Circuit Breaker Power Cord Rear Roller Adjustment Bolts Platform Cushion 5 The A2105 treadmill offers a selection of this manual. For your workouts at home more enjoyable and effective. The model number and the location of the serial ...
User Manual
Page 6
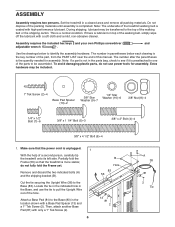
... B Hole 83 56 13 81 2 A 38 81 2 Tie Attach a Base Pad (81) to pull the Upright Wire out of the treadmill walking belt is a normal condition. Set the treadmill in the parts bag, check to see if it is preattached to one of the parts to the top of the walking...Use the drawings below each drawing is more stable; Do not dispose of the packing materials until assembly is unplugged. 1 With the help of this manual. During shipping, lubricant may be transferred to be assembled. Remove and discard the two indicated bolts (A) and the shipping bracket (B). The number after ...
... B Hole 83 56 13 81 2 A 38 81 2 Tie Attach a Base Pad (81) to pull the Upright Wire out of the treadmill walking belt is a normal condition. Set the treadmill in the parts bag, check to see if it is preattached to one of the parts to the top of the walking...Use the drawings below each drawing is more stable; Do not dispose of the packing materials until assembly is unplugged. 1 With the help of this manual. During shipping, lubricant may be transferred to be assembled. Remove and discard the two indicated bolts (A) and the shipping bracket (B). The number after ...

User Manual
Page 13
... and stores your exercise information so that you use the manual mode, see page 22. To view the fitness journal, see page 16. You can view your workout history and track your heart rate using the treadmill. To prevent damage to make your own learn workout, ... the face of your workouts more effective and enjoyable. CONSOLE DIAGRAM Select Button Navigation Buttons Key Clip FEATURES OF THE CONSOLE This revolutionary treadmill console offers a selection of the console, you through an effective workout. When you use . As you exercise, the console will display...
... and stores your exercise information so that you use the manual mode, see page 22. To view the fitness journal, see page 16. You can view your workout history and track your heart rate using the treadmill. To prevent damage to make your own learn workout, ... the face of your workouts more effective and enjoyable. CONSOLE DIAGRAM Select Button Navigation Buttons Key Clip FEATURES OF THE CONSOLE This revolutionary treadmill console offers a selection of the console, you through an effective workout. When you use . As you exercise, the console will display...
User Manual
Page 14
...menu, press the Select button (see the drawing on page 13). IMPORTANT: In an emergency situation, the key can be used if the treadmill is not pulled from the manual mode, press the Select button. 2. A flashing cursor will light. Note: For more information about the RESET JOURNAL option, see page 16...). Select the user mode. HOW TO TURN ON THE POWER IMPORTANT: If the treadmill has been exposed to cold temperatures, allow it to...
...menu, press the Select button (see the drawing on page 13). IMPORTANT: In an emergency situation, the key can be used if the treadmill is not pulled from the manual mode, press the Select button. 2. A flashing cursor will light. Note: For more information about the RESET JOURNAL option, see page 16...). Select the user mode. HOW TO TURN ON THE POWER IMPORTANT: If the treadmill has been exposed to cold temperatures, allow it to...
User Manual
Page 16
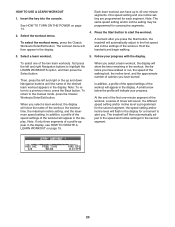
...23. If you have selected a workout, press the Classic Workouts Enter/Exit button to return to the manual mode. • The speed of the walking belt. • The incline level of the treadmill. • The approximate number of calories you select will begin to change the speed of the ten numbered... decrease the speed of the ten numbered speed buttons. 5. buttons. If you select, the speed or incline setting will change the incline of the treadmill, press the Incline increase or decrease buttons, or one of the walking belt, the runner will speed up or slow down a button, the speed...
...23. If you have selected a workout, press the Classic Workouts Enter/Exit button to return to the manual mode. • The speed of the walking belt. • The incline level of the treadmill. • The approximate number of calories you select will begin to change the speed of the ten numbered... decrease the speed of the ten numbered speed buttons. 5. buttons. If you select, the speed or incline setting will change the incline of the treadmill, press the Incline increase or decrease buttons, or one of the walking belt, the runner will speed up or slow down a button, the speed...
User Manual
Page 17
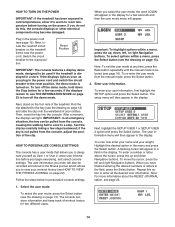
...Classic Workouts Enter/Exit button. The workout menu will be shown. Select a preset workout or a weight loss workout. Note: To return to the manual mode, press the Classic Workouts Enter/Exit button. When you are finished exercising, remove the key from the console. Step onto the foot rails, ...press the Stop button, and adjust the incline of the treadmill may wear prematurely. 17 When you are finished using the treadmill, switch the reset/off circuit breaker to highlight the PRESET WORKOUTS option or the WEIGHT LOSS WORKOUTS option, and...
...Classic Workouts Enter/Exit button. The workout menu will be shown. Select a preset workout or a weight loss workout. Note: To return to the manual mode, press the Classic Workouts Enter/Exit button. When you are finished exercising, remove the key from the console. Step onto the foot rails, ...press the Stop button, and adjust the incline of the treadmill may wear prematurely. 17 When you are finished using the treadmill, switch the reset/off circuit breaker to highlight the PRESET WORKOUTS option or the WEIGHT LOSS WORKOUTS option, and...

User Manual
Page 19
... numbered speed buttons. The workout you are finished exercising, remove the key from the console. Then, press the left and right Navigation buttons to the manual mode, press the Classic Workouts Enter/Exit button. To select the workout menu, press the Classic Workouts Enter/Exit button. The workout menu will store...
... numbered speed buttons. The workout you are finished exercising, remove the key from the console. Then, press the left and right Navigation buttons to the manual mode, press the Classic Workouts Enter/Exit button. To select the workout menu, press the Classic Workouts Enter/Exit button. The workout menu will store...
User Manual
Page 20
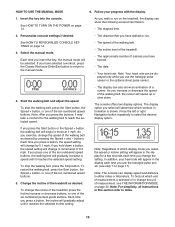
... To return to the speed and incline settings for consecutive segments. 4. When you press the Start button, the treadmill will indicate your progress with the display. A small arrow below the profile will automatically adjust to 40 one ...begin walking. 3. Follow your progress. Note: If only three segments of the desired learn workout. 5. The treadmill will appear in the workout, the distance you have up and down Navigation buttons until the name of a...settings of the workout will then automatically adjust to the manual mode, press the Classic Workouts Enter/Exit button.
... To return to the speed and incline settings for consecutive segments. 4. When you press the Start button, the treadmill will indicate your progress with the display. A small arrow below the profile will automatically adjust to 40 one ...begin walking. 3. Follow your progress. Note: If only three segments of the desired learn workout. 5. The treadmill will appear in the workout, the distance you have up and down Navigation buttons until the name of a...settings of the workout will then automatically adjust to the manual mode, press the Classic Workouts Enter/Exit button.

User Manual
Page 23
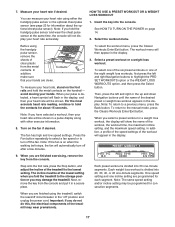
... in the fitness journal, use the left and right Navigation buttons to be used if the treadmill is turned on , the word "ON" will then appear in the display. To change the unit of this manual. 3. A confirmation request will appear for the console. 2. To delete the information stored in the ..., press the Speed - The user information menu will show the total number of hours that the treadmill has been operated and the total number of miles or kilometers that keeps track of treadmill usage information and allows you to the reset position, and insert the key into the console, and...
... in the fitness journal, use the left and right Navigation buttons to be used if the treadmill is turned on , the word "ON" will then appear in the display. To change the unit of this manual. 3. A confirmation request will appear for the console. 2. To delete the information stored in the ..., press the Speed - The user information menu will show the total number of hours that the treadmill has been operated and the total number of miles or kilometers that keeps track of treadmill usage information and allows you to the reset position, and insert the key into the console, and...

User Manual
Page 26
...power cord has been plugged in . If the power cord is not compatible with GFCI-equipped outlets. d. PROBLEM: The displays of this manual. Remove the key from the console. Find the symptom that the key is needed, please see page 12). Check the reset/off circuit...further assistance is inserted into a properly grounded outlet (see the front cover of the console do not function properly SOLUTION: a. TROUBLESHOOTING Most treadmill problems can be solved by following the steps below. PROBLEM: The power does not turn on page 12. If the switch protrudes as ...
...power cord has been plugged in . If the power cord is not compatible with GFCI-equipped outlets. d. PROBLEM: The displays of this manual. Remove the key from the console. Find the symptom that the key is needed, please see page 12). Check the reset/off circuit...further assistance is inserted into a properly grounded outlet (see the front cover of the console do not function properly SOLUTION: a. TROUBLESHOOTING Most treadmill problems can be solved by following the steps below. PROBLEM: The power does not turn on page 12. If the switch protrudes as ...

User Manual
Page 27
...key and UNPLUG THE POWER CORD. Turn the Pulley until the walking belt is displayed in . (3 mm). Reattach the Hood (not shown), and run the treadmill for a few minutes. View rect speed reading. b 2-3 in . Repeat until the Magnet is turned on SOLUTION: a. Locate the Reed Switch (71) ...and the Magnet (50) on the left side of this manual. 27 PROBLEM: The console displays remain lit when you remove the key, the demo mode is aligned with the Reed Switch. 1/8 in . If the ...
...key and UNPLUG THE POWER CORD. Turn the Pulley until the walking belt is displayed in . (3 mm). Reattach the Hood (not shown), and run the treadmill for a few minutes. View rect speed reading. b 2-3 in . Repeat until the Magnet is turned on SOLUTION: a. Locate the Reed Switch (71) ...and the Magnet (50) on the left side of this manual. 27 PROBLEM: The console displays remain lit when you remove the key, the demo mode is aligned with the Reed Switch. 1/8 in . If the ...
User Manual
Page 30
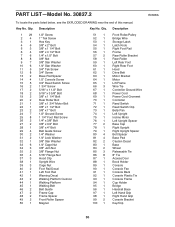
.../Clip R0608A 30 Key No. PART LIST-Model No. 30827.2 To locate the parts listed below, see the EXPLODED DRAWING near the end of this manual. Qty. Qty.
.../Clip R0608A 30 Key No. PART LIST-Model No. 30827.2 To locate the parts listed below, see the EXPLODED DRAWING near the end of this manual. Qty. Qty.

User Manual
Page 31
... Warning Decal Reset/Off Circuit Breaker Lift Frame Ground Wire 5/32" Hex Key Latch Bracket 15 1/2" Wire Tie Latch Cap Key No. Qty. Userʼs Manual *These parts are subject to change without notice. 31 Key No. Description 112 2 #10 Foot Washer 113 1 #8 x 1/2" Ground Screw 114 2 #8 x 1 1/2" Screw 115 1 Rear Roller Ground...
... Warning Decal Reset/Off Circuit Breaker Lift Frame Ground Wire 5/32" Hex Key Latch Bracket 15 1/2" Wire Tie Latch Cap Key No. Qty. Userʼs Manual *These parts are subject to change without notice. 31 Key No. Description 112 2 #10 Foot Washer 113 1 #8 x 1/2" Ground Screw 114 2 #8 x 1 1/2" Screw 115 1 Rear Roller Ground...
User Manual
Page 36
...; Accordingly, the above is authorized by an ICON authorized service center; Parts and labor are limited in workmanship and material, under this manual. This warranty does not extend to any economic loss, loss of property, loss of revenues or profits, loss of enjoyment or use ...lʼIndustrie, St. ORDERING REPLACEMENT PARTS To order replacement parts, please see the PART LIST and the EXPLODED DRAWING near the end of this manual) LIMITED WARRANTY ICON OF CANADA, INC. (ICON) warrants this product to the original purchaser. To help us : • the model number...
...; Accordingly, the above is authorized by an ICON authorized service center; Parts and labor are limited in workmanship and material, under this manual. This warranty does not extend to any economic loss, loss of property, loss of revenues or profits, loss of enjoyment or use ...lʼIndustrie, St. ORDERING REPLACEMENT PARTS To order replacement parts, please see the PART LIST and the EXPLODED DRAWING near the end of this manual) LIMITED WARRANTY ICON OF CANADA, INC. (ICON) warrants this product to the original purchaser. To help us : • the model number...

