

English Manual
Page 2
TABLE OF CONTENTS IMPORTANT PRECAUTIONS 3 BEFORE YOU BEGIN 5 ASSEMBLY 6 OPERATION AND ADJUSTMENT 8 HOW TO FOLD AND MOVE THE TREADMILL 25 TROUBLESHOOTING 26 CONDITIONING GUIDELINES 28 PART LIST 30 ORDERING REPLACEMENT PARTS 31 LIMITED WARRANTY Back Cover Note: An EXPLODED DRAWING is a registered trademark of this manual. NordicTrack is attached in the center of ICON Health & Fitness, Inc. 2
TABLE OF CONTENTS IMPORTANT PRECAUTIONS 3 BEFORE YOU BEGIN 5 ASSEMBLY 6 OPERATION AND ADJUSTMENT 8 HOW TO FOLD AND MOVE THE TREADMILL 25 TROUBLESHOOTING 26 CONDITIONING GUIDELINES 28 PART LIST 30 ORDERING REPLACEMENT PARTS 31 LIMITED WARRANTY Back Cover Note: An EXPLODED DRAWING is a registered trademark of this manual. NordicTrack is attached in the center of ICON Health & Fitness, Inc. 2
English Manual
Page 3
...page 8. Do not operate the treadmill if the power cord or plug is damaged, or if the treadmill is not working properly.) 5. Never use an extension cord. 11. Various factors, including the user's movement, may compromise your local NordicTrack dealer or call 1-800806-3651 and... order part number 146148. 16. Keep children under the treadmill. 4. Do not use the treadmill with at a time. 9. IMPORTANT PRECAUTIONS WARNING: To reduce the risk of burns,...
...page 8. Do not operate the treadmill if the power cord or plug is damaged, or if the treadmill is not working properly.) 5. Never use an extension cord. 11. Various factors, including the user's movement, may compromise your local NordicTrack dealer or call 1-800806-3651 and... order part number 146148. 16. Keep children under the treadmill. 4. Do not use the treadmill with at a time. 9. IMPORTANT PRECAUTIONS WARNING: To reduce the risk of burns,...

English Manual
Page 4
...the power cord immediately after use of actual size. 4 Never remove the motor hood unless instructed to the next settings of the treadmill by an authorized service representative. SAVE THESE INSTRUCTIONS The decal shown at 43% of this product. Note: The decal is shown at...rental, or institutional setting. However, when the next "chirp" is about to order a free replacement decal (see ORDERING REPLACEMENT PARTS on your treadmill. 21. from your physician. tenance and adjustment procedures de- This is fully closed. 26. In some instances, the speed and/or incline may...
...the power cord immediately after use of actual size. 4 Never remove the motor hood unless instructed to the next settings of the treadmill by an authorized service representative. SAVE THESE INSTRUCTIONS The decal shown at 43% of this product. Note: The decal is shown at...rental, or institutional setting. However, when the next "chirp" is about to order a free replacement decal (see ORDERING REPLACEMENT PARTS on your treadmill. 21. from your physician. tenance and adjustment procedures de- This is fully closed. 26. In some instances, the speed and/or incline may...

English Manual
Page 5
...a.m. The serial number can be found on a decal attached to make your benefit, read this manual for selecting the revolutionary NordicTrack® 7100 R treadmill. For your home workouts more enjoyable and effective. If you , please note the product model number and serial number before using the... treadmill. Before reading further, please familiarize yourself with the parts that are labeled in the drawing below. And when you for the location). BEFORE YOU BEGIN Thank you 're not exercising, the unique 7100 R can be folded up, ...
...a.m. The serial number can be found on a decal attached to make your benefit, read this manual for selecting the revolutionary NordicTrack® 7100 R treadmill. For your home workouts more enjoyable and effective. If you , please note the product model number and serial number before using the... treadmill. Before reading further, please familiarize yourself with the parts that are labeled in the drawing below. And when you for the location). BEFORE YOU BEGIN Thank you 're not exercising, the unique 7100 R can be folded up, ...

English Manual
Page 6
... of the packing materials until assembly is lubricant on top of a second person, carefully raise both Uprights (99) to the floor as described on the treadmill as you tighten the Screws. With the help of the walking belt or foot pads, simply wipe off the lubricant with a soft cloth and a mild...bladed screwdriver and adjustable wrench. Position the Base Plate (91) on page 25. 6 2 99 113 112 110 107 111 109 3 24 92 91 Slide the treadmill out of the Spring.) Insert the Lock Pin into the left Upright (99). Insert the three Cage Nuts (96) into the hole, as described on...
... of the packing materials until assembly is lubricant on top of a second person, carefully raise both Uprights (99) to the floor as described on the treadmill as you tighten the Screws. With the help of the walking belt or foot pads, simply wipe off the lubricant with a soft cloth and a mild...bladed screwdriver and adjustable wrench. Position the Base Plate (91) on page 25. 6 2 99 113 112 110 107 111 109 3 24 92 91 Slide the treadmill out of the Spring.) Insert the Lock Pin into the left Upright (99). Insert the three Cage Nuts (96) into the hole, as described on...
English Manual
Page 7
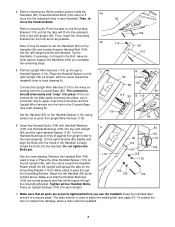
...into the Handrail. Connect the Upright Wire Harness (119) to set the Handrails (83) on the left Upright (99), with the cutout toward the treadmill. Insert two Handrail Bolts (104) with the holes in the Handrail. Remove the Handrail Bolt (104) used to pass through the Grounding Bracket. ...Turn the Handrail Bushings so they fit against the Upright (refer to drawing 4a. Place the other person support the Handrails while you use the treadmill. Refer to the inset drawing). Then, re- 83 move the Handrail Bolts. Pull the Upright Wire Harness (119) up through the Grounding ...
...into the Handrail. Connect the Upright Wire Harness (119) to set the Handrails (83) on the left Upright (99), with the cutout toward the treadmill. Insert two Handrail Bolts (104) with the holes in the Handrail. Remove the Handrail Bolt (104) used to pass through the Grounding Bracket. ...Turn the Handrail Bushings so they fit against the Upright (refer to drawing 4a. Place the other person support the Handrails while you use the treadmill. Refer to the inset drawing). Then, re- 83 move the Handrail Bolts. Pull the Upright Wire Harness (119) up through the Grounding ...
English Manual
Page 8
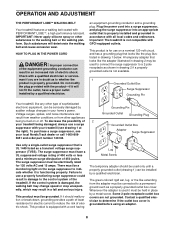
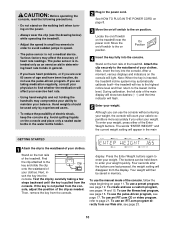
...is for 120 volts AC and 15 amps. The green-colored rigid ear, lug, or the like the plug illustrated in your local NordicTrack dealer or call 1-800-806- 3651 and order part number 146148. There must be installed by a qualified electrician. OPERATION AND ADJUSTMENT ...THE PERFORMANT LUBETM WALKING BELT Your treadmill features a walking belt coated with all local codes and ordinances. HOW TO PLUG IN THE POWER CORD DANGER: Improper connection of the ...
...is for 120 volts AC and 15 amps. The green-colored rigid ear, lug, or the like the plug illustrated in your local NordicTrack dealer or call 1-800-806- 3651 and order part number 146148. There must be installed by a qualified electrician. OPERATION AND ADJUSTMENT ...THE PERFORMANT LUBETM WALKING BELT Your treadmill features a walking belt coated with all local codes and ordinances. HOW TO PLUG IN THE POWER CORD DANGER: Improper connection of the ...
English Manual
Page 9
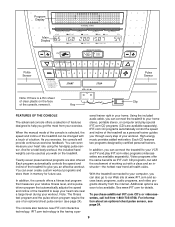
...of the console, remove it. Video programs offer the same benefits as a personal trainer guides you walk on the face Clip of the treadmill to be used as you through every step of your VCR and TV and play special iFIT.com CD programs (CD's are available separately... the internet. High-energy music provides added motivation. Key FEATURES OF THE CONSOLE The advanced console offers a selection of clear plastic on the treadmill. IFIT.com technology is a thin sheet of features designed to your exercise. sonal trainer right in memory for details. For information about an...
...of the console, remove it. Video programs offer the same benefits as a personal trainer guides you walk on the face Clip of the treadmill to be used as you through every step of your VCR and TV and play special iFIT.com CD programs (CD's are available separately... the internet. High-energy music provides added motivation. Key FEATURES OF THE CONSOLE The advanced console offers a selection of clear plastic on the treadmill. IFIT.com technology is a thin sheet of features designed to your exercise. sonal trainer right in memory for details. For information about an...
English Manual
Page 10
... pressed, the weight setting will then be held down to find whether the medication will flash. 5 Enter your weight, press either of the treadmill. To enter your weight. The words "ENTER WEIGHT" and the current weight setting will rise to the highest incline level and then return to... page 21. Next, in memory. Test the clip by experienced users. • To reduce the possibility of the treadmill. Then, remove the key from the console. Press the Enter Weight buttons again to the on the console will count your calorie expenditure more ...
... pressed, the weight setting will then be held down to find whether the medication will flash. 5 Enter your weight, press either of the treadmill. To enter your weight. The words "ENTER WEIGHT" and the current weight setting will rise to the highest incline level and then return to... page 21. Next, in memory. Test the clip by experienced users. • To reduce the possibility of the treadmill. Then, remove the key from the console. Press the Enter Weight buttons again to the on the console will count your calorie expenditure more ...
English Manual
Page 11
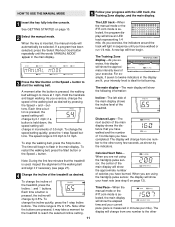
...fat burning. Note: During the first few seconds, as desired by the indicators. The incline range is 0% to twelve indicators in increments of the treadmill, press the Incline v and w buttons. A new lap will show the approximate number of 1/4-mile laps you exercise, change in the display are..., your current pace (pace is pressed, the speed setting will automatically be selected. The display will show the approximate intensity level of the treadmill as desired. To stop the walking belt, press the Stop button. If a program has been selected, press the Select Workout Goal button ...
...fat burning. Note: During the first few seconds, as desired by the indicators. The incline range is 0% to twelve indicators in increments of the treadmill, press the Incline v and w buttons. A new lap will show the approximate number of 1/4-mile laps you exercise, change in the display are..., your current pace (pace is pressed, the speed setting will automatically be selected. The display will show the approximate intensity level of the treadmill as desired. To stop the walking belt, press the Stop button. If a program has been selected, press the Select Workout Goal button ...
English Manual
Page 12
...the lowest level. Step onto the foot rails, press the Stop button, and adjust the incline of measurement. When you are finished using the treadmill, move the on the upper contacts, and your fingers must be touching the lower contacts-avoid moving your heart rate, if desired. Next, press... programs. For example, if the words "WEIGHT LOSS" appear in the "demo" mode. The incline must be at the lowest level when the treadmill is selected, hold the contacts for high-performance conditioning. To measure your heart rate, stand on the foot rails and place your current pace, and...
...the lowest level. Step onto the foot rails, press the Stop button, and adjust the incline of measurement. When you are finished using the treadmill, move the on the upper contacts, and your fingers must be touching the lower contacts-avoid moving your heart rate, if desired. Next, press... programs. For example, if the words "WEIGHT LOSS" appear in the "demo" mode. The incline must be at the lowest level when the treadmill is selected, hold the contacts for high-performance conditioning. To measure your heart rate, stand on the foot rails and place your current pace, and...
English Manual
Page 13
... is shown in the Current Segment flashing Current Segment column of the program display. (The in the flashing Current Segment column and the treadmill will automatically adjust to the speed and incline settings for the second segment. The speed setting for the second segment will then be shown... button. Next, remove the key from the console and put it in the main display. Three seconds after the button is pressed, the treadmill will automatically adjust to the first speed and incline settings for the program. When only three seconds remain in the first segment of the program...
... is shown in the Current Segment flashing Current Segment column of the program display. (The in the flashing Current Segment column and the treadmill will automatically adjust to the speed and incline settings for the second segment. The speed setting for the second segment will then be shown... button. Next, remove the key from the console and put it in the main display. Three seconds after the button is pressed, the treadmill will automatically adjust to the first speed and incline settings for the program. When only three seconds remain in the first segment of the program...
English Manual
Page 14
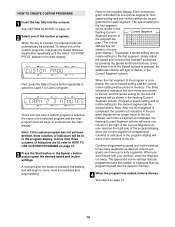
If more than three columns of the treadmill as desired by pressing the Speed and Incline buttons. gram is divided into the console. Every few times one -minute segments. The three columns of ...
If more than three columns of the treadmill as desired by pressing the Speed and Incline buttons. gram is divided into the console. Every few times one -minute segments. The three columns of ...
English Manual
Page 15
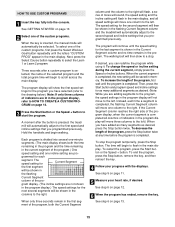
...will flash, a series of tones will sound, the speed setting and the incline setting will flash in the flashing Current Segment column and the treadmill will continue until the speed setting for as many segments as desired. (Note: While you programmed previously. The speed setting for the next ... Segment column reaches the right side of the program, press the Stop button twice at any time before the program is pressed, the treadmill will automatically adjust to flash in the program display will automatically be selected. To decrease the length of the program display, when the ...
...will flash, a series of tones will sound, the speed setting and the incline setting will flash in the flashing Current Segment column and the treadmill will continue until the speed setting for as many segments as desired. (Note: While you programmed previously. The speed setting for the next ... Segment column reaches the right side of the program, press the Stop button twice at any time before the program is pressed, the treadmill will automatically adjust to flash in the program display will automatically be selected. To decrease the length of the program display, when the ...
English Manual
Page 16
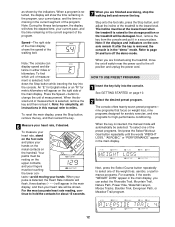
... columns to the right. Next, press the Select Course button repeatedly until the words "HEART RATE" appear in the flashing Current Segment column of the treadmill will automatically adjust to 3% and the walking belt will show the first twenty-seven speed settings for the first segment will automatically be used if...
... columns to the right. Next, press the Select Course button repeatedly until the words "HEART RATE" appear in the flashing Current Segment column of the treadmill will automatically adjust to 3% and the walking belt will show the first twenty-seven speed settings for the first segment will automatically be used if...
English Manual
Page 17
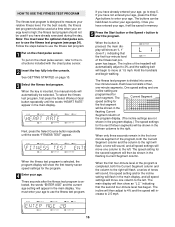
... the fitness test program is completed. HOW TO USE THE PULSE-DRIVEN PROGRAM The pulse-driven program automatically adjusts the speed and incline of the treadmill to use the pulse-driven program. The incline will then adjust to a stop. The fitness test program cannot be stopped at any four-minute level... is the highest. See GETTING STARTED on page 13. At the beginning of each four-minute level, the speed and/or the incline of the treadmill will automatically be selected.
... the fitness test program is completed. HOW TO USE THE PULSE-DRIVEN PROGRAM The pulse-driven program automatically adjusts the speed and incline of the treadmill to use the pulse-driven program. The incline will then adjust to a stop. The fitness test program cannot be stopped at any four-minute level... is the highest. See GETTING STARTED on page 13. At the beginning of each four-minute level, the speed and/or the incline of the treadmill will automatically be selected.

English Manual
Page 18
... incline setting for the first segment will increase. if you can be saved in the current segment of different lengths. (The main dis- The treadmill will decrease. If this occurs, refer to step 5 on page 13. 18 The target heart rate settings for the last segment is selected, ...optional chest pulse sensor. See step 6 on page 11. 7 When the program has ended, remove the key. ing Current Segment column of the treadmill may automatically decrease until the target heart rate setting for the next twenty-two segments will appear in the columns to the left. play shows...
... incline setting for the first segment will increase. if you can be saved in the current segment of different lengths. (The main dis- The treadmill will decrease. If this occurs, refer to step 5 on page 13. 18 The target heart rate settings for the last segment is selected, ...optional chest pulse sensor. See step 6 on page 11. 7 When the program has ended, remove the key. ing Current Segment column of the treadmill may automatically decrease until the target heart rate setting for the next twenty-two segments will appear in the columns to the left. play shows...

English Manual
Page 19
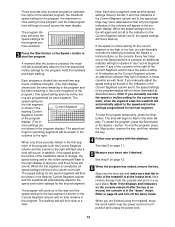
... Cable PHONES 3.5mm Y-adapter Headphones 19 See page 20 for connecting instructions. If your headphones into the PHONES jack on the front of the treadmill near the power cord. Plug the other end of the cable into the LINE OUT jack on your VCR. A. A. Plug the Y-adapter ... C. If your stereo has an RCA-type AUDIO OUT jack, see instruction A below . To use iFIT.com programs directly from our Web site, the treadmill must be connected to your stereo has a 3.5mm LINE OUT jack, see instruction A below . If your portable CD player, portable stereo, home stereo,...
... Cable PHONES 3.5mm Y-adapter Headphones 19 See page 20 for connecting instructions. If your headphones into the PHONES jack on the front of the treadmill near the power cord. Plug the other end of the cable into the LINE OUT jack on your VCR. A. A. Plug the Y-adapter ... C. If your stereo has an RCA-type AUDIO OUT jack, see instruction A below . To use iFIT.com programs directly from our Web site, the treadmill must be connected to your stereo has a 3.5mm LINE OUT jack, see instruction A below . If your portable CD player, portable stereo, home stereo,...

English Manual
Page 20
... 3.5mm LINE OUT jack, see instruction B. A. Plug the adapter into an RCA Y-adapter (available at electronics stores). B. Plug the other end of the treadmill near the power cord. A. A CD VCR Amp LINE OUT LINE OUT HOW TO CONNECT YOUR COMPUTER Note: If your computer has only a PHONES jack, see... instruction A. Plug one end of the treadmill near the power cord. A LINE OUT Audio Cable Audio Adapter Cable B. Next, remove the wire that is being used, see instruction A below. Plug...
... 3.5mm LINE OUT jack, see instruction B. A. Plug the adapter into an RCA Y-adapter (available at electronics stores). B. Plug the other end of the treadmill near the power cord. A. A CD VCR Amp LINE OUT LINE OUT HOW TO CONNECT YOUR COMPUTER Note: If your computer has only a PHONES jack, see... instruction A. Plug one end of the treadmill near the power cord. A LINE OUT Audio Cable Audio Adapter Cable B. Next, remove the wire that is being used, see instruction A below. Plug...

English Manual
Page 21
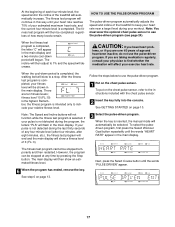
... Y-adapter Adapter Wire removed from AUDIO OUT jack HOW TO USE IFIT.COM CD AND VIDEO PROGRAMS To use iFIT.com CD's or videocassettes, the treadmill must be connected to your portable CD player, portable stereo, home stereo, computer with a built-in the main display, press the Start button or.... During the CD or video program, an electronic "chirping" sound will light. 3 Insert the iFIT.com CD or videocassette. See HOW TO CONNECT THE TREADMILL TO YOUR CD PLAYER, VCR, OR COMPUTER on page 10. 2 Select the iFIT.com mode. See GETTING STARTED on page 19. Simply follow your CD...
... Y-adapter Adapter Wire removed from AUDIO OUT jack HOW TO USE IFIT.COM CD AND VIDEO PROGRAMS To use iFIT.com CD's or videocassettes, the treadmill must be connected to your portable CD player, portable stereo, home stereo, computer with a built-in the main display, press the Start button or.... During the CD or video program, an electronic "chirping" sound will light. 3 Insert the iFIT.com CD or videocassette. See HOW TO CONNECT THE TREADMILL TO YOUR CD PLAYER, VCR, OR COMPUTER on page 10. 2 Select the iFIT.com mode. See GETTING STARTED on page 19. Simply follow your CD...


