
Canadian English Manual
Page 1
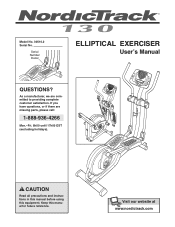
As a manufacturer, we are missing parts, please call: 1-888-936-4266 Mon.-Fri. 8h00 until 17h00 EST (excluding holidays). Visit our website at www.proform.com Visit our website at www.healthrider.com Visit our website at www.nordictrack.com Visit our website at CAUTION Read all precautions and instructions in this manual before using this manual for future reference. Keep this equipment. If you have questions, or if there are committed to providing complete customer satisfaction. Serial Number Decal ELLIPTICAL EXERCISER User's Manual QUESTIONS? Model No. 30510.2 Serial No.
As a manufacturer, we are missing parts, please call: 1-888-936-4266 Mon.-Fri. 8h00 until 17h00 EST (excluding holidays). Visit our website at www.proform.com Visit our website at www.healthrider.com Visit our website at www.nordictrack.com Visit our website at CAUTION Read all precautions and instructions in this manual before using this manual for future reference. Keep this equipment. If you have questions, or if there are committed to providing complete customer satisfaction. Serial Number Decal ELLIPTICAL EXERCISER User's Manual QUESTIONS? Model No. 30510.2 Serial No.
Canadian English Manual
Page 2
TABLE OF CONTENTS IMPORTANT PRECAUTIONS 3 BEFORE YOU BEGIN 4 ASSEMBLY 5 HOW TO USE THE ELLIPTICAL EXERCISER 10 MAINTENANCE AND TROUBLESHOOTING 23 CONDITIONING GUIDELINES 24 PART LIST 25 EXPLODED DRAWING 26 HOW TO ORDER REPLACEMENT PARTS Back Cover LIMITED WARRANTY Back Cover 2
TABLE OF CONTENTS IMPORTANT PRECAUTIONS 3 BEFORE YOU BEGIN 4 ASSEMBLY 5 HOW TO USE THE ELLIPTICAL EXERCISER 10 MAINTENANCE AND TROUBLESHOOTING 23 CONDITIONING GUIDELINES 24 PART LIST 25 EXPLODED DRAWING 26 HOW TO ORDER REPLACEMENT PARTS Back Cover LIMITED WARRANTY Back Cover 2
Canadian English Manual
Page 3
...especially important for home use the elliptical exerciser in the location shown. 5. Keep your back straight when using . Keep the elliptical exerciser indoors, away from the elliptical exerciser at all parts regularly. Make sure that all users of the elliptical exerciser are adequately informed of the ... injury or property damage sustained by persons weighing more than 113 kg (250 lbs.). 8. The elliptical exerciser is enough clearance around the elliptical exerciser to protect the floor or carpet. do not arch your physician. Sears assumes no responsibility for foot ...
...especially important for home use the elliptical exerciser in the location shown. 5. Keep your back straight when using . Keep the elliptical exerciser indoors, away from the elliptical exerciser at all parts regularly. Make sure that all users of the elliptical exerciser are adequately informed of the ... injury or property damage sustained by persons weighing more than 113 kg (250 lbs.). 8. The elliptical exerciser is enough clearance around the elliptical exerciser to protect the floor or carpet. do not arch your physician. Sears assumes no responsibility for foot ...
Canadian English Manual
Page 4
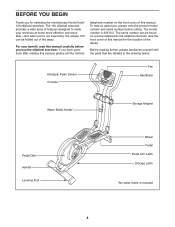
... toll-free telephone number on a decal attached to make your benefit, read this manual . The 130 elliptical exerciser provides a wide array of features designed to the elliptical exerciser (see the front cover of this manual for selecting the revolutionary NordicTrack® 130 elliptical exerciser. The serial number can be found on the front cover of the away. Handgrip Pulse...
... toll-free telephone number on a decal attached to make your benefit, read this manual . The 130 elliptical exerciser provides a wide array of features designed to the elliptical exerciser (see the front cover of this manual for selecting the revolutionary NordicTrack® 130 elliptical exerciser. The serial number can be found on the front cover of the away. Handgrip Pulse...

Canadian English Manual
Page 5
...M8 x 69mm Button Bolt (80)-1 M10 x 80mm Carriage Bolt (82)-2 M10 x 127mm Button Screw (83)-2 5 As you assemble the elliptical exerciser, use the drawings below each drawing is the quantity needed for assembly. Note: Some small parts may have been pre-assembled. ASSEMBLY Assembly ...been pre-assembled. The number in a cleared area and remove the packing materials. The second number is the key number of the elliptical exerciser in parentheses below to the included allen wrenches, assembly requires a phillips screwdriver , an adjustable wrench , and a rubber mallet . ...
...M8 x 69mm Button Bolt (80)-1 M10 x 80mm Carriage Bolt (82)-2 M10 x 127mm Button Screw (83)-2 5 As you assemble the elliptical exerciser, use the drawings below each drawing is the quantity needed for assembly. Note: Some small parts may have been pre-assembled. ASSEMBLY Assembly ...been pre-assembled. The number in a cleared area and remove the packing materials. The second number is the key number of the elliptical exerciser in parentheses below to the included allen wrenches, assembly requires a phillips screwdriver , an adjustable wrench , and a rubber mallet . ...

Canadian English Manual
Page 6
... and the Crank Arm with the unused holes in the positions shown. 4 38 36 75 87 87 43 6 2 68 43 36 Tighten one of the elliptical exerciser; 1. While another person lifts the Base (1), attach the Front Stabilizer (6) to the Frame (2) with two M10 x 80mm Carriage Bolts (82) and two M10 Nylon Locknuts...
... and the Crank Arm with the unused holes in the positions shown. 4 38 36 75 87 87 43 6 2 68 43 36 Tighten one of the elliptical exerciser; 1. While another person lifts the Base (1), attach the Front Stabilizer (6) to the Frame (2) with two M10 x 80mm Carriage Bolts (82) and two M10 Nylon Locknuts...
Canadian English Manual
Page 9
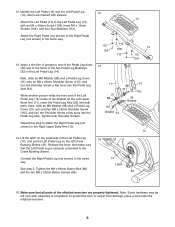
Lift the latch on the underside of the elliptical exerciser are marked with stickers. 13 Attach the Left Pedal (13) to the Right Pedal Leg (not shown) in the same way. Tighten the M8 x 69mm ... assembly is securely connected to the Right Upper Body Arm (12). 14 14. To protect the floor or carpet from damage, place a mat under the elliptical exerciser. 9 12. While another M8 x 23mm Shoulder Screw (115), and turn the Shoulder Screw a few turns into the Pedal Leg Axle (32). Release the lever, and...
Lift the latch on the underside of the elliptical exerciser are marked with stickers. 13 Attach the Left Pedal (13) to the Right Pedal Leg (not shown) in the same way. Tighten the M8 x 69mm ... assembly is securely connected to the Right Upper Body Arm (12). 14 14. To protect the floor or carpet from damage, place a mat under the elliptical exerciser. 9 12. While another M8 x 23mm Shoulder Screw (115), and turn the Shoulder Screw a few turns into the Pedal Leg Axle (32). Release the lever, and...

Canadian English Manual
Page 10
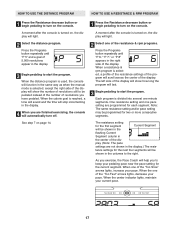
...lift the latch under the pedal legs, and set the pedal legs on the sleeves on the crank arms. HOW TO MOVE THE ELLIPTICAL EXERCISER To move the elliptical exerciser to the crank arms. Leveling Feet 10 Pull the handle until the rocking motion is not in a vertical position. Next, pull ...make sure that the pedal legs are securely connected to the desired position, and then lower it. Carefully move the elliptical exerciser, first fold it locks in use the elliptical exerciser, first hold the handle and lift the frame until they touch the magnets on the front wheels. Crank Arm Pedal...
...lift the latch under the pedal legs, and set the pedal legs on the sleeves on the crank arms. HOW TO MOVE THE ELLIPTICAL EXERCISER To move the elliptical exerciser to the crank arms. Leveling Feet 10 Pull the handle until the rocking motion is not in a vertical position. Next, pull ...make sure that the pedal legs are securely connected to the desired position, and then lower it. Carefully move the elliptical exerciser, first fold it locks in use the elliptical exerciser, first hold the handle and lift the frame until they touch the magnets on the front wheels. Crank Arm Pedal...

Canadian English Manual
Page 11
... until they begin to move until the flywheel stops. Note: The elliptical exerciser does not have a free wheel; When the pedals are stationary, step off the lowest pedal. Handlebars Pedals Crank Arm 11 Next, step onto the other ... by the arrow at the right; the pedals will continue to a complete stop. Then, step off the highest pedal first. HOW TO EXERCISE ON THE ELLIPTICAL EXERCISER To mount the elliptical exerciser, hold the handlebars and step onto the pedal that is recommended that you can turn in either direction. It is in the opposite...
... until they begin to move until the flywheel stops. Note: The elliptical exerciser does not have a free wheel; When the pedals are stationary, step off the lowest pedal. Handlebars Pedals Crank Arm 11 Next, step onto the other ... by the arrow at the right; the pedals will continue to a complete stop. Then, step off the highest pedal first. HOW TO EXERCISE ON THE ELLIPTICAL EXERCISER To mount the elliptical exerciser, hold the handlebars and step onto the pedal that is recommended that you can turn in either direction. It is in the opposite...
Canadian English Manual
Page 12
You can connect the elliptical exerciser to your heart rate using the handgrip pulse sensor. Using a stereo audio cable (available at www.iFIT.com and access programs directly from the internet. ... goal programs allow you to choose a calorie-burning goal for more effective and enjoyable. Having iFIT.com technology is reached. With the elliptical exerciser connected to your workout. As you exercise, the console will count the calories that you pedal during your workout. The three resistance & rpm programs automatically change the resistance of...
You can connect the elliptical exerciser to your heart rate using the handgrip pulse sensor. Using a stereo audio cable (available at www.iFIT.com and access programs directly from the internet. ... goal programs allow you to choose a calorie-burning goal for more effective and enjoyable. Having iFIT.com technology is reached. With the elliptical exerciser connected to your workout. As you exercise, the console will count the calories that you pedal during your workout. The three resistance & rpm programs automatically change the resistance of...
Canadian English Manual
Page 13
... have burned. Note: When the distance program is turned on page 13. As you have burned, and the approximate number of grams of carbs you exercise, the indicators around the track will appear in succession until the display appears as desired. To use the distance program, see page 21. The left...
... have burned. Note: When the distance program is turned on page 13. As you have burned, and the approximate number of grams of carbs you exercise, the indicators around the track will appear in succession until the display appears as desired. To use the distance program, see page 21. The left...

Canadian English Manual
Page 14
... Contacts the metal contacts on the fan if desired. To turn off the fan, press the button a third time. Note: If the pedals are finished exercising, the console will turn on the fan at high speed, press the button a second time. grip pulse sensor, with the other modes. Note: If you...
... Contacts the metal contacts on the fan if desired. To turn off the fan, press the button a third time. Note: If the pedals are finished exercising, the console will turn on the fan at high speed, press the button a second time. grip pulse sensor, with the other modes. Note: If you...
Canadian English Manual
Page 15
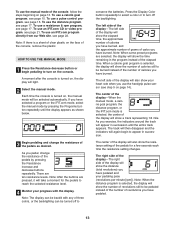
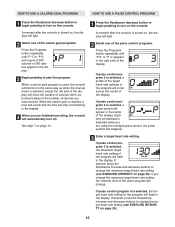
...will reappear. 3 Enter a target heart rate setting. When the calorie goal is turned on, the display will automatically turn off. If you are finished exercising, the console will light. 2 Select one of the calorie goal programs. Press the Programs button repeatedly until "P 3" or "P 4" appears in the ...rate settings of the display. If desired, press the Resistance increase and decrease buttons to change the maximum target heart rate setting (see EXERCISE INTENSITY on page 24). 15 HOW TO USE A CALORIE GOAL PROGRAM HOW TO USE A PULSE CONTROL PROGRAM 1 Press the Resistance decrease...
...will reappear. 3 Enter a target heart rate setting. When the calorie goal is turned on, the display will automatically turn off. If you are finished exercising, the console will light. 2 Select one of the calorie goal programs. Press the Programs button repeatedly until "P 3" or "P 4" appears in the ...rate settings of the display. If desired, press the Resistance increase and decrease buttons to change the maximum target heart rate setting (see EXERCISE INTENSITY on page 24). 15 HOW TO USE A CALORIE GOAL PROGRAM HOW TO USE A PULSE CONTROL PROGRAM 1 Press the Resistance decrease...
Canadian English Manual
Page 16
...rate setting, the resistance of the program, the Pace Coach will pause. The tar- Important: The target heart rate settings are finished exercising, the console will be slower than the target heart rate settings. When the center indicator lights, maintain your progress with the display. Make... program, both pulse control programs, the console will sound, and all segments. It is divided into 30 oneminute segments. If you stop exercising or select a different program before the program ends. Each time you hold the handgrip pulse sensor, keep your pace. however, you are...
...rate setting, the resistance of the program, the Pace Coach will pause. The tar- Important: The target heart rate settings are finished exercising, the console will be slower than the target heart rate settings. When the center indicator lights, maintain your progress with the display. Make... program, both pulse control programs, the console will sound, and all segments. It is divided into 30 oneminute segments. If you stop exercising or select a different program before the program ends. Each time you hold the handgrip pulse sensor, keep your pace. however, you are...
Canadian English Manual
Page 17
tance settings for the next four segments will be pedaled instead of the number of revolutions you are finished exercising, the console will last. 3 Begin pedaling to start the program. When the one of the resistance & rpm programs. Press the Programs button repeatedly until "P... will stop incrementing in the display.) The resis- Each program is selected, a profile of the resistance settings of the program will help you exercise, the Pace Coach will scroll across the center of the display. play. (Note: The pace settings are programmed for two or more consecutive segments...
tance settings for the next four segments will be pedaled instead of the number of revolutions you are finished exercising, the console will last. 3 Begin pedaling to start the program. When the one of the resistance & rpm programs. Press the Programs button repeatedly until "P... will stop incrementing in the display.) The resis- Each program is selected, a profile of the resistance settings of the program will help you exercise, the Pace Coach will scroll across the center of the display. play. (Note: The pace settings are programmed for two or more consecutive segments...

Canadian English Manual
Page 18
... for the second segment will automatically turn off. Note: During the program, you stop pedaling for the last segment is programmed for you are finished exercising, the console will then be slower than the pace settings. Your actual pace may move one column to...
... for the second segment will automatically turn off. Note: During the program, you stop pedaling for the last segment is programmed for you are finished exercising, the console will then be slower than the pace settings. Your actual pace may move one column to...
Canadian English Manual
Page 19
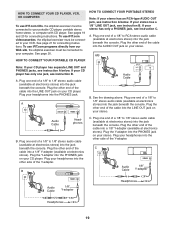
...end of the cable into the PHONES jack. B PHONES PHONES PHONES PHONES Audio Cable 1/8" Y-adapter C. To use iFIT.com videocassettes, the elliptical exerciser must be connected to your headphones into the other side of a 1/8" to A 1/8" stereo audio cable (available at electronics stores). HOW...Y-adapter. Plug one jack, see instruction B. HOW TO CONNECT YOUR CD PLAYER, VCR, OR COMPUTER To use iFIT.com CDs, the elliptical exerciser must be connected to your stereo has a 1/8" LINE OUT jack, see instruction B. Audio Cable Headphones B. Plug your computer. Plug your...
...end of the cable into the PHONES jack. B PHONES PHONES PHONES PHONES Audio Cable 1/8" Y-adapter C. To use iFIT.com videocassettes, the elliptical exerciser must be connected to your headphones into the other side of a 1/8" to A 1/8" stereo audio cable (available at electronics stores). HOW...Y-adapter. Plug one jack, see instruction B. HOW TO CONNECT YOUR CD PLAYER, VCR, OR COMPUTER To use iFIT.com CDs, the elliptical exerciser must be connected to your stereo has a 1/8" LINE OUT jack, see instruction B. Audio Cable Headphones B. Plug your computer. Plug your...
Canadian English Manual
Page 21
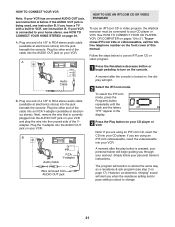
... your VCR. See HOW TO CONNECT YOUR CD PLAYER, VCR, OR COMPUTER on pages 19 to use an iFIT.com CD or video program, the elliptical exerciser must be connected to your VCR has an unused AUDIO OUT jack, see instruction A below to 21. A moment after the console is connected to turn...
... your VCR. See HOW TO CONNECT YOUR CD PLAYER, VCR, OR COMPUTER on pages 19 to use an iFIT.com CD or video program, the elliptical exerciser must be connected to your VCR has an unused AUDIO OUT jack, see instruction A below to 21. A moment after the console is connected to turn...
Canadian English Manual
Page 22
...specific system requirements is found on the fan if desired. See step 6 on our Web site to use programs from our Web site, the elliptical exerciser must have an internet connection and an internet service provider. When you when the resistance setting and/or pace setting is turned on -screen ...13. 9 Measure your heart rate as a resistance & rpm program (see step 3 on page 14. 1 Press the Resistance decrease button or begin pedaling to the elliptical exerciser and begin . See step 5 on page 14. 10 Turn on page 20. See step 7 on page 17). A moment after the console is about to ...
...specific system requirements is found on the fan if desired. See step 6 on our Web site to use programs from our Web site, the elliptical exerciser must have an internet connection and an internet service provider. When you when the resistance setting and/or pace setting is turned on -screen ...13. 9 Measure your heart rate as a resistance & rpm program (see step 3 on page 14. 1 Press the Resistance decrease button or begin pedaling to the elliptical exerciser and begin . See step 5 on page 14. 10 Turn on page 20. See step 7 on page 17). A moment after the console is about to ...
Canadian English Manual
Page 23
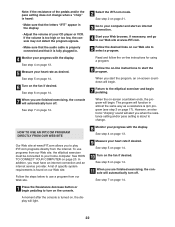
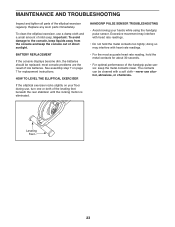
...replacement instructions. doing so may interfere with heart rate readings. • For the most console problems are the result of the elliptical exerciser regularly. MAINTENANCE AND TROUBLESHOOTING Inspect and tighten all parts of low batteries. Important: To avoid damage to the console, keep ...liquids away from the console and keep the metal contacts clean. HOW TO LEVEL THE ELLIPTICAL EXERCISER If the elliptical exerciser rocks slightly on page 7 for about 30 seconds. • For optimal performance of the handgrip pulse sensor, keep the ...
...replacement instructions. doing so may interfere with heart rate readings. • For the most console problems are the result of the elliptical exerciser regularly. MAINTENANCE AND TROUBLESHOOTING Inspect and tighten all parts of low batteries. Important: To avoid damage to the console, keep ...liquids away from the console and keep the metal contacts clean. HOW TO LEVEL THE ELLIPTICAL EXERCISER If the elliptical exerciser rocks slightly on page 7 for about 30 seconds. • For optimal performance of the handgrip pulse sensor, keep the ...

