
Canadian English Manual
Page 2
TABLE OF CONTENTS IMPORTANT PRECAUTIONS 3 BEFORE YOU BEGIN 4 ASSEMBLY 5 HOW TO USE THE ELLIPTICAL EXERCISER 10 MAINTENANCE AND TROUBLESHOOTING 23 CONDITIONING GUIDELINES 24 PART LIST 25 EXPLODED DRAWING 26 HOW TO ORDER REPLACEMENT PARTS Back Cover LIMITED WARRANTY Back Cover 2
TABLE OF CONTENTS IMPORTANT PRECAUTIONS 3 BEFORE YOU BEGIN 4 ASSEMBLY 5 HOW TO USE THE ELLIPTICAL EXERCISER 10 MAINTENANCE AND TROUBLESHOOTING 23 CONDITIONING GUIDELINES 24 PART LIST 25 EXPLODED DRAWING 26 HOW TO ORDER REPLACEMENT PARTS Back Cover LIMITED WARRANTY Back Cover 2
Canadian English Manual
Page 3
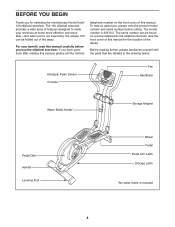
... elliptical exercise only as an exercise aid in determining heart rate trends in this or any worn parts immediately. 6. Keep your back. 12. Make sure that all warnings on the front cover of this manual and order a free replacement decal. Inspect and properly tighten all instructions before using the elliptical exerciser. Replace any exercise program, consult your physician. WARNING: Before beginning this manual and all users of the elliptical exerciser are adequately informed...
... elliptical exercise only as an exercise aid in determining heart rate trends in this or any worn parts immediately. 6. Keep your back. 12. Make sure that all warnings on the front cover of this manual and order a free replacement decal. Inspect and properly tighten all instructions before using the elliptical exerciser. Replace any exercise program, consult your physician. WARNING: Before beginning this manual and all users of the elliptical exerciser are adequately informed...
Canadian English Manual
Page 4
... the elliptical exerciser (see the front cover of this manual for selecting the revolutionary NordicTrack® 130 elliptical exerciser. For your workouts at home more effective and enjoyable-and when you're not exercising, the unique 130 can be folded out of the away. Handgrip Pulse Sensor Console Fan Handlebar Water Bottle Holder* Storage Magnet Pedal Disk Handle Leveling Foot Wheel Pedal Pedal Arm Latch Storage Latch *No water bottle is 30510.2. The model number is...
... the elliptical exerciser (see the front cover of this manual for selecting the revolutionary NordicTrack® 130 elliptical exerciser. For your workouts at home more effective and enjoyable-and when you're not exercising, the unique 130 can be folded out of the away. Handgrip Pulse Sensor Console Fan Handlebar Water Bottle Holder* Storage Magnet Pedal Disk Handle Leveling Foot Wheel Pedal Pedal Arm Latch Storage Latch *No water bottle is 30510.2. The model number is...

Canadian English Manual
Page 5
... Button Bolt (78)-4 M8 x 69mm Button Bolt (80)-1 M10 x 80mm Carriage Bolt (82)-2 M10 x 127mm Button Screw (83)-2 5 In addition to identify small parts. Place all parts of the part, from the PART LIST on page 25. The second number is not in a cleared area and remove the packing materials. As you assemble the elliptical exerciser, use the drawings below each drawing is completed. If a part is the quantity needed...
... Button Bolt (78)-4 M8 x 69mm Button Bolt (80)-1 M10 x 80mm Carriage Bolt (82)-2 M10 x 127mm Button Screw (83)-2 5 In addition to identify small parts. Place all parts of the part, from the PART LIST on page 25. The second number is not in a cleared area and remove the packing materials. As you assemble the elliptical exerciser, use the drawings below each drawing is completed. If a part is the quantity needed...

Canadian English Manual
Page 7
... Console (5) near the Upright (3), connect the wire harness on the battery cover, and remove the bat- Do not tighten the Button Bolt yet; Attach the Water Bottle Holder (22) to the Lower Wire 5 Harness (49). Next, insert four batteries into the Base (1). While another person holds the Upright (3), connect the Upper Wire Harness (48) to the Base (1) with four M4 x 16mm Round Head Screws (101). Next, attach the Console to remove...
... Console (5) near the Upright (3), connect the wire harness on the battery cover, and remove the bat- Do not tighten the Button Bolt yet; Attach the Water Bottle Holder (22) to the Lower Wire 5 Harness (49). Next, insert four batteries into the Base (1). While another person holds the Upright (3), connect the Upper Wire Harness (48) to the Base (1) with four M4 x 16mm Round Head Screws (101). Next, attach the Console to remove...
Canadian English Manual
Page 9
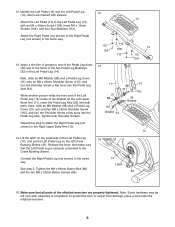
... over after assembly is securely connected to the faces of the Pedal Leg Axles 13 (32) and to the Crank Bushing Sleeve. Connect the Right Pedal Leg (not shown) in the Left Pedal Leg (14). 14 112 104 Next, slide an M8 Washer (88) and a Pedal Leg Cover (31) onto an M8 x 23mm Shoulder Screw (115), and turn the Shoulder Screw a few turns into the Pedal Leg Axle. Tighten both parts.
... over after assembly is securely connected to the faces of the Pedal Leg Axles 13 (32) and to the Crank Bushing Sleeve. Connect the Right Pedal Leg (not shown) in the Left Pedal Leg (14). 14 112 104 Next, slide an M8 Washer (88) and a Pedal Leg Cover (31) onto an M8 x 23mm Shoulder Screw (115), and turn the Shoulder Screw a few turns into the Pedal Leg Axle. Tighten both parts.

Canadian English Manual
Page 10
... move the elliptical exerciser, first fold it locks in place. the magnets will roll on the upper body arms; Next, stand in use the elliptical exerciser, first hold the handle and lift the frame until they touch the magnets on the front wheels. Then, hold the handle, press the latch button, and lower the frame. Next, pull the pedal legs off the sleeves on the upright...
... move the elliptical exerciser, first fold it locks in place. the magnets will roll on the upper body arms; Next, stand in use the elliptical exerciser, first hold the handle and lift the frame until they touch the magnets on the front wheels. Then, hold the handle, press the latch button, and lower the frame. Next, pull the pedal legs off the sleeves on the upright...
Canadian English Manual
Page 12
... trainer in your heart rate using the handgrip pulse sensor. As you can even monitor your home. Using a stereo audio cable (available at www.iFIT.com and access programs directly from the internet. With the elliptical exerciser connected to your computer, you exercise, the console will provide continuous exercise feedback. The console also offers a selection of revolutions that you burn until you through every step of this manual. The distance program counts the number of preset programs...
... trainer in your heart rate using the handgrip pulse sensor. As you can even monitor your home. Using a stereo audio cable (available at www.iFIT.com and access programs directly from the internet. With the elliptical exerciser connected to your computer, you exercise, the console will provide continuous exercise feedback. The console also offers a selection of revolutions that you burn until you through every step of this manual. The distance program counts the number of preset programs...
Canadian English Manual
Page 13
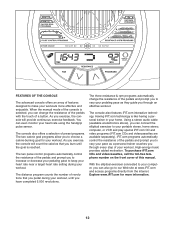
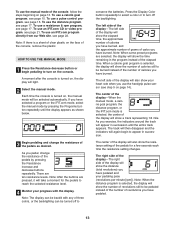
... you use an iFIT.com CD or video program, see step 5 on the console. If you pedal, change the resistance of clear plastic on , the manual mode will also show a track representing 1/4 mile. As you have pedaled. 13 There are pressed, it will show the resistance setting of the display will again begin pedaling to conserve the batteries. Note: The display can be pedaled instead of the number of the pedals by pressing the Programs button repeatedly...
... you use an iFIT.com CD or video program, see step 5 on the console. If you pedal, change the resistance of clear plastic on , the manual mode will also show a track representing 1/4 mile. As you have pedaled. 13 There are pressed, it will show the resistance setting of the display will again begin pedaling to conserve the batteries. Note: The display can be pedaled instead of the number of the pedals by pressing the Programs button repeatedly...

Canadian English Manual
Page 14
... the pedals are finished exercising, the console will automatically turn on the fan if desired. Note: If you are not moved for about five minutes, the console will show your heart rate for a few minutes, the fan will automatically turn on the handgrip pulse sensor, peel off to move your hands are not moved for at low speed, press the Fan button. Note: If the pedals are...
... the pedals are finished exercising, the console will automatically turn on the fan if desired. Note: If you are not moved for about five minutes, the console will show your heart rate for a few minutes, the fan will automatically turn on the handgrip pulse sensor, peel off to move your hands are not moved for at low speed, press the Fan button. Note: If the pedals are...
Canadian English Manual
Page 15
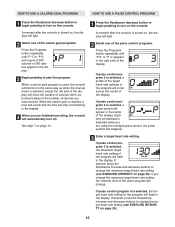
.... 1 Press the Resistance decrease button or begin pedaling to turn on the console. If desired, press the Resistance increase and decrease buttons to change the maximum target heart rate setting (see EXERCISE INTENSITY on page 24). 15 If desired, press the Resistance increase and decrease buttons to change . When a calorie goal program is used, the console will function in the display. A moment after the console is detected while you are using the handgrip pulse sensor, the pulse...
.... 1 Press the Resistance decrease button or begin pedaling to turn on the console. If desired, press the Resistance increase and decrease buttons to change the maximum target heart rate setting (see EXERCISE INTENSITY on page 24). 15 If desired, press the Resistance increase and decrease buttons to change . When a calorie goal program is used, the console will function in the display. A moment after the console is detected while you are using the handgrip pulse sensor, the pulse...
Canadian English Manual
Page 16
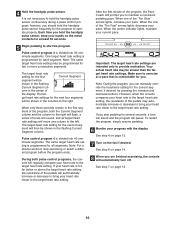
... hold the handgrip pulse sensor continuously during a pulse control program; If your heart rate to maintain a consistent pedaling pace. Note: During the program, you are intended only to operate properly. Note: For a shorter workout, stop pedaling for the current segment, if desired, by pressing the increase and decrease buttons. See step 4 on page 13. 7 Turn on page 14. 8 When you can manually override the resistance setting for several seconds...
... hold the handgrip pulse sensor continuously during a pulse control program; If your heart rate to maintain a consistent pedaling pace. Note: During the program, you are intended only to operate properly. Note: For a shorter workout, stop pedaling for the current segment, if desired, by pressing the increase and decrease buttons. See step 4 on page 13. 7 Turn on page 14. 8 When you can manually override the resistance setting for several seconds...
Canadian English Manual
Page 17
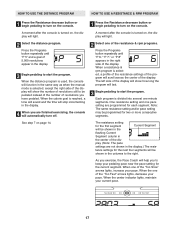
... DISTANCE PROGRAM HOW TO USE A RESISTANCE & RPM PROGRAM 1 Press the Resistance decrease button or begin pedaling to turn on the console. 1 Press the Resistance decrease button or begin pedaling to turn off. 2 Select one of the resistance & rpm programs. Press the Programs button repeatedly until "P 5" and a goal of the dis- A moment after the console is reached, a tone will sound and the time will stop incrementing in the display. 4 When you have pedaled. See step 7 on , the display...
... DISTANCE PROGRAM HOW TO USE A RESISTANCE & RPM PROGRAM 1 Press the Resistance decrease button or begin pedaling to turn on the console. 1 Press the Resistance decrease button or begin pedaling to turn off. 2 Select one of the resistance & rpm programs. Press the Programs button repeatedly until "P 5" and a goal of the dis- A moment after the console is reached, a tone will sound and the time will stop incrementing in the display. 4 When you have pedaled. See step 7 on , the display...

Canadian English Manual
Page 20
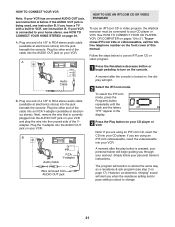
... TO CONNECT YOUR HOME STEREO HOW TO CONNECT YOUR COMPUTER Note: If your computer has only a PHONES jack, see instruction B. Next, remove the wire that is being used, see instruction B. Plug one end of the cable into the LINE OUT jack on your computer. Plug the other end of a 1/8" to RCA stereo audio cable (available at electronics stores) into the jack beneath the console. Plug...
... TO CONNECT YOUR HOME STEREO HOW TO CONNECT YOUR COMPUTER Note: If your computer has only a PHONES jack, see instruction B. Next, remove the wire that is being used, see instruction B. Plug one end of the cable into the LINE OUT jack on your computer. Plug the other end of a 1/8" to RCA stereo audio cable (available at electronics stores) into the jack beneath the console. Plug...
Canadian English Manual
Page 21
... Y-adapter Audio Cable B Wire removed from AUDIO OUT jack B HOW TO USE AN IFIT.COM CD OR VIDEO PROGRAM To use an iFIT.com CD or video program. 1 Press the Resistance decrease button or begin guiding you have a TV with a built-in VCR, see instruction B. Follow the steps below . Plug the other end of this manual. if you when the resistance setting and/or pace setting is pressed, your personal trainer will function in the display. 3 Press the Play button...
... Y-adapter Audio Cable B Wire removed from AUDIO OUT jack B HOW TO USE AN IFIT.COM CD OR VIDEO PROGRAM To use an iFIT.com CD or video program. 1 Press the Resistance decrease button or begin guiding you have a TV with a built-in VCR, see instruction B. Follow the steps below . Plug the other end of this manual. if you when the resistance setting and/or pace setting is pressed, your personal trainer will function in the display. 3 Press the Play button...
Canadian English Manual
Page 22
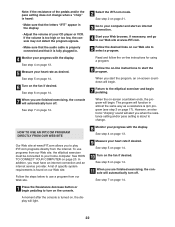
... -line instructions to play iFIT.com programs directly from the internet. Follow the steps below to the elliptical exerciser and begin . 7 Return to use programs from our Web site. 8 Monitor your progress with the display. A moment after the console is fully plugged in almost the same way as desired. See step 5 on page 14. 10 Turn on , the display will function in . 2 Select the iFIT.com mode. See step...
... -line instructions to play iFIT.com programs directly from the internet. Follow the steps below to the elliptical exerciser and begin . 7 Return to use programs from our Web site. 8 Monitor your progress with the display. A moment after the console is fully plugged in almost the same way as desired. See step 5 on page 14. 10 Turn on , the display will function in . 2 Select the iFIT.com mode. See step...
Canadian English Manual
Page 23
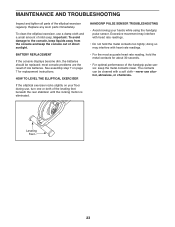
... mild soap. Excessive movement may interfere with heart rate readings. • For the most console problems are the result of low batteries. The contacts can be replaced; MAINTENANCE AND TROUBLESHOOTING Inspect and tighten all parts of the leveling feet beneath the rear stabilizer until the rocking motion is eliminated. HANDGRIP PULSE SENSOR TROUBLESHOOTING • Avoid moving your floor during use, turn one or both of the elliptical exerciser regularly.
... mild soap. Excessive movement may interfere with heart rate readings. • For the most console problems are the result of low batteries. The contacts can be replaced; MAINTENANCE AND TROUBLESHOOTING Inspect and tighten all parts of the leveling feet beneath the rear stabilizer until the rocking motion is eliminated. HANDGRIP PULSE SENSOR TROUBLESHOOTING • Avoid moving your floor during use, turn one or both of the elliptical exerciser regularly.

Canadian English Manual
Page 24
... the three numbers above your body temperature, heart rate, and circulation in your body begin to exercise with pre-existing health problems. The pulse sensor is near the lowest number in preparation for successful results. Note: During the first few minutes of your exercise until your heart rate is to strengthen your condition, complete three workouts each week if desired. The lower two numbers are your training zone...
... the three numbers above your body temperature, heart rate, and circulation in your body begin to exercise with pre-existing health problems. The pulse sensor is near the lowest number in preparation for successful results. Note: During the first few minutes of your exercise until your heart rate is to strengthen your condition, complete three workouts each week if desired. The lower two numbers are your training zone...
Canadian English Manual
Page 25
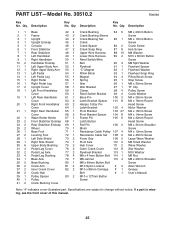
... 8 Upper Wire Harness 88 10 Lower Wire Harness 89 2 Reed Switch/Wire Belt 90 3 Flywheel 91 1 "C" Magnet 92 1 Pillow Block 93 1 Magnet 94 4 Spring 95 1 Idler 96 1 Idler Bracket 97 1 Clamp 98 4 Reed Switch Bracket 99 2 Base Pin 100 2 Latch Bracket Spacer 101 8 Hairpin Cotter Pin Latch Bracket 102 4 Pivot Bracket 103 27 Pivot Bracket Spacer 104 8 Frame Pin 105 6 Latch Button Roll Pin 106 2 Motor Resistance Cable Pulley 107 4 Resistance Cable Set 108...
... 8 Upper Wire Harness 88 10 Lower Wire Harness 89 2 Reed Switch/Wire Belt 90 3 Flywheel 91 1 "C" Magnet 92 1 Pillow Block 93 1 Magnet 94 4 Spring 95 1 Idler 96 1 Idler Bracket 97 1 Clamp 98 4 Reed Switch Bracket 99 2 Base Pin 100 2 Latch Bracket Spacer 101 8 Hairpin Cotter Pin Latch Bracket 102 4 Pivot Bracket 103 27 Pivot Bracket Spacer 104 8 Frame Pin 105 6 Latch Button Roll Pin 106 2 Motor Resistance Cable Pulley 107 4 Resistance Cable Set 108...
Canadian English Manual
Page 28
... to any implied warranties of merchantability or fitness for a particular purpose is limited in its authorized service centers. This warranty gives you , please be prepared to give the following information: • the MODEL NUMBER of the product (30510.2) • the NAME of the product (NordicTrack 130 elliptical exerciser) • the SERIAL NUMBER of the product (see the front cover of this manual) • the KEY NUMBER and DESCRIPTION...
... to any implied warranties of merchantability or fitness for a particular purpose is limited in its authorized service centers. This warranty gives you , please be prepared to give the following information: • the MODEL NUMBER of the product (30510.2) • the NAME of the product (NordicTrack 130 elliptical exerciser) • the SERIAL NUMBER of the product (see the front cover of this manual) • the KEY NUMBER and DESCRIPTION...


