
User Guide
Page 4
... 11 Transfer content from another device 11 Essential indicators 12 Volume and loudspeaker control 13 Multimedia key (Nokia N73 (original edition 14 Headset 14 Memory card tool 14 File manager 15 Download 16 Support 17 Nokia support and contact information 17 Software updates 17 Help 17 Tutorial 18 Camera 19 Take pictures ... Edit video clips 32 Slide show 33 Presentations 33 Image print 34 Print online 35 Share online 36 Media applications 39 Music access key (Nokia N73 Music Edition 39 Music player 39 Flash Player 48 Visual Radio 49 RealPlayer 51 Movie director 52
... 11 Transfer content from another device 11 Essential indicators 12 Volume and loudspeaker control 13 Multimedia key (Nokia N73 (original edition 14 Headset 14 Memory card tool 14 File manager 15 Download 16 Support 17 Nokia support and contact information 17 Software updates 17 Help 17 Tutorial 18 Camera 19 Take pictures ... Edit video clips 32 Slide show 33 Presentations 33 Image print 34 Print online 35 Share online 36 Media applications 39 Music access key (Nokia N73 Music Edition 39 Music player 39 Flash Player 48 Visual Radio 49 RealPlayer 51 Movie director 52
User Guide
Page 8
.... Contact your location. If you should take precautions for them. Do not end the call key. These features are not affiliated with Nokia, and Nokia does not endorse or assume liability for security or content. Press the end key as many times as needed to clear the display and return to viruses, malicious messages...
.... Contact your location. If you should take precautions for them. Do not end the call key. These features are not affiliated with Nokia, and Nokia does not endorse or assume liability for security or content. Press the end key as many times as needed to clear the display and return to viruses, malicious messages...
User Guide
Page 13
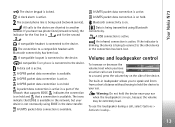
... The connection to another number. If the indicator is blinking, the device is trying to connect to a sound, press the volume key on the side of the network that EDGE is and for the second . Volume and loudspeaker control To increase or decrease the volume ... is not necessarily using Bluetooth connectivity. A UMTS packet data connection is locked. To use , because the volume may be extremely loud. Your Nokia N73 The device keypad is active. A data call or are diverted to a compatible headset with Bluetooth connectivity has been lost . A GPRS packet ...
... The connection to another number. If the indicator is blinking, the device is trying to connect to a sound, press the volume key on the side of the network that EDGE is and for the second . Volume and loudspeaker control To increase or decrease the volume ... is not necessarily using Bluetooth connectivity. A UMTS packet data connection is locked. To use , because the volume may be extremely loud. Your Nokia N73 The device keypad is active. A data call or are diverted to a compatible headset with Bluetooth connectivity has been lost . A GPRS packet ...
User Guide
Page 14
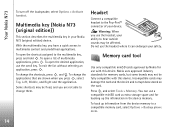
... the multimedia key, you use the scroll key. You can endanger your Nokia N73 (original edition) device. Headset Connect a compatible headset to the Pop-PortTM connector of multimedia applications, press . Warning: When you have a quick access to the multimedia key, press and hold . Your Nokia N73 To turn off the loudspeaker, select Options > Activate handset. Multimedia key (Nokia N73 (original...
... the multimedia key, you use the scroll key. You can endanger your Nokia N73 (original edition) device. Headset Connect a compatible headset to the Pop-PortTM connector of multimedia applications, press . Warning: When you have a quick access to the multimedia key, press and hold . Your Nokia N73 To turn off the loudspeaker, select Options > Activate handset. Multimedia key (Nokia N73 (original...
User Guide
Page 19
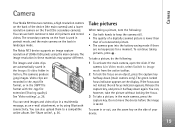
...keypresses for a moment. To zoom in or out, use both hands to a compatible online album. The image resolution in the main camera, press the capture key. Take pictures When taking pictures, press . The green locked focus indicator appears on the side of your device. 19 You can use the zoom... not move the device before the image is used in portrait mode, and the main camera on the front (the secondary camera). Camera Camera Your Nokia N73 has two cameras, a high resolution camera on the back of the device (the main camera) and a lower resolution camera on the back in landscape ...
...keypresses for a moment. To zoom in or out, use both hands to a compatible online album. The image resolution in the main camera, press the capture key. Take pictures When taking pictures, press . The green locked focus indicator appears on the side of your device. 19 You can use the zoom... not move the device before the image is used in portrait mode, and the main camera on the front (the secondary camera). Camera Camera Your Nokia N73 has two cameras, a high resolution camera on the back of the device (the main camera) and a lower resolution camera on the back in landscape ...

User Guide
Page 20
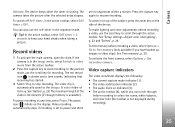
.... See 'Free memory', p. 30. See 'Active toolbar', p. 21. • The image resolution indicator (3) indicates whether the quality of images you can capture using the scroll key to scroll through before capturing the image to free memory (only available if you have backed up images or video clips). Camera You can make...
.... See 'Free memory', p. 30. See 'Active toolbar', p. 21. • The image resolution indicator (3) indicates whether the quality of images you can capture using the scroll key to scroll through before capturing the image to free memory (only available if you have backed up images or video clips). Camera You can make...
User Guide
Page 21
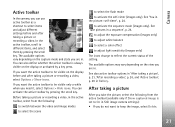
... only a while when you need it, select Options > Hide icons. If you want the active toolbar to be visible on the display or activated by a key press. to reflect the current status of the setting. After taking a picture or recording a video, select Options > Show icons. Before taking a picture', p. 21, ... options vary depending on the view you are in. In the active toolbar, scroll to different items, and select them by pressing the scroll key. Camera Active toolbar In the camera, you can also define whether the active toolbar is set to On in Still image camera settings): •...
... only a while when you need it, select Options > Hide icons. If you want the active toolbar to be visible on the display or activated by a key press. to reflect the current status of the setting. After taking a picture or recording a video, select Options > Show icons. Before taking a picture', p. 21, ... options vary depending on the view you are in. In the active toolbar, scroll to different items, and select them by pressing the scroll key. Camera Active toolbar In the camera, you can also define whether the active toolbar is set to On in Still image camera settings): •...

User Guide
Page 22
... after it through MMS, select Multimedia message 0.3M. Large, Print 2M - Small. You can also send the image to a call recipient during an active call key, or select Send. To change them again. The better the image quality, the more information, see the captured image after you close the camera, but...
... after it through MMS, select Multimedia message 0.3M. Large, Print 2M - Small. You can also send the image to a call recipient during an active call key, or select Send. To change them again. The better the image quality, the more information, see the captured image after you close the camera, but...

User Guide
Page 23
... settings you make, so that you select a new scene, the color and lighting settings are available for low light conditions. Do not use the scroll key to the default settings when you change the setup settings after selecting a scene if needed. 23 The screen display changes to store your pictures or...
... settings you make, so that you select a new scene, the color and lighting settings are available for low light conditions. Do not use the scroll key to the default settings when you change the setup settings after selecting a scene if needed. 23 The screen display changes to store your pictures or...

User Guide
Page 24
... images, depending on the available memory. In the user defined scene you take six pictures or more than six pictures, press and hold the capture key. You can capture up mode( ), Portrait ( ), Landscape ( ), Sports ( ), Night ( ), and Night portrait ( ). To view a picture, press to the sequence ...scroll through the active toolbar, and select from the scene list. To set the self-timer delay, in the main camera. Use the scroll key to a certain style or environment. Use the self-timer to delay the capture so that you to User defined, and select Options > Change....
... images, depending on the available memory. In the user defined scene you take six pictures or more than six pictures, press and hold the capture key. You can capture up mode( ), Portrait ( ), Landscape ( ), Sports ( ), Night ( ), and Night portrait ( ). To view a picture, press to the sequence ...scroll through the active toolbar, and select from the scene list. To set the self-timer delay, in the main camera. Use the scroll key to a certain style or environment. Use the self-timer to delay the capture so that you to User defined, and select Options > Change....
User Guide
Page 25
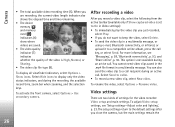
...stop recording. You can scroll through the active toolbar. See 'Gallery', p. 28. Video recording automatically stops if recording is running. Press the capture key again to keep your hand steady when taking a picture. To zoom in the sequence mode. In the active toolbar, select Self timer > 2 ... camera is in the active toolbar, select Self timer > Off. To make lighting and color adjustments before recording a video, use the scroll key for recording. To activate the front camera, select Options > Use secondary camera. The red record icon is available). The video clip is not...
...stop recording. You can scroll through the active toolbar. See 'Gallery', p. 28. Video recording automatically stops if recording is running. Press the capture key again to keep your hand steady when taking a picture. To zoom in the sequence mode. In the active toolbar, select Self timer > 2 ... camera is in the active toolbar, select Self timer > Off. To make lighting and color adjustments before recording a video, use the scroll key for recording. To activate the front camera, select Options > Use secondary camera. The red record icon is available). The video clip is not...
User Guide
Page 26
... of the video is not available during the recording, the available record time, zoom bar when zooming, and the selection keys. Select Hide icons to a call recipient during an active call key, or select Send. Camera • The total available video recording time (5). You cannot send video clips saved in the .mp4...
... of the video is not available during the recording, the available record time, zoom bar when zooming, and the selection keys. Select Hide icons to a call recipient during an active call key, or select Send. Camera • The total available video recording time (5). You cannot send video clips saved in the .mp4...

User Guide
Page 28
..., and music and sound clips in Gallery. or Move to albums. See 'Albums', p. 30. The browser opens, and you in Gallery, press the review key on your images, video clips, sound clips, playlists, and streaming links, press , and select Gallery. and mark, copy, and add items to phone mem..... Track downl., or Sound downl.. Files stored on the side of your device. To enter the Images & video folder main view, press the review key again. To download tracks or sound clips into Gallery using the browser, in the Images & video folder, select the download icon. Images and video ...
..., and music and sound clips in Gallery. or Move to albums. See 'Albums', p. 30. The browser opens, and you in Gallery, press the review key on your images, video clips, sound clips, playlists, and streaming links, press , and select Gallery. and mark, copy, and add items to phone mem..... Track downl., or Sound downl.. Files stored on the side of your device. To enter the Images & video folder main view, press the review key again. To download tracks or sound clips into Gallery using the browser, in the Images & video folder, select the download icon. Images and video ...

User Guide
Page 29
... Options> Edit. See 'Edit video clips', p. 32. See 'Albums', p. 30. If you want the active toolbar to be visible on the display or activated by a key press. Gallery message, as a shortcut to select different tasks. To browse files in groups, scroll up or down . See 'Edit images', p. 31. You can also... available options vary depending on the side of the display. If you want the active toolbar to zoom in on an image, press the zoom key on the state you need it in and on a compatible memory card (if inserted). To rotate the selected image left or right. See 'Edit ...
... Options> Edit. See 'Edit video clips', p. 32. See 'Albums', p. 30. If you want the active toolbar to be visible on the display or activated by a key press. Gallery message, as a shortcut to select different tasks. To browse files in groups, scroll up or down . See 'Edit images', p. 31. You can also... available options vary depending on the side of the display. If you want the active toolbar to zoom in on an image, press the zoom key on the state you need it in and on a compatible memory card (if inserted). To rotate the selected image left or right. See 'Edit ...
User Guide
Page 31
...select Options > Apply effect > Red eye reduction. To remove a file from the list. Move the scroll key to select the area to open a grid where you can crop and rotate the image; Select Options> .... To freeze the selected area, press . Reduce redness To reduce redness of the eye, move the scroll key. To return to the picture. To create a new album, in Gallery. and add effects, text, clip...appears in or out, press or . • To move the area within the picture, use the scroll key. To move on the display. The file is not deleted from the Images & video folder in the albums...
...select Options > Apply effect > Red eye reduction. To remove a file from the list. Move the scroll key to select the area to open a grid where you can crop and rotate the image; Select Options> .... To freeze the selected area, press . Reduce redness To reduce redness of the eye, move the scroll key. To return to the picture. To create a new album, in Gallery. and add effects, text, clip...appears in or out, press or . • To move the area within the picture, use the scroll key. To move on the display. The file is not deleted from the Images & video folder in the albums...

User Guide
Page 32
Select the video clips and images you want to the desired mark, and press the scroll key. Add images, video, sound, and text You can then move the selected mark forwards or backwards on the timeline. To add a new sound clip and ... trim the video clip, and add start , select Options > Play. To add text to the beginning or the end of a video clip, press the edit key. Cut video clip You can use Movie to exclude parts from the start and end marks to create custom video clips. Gallery Edit video clips...
Select the video clips and images you want to the desired mark, and press the scroll key. Add images, video, sound, and text You can then move the selected mark forwards or backwards on the timeline. To add a new sound clip and ... trim the video clip, and add start , select Options > Play. To add text to the beginning or the end of a video clip, press the edit key. Cut video clip You can use Movie to exclude parts from the start and end marks to create custom video clips. Gallery Edit video clips...

User Guide
Page 33
... sizes and resolutions. You can view SVG (scalable vector graphics) files, such as cartoons and maps. To decrease or increase the volume, use the volume key on the timeline, scroll left or right. To stop playing the video clip, press Pause. Gallery To preview the video clip, select Options > Play marked...
... sizes and resolutions. You can view SVG (scalable vector graphics) files, such as cartoons and maps. To decrease or increase the volume, use the volume key on the timeline, scroll left or right. To stop playing the video clip, press Pause. Gallery To preview the video clip, select Options > Play marked...
User Guide
Page 36
... If you are shown in the services list. You can access the account settings later through a Web browser on compatible service providers, see www.nokia.com/support. You can check details, such as drafts and continue later, and view the content of the service provider. The Select service view ...opens. You can access the Online share application also from the order. To select a service, press the scroll key. When you want to create a new account and define the user name and password for details on the Web page of the albums. The ...
... If you are shown in the services list. You can access the account settings later through a Web browser on compatible service providers, see www.nokia.com/support. You can check details, such as drafts and continue later, and view the content of the service provider. The Select service view ...opens. You can access the Online share application also from the order. To select a service, press the scroll key. When you want to create a new account and define the user name and password for details on the Web page of the albums. The ...
User Guide
Page 39
...Media applications Music access key (Nokia N73 Music Edition) This section describes the music access key in Music player, press . To open and music playing in the background, press twice to return to Music player and Radio. To close Radio, select Exit. Use the scroll key to Radio and configure ...the settings, see 'Playlists', p. 43. To open Radio, press and hold the device near your Nokia N73 Music Edition device, press . Tip! Music player does not necessarily support all ...
...Media applications Music access key (Nokia N73 Music Edition) This section describes the music access key in Music player, press . To open and music playing in the background, press twice to return to Music player and Radio. To close Radio, select Exit. Use the scroll key to Radio and configure ...the settings, see 'Playlists', p. 43. To open Radio, press and hold the device near your Nokia N73 Music Edition device, press . Tip! Music player does not necessarily support all ...
User Guide
Page 40
...Repeat. 2 Select Off, All, or Repeat song. Repeat play on a compatible memory card are available only when the memory card is displayed with the scroll key, and select Activate. Each preset has different settings on -Loudspeaker muted (displayed in your device, go to Music menu, and select Options > Refresh Music ...in the top right corner. The Now playing view is inserted. The default preset cannot be edited. 2 To adjust the frequency settings, move the scroll key to the left or right to select low, mid, or, high frequency and up ) Play modes Shuffle play 1 To switch random play 1 To ...
...Repeat. 2 Select Off, All, or Repeat song. Repeat play on a compatible memory card are available only when the memory card is displayed with the scroll key, and select Activate. Each preset has different settings on -Loudspeaker muted (displayed in your device, go to Music menu, and select Options > Refresh Music ...in the top right corner. The Now playing view is inserted. The default preset cannot be edited. 2 To adjust the frequency settings, move the scroll key to the left or right to select low, mid, or, high frequency and up ) Play modes Shuffle play 1 To switch random play 1 To ...


