User Guide
Page 6
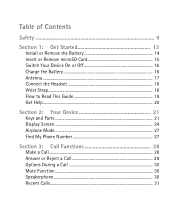
Table of Contents Safety 9 Section 1: Get Started 13 Install or Remove the Battery 14 Insert or Remove microSD Card 15 Switch Your Device On or Off 16 Charge the Battery 16 Antenna ...17 Connect the Headset 18 Wrist Strap...18 Flow to Read This Guide 19 Get Help...20 Section 2: Your Device 21 Keys and Parts 21 Display Screen 24 Airplane Mode 27 Find My Phone Number 27 Section 3: Call Functions 28 Make a Call...28 Answer or Reject a Call 29 Options During a Call 30 Mute Function 30 Speakerphone 30 Recent Calls 31
Table of Contents Safety 9 Section 1: Get Started 13 Install or Remove the Battery 14 Insert or Remove microSD Card 15 Switch Your Device On or Off 16 Charge the Battery 16 Antenna ...17 Connect the Headset 18 Wrist Strap...18 Flow to Read This Guide 19 Get Help...20 Section 2: Your Device 21 Keys and Parts 21 Display Screen 24 Airplane Mode 27 Find My Phone Number 27 Section 3: Call Functions 28 Make a Call...28 Answer or Reject a Call 29 Options During a Call 30 Mute Function 30 Speakerphone 30 Recent Calls 31
User Guide
Page 14
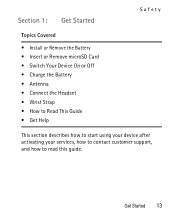
Section 1: Get Started Safety Topics Covered • Install or Remove the Battery • Insert or Remove microSD Card • Switch Your Device On or Off • Charge the Battery • Antenna • Connect the Headset • Wrist Strap • How to Read This Guide • Get Help This section describes how to start using your device after activating your services, how to contact customer support, and how to read this guide. Get Started 13
Section 1: Get Started Safety Topics Covered • Install or Remove the Battery • Insert or Remove microSD Card • Switch Your Device On or Off • Charge the Battery • Antenna • Connect the Headset • Wrist Strap • How to Read This Guide • Get Help This section describes how to start using your device after activating your services, how to contact customer support, and how to read this guide. Get Started 13
User Guide
Page 18
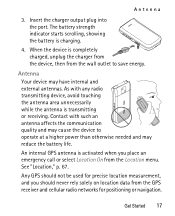
... be used for positioning or navigation. Get Started 17 Contact with any radio transmitting device, avoid touching the antenna area unnecessarily while the antenna is charging. 4. Any GPS should never rely solely on location data from the GPS receiver and cellular radio networks for precise location measurement, and you place an emergency call or select Location On from the wall outlet to operate at a higher power than otherwise needed and...
... be used for positioning or navigation. Get Started 17 Contact with any radio transmitting device, avoid touching the antenna area unnecessarily while the antenna is charging. 4. Any GPS should never rely solely on location data from the GPS receiver and cellular radio networks for precise location measurement, and you place an emergency call or select Location On from the wall outlet to operate at a higher power than otherwise needed and...
User Guide
Page 21
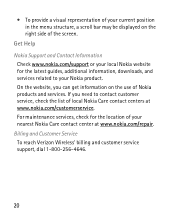
... bar may be displayed on the use of the screen. On the website, you need to your Nokia product. If you can get information on the right side of Nokia products and services. For maintenance services, check for the latest guides, additional information, downloads, and services related to contact customer service, check the list of your local Nokia website for the location of local Nokia Care contact centers at www.nokia.com/repair...
... bar may be displayed on the use of the screen. On the website, you need to your Nokia product. If you can get information on the right side of Nokia products and services. For maintenance services, check for the latest guides, additional information, downloads, and services related to contact customer service, check the list of your local Nokia website for the location of local Nokia Care contact centers at www.nokia.com/repair...
User Guide
Page 26
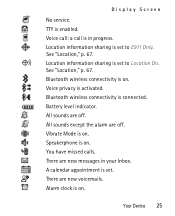
...Bluetooth wireless connectivity is set. Battery level indicator. A calendar appointment is connected. Your Device 25 Voice privacy is set to Location On. Vibrate Mode is on . Bluetooth wireless connectivity is on . All sounds are new messages in progress. There are off . Location information sharing is activated. All sounds except the alarm are new voicemails. There are off . Location information sharing is enabled. Alarm clock is on . You have missed calls. Speakerphone is on . Display Screen No service. See "Location," p. 67. See "Location...
...Bluetooth wireless connectivity is set. Battery level indicator. A calendar appointment is connected. Your Device 25 Voice privacy is set to Location On. Vibrate Mode is on . Bluetooth wireless connectivity is on . All sounds are new messages in progress. There are off . Location information sharing is activated. All sounds except the alarm are new voicemails. There are off . Location information sharing is enabled. Alarm clock is on . You have missed calls. Speakerphone is on . Display Screen No service. See "Location," p. 67. See "Location...

User Guide
Page 39
... update the contact. Scroll to Hide, and press the ( ) key. Scroll to the desired picture, and press the ( ) key, and then press the ( ) key (SAVE) to Show Hidden, and press the ( ) key. 38 You can replace the icon with a photo as follows: 1. Scroll down . 2. Press the Right Soft key (Options). The icon and the color shade are determined by the contact's phone number. Using Photos or Icons to Represent a Contact...
... update the contact. Scroll to Hide, and press the ( ) key. Scroll to the desired picture, and press the ( ) key, and then press the ( ) key (SAVE) to Show Hidden, and press the ( ) key. 38 You can replace the icon with a photo as follows: 1. Scroll down . 2. Press the Right Soft key (Options). The icon and the color shade are determined by the contact's phone number. Using Photos or Icons to Represent a Contact...

User Guide
Page 40
... Soft key (Set). Scroll to the desired field, and enter the corresponding information. • To assign a picture ID to Visible. 5. Create New Contacts Create a New Contact 1. Create New Contacts 4. To enter the contact information, press ( ) New Contact. 3. To use an existing image as the picture ID for the contact, scroll to the desired image in the My Pictures folder, and press the ( ) key. • To assign a ringtone to the contact, scroll...
... Soft key (Set). Scroll to the desired field, and enter the corresponding information. • To assign a picture ID to Visible. 5. Create New Contacts Create a New Contact 1. Create New Contacts 4. To enter the contact information, press ( ) New Contact. 3. To use an existing image as the picture ID for the contact, scroll to the desired image in the My Pictures folder, and press the ( ) key. • To assign a ringtone to the contact, scroll...

User Guide
Page 42
..., enter the first letters of the name you wish to quickly access the contact list, press the Right Soft key (Contacts). Contact List In the idle screen, to find, and select from the available options. Contacts is highlighted. 2. Select from the proposed matches, or scroll using the Directional key. Press the Left Soft key (Save), and select Add New Contact or Update Existing by pressing the ( ) key. 4. Find a Contact Entry 1. Press ( ) Contact List. 3. Contacts...
..., enter the first letters of the name you wish to quickly access the contact list, press the Right Soft key (Contacts). Contact List In the idle screen, to find, and select from the available options. Contacts is highlighted. 2. Select from the proposed matches, or scroll using the Directional key. Press the Left Soft key (Save), and select Add New Contact or Update Existing by pressing the ( ) key. 4. Find a Contact Entry 1. Press ( ) Contact List. 3. Contacts...

User Guide
Page 43
To save the update, press the ( ) key (SAVE). New TXT Message - Send the contact a picture message (network service). New Video Message - Press the ( ) key (MENU). Erase - Set As ICE Contact or Unassign ICE Contact - Set your contact as an ICE (In Case of Emergency) contact or unassign your contact as an ICE contact. 42 Press ( ) Contact List. 3. Delete the contact entry. New Picture Message - Scroll to the desired contact, press the Right Soft key (Options), and select from the following: New Contact - For editing options, see "Create a New Contact," p. 39. 4. Contact List ...
To save the update, press the ( ) key (SAVE). New TXT Message - Send the contact a picture message (network service). New Video Message - Press the ( ) key (MENU). Erase - Set As ICE Contact or Unassign ICE Contact - Set your contact as an ICE (In Case of Emergency) contact or unassign your contact as an ICE contact. 42 Press ( ) Contact List. 3. Delete the contact entry. New Picture Message - Scroll to the desired contact, press the Right Soft key (Options), and select from the following: New Contact - For editing options, see "Create a New Contact," p. 39. 4. Contact List ...

User Guide
Page 44
... to another device using Bluetooth connectivity. Send Name Card - Create a New Group 1. Press the ( ) key (MENU). Erase All - Send the contact information in one or more groups. Rename a Group 1. To add a new group, press the Left Soft key (New), enter a name, and press the ( ) key (SAVE). Contact Groups Call - Press ( ) Groups. 3. Contacts is highlighted. 2. Press the ( ) key (MENU). Contacts 43 Delete all contacts in vCard format to a Group 1. Press the ( ) key (MENU). Enter a new name, and press the ( ) key (SAVE). Call the contact (network service).
... to another device using Bluetooth connectivity. Send Name Card - Create a New Group 1. Press the ( ) key (MENU). Erase All - Send the contact information in one or more groups. Rename a Group 1. To add a new group, press the Left Soft key (New), enter a name, and press the ( ) key (SAVE). Contact Groups Call - Press ( ) Groups. 3. Contacts is highlighted. 2. Press the ( ) key (MENU). Contacts 43 Delete all contacts in vCard format to a Group 1. Press the ( ) key (MENU). Enter a new name, and press the ( ) key (SAVE). Call the contact (network service).

User Guide
Page 46
... number, and press the ( ) key. Speed Dials Speed Dials You can associate any mobile, home, or work phone number in the contact list with more than one touch dial feature is enabled. Speed dial location 97 (#BAL) is assigned to make a bill payment. To select a contact entry, scroll to check your Verizon Wireless usage. Contacts 45 Voicemail is used to an unassigned speed dial location, and press the ( ) key (SET). 4. Speed dial location 99 (#PMT) is used to the desired contact, and press the ( ) key. 5. Press the ( ) key (MENU). Speed dial location...
... number, and press the ( ) key. Speed Dials Speed Dials You can associate any mobile, home, or work phone number in the contact list with more than one touch dial feature is enabled. Speed dial location 97 (#BAL) is assigned to make a bill payment. To select a contact entry, scroll to check your Verizon Wireless usage. Contacts 45 Voicemail is used to an unassigned speed dial location, and press the ( ) key (SET). 4. Speed dial location 99 (#PMT) is used to the desired contact, and press the ( ) key. 5. Press the ( ) key (MENU). Speed dial location...

User Guide
Page 50
... a Text Message 1. Press the ( ) key (MENU), and scroll to the picture or video messaging service, contact Verizon Wireless. Compose a message using the Alphanumeric keypad. 5. To check availability and to subscribe to Messaging. 2. Verizon Wireless may limit the size of picture and video messages. To send the message, press the ( ) key (SEND). To write a new text message, press ( ) New Message, and then press ( ) TXT Message. 3. Picture or Video Message The wireless network may charge accordingly. Messaging 49 Characters that can be sent. Select a recipient from some language...
... a Text Message 1. Press the ( ) key (MENU), and scroll to the picture or video messaging service, contact Verizon Wireless. Compose a message using the Alphanumeric keypad. 5. To check availability and to subscribe to Messaging. 2. Verizon Wireless may limit the size of picture and video messages. To send the message, press the ( ) key (SEND). To write a new text message, press ( ) New Message, and then press ( ) TXT Message. 3. Picture or Video Message The wireless network may charge accordingly. Messaging 49 Characters that can be sent. Select a recipient from some language...

User Guide
Page 51
... when opening messages. Select a recipient from the contact list or enter the number. 4. To add a picture, scroll down to the Text: field, press the ( ) key. To add a new picture using the Alphanumeric keypad. 5. Write and Send a Picture or Video Message 1. To move to the Picture: field. Compose a message using the camera, press the Right Soft key (Options), press ( ) Take Picture, press the ( ) key (TAKE), and press the Left Soft key (Save). 50 To write a new text message, press ( ) New Message, then press ( ) Picture Message or ( ) Video Message. 3. Add...
... when opening messages. Select a recipient from the contact list or enter the number. 4. To add a picture, scroll down to the Text: field, press the ( ) key. To add a new picture using the Alphanumeric keypad. 5. Write and Send a Picture or Video Message 1. To move to the Picture: field. Compose a message using the camera, press the Right Soft key (Options), press ( ) Take Picture, press the ( ) key (TAKE), and press the Left Soft key (Save). 50 To write a new text message, press ( ) New Message, then press ( ) Picture Message or ( ) Video Message. 3. Add...

User Guide
Page 53
... directly use onscreen options to listen to messages and archive them, call back or reply with text messages, and more. 1. Scroll to a message, and select from the available options. With this, you receive a new voicemail message, the device displays a voicemail notification. 1. Scroll to Listen Now or Listen Later. 2. Visual Voice Mail Your device features a visual interface to dial your voicemail service and retrieve your voicemail messages. The message list is displayed. Press the ( ) key. Press the ( ) key (CALL) to access...
... directly use onscreen options to listen to messages and archive them, call back or reply with text messages, and more. 1. Scroll to a message, and select from the available options. With this, you receive a new voicemail message, the device displays a voicemail notification. 1. Scroll to Listen Now or Listen Later. 2. Visual Voice Mail Your device features a visual interface to dial your voicemail service and retrieve your voicemail messages. The message list is displayed. Press the ( ) key. Press the ( ) key (CALL) to access...

User Guide
Page 55
... automatically save incoming picture or video messages automatically. Auto Erase Inbox - Change the character size of messages in folders and when composing a text message. TXT Auto View - To define message settings, select from the Inbox folder when the device memory is received, you can select Reject to refuse to automatically erase the oldest (unlocked) message from the following: Entry Mode - Select whether to receive the message. 54 Pic-Video Auto Receive - Select whether to save all sent messages to display incoming text messages...
... automatically save incoming picture or video messages automatically. Auto Erase Inbox - Change the character size of messages in folders and when composing a text message. TXT Auto View - To define message settings, select from the Inbox folder when the device memory is received, you can select Reject to refuse to automatically erase the oldest (unlocked) message from the following: Entry Mode - Select whether to receive the message. 54 Pic-Video Auto Receive - Select whether to save all sent messages to display incoming text messages...
User Guide
Page 58
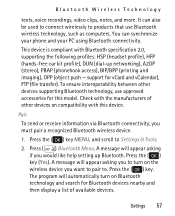
... connect wirelessly to Settings & Tools. 2. Press the ( ) key MENU, and scroll to products that use approved accessories for vCard and vCalendar), FTP (file transfer). A message will automatically turn on compatibility with Bluetooth specification 2.0, supporting the following profiles: HSP (headset profile), HFP (hands-free car kit profile), DUN (dial-up Bluetooth. The program will appear asking you to turn on Bluetooth technology and search for Bluetooth devices nearby and then display a list of other devices supporting Bluetooth...
... connect wirelessly to Settings & Tools. 2. Press the ( ) key MENU, and scroll to products that use approved accessories for vCard and vCalendar), FTP (file transfer). A message will automatically turn on compatibility with Bluetooth specification 2.0, supporting the following profiles: HSP (headset profile), HFP (hands-free car kit profile), DUN (dial-up Bluetooth. The program will appear asking you to turn on Bluetooth technology and search for Bluetooth devices nearby and then display a list of other devices supporting Bluetooth...
User Guide
Page 61
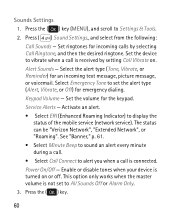
... alert type (Alert, Vibrate, or Off) for incoming calls by setting Call Vibrate on or off. Keypad Volume - Power On/Off - This option only works when the master volume is received by selecting Call Ringtone, and then the desired ringtone. Press ( ) Sound Settings., and select from the following: Call Sounds - Set the volume for an incoming text message, picture message, or voicemail. Activate an alert. • Select ERI (Enhanced Roaming Indicator) to All Sounds Off or Alarm Only. 3. Set the device to Settings & Tools. 2. Press the ( ) key (MENU...
... alert type (Alert, Vibrate, or Off) for incoming calls by setting Call Vibrate on or off. Keypad Volume - Power On/Off - This option only works when the master volume is received by selecting Call Ringtone, and then the desired ringtone. Press ( ) Sound Settings., and select from the following: Call Sounds - Set the volume for an incoming text message, picture message, or voicemail. Activate an alert. • Select ERI (Enhanced Roaming Indicator) to All Sounds Off or Alarm Only. 3. Set the device to Settings & Tools. 2. Press the ( ) key (MENU...

User Guide
Page 68
... ( ) Location. 3. Security The Security menu allows you call the emergency services. 1. Press the ( ) key (MENU), and scroll to Settings & Tools. 2. Press ( ) Phone Settings, and then press ( ) Language. 3. Phone Settings Language The display language can enable this setting or set GPS to work only if you to lock your location to the network. Press the ( ) key (MENU), and scroll to Settings & Tools. 2. Scroll to English or Español, and press the ( ) key. Enter the lock code (factory settings are the last four digits of your phone number), press...
... ( ) Location. 3. Security The Security menu allows you call the emergency services. 1. Press the ( ) key (MENU), and scroll to Settings & Tools. 2. Press ( ) Phone Settings, and then press ( ) Language. 3. Phone Settings Language The display language can enable this setting or set GPS to work only if you to lock your location to the network. Press the ( ) key (MENU), and scroll to Settings & Tools. 2. Scroll to English or Español, and press the ( ) key. Enter the lock code (factory settings are the last four digits of your phone number), press...

User Guide
Page 78
... key (Save). • To preview video clips saved in your device, press the Left Soft key (Videos). • To define specific video recorder settings, press the Right Soft key (Options) and select from the available options. Select Mobile Web 2.0 and press the ( ) key. For more information, contact Verizon Wireless. Media Center 77 Do not use the flash on people or animals at close range. Mobile Web Warning: Keep a safe distance when using the flash. Record a Video...
... key (Save). • To preview video clips saved in your device, press the Left Soft key (Videos). • To define specific video recorder settings, press the Right Soft key (Options) and select from the available options. Select Mobile Web 2.0 and press the ( ) key. For more information, contact Verizon Wireless. Media Center 77 Do not use the flash on people or animals at close range. Mobile Web Warning: Keep a safe distance when using the flash. Record a Video...

User Guide
Page 107
microSD card 15 Mobile Web 56, 77 mute function 30 My Verizon 56, 77 N NAM selection 68 network settings 64 Nokia support information . .20 number mode 35 O one touch dial 45, 70 P pictures 76 positioning information . . . 78 Pulsing Alert 64 Q Quick Text 55 R recent calls 31 S safety hearing aids 96 screen settings 61 security lock code 67 sent messages 51 settings Bluetooth 56 device 64 display 61 shortcuts 65 signature 55 silent mode 61 speakerphone 30 speed dials 29, 45...
microSD card 15 Mobile Web 56, 77 mute function 30 My Verizon 56, 77 N NAM selection 68 network settings 64 Nokia support information . .20 number mode 35 O one touch dial 45, 70 P pictures 76 positioning information . . . 78 Pulsing Alert 64 Q Quick Text 55 R recent calls 31 S safety hearing aids 96 screen settings 61 security lock code 67 sent messages 51 settings Bluetooth 56 device 64 display 61 shortcuts 65 signature 55 silent mode 61 speakerphone 30 speed dials 29, 45...


