
User Guide
Page 5
...(Menu 1) ...49 Text messages (SMS)...49 Multimedia messages ...56 Multimedia messages memory full 60 Deleting messages ...60 Chat...61 Copyright © 2005 Nokia. All rights reserved. 5 Writing text 38 Setting predictive text input on and off 38 Using predictive text input ...38 Writing compound words ...39 ... call ...36 4. Using the menu 42 Accessing a menu function ...42 List of menu functions ...44 6. Installing the SIM card and the battery 25 Charging the battery ...28 Switching the phone on or off ...29 Keypad lock (Keyguard) ...30 Changing the covers ...32 3.
...(Menu 1) ...49 Text messages (SMS)...49 Multimedia messages ...56 Multimedia messages memory full 60 Deleting messages ...60 Chat...61 Copyright © 2005 Nokia. All rights reserved. 5 Writing text 38 Setting predictive text input on and off 38 Using predictive text input ...38 Writing compound words ...39 ... call ...36 4. Using the menu 42 Accessing a menu function ...42 List of menu functions ...44 6. Installing the SIM card and the battery 25 Charging the battery ...28 Switching the phone on or off ...29 Keypad lock (Keyguard) ...30 Changing the covers ...32 3.

User Guide
Page 8
Battery information 136 Charging and Discharging...136 CARE AND MAINTENANCE 138 ADDITIONAL SAFETY INFORMATION 140 Copyright © 2005 Nokia. All rights reserved. 8 PC Connectivity 133 PC Suite ...133 GPRS, HSCSD and CSD ...134 Using data communication applications 135 8. GPRS... ...118 Services (Menu 14) ...120 Basic steps for accessing and using services 120 Setting up the phone for a service 121 Making ...
Battery information 136 Charging and Discharging...136 CARE AND MAINTENANCE 138 ADDITIONAL SAFETY INFORMATION 140 Copyright © 2005 Nokia. All rights reserved. 8 PC Connectivity 133 PC Suite ...133 GPRS, HSCSD and CSD ...134 Using data communication applications 135 8. GPRS... ...118 Services (Menu 14) ...120 Basic steps for accessing and using services 120 Setting up the phone for a service 121 Making ...
User Guide
Page 10
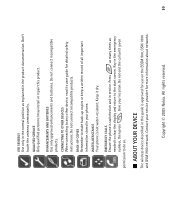
...permission to do so. ■ ABOUT YOUR DEVICE The wireless device described in this product. Contact your phone. Give your location. Keep it dry. Key in the product documentation. CONNECTING TO OTHER DEVICES When ...position as needed to clear the display and return to the start screen. EMERGENCY CALLS Ensure the phone is not water-resistant. QUALIFIED SERVICE Only qualified personnel may install or repair this guide is ... the antenna unnecessarily. All rights reserved. 10 Copyright © 2005 Nokia. ENHANCEMENTS AND BATTERIES Use only approved enhancements and...
...permission to do so. ■ ABOUT YOUR DEVICE The wireless device described in this product. Contact your phone. Give your location. Keep it dry. Key in the product documentation. CONNECTING TO OTHER DEVICES When ...position as needed to clear the display and return to the start screen. EMERGENCY CALLS Ensure the phone is not water-resistant. QUALIFIED SERVICE Only qualified personnel may install or repair this guide is ... the antenna unnecessarily. All rights reserved. 10 Copyright © 2005 Nokia. ENHANCEMENTS AND BATTERIES Use only approved enhancements and...
User Guide
Page 12
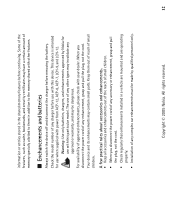
...use when supplied with this device. The use with power from ACP-12, ACP-8, ACP-7, LCH-9, and LCH-12. Warning: Use only batteries, chargers, and enhancements approved by qualified personnel only. For availability of any enhancement, grasp and pull the plug, not the cord. A ...with this particular model. Check the model number of any other features. ■ Enchancements and batteries Always switch the device off and disconnect the charger before continuing. Copyright © 2005 Nokia. This device is intended for use of any approval or warranty, and may contain small parts...
...use when supplied with this device. The use with power from ACP-12, ACP-8, ACP-7, LCH-9, and LCH-12. Warning: Use only batteries, chargers, and enhancements approved by qualified personnel only. For availability of any enhancement, grasp and pull the plug, not the cord. A ...with this particular model. Check the model number of any other features. ■ Enchancements and batteries Always switch the device off and disconnect the charger before continuing. Copyright © 2005 Nokia. This device is intended for use of any approval or warranty, and may contain small parts...
User Guide
Page 20
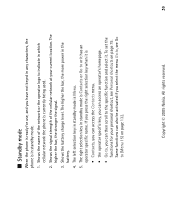
... reserved. 20 To set the functions for use, and you can then scroll to indicate in which cellular network the phone is currently being used. 2. Shows the battery charge level. The right selection key in standby mode. 1. Shows the name of the cellular network at your personal shortcut..., see Go to or it has an operator specific name. Copyright © 2005 Nokia. ■ Standby mode When the phone is ready for your current...
... reserved. 20 To set the functions for use, and you can then scroll to indicate in which cellular network the phone is currently being used. 2. Shows the battery charge level. The right selection key in standby mode. 1. Shows the name of the cellular network at your personal shortcut..., see Go to or it has an operator specific name. Copyright © 2005 Nokia. ■ Standby mode When the phone is ready for your current...

User Guide
Page 25
...so be the service provider, network operator, or other vendor. Copyright © 2005 Nokia. Getting started ■ Installing the SIM card and the battery Keep all SIM cards out of the reach of the phone facing you, push the back cover release button (1) and remove the cover from any ...enhancement and then remove the battery. 1. This may be careful when handling, inserting or removing the card. Before installing the SIM card, always make sure that the phone is switched off and disconnected from the phone (2). All rights reserved. 25 To remove the back ...
...so be the service provider, network operator, or other vendor. Copyright © 2005 Nokia. Getting started ■ Installing the SIM card and the battery Keep all SIM cards out of the reach of the phone facing you, push the back cover release button (1) and remove the cover from any ...enhancement and then remove the battery. 1. This may be careful when handling, inserting or removing the card. Before installing the SIM card, always make sure that the phone is switched off and disconnected from the phone (2). All rights reserved. 25 To remove the back ...
User Guide
Page 26
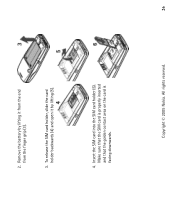
Make sure that the SIM card is properly inserted and that the golden contact area on the card is facing downwards. Remove the battery by lifting it by lifting (5). 4. To release the SIM card holder, slide the card holder backwards (4) and open it from the end from the finger grip (3). 3. Copyright © 2005 Nokia. Insert the SIM card into the SIM card holder (6). All rights reserved. 26 2.
Make sure that the SIM card is properly inserted and that the golden contact area on the card is facing downwards. Remove the battery by lifting it by lifting (5). 4. To release the SIM card holder, slide the card holder backwards (4) and open it from the end from the finger grip (3). 3. Copyright © 2005 Nokia. Insert the SIM card into the SIM card holder (6). All rights reserved. 26 2.
User Guide
Page 27
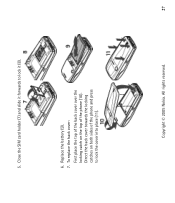
To replace the back cover: First place the top of the back cover over the locking catch on both sides of the phone (10). Copyright © 2005 Nokia. Direct the back cover towards the locking catches on the top of the phone and press to lock it (8). 6. 5. Close the SIM card holder (7) and slide it forwards to lock the cover into place (11). Replace the battery (9). 7. All rights reserved. 27
To replace the back cover: First place the top of the back cover over the locking catch on both sides of the phone (10). Copyright © 2005 Nokia. Direct the back cover towards the locking catches on the top of the phone and press to lock it (8). 6. 5. Close the SIM card holder (7) and slide it forwards to lock the cover into place (11). Replace the battery (9). 7. All rights reserved. 27

User Guide
Page 28
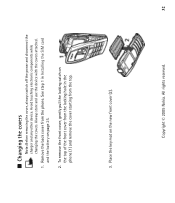
...reserved. 28 For example, charging a BLD-3 battery with the ACP-12 charger takes up to an AC wall socket. Copyright © 2005 Nokia. The text Charging is displayed briefly if the phone is connected. You can be made. ■ Charging the battery 1. Connect the lead from the charger to ...the socket on the charger and the battery used. The charging time depends on the...
...reserved. 28 For example, charging a BLD-3 battery with the ACP-12 charger takes up to an AC wall socket. Copyright © 2005 Nokia. The text Charging is displayed briefly if the phone is connected. You can be made. ■ Charging the battery 1. Connect the lead from the charger to ...the socket on the charger and the battery used. The charging time depends on the...

User Guide
Page 30
Copyright © 2005 Nokia. Avoiding contact with the antenna area when operating the device optimises the antenna performance and the battery life. ■ Keypad lock (Keyguard) You can be locked. During a call when the keyguard is switched on. Note: As with any other radio ... 36. When you end or reject the call quality and may cause the device to prevent the keys being accidentally pressed, for example, when your phone is in your handbag. • Locking the keypad In standby mode, press Menu and then within 1.5 seconds. • Unlocking the keypad Press ...
Copyright © 2005 Nokia. Avoiding contact with the antenna area when operating the device optimises the antenna performance and the battery life. ■ Keypad lock (Keyguard) You can be locked. During a call when the keyguard is switched on. Note: As with any other radio ... 36. When you end or reject the call quality and may cause the device to prevent the keys being accidentally pressed, for example, when your phone is in your handbag. • Locking the keypad In standby mode, press Menu and then within 1.5 seconds. • Unlocking the keypad Press ...
User Guide
Page 32
... remove the cover starting from the phone. Copyright © 2005 Nokia. All rights reserved. 32 Remove the back cover from the top. 3. Place the key mat on page 25. 2. ■ Changing the covers Note: Before removing ... front cover, gently pull the locking catch on the top of the front cover from the locking hole in Installing the SIM card and the battery on the new front cover (2).
... remove the cover starting from the phone. Copyright © 2005 Nokia. All rights reserved. 32 Remove the back cover from the top. 3. Place the key mat on page 25. 2. ■ Changing the covers Note: Before removing ... front cover, gently pull the locking catch on the top of the front cover from the locking hole in Installing the SIM card and the battery on the new front cover (2).
User Guide
Page 33
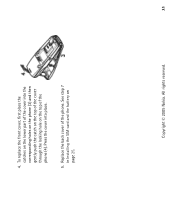
All rights reserved. 33 Replace the back cover of the phone (4). See step 7 in Installing the SIM card and the battery on the top of the phone. To replace the front cover, first place the catches on the lower part of the cover into place. 5. Press the cover into the corresponding holes on the phone (3) and then gently push the catch on the top of the cover through the locking hole on page 25. Copyright © 2005 Nokia. 4.
All rights reserved. 33 Replace the back cover of the phone (4). See step 7 in Installing the SIM card and the battery on the top of the phone. To replace the front cover, first place the catches on the lower part of the cover into place. 5. Press the cover into the corresponding holes on the phone (3) and then gently push the catch on the top of the cover through the locking hole on page 25. Copyright © 2005 Nokia. 4.

User Guide
Page 80
... not change the time that you have set to set the time again. The automatic update of the display in standby mode. Copyright © 2005 Nokia. Date Press Menu, and select Settings, Time and date settings and Date. Auto update of date and time Press Menu, and select Settings, Time ...-hour or 24-hour time format. To set for a confirmation before the update, select Confirm first. Updating may need to expire. If the battery is removed from the phone or if it is in local time. You can also select the date format and date separator. Select Show date (or Hide date...
... not change the time that you have set to set the time again. The automatic update of the display in standby mode. Copyright © 2005 Nokia. Date Press Menu, and select Settings, Time and date settings and Date. Auto update of date and time Press Menu, and select Settings, Time ...-hour or 24-hour time format. To set for a confirmation before the update, select Confirm first. Updating may need to expire. If the battery is removed from the phone or if it is in local time. You can also select the date format and date separator. Select Show date (or Hide date...

User Guide
Page 86
If you have been used for power saving in some display components, for example, indicators and signal and battery bars. See also PC Suite on availability of the phone's functions have not saved the operator logo, the Operator logo menu is dimmed. Select the desired colour scheme. Select ...the menu list view and Grid for a certain time. For more information on page 133. Copyright © 2005 Nokia. Note that the wallpaper is not displayed when the phone activates the screen saver. Press Menu, and select Settings, Display settings and Colour schemes. Menu view To select the...
If you have been used for power saving in some display components, for example, indicators and signal and battery bars. See also PC Suite on availability of the phone's functions have not saved the operator logo, the Operator logo menu is dimmed. Select the desired colour scheme. Select ...the menu list view and Grid for a certain time. For more information on page 133. Copyright © 2005 Nokia. Note that the wallpaper is not displayed when the phone activates the screen saver. Press Menu, and select Settings, Display settings and Colour schemes. Menu view To select the...

User Guide
Page 88
...settings The enhancement settings menu is shown only if the phone is or has been connected to a charger, a desktop stand, or a car kit. You can select some mobile enhancements, chargers and handsfree units, for example, when the battery is running out of the following options: • ...Headset, Handsfree, Loopset, Text phone, Music stand or Charger, if the corresponding enhancement is or has been connected to sound tones, for example. The vibrating alert does not work when the phone is connected. All rights reserved. 88 Copyright © 2005 Nokia. Press Menu, and select ...
...settings The enhancement settings menu is shown only if the phone is or has been connected to a charger, a desktop stand, or a car kit. You can select some mobile enhancements, chargers and handsfree units, for example, when the battery is running out of the following options: • ...Headset, Handsfree, Loopset, Text phone, Music stand or Charger, if the corresponding enhancement is or has been connected to sound tones, for example. The vibrating alert does not work when the phone is connected. All rights reserved. 88 Copyright © 2005 Nokia. Press Menu, and select ...
User Guide
Page 98
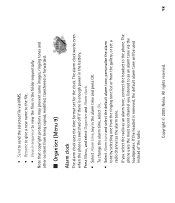
...clock uses the time format set a radio channel as the alarm tone. • Send to send the selected file via the loudspeaker. Copyright © 2005 Nokia. Note that copyright protections may prevent some images, ringing tones and other content from the gallery, or set for the clock. The alarm clock works... of the radio. If you listened to as an alarm tone, connect the headset to view the files in the battery. If the headset is enough power in the folder sequentially. The phone uses the most recent channel you select the radio as an alarm tone via MMS. • Rename to give...
...clock uses the time format set a radio channel as the alarm tone. • Send to send the selected file via the loudspeaker. Copyright © 2005 Nokia. Note that copyright protections may prevent some images, ringing tones and other content from the gallery, or set for the clock. The alarm clock works... of the radio. If you listened to as an alarm tone, connect the headset to view the files in the battery. If the headset is enough power in the folder sequentially. The phone uses the most recent channel you select the radio as an alarm tone via MMS. • Rename to give...

User Guide
Page 103
...the desired game and press Options and select Open, or press . Note that running some games may consume the phone's battery faster (and you may need to connect the phone to access the page from the service whose connection settings are currently active. Game downloads Press Menu, and select Games... and Game downloads. In this case, enter the Services menu and activate Copyright © 2005 Nokia. Press Options and select Open...
...the desired game and press Options and select Open, or press . Note that running some games may consume the phone's battery faster (and you may need to connect the phone to access the page from the service whose connection settings are currently active. Game downloads Press Menu, and select Games... and Game downloads. In this case, enter the Services menu and activate Copyright © 2005 Nokia. Press Options and select Open...

User Guide
Page 105
...169; 2005 Nokia. If the selection is a single Otherwise, a list of the application is displayed. Launching an application 1. To launch a single application, scroll to your phone, you may download it will be launched. . Note that running some applications may consume the phone's battery faster (and... you may need to connect the phone to set from the phone. Press Options and select Open or press ...
...169; 2005 Nokia. If the selection is a single Otherwise, a list of the application is displayed. Launching an application 1. To launch a single application, scroll to your phone, you may download it will be launched. . Note that running some applications may consume the phone's battery faster (and... you may need to connect the phone to set from the phone. Press Options and select Open or press ...
User Guide
Page 109
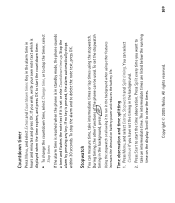
...to view the times. The intermediate times are listed below the running time on battery power and reduces the battery life. If no key is set or else Countdown time up. To set ...text, press OK. All rights reserved. 109 If the alarm time is reached when the phone is displayed when the time expires, and press OK to take intermediate times or lap times...the demand on the display. If you want to start the time observation. Copyright © 2005 Nokia. Time observation and time splitting 1. Countdown timer Press Menu, and select Extras and Countdown timer. Stopwatch...
...to view the times. The intermediate times are listed below the running time on battery power and reduces the battery life. If no key is set or else Countdown time up. To set ...text, press OK. All rights reserved. 109 If the alarm time is reached when the phone is displayed when the time expires, and press OK to take intermediate times or lap times...the demand on the display. If you want to start the time observation. Copyright © 2005 Nokia. Time observation and time splitting 1. Countdown timer Press Menu, and select Extras and Countdown timer. Stopwatch...
User Guide
Page 135
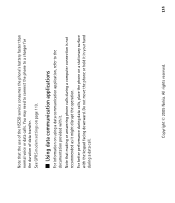
.... Copyright © 2005 Nokia. Note that making or answering phone calls during a data call. For better performance during data calls, place the phone on using a data communication application, refer to a charger for the duration of the HSCSD service consumes the phone's battery faster than normal voice or... data calls. Do not move the phone or hold it in your hand during a computer connection is not recommended as it . Note that...
.... Copyright © 2005 Nokia. Note that making or answering phone calls during a data call. For better performance during data calls, place the phone on using a data communication application, refer to a charger for the duration of the HSCSD service consumes the phone's battery faster than normal voice or... data calls. Do not move the phone or hold it in your hand during a computer connection is not recommended as it . Note that...


