
S570 User's Manual
Page 3
Introduction First Steps A Basic Photography and Playback: Auto Mode C Shooting Suited for the Scene F Taking Pictures of Smiling Faces (Smart Portrait Mode) c More on Playback/In-Camera Editing D Movies Connecting to Televisions, Computers and Printers d Shooting, Playback and Setup Menus Technical Notes i
Introduction First Steps A Basic Photography and Playback: Auto Mode C Shooting Suited for the Scene F Taking Pictures of Smiling Faces (Smart Portrait Mode) c More on Playback/In-Camera Editing D Movies Connecting to Televisions, Computers and Printers d Shooting, Playback and Setup Menus Technical Notes i

S570 User's Manual
Page 4
... the presence of flammable gas, as the result of the camera or AC adapter could result in injury. Do not disassemble Touching the internal parts of a fall or other small parts into their entirety before using this Nikon product, to others, read them. Repairs should be performed... from putting the battery or other accident, take the equipment to avoid burns. Handle the camera strap with care Never place the strap around the neck of children Particular care should be taken to a Nikon-authorized service representative for inspection. WARNINGS Turn off in explosion or fire.
... the presence of flammable gas, as the result of the camera or AC adapter could result in injury. Do not disassemble Touching the internal parts of a fall or other small parts into their entirety before using this Nikon product, to others, read them. Repairs should be performed... from putting the battery or other accident, take the equipment to avoid burns. Handle the camera strap with care Never place the strap around the neck of children Particular care should be taken to a Nikon-authorized service representative for inspection. WARNINGS Turn off in explosion or fire.

S570 User's Manual
Page 6
...given out by this precaution could cause temporary visual impairment. Observe caution when using the flash Using the flash close to observe this camera may disrupt the electronic systems of the airplane or the instruments of the hospital when using inside an airplane or the hospital Turn the...iv For Your Safety Use appropriate cables When connecting cables to the input and output jacks, use only the cables provided or sold by Nikon for the purpose, to prevent liquid crystal from the subject. Do not operate the flash with the flash window touching a person or object...
...given out by this precaution could cause temporary visual impairment. Observe caution when using the flash Using the flash close to observe this camera may disrupt the electronic systems of the airplane or the instruments of the hospital when using inside an airplane or the hospital Turn the...iv For Your Safety Use appropriate cables When connecting cables to the input and output jacks, use only the cables provided or sold by Nikon for the purpose, to prevent liquid crystal from the subject. Do not operate the flash with the flash window touching a person or object...
S570 User's Manual
Page 9
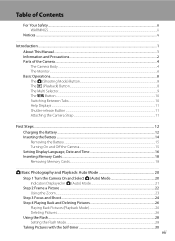
Table of Contents For Your Safety...ii WARNINGS...ii Notices ...v Introduction ...1 About This Manual ...1 Information and Precautions...2 Parts of the Camera...4 The Camera Body ...4 The Monitor...6 Basic Operations...8 The A (Shooting Mode) Button...8 The c (Playback) Button...8 The Multi Selector...9 The d Button...... Language, Date and Time 16 Inserting Memory Cards ...18 Removing Memory Cards...18 A Basic Photography and Playback: Auto Mode 20 Step 1 Turn the Camera On and Select A (Auto) Mode 20 Indicators Displayed in A (Auto) Mode 21 Step 2 Frame a Picture ...22 Using the Zoom...23 ...
Table of Contents For Your Safety...ii WARNINGS...ii Notices ...v Introduction ...1 About This Manual ...1 Information and Precautions...2 Parts of the Camera...4 The Camera Body ...4 The Monitor...6 Basic Operations...8 The A (Shooting Mode) Button...8 The c (Playback) Button...8 The Multi Selector...9 The d Button...... Language, Date and Time 16 Inserting Memory Cards ...18 Removing Memory Cards...18 A Basic Photography and Playback: Auto Mode 20 Step 1 Turn the Camera On and Select A (Auto) Mode 20 Indicators Displayed in A (Auto) Mode 21 Step 2 Frame a Picture ...22 Using the Zoom...23 ...

S570 User's Manual
Page 10
... for the Scene 33 Shooting in Scene Mode ...33 Choosing a Scene Mode ...33 Features ...34 Shooting in the Scene Mode Selected by the Camera (Scene Auto Selector 41 Taking Pictures in Food Mode...43 Taking Pictures for a Panorama ...45 F Taking Pictures of Smiling Faces (Smart Portrait ...Mode 47 Using Smart Portrait Mode...47 Smart portrait menu ...48 c More on Playback/In-Camera Editing 50 Viewing Multiple Pictures: Thumbnail Playback 50 Calendar Display...51 Taking a Closer Look: Playback Zoom 52 Viewing Pictures by Date (List by Date...
... for the Scene 33 Shooting in Scene Mode ...33 Choosing a Scene Mode ...33 Features ...34 Shooting in the Scene Mode Selected by the Camera (Scene Auto Selector 41 Taking Pictures in Food Mode...43 Taking Pictures for a Panorama ...45 F Taking Pictures of Smiling Faces (Smart Portrait ...Mode 47 Using Smart Portrait Mode...47 Smart portrait menu ...48 c More on Playback/In-Camera Editing 50 Viewing Multiple Pictures: Thumbnail Playback 50 Calendar Display...51 Taking a Closer Look: Playback Zoom 52 Viewing Pictures by Date (List by Date...

S570 User's Manual
Page 11
... Connecting to Televisions, Computers and Printers 79 Connecting to a TV...79 Connecting to a Computer...80 Before Connecting the Camera...80 Transferring Pictures from the Camera to a Computer 81 Connecting to a Printer...84 Connecting the Camera and Printer...85 Printing Pictures One at a Time ...86 Printing Multiple Pictures ...87 Creating a DPOF Print Order: Print...
... Connecting to Televisions, Computers and Printers 79 Connecting to a TV...79 Connecting to a Computer...80 Before Connecting the Camera...80 Transferring Pictures from the Camera to a Computer 81 Connecting to a Printer...84 Connecting the Camera and Printer...85 Printing Pictures One at a Time ...86 Printing Multiple Pictures ...87 Creating a DPOF Print Order: Print...

S570 User's Manual
Page 12
Table of Contents Basic Camera Setup: The Setup Menu 112 Displaying the Setup Menu...113 a Menus ...114 c Welcome Screen...115 d Date...116 e Monitor Settings ...119 f Date Imprint...120 w Electronic VR...121 U Motion Detection ...122 h AF Assist ...123 u Digital Zoom ...123 i Sound Settings ...124 k Auto Off ...124 l Format Memory/m Format Card 125 n Language ...126...
Table of Contents Basic Camera Setup: The Setup Menu 112 Displaying the Setup Menu...113 a Menus ...114 c Welcome Screen...115 d Date...116 e Monitor Settings ...119 f Date Imprint...120 w Electronic VR...121 U Motion Detection ...122 h AF Assist ...123 u Digital Zoom ...123 i Sound Settings ...124 k Auto Off ...124 l Format Memory/m Format Card 125 n Language ...126...

S570 User's Manual
Page 13
...only to , or delete, or view pictures. 1 Introduction Introduction About This Manual Thank you for your Nikon digital camera. This manual was written to the camera. This icon indicates that monitor indicators can be read it where all new pictures will read before the ...of purchase is referred to as the "default setting". • The names of menu items displayed in the camera monitor, and the names of a Nikon COOLPIX S570 digital camera. Illustrations and Screen Display Illustrations and text displays shown in bold. This icon marks tips, additional D information that...
...only to , or delete, or view pictures. 1 Introduction Introduction About This Manual Thank you for your Nikon digital camera. This manual was written to the camera. This icon indicates that monitor indicators can be read it where all new pictures will read before the ...of purchase is referred to as the "default setting". • The names of menu items displayed in the camera monitor, and the names of a Nikon COOLPIX S570 digital camera. Illustrations and Screen Display Illustrations and text displays shown in bold. This icon marks tips, additional D information that...

S570 User's Manual
Page 14
... information, tips, answers to frequently asked questions (FAQs), and general advice on digital imaging and photography. Additional information may be available from product malfunction. See the URL below for contact information: http://imaging.nikon.com/ Use Only Nikon Brand Electronic Accessories Nikon COOLPIX cameras are engineered and proven to operate within the operational and safety requirements...
... information, tips, answers to frequently asked questions (FAQs), and general advice on digital imaging and photography. Additional information may be available from product malfunction. See the URL below for contact information: http://imaging.nikon.com/ Use Only Nikon Brand Electronic Accessories Nikon COOLPIX cameras are engineered and proven to operate within the operational and safety requirements...

S570 User's Manual
Page 15
... reproduction of paper money, coins, or securities which are to infringe copyright laws. Unless the prior permission of the government was digitally copied or reproduced by means of a scanner, digital camera or other device may be provided for business use by law from discarded storage devices using commercial deletion software, or format the...
... reproduction of paper money, coins, or securities which are to infringe copyright laws. Unless the prior permission of the government was digitally copied or reproduced by means of a scanner, digital camera or other device may be provided for business use by law from discarded storage devices using commercial deletion software, or format the...

S570 User's Manual
Page 16
Introduction Parts of the Camera The Camera Body 10 1 23 4 5 9 8 7 6 Lens cover closed 11 1 Shutter-release button 24 Zoom control 23 f : wide 23 2 g : tele 23 h : thumbnail playback 50 i : playback zoom 52 j : help 11 3 Power switch/Power-on lamp 20, 124 4 Self-timer lamp 30 AF-assist illuminator 123 5 Built-in flash 28 6 Lens 135, 149 7 Built-in microphone 66, 75 8 Eyelet for camera strap 11 9 Cable connector 79, 81, 85 10 Pin cover 79, 81, 85 11 Lens cover 133 4
Introduction Parts of the Camera The Camera Body 10 1 23 4 5 9 8 7 6 Lens cover closed 11 1 Shutter-release button 24 Zoom control 23 f : wide 23 2 g : tele 23 h : thumbnail playback 50 i : playback zoom 52 j : help 11 3 Power switch/Power-on lamp 20, 124 4 Self-timer lamp 30 AF-assist illuminator 123 5 Built-in flash 28 6 Lens 135, 149 7 Built-in microphone 66, 75 8 Eyelet for camera strap 11 9 Cable connector 79, 81, 85 10 Pin cover 79, 81, 85 11 Lens cover 133 4

S570 User's Manual
Page 17
Introduction Parts of the Camera 1 2 3 4 5 6 7 8 9 10 11 12 13 14 15 1 Flash lamp 29 2 Speaker 67, 78 3 A (shooting mode) button 8 4 c (playback) button 8, 26 5 Multi selector 9 6 k (apply selection) button 9 7 l (delete) button 26, 27, 67, 78 8 d button ........ 10, 33, 76, 93, 106, 113 9 Monitor 6 10 Tripod socket 11 Battery-chamber/ memory card slot cover 14, 18 Power connector cover 12 (for connection to optional AC adapter 131 13 Battery chamber 14 14 Memory card slot 18 15 Battery latch 14, 15 5
Introduction Parts of the Camera 1 2 3 4 5 6 7 8 9 10 11 12 13 14 15 1 Flash lamp 29 2 Speaker 67, 78 3 A (shooting mode) button 8 4 c (playback) button 8, 26 5 Multi selector 9 6 k (apply selection) button 9 7 l (delete) button 26, 27, 67, 78 8 d button ........ 10, 33, 76, 93, 106, 113 9 Monitor 6 10 Tripod socket 11 Battery-chamber/ memory card slot cover 14, 18 Power connector cover 12 (for connection to optional AC adapter 131 13 Battery chamber 14 14 Memory card slot 18 15 Battery latch 14, 15 5

S570 User's Manual
Page 18
... 116 25 White balance mode 96 12 Date imprint 120 26 Continuous shooting mode 98 13 Image mode 94 Movie options 76 a Number of the Camera Introduction The Monitor The following indicators may appear in the monitor during shooting and playback (actual display varies with current...
... 116 25 White balance mode 96 12 Date imprint 120 26 Continuous shooting mode 98 13 Image mode 94 Movie options 76 a Number of the Camera Introduction The Monitor The following indicators may appear in the monitor during shooting and playback (actual display varies with current...

S570 User's Manual
Page 19
Parts of the Camera Introduction Playback 4 1 23 16 15 14 15/11/2009 12:00 5 19 9999.JPG 6 18 17 13 7 12 999 999 10 9 8 11 999 999 a 9999 ...
Parts of the Camera Introduction Playback 4 1 23 16 15 14 15/11/2009 12:00 5 19 9999.JPG 6 18 17 13 7 12 999 999 10 9 8 11 999 999 a 9999 ...

S570 User's Manual
Page 20
... enter playback mode. • Press the c button in playback mode to display the "playback-mode selection menu" and change the playback mode. • If the camera is displayed, press the c button to return to display the "shooting-mode selection" menu and change the shooting mode. x Scene mode (A 33)* 3 3. D Movie mode ...playback modes. 1 Play 1. C List by date mode (A 53) While the playback-mode selection menu is turned off, hold down the c button to turn the camera on in shooting mode to playback mode without changing the shooting mode. c Playback mode (A 26) 2 2.
... enter playback mode. • Press the c button in playback mode to display the "playback-mode selection menu" and change the playback mode. • If the camera is displayed, press the c button to return to display the "shooting-mode selection" menu and change the shooting mode. x Scene mode (A 33)* 3 3. D Movie mode ...playback modes. 1 Play 1. C List by date mode (A 53) While the playback-mode selection menu is turned off, hold down the c button to turn the camera on in shooting mode to playback mode without changing the shooting mode. c Playback mode (A 26) 2 2.

S570 User's Manual
Page 23
Exit Back Shutter-release Button The camera features a two-stage shutter-release button. White balance For accurate color reproduction, choose a setting that matches the light source. To release the shutter and take ... resistance. Introduction Basic Operations Help Displays Rotate the zoom control to g (j) when M/L is held in this may result in camera shake and blurred pictures. To set focus and exposure Attaching the Camera Strap Press the shutter-release button the rest of the way down . Focus and exposure lock while the shutter-release...
Exit Back Shutter-release Button The camera features a two-stage shutter-release button. White balance For accurate color reproduction, choose a setting that matches the light source. To release the shutter and take ... resistance. Introduction Basic Operations Help Displays Rotate the zoom control to g (j) when M/L is held in this may result in camera shake and blurred pictures. To set focus and exposure Attaching the Camera Strap Press the shutter-release button the rest of the way down . Focus and exposure lock while the shutter-release...

S570 User's Manual
Page 25
... CHARGE lamp status. B Notes on the Battery • Be sure to read and follow the warnings for use only genuine Nikon brand rechargeable batteries. • Be sure to the camera. 13 Battery fully charged. • The battery is lying flat. • Operating temperature range exceeded. Be sure to use...extended periods, use another make or model of 5 °C to 35 °C (41 °F to storage. C AC Power Supply To power the camera continuously for an extended period, recharge it at least once every six months and run it flat before returning it into the battery charger so...
... CHARGE lamp status. B Notes on the Battery • Be sure to read and follow the warnings for use only genuine Nikon brand rechargeable batteries. • Be sure to the camera. 13 Battery fully charged. • The battery is lying flat. • Operating temperature range exceeded. Be sure to use...extended periods, use another make or model of 5 °C to 35 °C (41 °F to storage. C AC Power Supply To power the camera continuously for an extended period, recharge it at least once every six months and run it flat before returning it into the battery charger so...

S570 User's Manual
Page 26
B Inserting the Battery Inserting the battery upside down or backwards could damage the camera. When the battery is running low (A 12). 1 Open the battery-chamber/memory card slot cover. • Slide the cover latch toward Y (1) and open the battery-... the battery. • Use the battery to the Z position (2). 14 First Steps Inserting the Battery Insert a Rechargeable Li-ion Battery EN-EL10 (supplied) into your camera. • Charge the battery before the first use or when the battery is fully inserted, the battery latch will lock it in place. Be sure...
B Inserting the Battery Inserting the battery upside down or backwards could damage the camera. When the battery is running low (A 12). 1 Open the battery-chamber/memory card slot cover. • Slide the cover latch toward Y (1) and open the battery-... the battery. • Use the battery to the Z position (2). 14 First Steps Inserting the Battery Insert a Rechargeable Li-ion Battery EN-EL10 (supplied) into your camera. • Charge the battery before the first use or when the battery is fully inserted, the battery latch will lock it in place. Be sure...

S570 User's Manual
Page 27
...the arrow (1). C Auto Power Off in Shooting Mode (Standby Mode) If no operations are performed for another three minutes, the camera will turn on the camera. observe due caution when removing the battery. If no operations are performed for about a minute (default setting), the monitor will... enter standby mode. First Steps Removing the Battery Turn the camera off in standby mode (the power-on lamp is blinking), press the power switch or the shutter-release button to reactivate it. &#...
...the arrow (1). C Auto Power Off in Shooting Mode (Standby Mode) If no operations are performed for another three minutes, the camera will turn on the camera. observe due caution when removing the battery. If no operations are performed for about a minute (default setting), the monitor will... enter standby mode. First Steps Removing the Battery Turn the camera off in standby mode (the power-on lamp is blinking), press the power switch or the shutter-release button to reactivate it. &#...

S570 User's Manual
Page 28
... press the k button. First Steps Setting Display Language, Date and Time A language-selection dialog is displayed the first time the camera is turned on. 1 Press the power switch to turn on the camera. • The power-on lamp (green) will light for a moment and the monitor will not be set. Date Set...
... press the k button. First Steps Setting Display Language, Date and Time A language-selection dialog is displayed the first time the camera is turned on. 1 Press the power switch to turn on the camera. • The power-on lamp (green) will light for a moment and the monitor will not be set. Date Set...


