Instruction Manual
Page 2
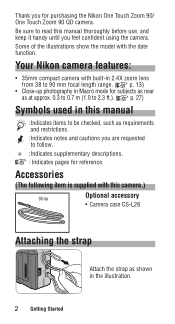
.... :Indicates notes and cautions you are requested to read this manual :Indicates items to be checked, such as shown in the illustration. 2 Getting Started Be sure to follow. :Indicates supplementary descriptions. : Indicates pages for purchasing the Nikon One Touch Zoom 90/ One Touch Zoom 90 QD camera. Thank you for reference. Accessories (The following item is supplied with the date function.
.... :Indicates notes and cautions you are requested to read this manual :Indicates items to be checked, such as shown in the illustration. 2 Getting Started Be sure to follow. :Indicates supplementary descriptions. : Indicates pages for purchasing the Nikon One Touch Zoom 90/ One Touch Zoom 90 QD camera. Thank you for reference. Accessories (The following item is supplied with the date function.
Instruction Manual
Page 3
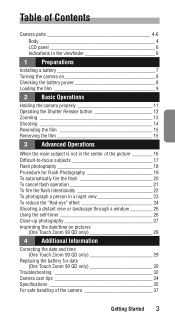
... flash operation 21 To fire the flash intentionally 22 To photograph a person in a night view 23 To reduce the "Red-eye" effect 24 Shooting a distant view or landscape through a window _________ 26 Using the self-timer 26 Close-up photography 27 Imprinting the date/time on pictures (One Touch Zoom 90 QD only 28 4 Additional Information Correcting the date and time (One Touch Zoom 90 QD only 29 Replacing the battery for date (One Touch Zoom...
... flash operation 21 To fire the flash intentionally 22 To photograph a person in a night view 23 To reduce the "Red-eye" effect 24 Shooting a distant view or landscape through a window _________ 26 Using the self-timer 26 Close-up photography 27 Imprinting the date/time on pictures (One Touch Zoom 90 QD only 28 4 Additional Information Correcting the date and time (One Touch Zoom 90 QD only 29 Replacing the battery for date (One Touch Zoom...

Instruction Manual
Page 4
Camera parts (Body) Auto Exposure metering window Autofocus window Viewfinder window ( p. 6) Flash ( pp. 18-23) Red-eye Reduciton lamp/ Self-Timer lamp Lens Strap slot ( p. 2) Autofocus window Power button ( p. 8) Macro button (orange lamp) ( p. 27) LCD panel ( p. 6) (Mid-roll Rewind) button ( p. 15) button Flash mode ( pp. 18-23) Infinity Focus mode ( p. 26) Camera back lock release lever ( p. 9) Shutter Release button ( p. 12) Zoom buttons ( p. 13) button Red-eye Reduction ( pp. 24, 25) Self-Timer ( p. 26) 4 Getting Started
Camera parts (Body) Auto Exposure metering window Autofocus window Viewfinder window ( p. 6) Flash ( pp. 18-23) Red-eye Reduciton lamp/ Self-Timer lamp Lens Strap slot ( p. 2) Autofocus window Power button ( p. 8) Macro button (orange lamp) ( p. 27) LCD panel ( p. 6) (Mid-roll Rewind) button ( p. 15) button Flash mode ( pp. 18-23) Infinity Focus mode ( p. 26) Camera back lock release lever ( p. 9) Shutter Release button ( p. 12) Zoom buttons ( p. 13) button Red-eye Reduction ( pp. 24, 25) Self-Timer ( p. 26) 4 Getting Started
Instruction Manual
Page 6
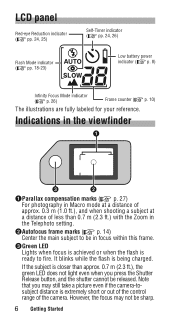
... the Telephoto setting. 2Autofocus frame marks ( p. 14) Center the main subject to fire. However, the focus may still take a picture even if the camera-tosubject distance is ready to be sharp. 6 Getting Started LCD panel Red-eye Reduction indicator ( pp. 24, 25) Flash Mode indicator ( pp. 18-23) Self-Timer indicator ( pp. 24, 26) Low battery power indicator ( p. 8) Infinity Focus Mode indicator ( p. 26...
... the Telephoto setting. 2Autofocus frame marks ( p. 14) Center the main subject to fire. However, the focus may still take a picture even if the camera-tosubject distance is ready to be sharp. 6 Getting Started LCD panel Red-eye Reduction indicator ( pp. 24, 25) Flash Mode indicator ( pp. 18-23) Self-Timer indicator ( pp. 24, 26) Low battery power indicator ( p. 8) Infinity Focus Mode indicator ( p. 26...

Instruction Manual
Page 9
... DX code Film speed DX-coded 35mm film Film cartridge Use DX-coded 35mm film with this camera. Open the camera back. Film speeds valid for automatic setting are ISO100, 200, 400 and 800. (With other films, the film speed is recommended to open the camera back (2). 2. Insert a film cartridge. Preparations 9 Film recommended It is automatically set . Slide the camera back lock release lever in flash photography, and reasonable protection against camera shake. 1. Loading the film Tips on 35mm film Number of the arrow (1) to open the camera back cover into direct...
... DX code Film speed DX-coded 35mm film Film cartridge Use DX-coded 35mm film with this camera. Open the camera back. Film speeds valid for automatic setting are ISO100, 200, 400 and 800. (With other films, the film speed is recommended to open the camera back (2). 2. Insert a film cartridge. Preparations 9 Film recommended It is automatically set . Slide the camera back lock release lever in flash photography, and reasonable protection against camera shake. 1. Loading the film Tips on 35mm film Number of the arrow (1) to open the camera back cover into direct...

Instruction Manual
Page 12
... button lightly, the focus and exposure are achieved, and the green LED lights up . Move away from the subject until the green LED lights up. Fully depress the Shutter Release button to take the picture. Pressing the Shutter Release button abruptly in one stroke may still work even if the camera-to slowly press the Shutter Release button. Lightly press the Shutter Release button again, and release the shutter after the green LED stops blinking and stays lit. Operating the Shutter Release button...
... button lightly, the focus and exposure are achieved, and the green LED lights up . Move away from the subject until the green LED lights up. Fully depress the Shutter Release button to take the picture. Pressing the Shutter Release button abruptly in one stroke may still work even if the camera-to slowly press the Shutter Release button. Lightly press the Shutter Release button again, and release the shutter after the green LED stops blinking and stays lit. Operating the Shutter Release button...

Instruction Manual
Page 14
Lightly press the Shutter Release button. 3. Slowly press the Shutter Release button all the way. If the subject is outside the autofocus frame: If the main subject is dark in camera shake. 14 Basic Operations If the main subject is outside the autofocus frame, use the focus lock to achieve focus. ( p. 16) 2. Pressing the Shutter Release button abruptly in one stroke may result in Auto Flash mode, the flash fires automatically. Shooting 1. Center the autofocus frame mark on the main subject.
Lightly press the Shutter Release button. 3. Slowly press the Shutter Release button all the way. If the subject is outside the autofocus frame: If the main subject is dark in camera shake. 14 Basic Operations If the main subject is outside the autofocus frame, use the focus lock to achieve focus. ( p. 16) 2. Pressing the Shutter Release button abruptly in one stroke may result in Auto Flash mode, the flash fires automatically. Shooting 1. Center the autofocus frame mark on the main subject.

Instruction Manual
Page 16
... Advanced Operations Compose the picture. When the main subject is not in the center of the picture Focus lock photography When the subject to be focused is outside the autofocus frame in the above example where the main subject is out of the picture, use focus lock for difficult-tofocus subjects described on the main subject, then lightly press the Shutter Release button. Do not change the picture...
... Advanced Operations Compose the picture. When the main subject is not in the center of the picture Focus lock photography When the subject to be focused is outside the autofocus frame in the above example where the main subject is out of the picture, use focus lock for difficult-tofocus subjects described on the main subject, then lightly press the Shutter Release button. Do not change the picture...

Instruction Manual
Page 18
Lightly press the Shutter Release button again, and release the shutter after the green LED stops blinking and stays lit. 18 Advanced Operations Flash is not enough light. : Infinity Focus( p. 26) For shooting a distant scene or landscape more sharply. Flash photography Selecting the flash mode You can select any of five flash modes by pressing the button. : Auto Flash( p. 20) The flash automatically fires when there is canceled in this mode. : Flash Cancel( p. 21) To cancel flash operation in lighting conditions...
Lightly press the Shutter Release button again, and release the shutter after the green LED stops blinking and stays lit. 18 Advanced Operations Flash is not enough light. : Infinity Focus( p. 26) For shooting a distant scene or landscape more sharply. Flash photography Selecting the flash mode You can select any of five flash modes by pressing the button. : Auto Flash( p. 20) The flash automatically fires when there is canceled in this mode. : Flash Cancel( p. 21) To cancel flash operation in lighting conditions...

Instruction Manual
Page 19
... film speed: (wide-angle) setting: approx. 0.7 to 7.0 m (2.3 to 23.1 ft.) (telephoto) setting: approx. 0.7 to 3.2 m (2.3 to select the Flash mode. Press the button to 10.6 ft.) Advanced Operations 19 Since slow shutter speeds are shown below. Compose the picture, then lightly press the Shutter Release button. 3. Check that the green LED lights up, then shoot. Flash shooting range The reference distance values are usually selected in (Flash Cancel) and (Slow Sync Flash) modes, use a tripod to prevent camera...
... film speed: (wide-angle) setting: approx. 0.7 to 7.0 m (2.3 to 23.1 ft.) (telephoto) setting: approx. 0.7 to 3.2 m (2.3 to select the Flash mode. Press the button to 10.6 ft.) Advanced Operations 19 Since slow shutter speeds are shown below. Compose the picture, then lightly press the Shutter Release button. 3. Check that the green LED lights up, then shoot. Flash shooting range The reference distance values are usually selected in (Flash Cancel) and (Slow Sync Flash) modes, use a tripod to prevent camera...

Instruction Manual
Page 20
... being charged, and the shutter cannot be released. Example When the green LED is blinking with the Shutter Release button pressed lightly, the flash is sufficiently illuminated, the flash does not fire. 20 Advanced Operations Check that the green LED lights up . Press the Power button. Lightly press the Shutter Release button again, and release the shutter after the green LED steadily lights up , then shoot. To automatically fire the flash Auto Flash mode The flash automatically fires when the...
... being charged, and the shutter cannot be released. Example When the green LED is blinking with the Shutter Release button pressed lightly, the flash is sufficiently illuminated, the flash does not fire. 20 Advanced Operations Check that the green LED lights up . Press the Power button. Lightly press the Shutter Release button again, and release the shutter after the green LED steadily lights up , then shoot. To automatically fire the flash Auto Flash mode The flash automatically fires when the...

Instruction Manual
Page 22
Lightly press the Shutter Release button again, and release the shutter after the green LED steadily lights up , then shoot. Example When the green LED is blinking with the Shutter Release button pressed lightly, the flash is being charged, and the shutter cannot be released. To fire the flash intentionally Anytime Flash mode Use this mode to intentionally fire the flash without regard to light conditions. 1. Press the button until " " appears on the LCD panel. 2. Make sure that the green LED lights up . 22 Advanced Operations
Lightly press the Shutter Release button again, and release the shutter after the green LED steadily lights up , then shoot. Example When the green LED is blinking with the Shutter Release button pressed lightly, the flash is being charged, and the shutter cannot be released. To fire the flash intentionally Anytime Flash mode Use this mode to intentionally fire the flash without regard to light conditions. 1. Press the button until " " appears on the LCD panel. 2. Make sure that the green LED lights up . 22 Advanced Operations

Instruction Manual
Page 23
.... Example When the green LED is blinking with the Shutter Release button pressed lightly, the flash is being charged, and the shutter cannot be released. Advanced Operations 23 Lightly press the Shutter Release button again, and release the shutter after the green LED steadily lights up , then shoot. Use a tripod for Slow Sync Flash mode Since slow shutter speeds are usually selected in a night view or at dusk. 1. To photograph a person in a night view Slow Sync Flash mode Use this mode, use a tripod to...
.... Example When the green LED is blinking with the Shutter Release button pressed lightly, the flash is being charged, and the shutter cannot be released. Advanced Operations 23 Lightly press the Shutter Release button again, and release the shutter after the green LED steadily lights up , then shoot. Use a tripod for Slow Sync Flash mode Since slow shutter speeds are usually selected in a night view or at dusk. 1. To photograph a person in a night view Slow Sync Flash mode Use this mode, use a tripod to...

Instruction Manual
Page 25
... Shutter Release button pressed lightly, the flash is not automatically canceled by turning the power off. To cancel the Red-eye Reduction mode, press the button until the flash fires. Compose the picture, then lightly press the Shutter Release button. 3. Be careful not to move the camera or let the subject move until " " disappears from the LCD panel. Lightly press the Shutter Release button again, and release the shutter after the green LED stops blinking...
... Shutter Release button pressed lightly, the flash is not automatically canceled by turning the power off. To cancel the Red-eye Reduction mode, press the button until the flash fires. Compose the picture, then lightly press the Shutter Release button. 3. Be careful not to move the camera or let the subject move until " " disappears from the LCD panel. Lightly press the Shutter Release button again, and release the shutter after the green LED stops blinking...

Instruction Manual
Page 26
... self-timer before the shutter is released. Flash is canceled in the picture. 1. Using the self-timer Use the self-timer when you wish to include yourself in this mode. Compose the picture, and press the Shutter Release button. When the Shutter Release button is pressed all the way, the Red-eye reduction/Self-timer lamp blinks and lights up , then shoot. Press the button until " " appears on a stable flat surface. 2. Shooting a distant view or landscape through a window Infinity Focus mode...
... self-timer before the shutter is released. Flash is canceled in the picture. 1. Using the self-timer Use the self-timer when you wish to include yourself in this mode. Compose the picture, and press the Shutter Release button. When the Shutter Release button is pressed all the way, the Red-eye reduction/Self-timer lamp blinks and lights up , then shoot. Press the button until " " appears on a stable flat surface. 2. Shooting a distant view or landscape through a window Infinity Focus mode...
Instruction Manual
Page 32
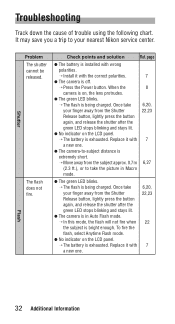
... camera is bright enough. page a The battery is exhausted. Once take your finger away from the Shutter Release button, lightly press the button again, and release the shutter after the green LED stops blinking and stays lit. Once take the picture in Auto Flash mode. → In this mode, the flash will not fire when the subject is off. → Press the Power button. Troubleshooting Track down the cause of trouble using the...
... camera is bright enough. page a The battery is exhausted. Once take your finger away from the Shutter Release button, lightly press the button again, and release the shutter after the green LED stops blinking and stays lit. Once take the picture in Auto Flash mode. → In this mode, the flash will not fire when the subject is off. → Press the Power button. Troubleshooting Track down the cause of trouble using the...
Instruction Manual
Page 33
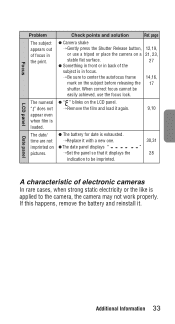
a Camera shake → Gently press the Shutter Release button, 12,19, or use the focus lock. The date/ time are not imprinted on the subject before releasing the 17 shutter. Additional Information 33 When correct focus cannot be imprinted. 30,31 " 28 LCD panel Date panel A characteristic of focus in focus. → Be sure to center the autofocus frame 14,16, mark on pictures. If this happens, remove the battery and reinstall...
a Camera shake → Gently press the Shutter Release button, 12,19, or use the focus lock. The date/ time are not imprinted on the subject before releasing the 17 shutter. Additional Information 33 When correct focus cannot be imprinted. 30,31 " 28 LCD panel Date panel A characteristic of focus in focus. → Be sure to center the autofocus frame 14,16, mark on pictures. If this happens, remove the battery and reinstall...

Instruction Manual
Page 34
... camera dry: The One Touch Zoom 90/ One Touch Zoom 90 QD is recommended. Use the flash intermittently: Firing the flash repeatedly makes the battery and camera hot. Allow sufficient time for a long period: Remove the battery and store the camera in use . Battery power may not operate at low temperatures, keep spare batteries warm, and use them to cool off when not in front of the shutter and resulting battery drain. Maintenance: Use...
... camera dry: The One Touch Zoom 90/ One Touch Zoom 90 QD is recommended. Use the flash intermittently: Firing the flash repeatedly makes the battery and camera hot. Allow sufficient time for a long period: Remove the battery and store the camera in use . Battery power may not operate at low temperatures, keep spare batteries warm, and use them to cool off when not in front of the shutter and resulting battery drain. Maintenance: Use...
Instruction Manual
Page 35
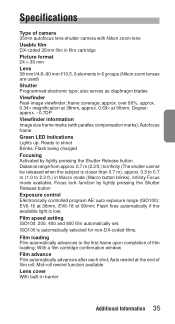
... 6 groups (Nikon zoom lenses are used) Shutter Programmed electronic type; ISO100 is automatically selected for non-DX-coded films. Film loading Film automatically advances to infinity (The shutter cannot be released when the subject is low; Auto rewind at 90mm; also serves as diaphragm blades Viewfinder Real-image viewfinder; Distance range from approx. 0.7 m (2.3 ft.) to the first frame upon completion of camera 35mm autofocus lens-shutter camera with parallax compensation marks); Autofocus frame Green LED indications Lights up...
... 6 groups (Nikon zoom lenses are used) Shutter Programmed electronic type; ISO100 is automatically selected for non-DX-coded films. Film loading Film automatically advances to infinity (The shutter cannot be released when the subject is low; Auto rewind at 90mm; also serves as diaphragm blades Viewfinder Real-image viewfinder; Distance range from approx. 0.7 m (2.3 ft.) to the first frame upon completion of camera 35mm autofocus lens-shutter camera with parallax compensation marks); Autofocus frame Green LED indications Lights up...
Instruction Manual
Page 36
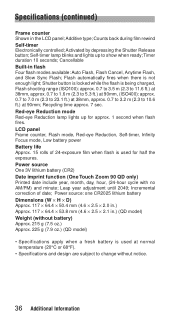
...; 2.5 × 2.1 in.) (QD model) Weight (without notice. 36 Additional Information Timer duration 10 seconds; Leap year adjustment until 2049; Additive type; Cancellable Built-in the LCD panel; Activated by depressing the Shutter Release button; Flash automatically fires when there is used at 90mm; Counts back during film rewind Self-timer Electronically controlled; Power source One 3V lithium battery (CR2) Date imprint function (One Touch Zoom 90 QD only) Printed date include year, month, day...
...; 2.5 × 2.1 in.) (QD model) Weight (without notice. 36 Additional Information Timer duration 10 seconds; Leap year adjustment until 2049; Additive type; Cancellable Built-in the LCD panel; Activated by depressing the Shutter Release button; Flash automatically fires when there is used at 90mm; Counts back during film rewind Self-timer Electronically controlled; Power source One 3V lithium battery (CR2) Date imprint function (One Touch Zoom 90 QD only) Printed date include year, month, day...


