Reference Manual
Page 2
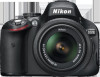
... default settings are used . information that should be read before use to prevent damage to find the information you for your camera, please be sure to read all instructions thoroughly and keep them where they will be read by all who use the product...www.nikondigitutor.com/index_eng.html A For Your Safety Before using the camera. 0 This icon marks references to other topics. Help Use the camera's on-board help feature for details. Digitutor "Digitutor", a series of a Nikon single-lens reflex (SLR) digital camera. To get the most from the following symbols and conventions are ...
... default settings are used . information that should be read before use to prevent damage to find the information you for your camera, please be sure to read all instructions thoroughly and keep them where they will be read by all who use the product...www.nikondigitutor.com/index_eng.html A For Your Safety Before using the camera. 0 This icon marks references to other topics. Help Use the camera's on-board help feature for details. Digitutor "Digitutor", a series of a Nikon single-lens reflex (SLR) digital camera. To get the most from the following symbols and conventions are ...

Reference Manual
Page 4
...during shooting? Can I make photos brighter or darker? i Focus Can I get more information about a photo? How can I view photographs on the camera? i Deletion How do I frame photos in the monitor (live view)? Can I delete unwanted photos? 0 26-29 30-34 115-121 63 64...? Can I choose a shutter speed (mode S)? Viewing Photographs i Playback How do I view photos in quiet surroundings? How can I choose how the camera focuses? i Release Modes Can I take pictures with the self-timer or a remote control? Q&A Index Find what you're looking for different scenes? ...
...during shooting? Can I make photos brighter or darker? i Focus Can I get more information about a photo? How can I view photographs on the camera? i Deletion How do I frame photos in the monitor (live view)? Can I delete unwanted photos? 0 26-29 30-34 115-121 63 64...? Can I choose a shutter speed (mode S)? Viewing Photographs i Playback How do I view photos in quiet surroundings? How can I choose how the camera focuses? i Release Modes Can I take pictures with the self-timer or a remote control? Q&A Index Find what you're looking for different scenes? ...
Reference Manual
Page 5
...JPEG copies of a photo that looks like a painting? What other accessories are available for my camera? What software is available for my camera? Where should I create a copy of RAW (NEF) photos? Can I use ? Can I take my camera for servicing and repairs? 0 176-191 178 183 181-182 186 111-113 0 5-6 ... do I get help for a menu or message? How do I keep the displays from turning off? How do I create retouched copies of recording on the camera or save movie stills? How do I use the menus? How do I use ? Can I print the date of photos? Can I trim movie footage on...
...JPEG copies of a photo that looks like a painting? What other accessories are available for my camera? What software is available for my camera? Where should I create a copy of RAW (NEF) photos? Can I use ? Can I take my camera for servicing and repairs? 0 176-191 178 183 181-182 186 111-113 0 5-6 ... do I get help for a menu or message? How do I keep the displays from turning off? How do I create retouched copies of recording on the camera or save movie stills? How do I use the menus? How do I use ? Can I print the date of photos? Can I trim movie footage on...

Reference Manual
Page 6
Table of Contents Q&A Index ...ii For Your Safety ...x Notices...xii Introduction 1 Getting to Know the Camera 1 The Camera Body ...1 The Mode Dial...3 The Monitor ...4 The Information Display...5 The Command Dial ...7 The Viewfinder...10 Camera Menus...11 Using Camera Menus ...12 First Steps ...14 Charge the Battery ...14 Insert the Battery ...15 Attach a Lens...17 Basic...
Table of Contents Q&A Index ...ii For Your Safety ...x Notices...xii Introduction 1 Getting to Know the Camera 1 The Camera Body ...1 The Mode Dial...3 The Monitor ...4 The Information Display...5 The Command Dial ...7 The Viewfinder...10 Camera Menus...11 Using Camera Menus ...12 First Steps ...14 Charge the Battery ...14 Insert the Battery ...15 Attach a Lens...17 Basic...
Reference Manual
Page 9
...and Calendar Playback 133 The Playback Menu ...134 Slide Shows ...136 Connections 137 Connecting to a Computer 137 Before Connecting the Camera 137 Connecting the Camera ...138 Printing Photographs...139 Connecting the Printer ...139 Printing Pictures One at a Time 140 Printing Multiple Pictures 142 Creating a... Control 153 Color Space...153 Long Exposure NR...154 High ISO NR ...154 ISO Sensitivity Settings 155 A Custom Settings: Fine-Tuning Camera Settings 156 Reset Custom Settings 157 a: Autofocus ...158 a1: AF-C Priority Selection 158 a2: Built-in AF-assist Illuminator 158 a3...
...and Calendar Playback 133 The Playback Menu ...134 Slide Shows ...136 Connections 137 Connecting to a Computer 137 Before Connecting the Camera 137 Connecting the Camera ...138 Printing Photographs...139 Connecting the Printer ...139 Printing Pictures One at a Time 140 Printing Multiple Pictures 142 Creating a... Control 153 Color Space...153 Long Exposure NR...154 High ISO NR ...154 ISO Sensitivity Settings 155 A Custom Settings: Fine-Tuning Camera Settings 156 Reset Custom Settings 157 a: Autofocus ...158 a1: AF-C Priority Selection 158 a2: Built-in AF-assist Illuminator 158 a3...

Reference Manual
Page 10
... 165 f2: Assign AE-L/AF-L Button 166 f3: Reverse Dial Rotation 166 f4: Slot Empty Release Lock 166 f5: Reverse Indicators...166 B The Setup Menu: Camera Setup 167 Monitor Brightness...168 Info Display Format ...168 Auto Info Display...170 Video Mode...170 Flicker Reduction...170 Time Zone and Date ...170 Language...
... 165 f2: Assign AE-L/AF-L Button 166 f3: Reverse Dial Rotation 166 f4: Slot Empty Release Lock 166 f5: Reverse Indicators...166 B The Setup Menu: Camera Setup 167 Monitor Brightness...168 Info Display Format ...168 Auto Info Display...170 Video Mode...170 Flicker Reduction...170 Time Zone and Date ...170 Language...

Reference Manual
Page 11
... 197 Compatible Lenses...197 Compatible CPU Lenses ...197 Compatible Non-CPU Lenses 199 Optional Flash Units (Speedlights 202 The Nikon Creative Lighting System (CLS 203 Other Accessories ...206 Approved Memory Cards 207 Attaching a Power Connector and AC Adapter 208 Caring for the... Camera...209 Storage...209 Cleaning ...209 The Low-Pass Filter...210 Caring for the Camera and Battery: Cautions 214 Available Settings ...216 Memory Card Capacity ...218 Exposure Program (Mode P 219...
... 197 Compatible Lenses...197 Compatible CPU Lenses ...197 Compatible Non-CPU Lenses 199 Optional Flash Units (Speedlights 202 The Nikon Creative Lighting System (CLS 203 Other Accessories ...206 Approved Memory Cards 207 Attaching a Power Connector and AC Adapter 208 Caring for the... Camera...209 Storage...209 Cleaning ...209 The Low-Pass Filter...210 Caring for the Camera and Battery: Cautions 214 Available Settings ...216 Memory Card Capacity ...218 Exposure Program (Mode P 219...

Reference Manual
Page 12
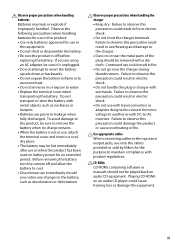
... before using this precaution could result in or close to the subject's eyes could cause temporary visual impairment. Sunlight focused into the camera when the sun is in strangulation. Should the product break open as this could result from the subject. A Turn off immediately in... unplug the AC adapter and remove the battery immediately, taking care to a Nikon-authorized service center for inspection. A Do not place the strap around the neck of an infant or child Placing the camera strap around the neck of children Failure to observe this equipment. x For Your...
... before using this precaution could result in or close to the subject's eyes could cause temporary visual impairment. Sunlight focused into the camera when the sun is in strangulation. Should the product break open as this could result from the subject. A Turn off immediately in... unplug the AC adapter and remove the battery immediately, taking care to a Nikon-authorized service center for inspection. A Do not place the strap around the neck of an infant or child Placing the camera strap around the neck of children Failure to observe this equipment. x For Your...
Reference Manual
Page 13
... with travel converters or adapters designed to convert from one voltage to the input and output jacks, use only the cables provided or sold by Nikon for use in fire. • Do not go near the metal parts of the plug should not be played back on audio CD equipment. Observe... audio CD player could result in a cool, dry place. • The battery may leak or explode if improperly handled. Before removing the battery turn the camera off before replacing the battery. A CD-ROMs CD-ROMs containing software or manuals should be sure it is not in use, attach the terminal cover...
... with travel converters or adapters designed to convert from one voltage to the input and output jacks, use only the cables provided or sold by Nikon for use in fire. • Do not go near the metal parts of the plug should not be played back on audio CD equipment. Observe... audio CD player could result in a cool, dry place. • The battery may leak or explode if improperly handled. Before removing the battery turn the camera off before replacing the battery. A CD-ROMs CD-ROMs containing software or manuals should be sure it is not in use, attach the terminal cover...
Reference Manual
Page 16
... tickets, except when a minimum of necessary copies are circulated in possession of material that has been digitally copied or reproduced by means of a scanner, digital camera, or other data storage devices does not completely erase the original image data. Deleted files can sometimes be taken to infringe copyright laws. AVC Patent...
... tickets, except when a minimum of necessary copies are circulated in possession of material that has been digitally copied or reproduced by means of a scanner, digital camera, or other data storage devices does not completely erase the original image data. Deleted files can sometimes be taken to infringe copyright laws. AVC Patent...

Reference Manual
Page 17
...8226; For users in Europe and Africa: http://www.europe-nikon.com/support/ • For users in the batteries overheating, igniting, rupturing, or leaking. Use Only Nikon Brand Electronic Accessories Nikon cameras are engineered and proven to operate within the operational and safety... regularly used professionally. D Use Only Nikon Brand Accessories Only Nikon brand accessories certified by Nikon specifically for contact information: http://imaging.nikon.com/ xv THE USE OF NON-NIKON ACCESSORIES COULD DAMAGE YOUR CAMERA AND MAY VOID YOUR NIKON WARRANTY. A Life-Long Learning As ...
...8226; For users in Europe and Africa: http://www.europe-nikon.com/support/ • For users in the batteries overheating, igniting, rupturing, or leaking. Use Only Nikon Brand Electronic Accessories Nikon cameras are engineered and proven to operate within the operational and safety... regularly used professionally. D Use Only Nikon Brand Accessories Only Nikon brand accessories certified by Nikon specifically for contact information: http://imaging.nikon.com/ xv THE USE OF NON-NIKON ACCESSORIES COULD DAMAGE YOUR CAMERA AND MAY VOID YOUR NIKON WARRANTY. A Life-Long Learning As ...
Reference Manual
Page 19
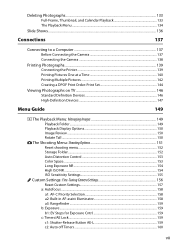
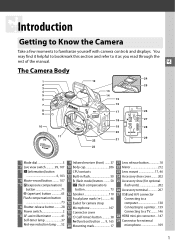
X The Camera Body 1 2 3 4 5 6 7 8 9 10 11 24 12 25 13 14 15 16 17 26 18 27 19 28 20 22 21 29 23 1 ...flash 50 13 M (flash mode) button ......... 50 Y (flash compensation) button 73 14 Speaker 110 15 Focal plane mark (E 46 16 Eyelet for camera strap 17 Microphone 107 18 Connector cover 19 E (self-timer) button 38 Fn (function) button ...... 9, 165 20 Mounting mark 17 21 Lens release...to a TV.......... 146 28 HDMI mini-pin connector ... 147 29 Connector for external microphone 109 1 XIntroduction Getting to Know the Camera Take a few moments to familiarize yourself with...
X The Camera Body 1 2 3 4 5 6 7 8 9 10 11 24 12 25 13 14 15 16 17 26 18 27 19 28 20 22 21 29 23 1 ...flash 50 13 M (flash mode) button ......... 50 Y (flash compensation) button 73 14 Speaker 110 15 Focal plane mark (E 46 16 Eyelet for camera strap 17 Microphone 107 18 Connector cover 19 E (self-timer) button 38 Fn (function) button ...... 9, 165 20 Mounting mark 17 21 Lens release...to a TV.......... 146 28 HDMI mini-pin connector ... 147 29 Connector for external microphone 109 1 XIntroduction Getting to Know the Camera Take a few moments to familiarize yourself with...

Reference Manual
Page 20
The Camera Body (Continued) 2 3 4 5 X 1 7 8 9 10 11 12 13 14 15 16 17 18 19 20 6 21 22 1 Viewfinder eyepiece 38 2 Rubber eyecup 38 3 G (menu) button .... 11, 149 ... W (thumbnail/playback zoom out) button 129 Q (help) button 11 22 Battery latch 15 A The Power Switch Rotate the power switch as shown to turn the camera off. 2 Rotate the power switch as shown to turn the...
The Camera Body (Continued) 2 3 4 5 X 1 7 8 9 10 11 12 13 14 15 16 17 18 19 20 6 21 22 1 Viewfinder eyepiece 38 2 Rubber eyecup 38 3 G (menu) button .... 11, 149 ... W (thumbnail/playback zoom out) button 129 Q (help) button 11 22 Battery latch 15 A The Power Switch Rotate the power switch as shown to turn the camera off. 2 Rotate the power switch as shown to turn the...
Reference Manual
Page 21
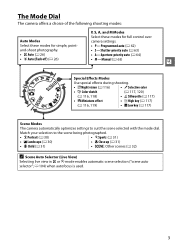
... 120) (0 116, 118) • 1 Silhouette (0 117) • ( Miniature effect • 2 High key (0 117) (0 116, 119) • 3 Low key (0 117) Scene Modes The camera automatically optimizes settings to the scene being photographed. • k Portrait (0 30) • m Sports (0 31) • l Landscape (0 30) • n Close up (0 31) • p Child...is used. 3 Match your selection to suit the scene selected with the mode dial. The Mode Dial The camera offers a choice of the following shooting modes: P, S, A, and M Modes Select these modes for full control over Auto Modes...
... 120) (0 116, 118) • 1 Silhouette (0 117) • ( Miniature effect • 2 High key (0 117) (0 116, 119) • 3 Low key (0 117) Scene Modes The camera automatically optimizes settings to the scene being photographed. • k Portrait (0 30) • m Sports (0 31) • l Landscape (0 30) • n Close up (0 31) • p Child...is used. 3 Match your selection to suit the scene selected with the mode dial. The Mode Dial The camera offers a choice of the following shooting modes: P, S, A, and M Modes Select these modes for full control over Auto Modes...
Reference Manual
Page 22
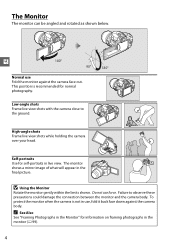
...image of what will appear in use, fold it back face down against the camera face out. D Using the Monitor Rotate the monitor gently within the limits shown. To protect the monitor when the camera is recommended for normal photography. Low-angle shots Frame live view shots while ...holding the camera over your head. X 180° 90° 180° Normal use force. A See Also ...
...image of what will appear in use, fold it back face down against the camera face out. D Using the Monitor Rotate the monitor gently within the limits shown. To protect the monitor when the camera is recommended for normal photography. Low-angle shots Frame live view shots while ...holding the camera over your head. X 180° 90° 180° Normal use force. A See Also ...

Reference Manual
Page 23
... 30 Focus mode 39, 100 31 AF-area mode 42, 101 32 Metering 68 33 Active D-Lighting 74 34 Bracketing increment ...........89 5 The Information Display Camera settings can be viewed and adjusted in the information display. Highlight items using the multi selector and press J to settings.
... 30 Focus mode 39, 100 31 AF-area mode 42, 101 32 Metering 68 33 Active D-Lighting 74 34 Bracketing increment ...........89 5 The Information Display Camera settings can be viewed and adjusted in the information display. Highlight items using the multi selector and press J to settings.

Reference Manual
Page 24
...the monitor stays on the indicators displayed in live view, see Auto info display (0 170). X R button Information display A Rotating the Camera When the camera is replaced by pressing the R button again. While the mode dial is rotated, this display is rotated 90 °, shooting information ...rotates to match camera orientation. For information on , see Info display format, (0 168). Slow shutter speed, small aperture (large f-number). For information on ...
...the monitor stays on the indicators displayed in live view, see Auto info display (0 170). X R button Information display A Rotating the Camera When the camera is replaced by pressing the R button again. While the mode dial is rotated, this display is rotated 90 °, shooting information ...rotates to match camera orientation. For information on , see Info display format, (0 168). Slow shutter speed, small aperture (large f-number). For information on ...
Reference Manual
Page 29
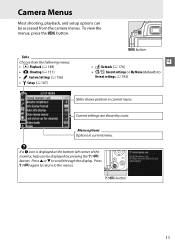
... displayed at the bottom left corner of the monitor, help can be displayed by icons. Q (W) button 11 Current settings are shown by pressing the Q (W) button. Camera Menus Most shooting, playback, and setup options can be accessed from the following menus: • D: Playback (0 149) • C: Shooting (0 151) • A: Custom Settings (0 156) •...) G button X • N: Retouch (0 176) • m/O: Recent settings or My Menu (defaults to Recent settings; 0 192) Slider shows position in current menu. Tabs Choose from the camera menus.
... displayed at the bottom left corner of the monitor, help can be displayed by icons. Q (W) button 11 Current settings are shown by pressing the Q (W) button. Camera Menus Most shooting, playback, and setup options can be accessed from the following menus: • D: Playback (0 149) • C: Shooting (0 151) • A: Custom Settings (0 156) •...) G button X • N: Retouch (0 176) • m/O: Recent settings or My Menu (defaults to Recent settings; 0 192) Slider shows position in current menu. Tabs Choose from the camera menus.

Reference Manual
Page 30
Press 1 or 3 to navigate the camera menus. Press the G button to display the menus. 2 Highlight the icon for the current menu. 3 Select a menu. Press 4 to navigate the menus. 1 Display the menus. G button 12 Using Camera Menus The multi selector and J button are used to select the desired menu. Move cursor up J button: select highlighted item Cancel and return to previous menu Select highlighted item or display sub-menu X Move cursor down Follow the steps below to highlight the icon for the current menu.
Press 1 or 3 to navigate the camera menus. Press the G button to display the menus. 2 Highlight the icon for the current menu. 3 Select a menu. Press 4 to navigate the menus. 1 Display the menus. G button 12 Using Camera Menus The multi selector and J button are used to select the desired menu. Move cursor up J button: select highlighted item Cancel and return to previous menu Select highlighted item or display sub-menu X Move cursor down Follow the steps below to highlight the icon for the current menu.
Reference Manual
Page 32
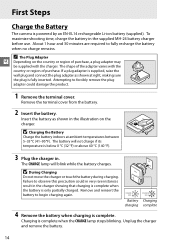
... Charging charging complete 4 Remove the battery when charging is powered by an EN-EL14 rechargeable Li-ion battery (supplied). First Steps Charge the Battery The camera is complete. Remove the terminal cover from the battery. 2 Insert the battery. The CHARGE lamp will not charge if its temperature is below 0 °C (32...
... Charging charging complete 4 Remove the battery when charging is powered by an EN-EL14 rechargeable Li-ion battery (supplied). First Steps Charge the Battery The camera is complete. Remove the terminal cover from the battery. 2 Insert the battery. The CHARGE lamp will not charge if its temperature is below 0 °C (32...


