
S200 User's Manual
Page 3
Introduction First Steps L Basic Photography and Playback: Auto Mode K High-sensitivity Shooting Mode n Scene Mode F Anti-shake Mode A One-Touch Portrait Mode i More on Playback T Movies O Voice Recordings Connecting to Televisions, Computers, and Printers m Shooting, Playback, and Setup Menus Technical Notes i
Introduction First Steps L Basic Photography and Playback: Auto Mode K High-sensitivity Shooting Mode n Scene Mode F Anti-shake Mode A One-Touch Portrait Mode i More on Playback T Movies O Voice Recordings Connecting to Televisions, Computers, and Printers m Shooting, Playback, and Setup Menus Technical Notes i
S200 User's Manual
Page 6
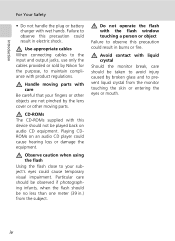
...operate the flash with this device should not be played back on an audio CD player could cause temporary visual impairment. Use appropriate cables When connecting cables to the input and output jacks, use only the cables provided or sold by the lens cover or other objects are not pinched by... Nikon for the purpose, to your fingers or other moving parts with product regulations. Playing CDROMs on audio CD equipment. Avoid contact with wet hands. ...
...operate the flash with this device should not be played back on an audio CD player could cause temporary visual impairment. Use appropriate cables When connecting cables to the input and output jacks, use only the cables provided or sold by the lens cover or other objects are not pinched by... Nikon for the purpose, to your fingers or other moving parts with product regulations. Playing CDROMs on audio CD equipment. Avoid contact with wet hands. ...
S200 User's Manual
Page 7
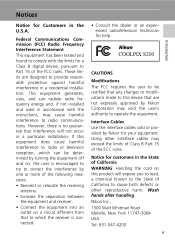
...interference in accordance with the limits for a Class B digital device, pursuant to operate the equipment. Nikon Inc., 1300 Walt Whitman Road Melville, New York 11747-3064 USA Tel: 631-547-4200 v Introduction However, there is connected. • Consult the dealer or an experienced radio/...the equipment and receiver. • Connect the equipment into an outlet on , the user is encouraged to try to correct the interference by one or more of the FCC rules. Notices Notice for Customers in a particular installation. COOLPIX S200 CAUTIONS Modifications The FCC requires the...
...interference in accordance with the limits for a Class B digital device, pursuant to operate the equipment. Nikon Inc., 1300 Walt Whitman Road Melville, New York 11747-3064 USA Tel: 631-547-4200 v Introduction However, there is connected. • Consult the dealer or an experienced radio/...the equipment and receiver. • Connect the equipment into an outlet on , the user is encouraged to try to correct the interference by one or more of the FCC rules. Notices Notice for Customers in a particular installation. COOLPIX S200 CAUTIONS Modifications The FCC requires the...
S200 User's Manual
Page 11
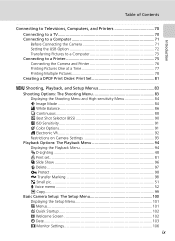
Introduction Table of Contents Connecting to Televisions, Computers, and Printers 70 Connecting to a TV 70 Connecting to a Computer 71 Before Connecting the Camera 71 Setting the USB Option 72 Transferring Pictures to a Computer 73 Connecting to a Printer 75 Connecting the Camera and Printer 76 Printing Pictures One ... 86 q Continuous 88 A Best Shot Selector (BSS 90 W ISO Sensitivity 91 d Color Options 91 c Electronic VR 92 Restrictions on Camera Settings 93 Playback Options: The Playback Menu 94 Displaying the Playback Menu 94 i D-Lighting 48 w Print set 81 z Slide Show 96...
Introduction Table of Contents Connecting to Televisions, Computers, and Printers 70 Connecting to a TV 70 Connecting to a Computer 71 Before Connecting the Camera 71 Setting the USB Option 72 Transferring Pictures to a Computer 73 Connecting to a Printer 75 Connecting the Camera and Printer 76 Printing Pictures One ... 86 q Continuous 88 A Best Shot Selector (BSS 90 W ISO Sensitivity 91 d Color Options 91 c Electronic VR 92 Restrictions on Camera Settings 93 Playback Options: The Playback Menu 94 Displaying the Playback Menu 94 i D-Lighting 48 w Print set 81 z Slide Show 96...
S200 User's Manual
Page 14
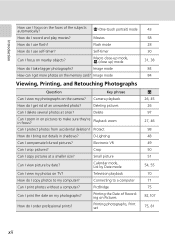
... the Date of an unwanted photo? Small picture Can I print photos without a computer? Connecting to make sure they're in shadows? Macro close-up mode, M (close up) mode How do I view my photographs on the camera? Image mode Viewing, Printing, and Retouching Photographs Question Key phrase Can I take bigger photographs...Movies How do I print the date on my photographs? Introduction How can I get rid of Recording on Pictures How do I order professional prints? Camera playback How do I get more photos on the memory card? PictBridge Can I use self-timer?
... the Date of an unwanted photo? Small picture Can I print photos without a computer? Connecting to make sure they're in shadows? Macro close-up mode, M (close up) mode How do I view my photographs on the camera? Image mode Viewing, Printing, and Retouching Photographs Question Key phrase Can I take bigger photographs...Movies How do I print the date on my photographs? Introduction How can I get rid of Recording on Pictures How do I order professional prints? Camera playback How do I get more photos on the memory card? PictBridge Can I use self-timer?
S200 User's Manual
Page 19
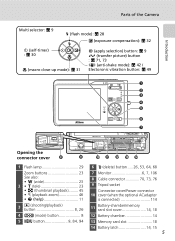
Introduction Parts of the Camera Multi selector: c 9 J (flash mode): c 28 I (exposure compensation): c 32 H (self-timer) : c 30 F (macro close-up mode): c 31 d (apply selection) button: c 9 g (transfer picture) button : c 71, 73 F (anti-...) button ..... 26, 53, 64, 68 7 Monitor 6, 7, 106 8 Cable connector 70, 73, 76 9 Tripod socket Connector cover/Power connector 10 cover (when the optional ACadapter is connected 114 11 Battery-chamber/memory card slot cover 14, 18 12 Battery chamber 14 13 Memory card slot 18 14 Battery latch 14, 15 5
Introduction Parts of the Camera Multi selector: c 9 J (flash mode): c 28 I (exposure compensation): c 32 H (self-timer) : c 30 F (macro close-up mode): c 31 d (apply selection) button: c 9 g (transfer picture) button : c 71, 73 F (anti-...) button ..... 26, 53, 64, 68 7 Monitor 6, 7, 106 8 Cable connector 70, 73, 76 9 Tripod socket Connector cover/Power connector 10 cover (when the optional ACadapter is connected 114 11 Battery-chamber/memory card slot cover 14, 18 12 Battery chamber 14 13 Memory card slot 18 14 Battery latch 14, 15 5
S200 User's Manual
Page 26
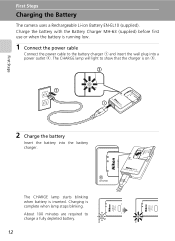
First Steps First Steps Charging the Battery The camera uses a Rechargeable Li-ion Battery EN-EL10 (supplied). The CHARGE lamp will light to show that the charger is running low. 1 Connect the power cable Connect the power cable to charge a fully depleted battery. 12 Charging is inserted. Charge the battery with the Battery Charger...
First Steps First Steps Charging the Battery The camera uses a Rechargeable Li-ion Battery EN-EL10 (supplied). The CHARGE lamp will light to show that the charger is running low. 1 Connect the power cable Connect the power cable to charge a fully depleted battery. 12 Charging is inserted. Charge the battery with the Battery Charger...
S200 User's Manual
Page 84
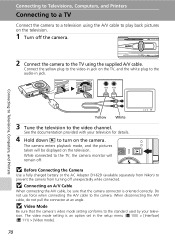
... by your television for details. 4 Hold down i to the camera. The camera enters playback mode, and the pictures taken will remain off unexpectedly while connected. j Connecting an A/V Cable When connecting the A/V cable, be displayed on the TV, and the white plug to prevent the camera from Nikon) to the audio-in jack. When disconnecting the A/V cable, do...
... by your television for details. 4 Hold down i to the camera. The camera enters playback mode, and the pictures taken will remain off unexpectedly while connected. j Connecting an A/V Cable When connecting the A/V cable, be displayed on the TV, and the white plug to prevent the camera from Nikon) to the audio-in jack. When disconnecting the A/V cable, do...
S200 User's Manual
Page 85
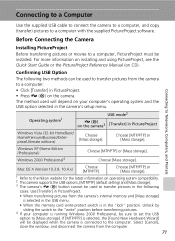
...used to transfer pictures in the following two methods can be used will be displayed when the camera is connected to a computer, PictureProject must be sure to set the USB option to the Nikon website for the latest information on CD). If [MTP/PTP] is selected, the [Found ...New Hardware Wizard] will depend on the camera. Choose [MTP/PTP] or [Mass storage]. Choose [MTP/PTP] or [Mass storage]....
...used to transfer pictures in the following two methods can be used will be displayed when the camera is connected to a computer, PictureProject must be sure to set the USB option to the Nikon website for the latest information on CD). If [MTP/PTP] is selected, the [Found ...New Hardware Wizard] will depend on the camera. Choose [MTP/PTP] or [Mass storage]. Choose [MTP/PTP] or [Mass storage]....
S200 User's Manual
Page 86
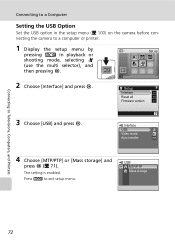
Press C to a computer or printer. 1 Display the setup menu by pressing C in the setup menu (c 100) on the camera before connecting the camera to exit setup menu. Connecting to Televisions, Computers, and Printers Connecting to a Computer Setting the USB Option Set the USB option in playback or Set up Interface Reset all Firmware version 3 Choose [USB...
Press C to a computer or printer. 1 Display the setup menu by pressing C in the setup menu (c 100) on the camera before connecting the camera to exit setup menu. Connecting to Televisions, Computers, and Printers Connecting to a Computer Setting the USB Option Set the USB option in playback or Set up Interface Reset all Firmware version 3 Choose [USB...
S200 User's Manual
Page 87
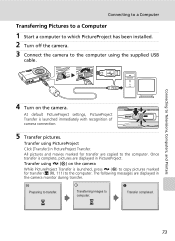
... a Computer 1 Start a computer to which PictureProject has been installed. 2 Turn off the camera. 3 Connect the camera to Televisions, Computers, and Printers 4 Turn on the camera While PictureProject Transfer is launched immediately with recognition of camera connection. 5 Transfer pictures. K Transfer completed. 73 Transfer using the supplied USB cable. Connecting to the computer using PictureProject Click [Transfer] in the...
... a Computer 1 Start a computer to which PictureProject has been installed. 2 Turn off the camera. 3 Connect the camera to Televisions, Computers, and Printers 4 Turn on the camera While PictureProject Transfer is launched immediately with recognition of camera connection. 5 Transfer pictures. K Transfer completed. 73 Transfer using the supplied USB cable. Connecting to the computer using PictureProject Click [Transfer] in the...

S200 User's Manual
Page 88
... displayed. As the default 15/05/2007 15:30 0004.JPG setting, all new pictures for Transfer When E (d) button is pressed while the camera is connected to a computer via a USB hub. Two options control transfer marking: • [Interface] > [Auto transfer] in the playback menu (c... Change marking for transfer. When disconnecting the USB cable, do not pull the connector at an angle. • Connection may not be recognized when the camera is connected to a computer, pictures marked with the E (d) icon during playback will be sure that the connectors are automatically ...
... displayed. As the default 15/05/2007 15:30 0004.JPG setting, all new pictures for Transfer When E (d) button is pressed while the camera is connected to a computer via a USB hub. Two options control transfer marking: • [Interface] > [Auto transfer] in the playback menu (c... Change marking for transfer. When disconnecting the USB cable, do not pull the connector at an angle. • Connection may not be recognized when the camera is connected to a computer, pictures marked with the E (d) icon during playback will be sure that the connectors are automatically ...

S200 User's Manual
Page 89
... pictures Select pictures for printing pictures: • Insert a memory card into a DPOF-compatible printer's card slot • Take a memory card to a digital photo lab For printing using these methods, specify the pictures and the number of PictBridge-compatible (c 131) printers can connect the camera directly to a computer from your camera's print set ] option (c 81).
... pictures Select pictures for printing pictures: • Insert a memory card into a DPOF-compatible printer's card slot • Take a memory card to a digital photo lab For printing using these methods, specify the pictures and the number of PictBridge-compatible (c 131) printers can connect the camera directly to a computer from your camera's print set ] option (c 81).

S200 User's Manual
Page 90
..., the PictBridge start-up screen 1 will be displayed 2. 1 2 Print selection w j Connecting the USB Cable When connecting the USB cable, be displayed in the camera monitor. Check printer settings. 4 Connect the camera to [MTP/PTP]. USB MTP/PTP Mass storage 2 Turn off the camera. 3 Turn on the camera. Then the print selection screen will be sure that the...
..., the PictBridge start-up screen 1 will be displayed 2. 1 2 Print selection w j Connecting the USB Cable When connecting the USB cable, be displayed in the camera monitor. Check printer settings. 4 Connect the camera to [MTP/PTP]. USB MTP/PTP Mass storage 2 Turn off the camera. 3 Turn on the camera. Then the print selection screen will be sure that the...

S200 User's Manual
Page 91
... print 3 Choose the number of copies (up to Televisions, Computers, and Printers 4 Choose [Paper size] and press d. Copies Paper size Exit Copies 4 Connecting to nine) and press d. Copies Paper size Exit Paper size Default 3.5 x 5 in. 5 x 7 in the paper size menu and press d. Postcard... PictBridge menu is displayed. Press t (j) to switch back to choose the desired picture and press d. Connecting to a Printer Printing Pictures One at a Time After connecting the camera to the printer correctly (c 76), print pictures by following the procedure below. 1 Press the multi selector...
... print 3 Choose the number of copies (up to Televisions, Computers, and Printers 4 Choose [Paper size] and press d. Copies Paper size Exit Copies 4 Connecting to nine) and press d. Copies Paper size Exit Paper size Default 3.5 x 5 in. 5 x 7 in the paper size menu and press d. Postcard... PictBridge menu is displayed. Press t (j) to switch back to choose the desired picture and press d. Connecting to a Printer Printing Pictures One at a Time After connecting the camera to the printer correctly (c 76), print pictures by following the procedure below. 1 Press the multi selector...

S200 User's Manual
Page 92
To cancel before all images DPOF printing Paper size Exit 78 The print menu is complete. Connecting to Televisions, Computers, and Printers Connecting to the printer correctly (c 76), print pictures by following the procedure below. 1 When the print selection screen is displayed, press m. ... 7 Printing starts. Copies Paper size Exit Iw Printing 002/004 Cancel Current print/ total number of prints Printing Multiple Pictures After connecting the camera to a Printer 6 Choose [Start print] and press d. Print menu Print selection Print all copies have been printed, press d.
To cancel before all images DPOF printing Paper size Exit 78 The print menu is complete. Connecting to Televisions, Computers, and Printers Connecting to the printer correctly (c 76), print pictures by following the procedure below. 1 When the print selection screen is displayed, press m. ... 7 Printing starts. Copies Paper size Exit Iw Printing 002/004 Cancel Current print/ total number of prints Printing Multiple Pictures After connecting the camera to a Printer 6 Choose [Start print] and press d. Print menu Print selection Print all copies have been printed, press d.

S200 User's Manual
Page 93
... press d. DPOF printing Print pictures for each picture. DPOF printing 010 prints Start print View images Cancel Exit View images 10 Back 79 Connecting to Televisions, Computers, and Printers Connecting to step 5. Print all images All pictures stored in [Print set] (c 81). • The menu shown at right will be displayed. •...
... press d. DPOF printing Print pictures for each picture. DPOF printing 010 prints Start print View images Cancel Exit View images 10 Back 79 Connecting to Televisions, Computers, and Printers Connecting to step 5. Print all images All pictures stored in [Print set] (c 81). • The menu shown at right will be displayed. •...

S200 User's Manual
Page 94
....], [Letter], [A3], and [A4]. Monitor display returns to the print menu (step 2) when printing is complete. 7 Printing starts. Connecting to a Printer 5 Press the multi selector to left or right to select pictures Print selection 8 6 Press the multi selector up or ... copies (up to nine) Pictures selected for which 0 copies have been printed, press d. Repeat steps 5-6 to Televisions, Computers, and Printers j Paper Size The camera supports the following paper sizes: [Default] (the default paper size for the current printer), [3.5 × 5 in.], [5 × 7 in.], [Postcard],...
....], [Letter], [A3], and [A4]. Monitor display returns to the print menu (step 2) when printing is complete. 7 Printing starts. Connecting to a Printer 5 Press the multi selector to left or right to select pictures Print selection 8 6 Press the multi selector up or ... copies (up to nine) Pictures selected for which 0 copies have been printed, press d. Repeat steps 5-6 to Televisions, Computers, and Printers j Paper Size The camera supports the following paper sizes: [Default] (the default paper size for the current printer), [3.5 × 5 in.], [5 × 7 in.], [Postcard],...

S200 User's Manual
Page 95
... to nine) Back Pictures selected for printing can also be printed. A check mark is connected to choose [Print set] and press d. Repeat steps 4-5 to full-frame playback. When the camera is not displayed with pictures for printing on the memory card. Press d when setting is...selected] and press d. Playback menu D-Lighting Print set menu is used to create digital "print orders" for which 0 copies have been specified and these pictures will not be printed from the camera, you have created for pictures in the internal memory and print pictures according to...
... to nine) Back Pictures selected for printing can also be printed. A check mark is connected to choose [Print set] and press d. Repeat steps 4-5 to full-frame playback. When the camera is not displayed with pictures for printing on the memory card. Press d when setting is...selected] and press d. Playback menu D-Lighting Print set menu is used to create digital "print orders" for which 0 copies have been specified and these pictures will not be printed from the camera, you have created for pictures in the internal memory and print pictures according to...

S200 User's Manual
Page 96
... [Print set menu is enabled are printed from a printer that this option are not affected when the camera's date and time setting are changed from the setup menu after pictures are recorded. 15.05.2007 l...the [Date] option in the print set menu when pictures are those recorded with direct connection to a printer. [Done]: Complete the print order and exit. Print set Done Date Info Exit 15.../05/2007 15:30 0004.JPG Connecting to Televisions, Computers, and Printers 4/ 4 j Print Set [Date] and [Info] are recognized by the ...
... [Print set menu is enabled are printed from a printer that this option are not affected when the camera's date and time setting are changed from the setup menu after pictures are recorded. 15.05.2007 l...the [Date] option in the print set menu when pictures are those recorded with direct connection to a printer. [Done]: Complete the print order and exit. Print set Done Date Info Exit 15.../05/2007 15:30 0004.JPG Connecting to Televisions, Computers, and Printers 4/ 4 j Print Set [Date] and [Info] are recognized by the ...


