
L18 / L16 User's Manual
Page 4
...following safety precautions in injury. After removing or disconnecting the power source, take the product to prevent infants from putting the batteries or other small parts into their entirety before using this could result from the camera or AC adapter, unplug the AC adapter... and remove the batteries immediately, taking care to a Nikon-authorized service representative for inspection after unplugging the product and/or removing the batteries. For Your Safety To prevent damage to your Nikon product or injury to yourself or to prevent possible ...
...following safety precautions in injury. After removing or disconnecting the power source, take the product to prevent infants from putting the batteries or other small parts into their entirety before using this could result from the camera or AC adapter, unplug the AC adapter... and remove the batteries immediately, taking care to a Nikon-authorized service representative for inspection after unplugging the product and/or removing the batteries. For Your Safety To prevent damage to your Nikon product or injury to yourself or to prevent possible ...

L18 / L16 User's Manual
Page 5
...not combine old and new batteries or batteries of them as necklaces or hairpins. • Batteries are prone to water. • Do not transport or store with a dry cloth. Continued use each of different makes or types. • If Nikon rechargeable EN-MH1 NiMH batteries are using an AC ...adapter, be sure to remove the batteries when no charge remains. • Discontinue use immediately should be damaged and the wires become exposed...
...not combine old and new batteries or batteries of them as necklaces or hairpins. • Batteries are prone to water. • Do not transport or store with a dry cloth. Continued use each of different makes or types. • If Nikon rechargeable EN-MH1 NiMH batteries are using an AC ...adapter, be sure to remove the batteries when no charge remains. • Discontinue use immediately should be damaged and the wires become exposed...
L18 / L16 User's Manual
Page 9
...) Button...8 The Multi Selector...9 The d Button...10 Help Displays...11 Attaching the Camera Strap ...11 Shutter-release Button ...11 First Steps ...12 Insert the Batteries...12 Supported Batteries ...12 Turning On and Off the Camera...12 Setting Display Language, Date and Time 14 Inserting Memory Cards ...16 Removing Memory Cards...17 G Basic...
...) Button...8 The Multi Selector...9 The d Button...10 Help Displays...11 Attaching the Camera Strap ...11 Shutter-release Button ...11 First Steps ...12 Insert the Batteries...12 Supported Batteries ...12 Turning On and Off the Camera...12 Setting Display Language, Date and Time 14 Inserting Memory Cards ...16 Removing Memory Cards...17 G Basic...
L18 / L16 User's Manual
Page 12
...-shake AE...82 h AF Assist ...83 i Sound Settings ...83 k Auto Off ...84 l Format Memory/m Format Card ...85 n Language ...86 o Video mode...86 p Reset All ...87 s Battery type...89 d Protect ...89 h Copy ...89 r Firmware Version ...90 Technical Notes...91 Optional Accessories ...91 Approved Memory Cards ...91 Image File and Folder Names...92...
...-shake AE...82 h AF Assist ...83 i Sound Settings ...83 k Auto Off ...84 l Format Memory/m Format Card ...85 n Language ...86 o Video mode...86 p Reset All ...87 s Battery type...89 d Protect ...89 h Copy ...89 r Firmware Version ...90 Technical Notes...91 Optional Accessories ...91 Approved Memory Cards ...91 Image File and Folder Names...92...
L18 / L16 User's Manual
Page 14
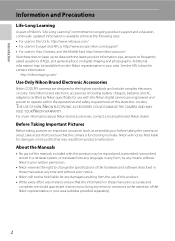
... to the attention of the Nikon representative in your area (address provided separately). 2 Only Nikon brand electronic accessories (including battery chargers, batteries and AC adapters) certified by any means, without Nikon's prior written permission. • Nikon reserves the right to change ... a retrieval system, or translated into any language in any form, by Nikon specifically for contact information: http://nikonimaging.com/ Use Only Nikon Brand Electronic Accessories Nikon COOLPIX cameras are engineered and proven to operate within the operational and safety requirements of...
... to the attention of the Nikon representative in your area (address provided separately). 2 Only Nikon brand electronic accessories (including battery chargers, batteries and AC adapters) certified by any means, without Nikon's prior written permission. • Nikon reserves the right to change ... a retrieval system, or translated into any language in any form, by Nikon specifically for contact information: http://nikonimaging.com/ Use Only Nikon Brand Electronic Accessories Nikon COOLPIX cameras are engineered and proven to operate within the operational and safety requirements of...
L18 / L16 User's Manual
Page 17
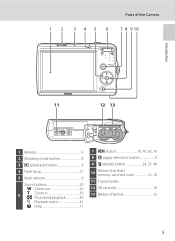
1 2 345 6 Parts of the Camera 7 8 9 10 Introduction 11 12 13 1 Monitor 6 2 Shooting mode button 8 3 c (playback) button 8 4 Flash lamp 27 5 Multi selector 9 Zoom buttons 20 f : Zoom out 20 6 g : Zoom in 20 h : Thumbnail playback 40 i : Playback zoom 41 j : Help 11 7 d button 10, 47, 62, 70 8 k (apply selection) button 9 9 l (delete) button 24, 25, 48 10 Battery-chamber/ memory card slot cover 12, 16 11 Tripod socket 12 SD card slot 16 13 Battery-chamber 12 5
1 2 345 6 Parts of the Camera 7 8 9 10 Introduction 11 12 13 1 Monitor 6 2 Shooting mode button 8 3 c (playback) button 8 4 Flash lamp 27 5 Multi selector 9 Zoom buttons 20 f : Zoom out 20 6 g : Zoom in 20 h : Thumbnail playback 40 i : Playback zoom 41 j : Help 11 7 d button 10, 47, 62, 70 8 k (apply selection) button 9 9 l (delete) button 24, 25, 48 10 Battery-chamber/ memory card slot cover 12, 16 11 Tripod socket 12 SD card slot 16 13 Battery-chamber 12 5
L18 / L16 User's Manual
Page 18
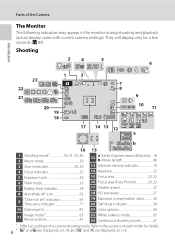
Refer to the current shooting mode. They will display only for details. 6 2 z and y are displayed on L18, and M and d are displayed on L16. Shooting 24 5 6 1 3 23 7 22 8 21 20 19 18 10 +1.0 1/60 F2.8 999 9 10 11 17 16 1 Shooting mode1 18, 31, 32, 46 2 Macro mode 29 ...3 Zoom indicator 20, 29 4 Focus indicator 22 5 Exposure Lock 39 6 Flash mode 26 7 Battery level indicator 18 8 Anti-shake AE icon 82 9 "Date not set" indicator 96 Time zone indicator 77 14 13 12 999 a 9999 59m59s b 15 9h59m59s...
Refer to the current shooting mode. They will display only for details. 6 2 z and y are displayed on L18, and M and d are displayed on L16. Shooting 24 5 6 1 3 23 7 22 8 21 20 19 18 10 +1.0 1/60 F2.8 999 9 10 11 17 16 1 Shooting mode1 18, 31, 32, 46 2 Macro mode 29 ...3 Zoom indicator 20, 29 4 Focus indicator 22 5 Exposure Lock 39 6 Flash mode 26 7 Battery level indicator 18 8 Anti-shake AE icon 82 9 "Date not set" indicator 96 Time zone indicator 77 14 13 12 999 a 9999 59m59s b 15 9h59m59s...
L18 / L16 User's Manual
Page 19
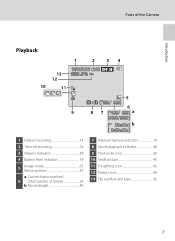
Introduction Parts of the Camera Playback 1 2 34 13 12 15/05/2008 12:00 9999.JPG 10 11 5 999 999 6 9 8 7 999 999 a 9999 9999 59m59s b 9h59m59s 1 Date of recording 14 2 Time of recording 14 3 Volume indicator 48 4 Battery level indicator 18 5 Image mode 63 Movie options 47 a Current frame number/ 6 total number of frames 24 b Movie length 48 7 Internal memory indicator 19 8 Movie playback indicator 48 9 Print-order icon 60 10 Small picture 45 11 D-Lighting icon 43 12 Protect icon 89 13 File number and type 92 7
Introduction Parts of the Camera Playback 1 2 34 13 12 15/05/2008 12:00 9999.JPG 10 11 5 999 999 6 9 8 7 999 999 a 9999 9999 59m59s b 9h59m59s 1 Date of recording 14 2 Time of recording 14 3 Volume indicator 48 4 Battery level indicator 18 5 Image mode 63 Movie options 47 a Current frame number/ 6 total number of frames 24 b Movie length 48 7 Internal memory indicator 19 8 Movie playback indicator 48 9 Print-order icon 60 10 Small picture 45 11 D-Lighting icon 43 12 Protect icon 89 13 File number and type 92 7
L18 / L16 User's Manual
Page 24
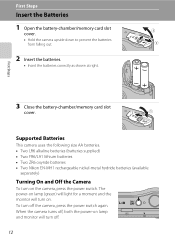
... shown at right. 3 1 2 First Steps 3 Close the battery-chamber/memory card slot cover. 2 1 Supported Batteries This camera uses the following size AA batteries. • Two LR6 alkaline batteries (batteries supplied) • Two FR6/L91 lithium batteries • Two ZR6 oxyride batteries • Two Nikon EN-MH1 rechargeable nickel-metal hydride batteries (available separately) Turning On and Off the Camera...
... shown at right. 3 1 2 First Steps 3 Close the battery-chamber/memory card slot cover. 2 1 Supported Batteries This camera uses the following size AA batteries. • Two LR6 alkaline batteries (batteries supplied) • Two FR6/L91 lithium batteries • Two ZR6 oxyride batteries • Two Nikon EN-MH1 rechargeable nickel-metal hydride batteries (available separately) Turning On and Off the Camera...
L18 / L16 User's Manual
Page 25
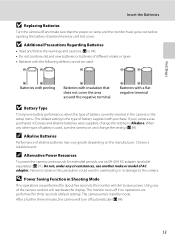
...further three minutes, the camera will turn the camera on and change the setting to save power. The default setting is used : Batteries with peeling Batteries with insulation that the power-on the manufacturer. Choose a reliable brand. C Alternative Power Resources To power the camera continuously for ... performed for extended periods, use another make sure that does not cover the area around the negative terminal. Batteries with purchase. When any of battery currently inserted in the camera in Shooting Mode If no operations are performed for about five seconds, the monitor...
...further three minutes, the camera will turn the camera on and change the setting to save power. The default setting is used : Batteries with peeling Batteries with insulation that the power-on the manufacturer. Choose a reliable brand. C Alternative Power Resources To power the camera continuously for ... performed for extended periods, use another make sure that does not cover the area around the negative terminal. Batteries with purchase. When any of battery currently inserted in the camera in Shooting Mode If no operations are performed for about five seconds, the monitor...
L18 / L16 User's Manual
Page 28
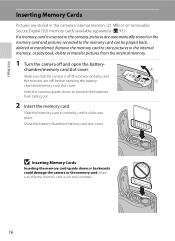
... are stored in correctly until it clicks into place. If a memory card is inserted in the camera, pictures are off and open the battery- chamber/memory card slot cover. Make sure that the memory card is off (the power-on removable Secure Digital (SD) memory cards (... back, delete or transfer pictures from falling out. 2 Insert the memory card. Close the battery-chamber/memory card slot cover. 3 1 2 B Inserting Memory Cards Inserting the memory card upside down to prevent the batteries from the internal memory. 1 Turn the camera off ) before opening the batterychamber/memory card...
... are stored in correctly until it clicks into place. If a memory card is inserted in the camera, pictures are off and open the battery- chamber/memory card slot cover. Make sure that the memory card is off (the power-on removable Secure Digital (SD) memory cards (... back, delete or transfer pictures from falling out. 2 Insert the memory card. Close the battery-chamber/memory card slot cover. 3 1 2 B Inserting Memory Cards Inserting the memory card upside down to prevent the batteries from the internal memory. 1 Turn the camera off ) before opening the batterychamber/memory card...
L18 / L16 User's Manual
Page 29
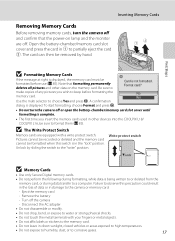
...Do not turn the camera off and confirm that formatting permanently deletes all pictures and other devices into the COOLPIX L18/ COOLPIX L16, be formatted before formatting the memory card. Remove the battery - Eject the memory card - B The Write Protect Switch Memory cards are off. Unlock by hand.... "write" position. First Steps Inserting Memory Cards Removing Memory Cards Before removing memory cards, turn the camera off or open the battery-chamber/memory card slot cover until formatting is complete. • The first time you wish to keep before use (A 85). ...
...Do not turn the camera off and confirm that formatting permanently deletes all pictures and other devices into the COOLPIX L18/ COOLPIX L16, be formatted before formatting the memory card. Remove the battery - Eject the memory card - B The Write Protect Switch Memory cards are off. Unlock by hand.... "write" position. First Steps Inserting Memory Cards Removing Memory Cards Before removing memory cards, turn the camera off or open the battery-chamber/memory card slot cover until formatting is complete. • The first time you wish to keep before use (A 85). ...
L18 / L16 User's Manual
Page 30
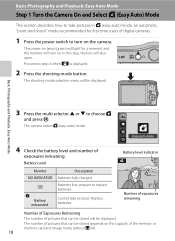
Basic Photography and Playback: Easy Auto Mode 3 Press the multi selector H or I to replace batteries. Easy auto mode 4 Check the battery level and number of pictures that can be stored will also open. prepare to choose G and press...when U is displayed. 2 Press the shooting mode button. Battery Level Battery level indicator Monitor NO INDICATOR B N Battery exhausted. The power-on the camera. Description Batteries fully charged. The camera enters G (easy auto) mode. Batteries low; Replace batteries. 7 Number of exposures remaining Number of Exposures Remaining The ...
Basic Photography and Playback: Easy Auto Mode 3 Press the multi selector H or I to replace batteries. Easy auto mode 4 Check the battery level and number of pictures that can be stored will also open. prepare to choose G and press...when U is displayed. 2 Press the shooting mode button. Battery Level Battery level indicator Monitor NO INDICATOR B N Battery exhausted. The power-on the camera. Description Batteries fully charged. The camera enters G (easy auto) mode. Batteries low; Replace batteries. 7 Number of exposures remaining Number of Exposures Remaining The ...
L18 / L16 User's Manual
Page 34
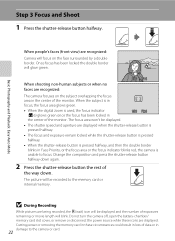
... on the face surrounded by a double border. Step 3 Focus and Shoot 1 Press the shutter-release button halfway. Do not turn the camera off, open the battery-chamber/ memory card slot cover, or remove or disconnect the power source while these circumstances could result in damage to focus.
... on the face surrounded by a double border. Step 3 Focus and Shoot 1 Press the shutter-release button halfway. Do not turn the camera off, open the battery-chamber/ memory card slot cover, or remove or disconnect the power source while these circumstances could result in damage to focus.
L18 / L16 User's Manual
Page 39
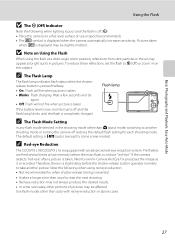
... not always produce the desired results. • In some scene modes) C Red-eye Reduction The COOLPIX L18/COOLPIX L16 is equipped with red-eye reduction in on a flat, level surface or use a tripod (recommended...except for each shooting mode. If the camera detects "red-eye" after a picture is taken, Nikon's own In-Camera Red Eye Fix processes the image as bright spots in the shooting mode other than...8226; On: Flash will not fire when picture is completely charged. Flash lamp If the battery level is off (W): • Place the camera on the subject. Note the following when...
... not always produce the desired results. • In some scene modes) C Red-eye Reduction The COOLPIX L18/COOLPIX L16 is equipped with red-eye reduction in on a flat, level surface or use a tripod (recommended...except for each shooting mode. If the camera detects "red-eye" after a picture is taken, Nikon's own In-Camera Red Eye Fix processes the image as bright spots in the shooting mode other than...8226; On: Flash will not fire when picture is completely charged. Flash lamp If the battery level is off (W): • Place the camera on the subject. Note the following when...
L18 / L16 User's Manual
Page 62
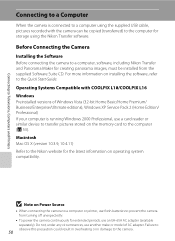
...the camera continuously for the latest information on Power Source • When connecting the camera to a computer or printer, use fresh batteries to prevent the camera from the supplied Software Suite CD. Failure to observe this precaution could result in overheating or in damage to... to the camera. 50 Before Connecting the Camera Installing the Software Before connecting the camera to a computer, software, including Nikon Transfer and Panorama Maker for storage using the supplied USB cable, pictures recorded with COOLPIX L18/COOLPIX L16 Windows Preinstalled versions of AC adapter.
...the camera continuously for the latest information on Power Source • When connecting the camera to a computer or printer, use fresh batteries to prevent the camera from the supplied Software Suite CD. Failure to observe this precaution could result in overheating or in damage to... to the camera. 50 Before Connecting the Camera Installing the Software Before connecting the camera to a computer, software, including Nikon Transfer and Panorama Maker for storage using the supplied USB cable, pictures recorded with COOLPIX L18/COOLPIX L16 Windows Preinstalled versions of AC adapter.

L18 / L16 User's Manual
Page 66
... prevent the camera from your 54 camera's print set menu (A 60). Connecting to a Printer Users of AC adapter. Do not, under any circumstances, use fresh batteries to the camera.
... prevent the camera from your 54 camera's print set menu (A 60). Connecting to a Printer Users of AC adapter. Do not, under any circumstances, use fresh batteries to the camera.

L18 / L16 User's Manual
Page 86
... selected pictures from accidental deletion. U Anti-shake AE Increase the shutter speed and adjust the anti-shake AE settings for camera monitor display. s Battery type Choose type of batteries inserted in camera. Shooting, Playback and Setup Menus Basic Camera Setup: The Setup Menu The setup menu contains the following options. h AF assist...
... selected pictures from accidental deletion. U Anti-shake AE Increase the shutter speed and adjust the anti-shake AE settings for camera monitor display. s Battery type Choose type of batteries inserted in camera. Shooting, Playback and Setup Menus Basic Camera Setup: The Setup Menu The setup menu contains the following options. h AF assist...

L18 / L16 User's Manual
Page 90
... 15/05/2008 10:31 London,Casablanca Daylight saving EST:New York Daylight saving Exit Shooting, Playback and Setup Menus B The Clock Battery The clock battery charges when the main batteries are set the home time zone. The setting is in effect: Turn Daylight saving off when daylight saving time ends, to set...
... 15/05/2008 10:31 London,Casablanca Daylight saving EST:New York Daylight saving Exit Shooting, Playback and Setup Menus B The Clock Battery The clock battery charges when the main batteries are set the home time zone. The setting is in effect: Turn Daylight saving off when daylight saving time ends, to set...

L18 / L16 User's Manual
Page 96
... from 30 s (default setting), 1 m, 5 m, and 30 m. Shooting, Playback and Setup Menus Basic Camera Setup: The Setup Menu k Auto Off To reduce the drain on the batteries, the monitor turns off and the camera enters standby mode (A 13), if no operations are performed for another three minutes, the camera turns off automatically...
... from 30 s (default setting), 1 m, 5 m, and 30 m. Shooting, Playback and Setup Menus Basic Camera Setup: The Setup Menu k Auto Off To reduce the drain on the batteries, the monitor turns off and the camera enters standby mode (A 13), if no operations are performed for another three minutes, the camera turns off automatically...


