
User Manual
Page 2
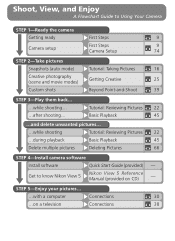
... ...and delete unwanted pictures... ...while shooting Tutorial: Reviewing Pictures 22 ...during playback Basic Playback 45 Delete multiple pictures Deleting Pictures 66 STEP 4-Install camera software Install software Quick Start Guide (provided) - Get to Using Your Camera STEP 1-Ready the camera Getting ready First Steps 9 Camera setup First Steps Camera Setup 9 74 STEP 2-Take pictures Snapshots (auto...
... ...and delete unwanted pictures... ...while shooting Tutorial: Reviewing Pictures 22 ...during playback Basic Playback 45 Delete multiple pictures Deleting Pictures 66 STEP 4-Install camera software Install software Quick Start Guide (provided) - Get to Using Your Camera STEP 1-Ready the camera Getting ready First Steps 9 Camera setup First Steps Camera Setup 9 74 STEP 2-Take pictures Snapshots (auto...
User Manual
Page 3
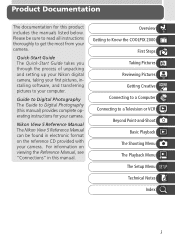
... found in this manual. Nikon View 5 Reference Manual The Nikon View 5 Reference Manual can be sure to read all instructions thoroughly to Digital Photography (this product includes the manuals listed below. Overview Getting to Know the COOLPIX 2000 First Steps Taking Pictures Reviewing Pictures Getting Creative Connecting to a Computer Connecting to your camera. For information on viewing...
... found in this manual. Nikon View 5 Reference Manual The Nikon View 5 Reference Manual can be sure to read all instructions thoroughly to Digital Photography (this product includes the manuals listed below. Overview Getting to Know the COOLPIX 2000 First Steps Taking Pictures Reviewing Pictures Getting Creative Connecting to a Computer Connecting to your camera. For information on viewing...
User Manual
Page 8
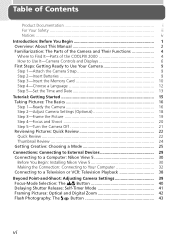
...This Manual 2 Familiarization: The Parts of the Camera and Their Functions 4 Where to Find It-Parts of the COOLPIX 2000 4 How to Use It-Camera Controls and Displays 6 First Steps: Getting Ready to Use Your Camera 9 Step 1-Attach the Camera Strap 9 Step 2-Insert Batteries 9 Step 3-Insert...Shoot 20 Step 5-Turn the Camera Off 21 Reviewing Pictures: Quick Review 22 Quick Review 22 Thumbnail Review 24 Getting Creative: Choosing a Mode 25 Connections: Connecting to External Devices 29 Connecting to a Computer: Nikon View 5 30 Before You Begin: Installing Nikon View 5 30 Making the ...
...This Manual 2 Familiarization: The Parts of the Camera and Their Functions 4 Where to Find It-Parts of the COOLPIX 2000 4 How to Use It-Camera Controls and Displays 6 First Steps: Getting Ready to Use Your Camera 9 Step 1-Attach the Camera Strap 9 Step 2-Insert Batteries 9 Step 3-Insert...Shoot 20 Step 5-Turn the Camera Off 21 Reviewing Pictures: Quick Review 22 Quick Review 22 Thumbnail Review 24 Getting Creative: Choosing a Mode 25 Connections: Connecting to External Devices 29 Connecting to a Computer: Nikon View 5 30 Before You Begin: Installing Nikon View 5 30 Making the ...
User Manual
Page 15
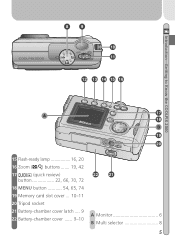
Introduction-Getting to Know the COOLPIX 2000 8 9 10 11 12 13 14 15 16 17 A 18 B 19 20 15 Flash-ready lamp 16, 20 16 Zoom ( / ) buttons ....... 19, 42 17 QUICK (quick review) button 22, 66, 70, 72 18 MENU button 54, 65, 74 19 Memory card slot cover ... 10-11 20 Tripod socket 21 Battery-chamber cover latch .... 9 22 Battery-chamber cover ...... 9-10 22 21 A Monitor 6 B Multi selector 8 5
Introduction-Getting to Know the COOLPIX 2000 8 9 10 11 12 13 14 15 16 17 A 18 B 19 20 15 Flash-ready lamp 16, 20 16 Zoom ( / ) buttons ....... 19, 42 17 QUICK (quick review) button 22, 66, 70, 72 18 MENU button 54, 65, 74 19 Memory card slot cover ... 10-11 20 Tripod socket 21 Battery-chamber cover latch .... 9 22 Battery-chamber cover ...... 9-10 22 21 A Monitor 6 B Multi selector 8 5
User Manual
Page 25
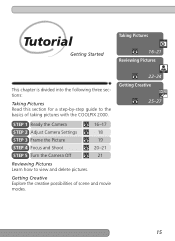
Tutorial Getting Started Taking Pictures 16-21 Reviewing Pictures This chapter is divided into the following three sections: Taking Pictures Read this section for a step-by-step guide to view and delete pictures. Getting Creative Explore the creative possibilities of taking pictures with the COOLPIX 2000. STEP 1 Ready the Camera STEP 2 Adjust Camera Settings STEP 3 Frame the Picture STEP 4 Focus and Shoot STEP 5 Turn the Camera Off 16-17 18 19 20-21 21 Reviewing Pictures Learn how to the basics of scene and movie modes. 22-24 Getting Creative 25-27 15
Tutorial Getting Started Taking Pictures 16-21 Reviewing Pictures This chapter is divided into the following three sections: Taking Pictures Read this section for a step-by-step guide to view and delete pictures. Getting Creative Explore the creative possibilities of taking pictures with the COOLPIX 2000. STEP 1 Ready the Camera STEP 2 Adjust Camera Settings STEP 3 Frame the Picture STEP 4 Focus and Shoot STEP 5 Turn the Camera Off 16-17 18 19 20-21 21 Reviewing Pictures Learn how to the basics of scene and movie modes. 22-24 Getting Creative 25-27 15
User Manual
Page 32
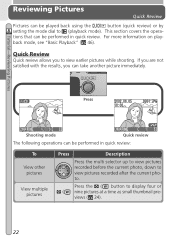
... four or ( ) nine pictures at a time as small thumbnail pre- Tutorial-Reviewing Pictures Reviewing Pictures Quick Review Pictures can take another picture immediately. This section covers the operations that can be performed in quick review. For more information on playback mode, see "Basic Playback" ( 46). Press 1632... by setting the mode dial to view pictures recorded after the current photo. Quick Review Quick review allows you can be performed in quick review: To View other pictures View multiple pictures Press Description Press the multi selector up to view pictures ...
... four or ( ) nine pictures at a time as small thumbnail pre- Tutorial-Reviewing Pictures Reviewing Pictures Quick Review Pictures can take another picture immediately. This section covers the operations that can be performed in quick review. For more information on playback mode, see "Basic Playback" ( 46). Press 1632... by setting the mode dial to view pictures recorded after the current photo. Quick Review Quick review allows you can be performed in quick review: To View other pictures View multiple pictures Press Description Press the multi selector up to view pictures ...
User Manual
Page 33
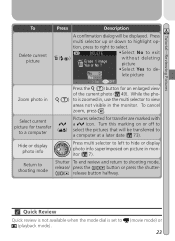
... the pho( ) to is set to a computer ( Pictures selected for transfer to (playback mode). (movie mode) or 23 Return to shooting mode Shutter To end review and return to view areas not visible in , use the multi selector to shooting mode, release/ press the QUICK button or press the shutterQUICK release... displayed. DELETE •Select No to a computer at a later date ( 73). To cancel zoom, press . Select current picture for transfer are marked with a icon. Quick Review Quick review is not available when the mode dial is zoomed in the monitor. Tutorial...
... the pho( ) to is set to a computer ( Pictures selected for transfer to (playback mode). (movie mode) or 23 Return to shooting mode Shutter To end review and return to view areas not visible in , use the multi selector to shooting mode, release/ press the QUICK button or press the shutterQUICK release... displayed. DELETE •Select No to a computer at a later date ( 73). To cancel zoom, press . Select current picture for transfer are marked with a icon. Quick Review Quick review is not available when the mode dial is zoomed in the monitor. Tutorial...

User Manual
Page 34
... selector up or down , left, or right to a computer at a later date ( 73). Return to shooting mode Shutter To end review and return to view highlighted picture full size. played, to shooting mode, press release/ the QUICK button or press the shutter-release butQUICK...thumbnail images. The following operations can be performed while thumbnails are marked with - () Erase 1 image Yes or No ? Press ( ) to "zoom in quick review displays a menu of pictures displayed ( / ( With four thumbnails displayed, press the but- ) ) ton once to a fourthumbnail view or, when four thumbnails...
... selector up or down , left, or right to a computer at a later date ( 73). Return to shooting mode Shutter To end review and return to view highlighted picture full size. played, to shooting mode, press release/ the QUICK button or press the shutter-release butQUICK...thumbnail images. The following operations can be performed while thumbnails are marked with - () Erase 1 image Yes or No ? Press ( ) to "zoom in quick review displays a menu of pictures displayed ( / ( With four thumbnails displayed, press the but- ) ) ton once to a fourthumbnail view or, when four thumbnails...
User Manual
Page 43
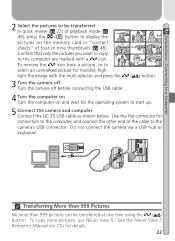
...on CD) for connection to the computer, and connect the other end of four or nine thumbnails ( 48). Do not connect the camera via a USB hub or keyboard. See the Nikon View 5 Reference Manual (on and wait for transfer, high- Confirm that only the pictures you want to copy 4 to 7 ... an unmarked picture for the operating system to start up. 5 Connect the camera and computer Connect the UC-E5 USB cable as shown below. light the image with a icon. Transferring More than 999 pictures can be transferred In quick review ( 22) or playback mode ( 46), press the ( ) button to ...
...on CD) for connection to the computer, and connect the other end of four or nine thumbnails ( 48). Do not connect the camera via a USB hub or keyboard. See the Nikon View 5 Reference Manual (on and wait for transfer, high- Confirm that only the pictures you want to copy 4 to 7 ... an unmarked picture for the operating system to start up. 5 Connect the camera and computer Connect the UC-E5 USB cable as shown below. light the image with a icon. Transferring More than 999 pictures can be transferred In quick review ( 22) or playback mode ( 46), press the ( ) button to ...
User Manual
Page 61
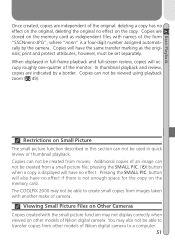
...When displayed in full-frame playback and full-screen review, copies will have the same transfer marking as independent files with another make of camera. print and protect attributes, however, must be created from other models of Nikon digital camera. Copies can not be created from images taken ... models of the monitor. The COOLPIX 2000 may not display correctly when viewed on the copy. Copies can not be able to a computer. 51 button will also have no effect if there is displayed will occupy roughly one-quarter of Nikon digital camera to create small copies from a...
...When displayed in full-frame playback and full-screen review, copies will have the same transfer marking as independent files with another make of camera. print and protect attributes, however, must be created from other models of Nikon digital camera. Copies can not be created from images taken ... models of the monitor. The COOLPIX 2000 may not display correctly when viewed on the copy. Copies can not be able to a computer. 51 button will also have no effect if there is displayed will occupy roughly one-quarter of Nikon digital camera to create small copies from a...

User Manual
Page 80
Note, however, that protected pictures will be selected at right, where you will be deleted in review, single- To exit Protect menu without changing pro- Done tected status of pictures, press MENU button. leted when the memory card is formatted. Repeat steps 1 ...
Note, however, that protected pictures will be selected at right, where you will be deleted in review, single- To exit Protect menu without changing pro- Done tected status of pictures, press MENU button. leted when the memory card is formatted. Repeat steps 1 ...
User Manual
Page 95
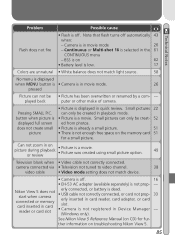
... movie. ther information on picture during playback or review • Picture is selected in Device Manager (Windows only). 33 - button when picture is • Picture is not registered in the 61 CONTINUOUS menu - Nikon View 5 does not start when camera connected or memory card inserted in card reader or... in movie mode 26 - See Nikon View 5 Reference Manual (on 62 • Battery level is low. 17 Colors are unnatural • White balance does not match light source. 58 No menu is displayed when MENU button is • Camera is in quick review. BSS is on CD) for ...
... movie. ther information on picture during playback or review • Picture is selected in Device Manager (Windows only). 33 - button when picture is • Picture is not registered in the 61 CONTINUOUS menu - Nikon View 5 does not start when camera connected or memory card inserted in card reader or... in movie mode 26 - See Nikon View 5 Reference Manual (on 62 • Battery level is low. 17 Colors are unnatural • White balance does not match light source. 58 No menu is displayed when MENU button is • Camera is in quick review. BSS is on CD) for ...
User Manual
Page 97
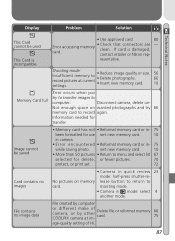
resentative. Image cannot be used This Card is damaged, contact retailer or Nikon rep- - File contains no images • Camera in quick review 23 mode: half-press shutter-re- Shooting mode: Insufficient memory to card. Not enough space on memory lease button to return to record ...or in- 75 been formatted for delete, or fewer pictures. 70 protect, or print set. 72 Card contains no image data File created by other COOLPIX camera at current settings. • Reduce image quality or size. • Delete photographs. • Insert new memory card. 56 66 10 Memory Card full...
resentative. Image cannot be used This Card is damaged, contact retailer or Nikon rep- - File contains no images • Camera in quick review 23 mode: half-press shutter-re- Shooting mode: Insufficient memory to card. Not enough space on memory lease button to return to record ...or in- 75 been formatted for delete, or fewer pictures. 70 protect, or print set. 72 Card contains no image data File created by other COOLPIX camera at current settings. • Reduce image quality or size. • Delete photographs. • Insert new memory card. 56 66 10 Memory Card full...
User Manual
Page 102
... pictures from playback menu, 66-67 in full-frame playback, 46 in quick review, 23 in , 19 MOV. See optional accessories AF●. See focus indicator Autofocus, 20 Auto... off, 76 Auto transfer, 73 B Backlight. See Nikon View 5; era File systems Delete, Deleting images from , 36-37 MENU button, 5, 12, 54,...40 CompactFlash™ card. See image qual- See Design rule for Camera File sys- See autofocus infinity, 40 macro close -up , 40 Formatting. tems, 47 Digital Print Order Format, 71 DPOF. See memory card, formatting I ...
... pictures from playback menu, 66-67 in full-frame playback, 46 in quick review, 23 in , 19 MOV. See optional accessories AF●. See focus indicator Autofocus, 20 Auto... off, 76 Auto transfer, 73 B Backlight. See Nikon View 5; era File systems Delete, Deleting images from , 36-37 MENU button, 5, 12, 54,...40 CompactFlash™ card. See image qual- See Design rule for Camera File sys- See autofocus infinity, 40 macro close -up , 40 Formatting. tems, 47 Digital Print Order Format, 71 DPOF. See memory card, formatting I ...
User Manual
Page 103
...Smear, 82 Specifications, 89 Speedlight. See Date Timer. See zoom, buttons Web resources, 83 White balance, 58-59 Wide angle. See shooting mode, Night Portrait Nikon View 5, i, 30 system requirements for , 23-24, 47-48 Troubleshooting, 83-85 V Video mode, 76 VCR, 38 W W. See shooting mode, ...48 zoom, 23 PLAYBACK menu, 65-73 Portrait. See zoom Z Zoom buttons, 5, 19, 42 digital, 42 indicator, 19, 42 optical, 42 R Red-eye reduction. See image quality QUICK button, 5, 22 Quick review, 22-24 QuickTime. See camera strap T T. ing, 6, 17 O On/off. See monitor; self- See also transfer 93...
...Smear, 82 Specifications, 89 Speedlight. See Date Timer. See zoom, buttons Web resources, 83 White balance, 58-59 Wide angle. See shooting mode, Night Portrait Nikon View 5, i, 30 system requirements for , 23-24, 47-48 Troubleshooting, 83-85 V Video mode, 76 VCR, 38 W W. See shooting mode, ...48 zoom, 23 PLAYBACK menu, 65-73 Portrait. See zoom Z Zoom buttons, 5, 19, 42 digital, 42 indicator, 19, 42 optical, 42 R Red-eye reduction. See image quality QUICK button, 5, 22 Quick review, 22-24 QuickTime. See camera strap T T. ing, 6, 17 O On/off. See monitor; self- See also transfer 93...
