Reference Manual
Page 6
...for use with this device as at weddings or before taking the camera on digital imaging and photography. Only Nikon brand electronic accessories (including battery chargers, batteries, Charging AC Adapter and AC adapters) certified by any means, without prior notice. • While every... of the hardware and software described in the documentation at any form, by Nikon specifically for contact information: http://imaging.nikon.com/ Use Only Nikon Brand Electronic Accessories Nikon COOLPIX cameras are engineered and proven to operate within the operational and safety requirements of...
...for use with this device as at weddings or before taking the camera on digital imaging and photography. Only Nikon brand electronic accessories (including battery chargers, batteries, Charging AC Adapter and AC adapters) certified by any means, without prior notice. • While every... of the hardware and software described in the documentation at any form, by Nikon specifically for contact information: http://imaging.nikon.com/ Use Only Nikon Brand Electronic Accessories Nikon COOLPIX cameras are engineered and proven to operate within the operational and safety requirements of...

Reference Manual
Page 8
...gasoline, as well as the result of malfunction Should you notice smoke or an unusual smell coming from putting the battery or other accident, take the equipment to a Nikon-authorized service representative for extended periods may cause injury. Keep out of reach of children Do not keep the products... devices in direct contact with the camera, Charging AC Adapter, or AC adapter for inspection, after unplugging the product and/or removing the battery. Do not disassemble Touching the internal parts of the devices become hot. Do not use the product will read them. Should the camera ...
...gasoline, as well as the result of malfunction Should you notice smoke or an unusual smell coming from putting the battery or other accident, take the equipment to a Nikon-authorized service representative for extended periods may cause injury. Keep out of reach of children Do not keep the products... devices in direct contact with the camera, Charging AC Adapter, or AC adapter for inspection, after unplugging the product and/or removing the battery. Do not disassemble Touching the internal parts of the devices become hot. Do not use the product will read them. Should the camera ...

Reference Manual
Page 9
...leak, overheat, or explode if improperly handled. Observe the following precautions when handling the Charging AC Adapter • Keep dry. Charge the battery by Nikon for use only the cables provided or sold by inserting it into the camera and connecting the Charging AC Adapter EH-70P (included). •...; When inserting the battery, do not attempt to insert it is prone to another or with a dry cloth. Failure to heat or flames. Observe ...
...leak, overheat, or explode if improperly handled. Observe the following precautions when handling the Charging AC Adapter • Keep dry. Charge the battery by Nikon for use only the cables provided or sold by inserting it into the camera and connecting the Charging AC Adapter EH-70P (included). •...; When inserting the battery, do not attempt to insert it is prone to another or with a dry cloth. Failure to heat or flames. Observe ...

Reference Manual
Page 12
Wash hands after handling. Nikon Inc., 1300 Walt Whitman Road, Melville, New York 11747-3064 USA Tel: 631-547-4200 Notice for Customers in European countries: • All batteries, whether marked with Canadian ICES-003. x Do not dispose of as household waste. • For more information,...California to cause birth defects or other reproductive harm. The following apply only to users in Europe CAUTIONS RISK OF EXPLOSION IF BATTERY IS REPLACED BY AN INCORRECT TYPE. Notices for Customers in Canada CAUTION This Class B digital apparatus complies with this symbol or ...
Wash hands after handling. Nikon Inc., 1300 Walt Whitman Road, Melville, New York 11747-3064 USA Tel: 631-547-4200 Notice for Customers in European countries: • All batteries, whether marked with Canadian ICES-003. x Do not dispose of as household waste. • For more information,...California to cause birth defects or other reproductive harm. The following apply only to users in Europe CAUTIONS RISK OF EXPLOSION IF BATTERY IS REPLACED BY AN INCORRECT TYPE. Notices for Customers in Canada CAUTION This Class B digital apparatus complies with this symbol or ...

Reference Manual
Page 18
... Precautions...iv For Your Safety ...vi WARNINGS ...vi Notices ...ix Notes on GPS/Electronic Compass (COOLPIX S9500 only xi Wi-Fi (Wireless LAN Network) Function (COOLPIX S9500 only xiii Parts of the Camera and Main Functions 1 The Camera Body ...1 Principle Functions of ...the Controls ...3 Attaching the Camera Strap ...5 Basic Menu Operations ...6 Monitor Screen ...8 The Basics of Shooting and Playback 12 Preparation 1 Insert the Battery...12 Preparation 2 Charge the Battery 14...
... Precautions...iv For Your Safety ...vi WARNINGS ...vi Notices ...ix Notes on GPS/Electronic Compass (COOLPIX S9500 only xi Wi-Fi (Wireless LAN Network) Function (COOLPIX S9500 only xiii Parts of the Camera and Main Functions 1 The Camera Body ...1 Principle Functions of ...the Controls ...3 Attaching the Camera Strap ...5 Basic Menu Operations ...6 Monitor Screen ...8 The Basics of Shooting and Playback 12 Preparation 1 Insert the Battery...12 Preparation 2 Charge the Battery 14...

Reference Manual
Page 22
Introduction Table of Contents Error Messages ...E91 File and Folder Names...E97 Optional Accessories ...E99 Technical Notes and Index ...F1 Caring for the Products...F2 The Camera ...F2 The Battery...F3 Charging AC Adapter ...F4 The Memory Cards...F5 Caring for the Camera ...F6 Cleaning ...F6 Storage ...F6 Troubleshooting...F7 USER LICENSE AGREEMENT FOR LOCATION NAME DATA (COOLPIX S9500 F15 Specifications ...F19 Supported Standards ...F23 Index ...F26 xx
Introduction Table of Contents Error Messages ...E91 File and Folder Names...E97 Optional Accessories ...E99 Technical Notes and Index ...F1 Caring for the Products...F2 The Camera ...F2 The Battery...F3 Charging AC Adapter ...F4 The Memory Cards...F5 Caring for the Camera ...F6 Cleaning ...F6 Storage ...F6 Troubleshooting...F7 USER LICENSE AGREEMENT FOR LOCATION NAME DATA (COOLPIX S9500 F15 Specifications ...F19 Supported Standards ...F23 Index ...F26 xx

Reference Manual
Page 24
... Flash lamp 50 7 l (delete) button 29, 87 8 b (e movie-record) button 28, 82 9 Tripod socket 10 Power connector cover (for an optional AC adapter E99 11 Battery-chamber/ memory card slot cover 12, 16 12 HDMI connector cover 77 13 Eyelet for camera strap 5 14 USB connector cover 14, 77, 80 15...
... Flash lamp 50 7 l (delete) button 29, 87 8 b (e movie-record) button 28, 82 9 Tripod socket 10 Power connector cover (for an optional AC adapter E99 11 Battery-chamber/ memory card slot cover 12, 16 12 HDMI connector cover 77 13 Eyelet for camera strap 5 14 USB connector cover 14, 77, 80 15...
Reference Manual
Page 31
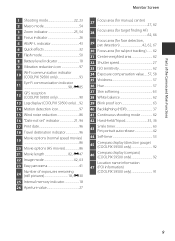
...indicator 43 6 Quick effects 32 7 Flash mode 50 8 Battery level indicator 18 9 Vibration reduction icon 97 10 Wi-Fi communication indicator (COOLPIX S9500 only 93 Eye-Fi communication indicator 11 98, E85 12 GPS reception (COOLPIX S9500 only 90 13 Log display (COOLPIX S9500 only) ....92 14 Motion detection icon 97 15 Wind noise ...Tripod 35, 36 43 Smile timer 63 Pet portrait auto release 42 44 Self-timer 53 45 Compass display (direction gauge) (COOLPIX S9500 only 92 46 Compass display (compass) (COOLPIX S9500 only 92 Location name information 47 (POI information...
...indicator 43 6 Quick effects 32 7 Flash mode 50 8 Battery level indicator 18 9 Vibration reduction icon 97 10 Wi-Fi communication indicator (COOLPIX S9500 only 93 Eye-Fi communication indicator 11 98, E85 12 GPS reception (COOLPIX S9500 only 90 13 Log display (COOLPIX S9500 only) ....92 14 Motion detection icon 97 15 Wind noise ...Tripod 35, 36 43 Smile timer 63 Pet portrait auto release 42 44 Self-timer 53 45 Compass display (direction gauge) (COOLPIX S9500 only 92 46 Compass display (compass) (COOLPIX S9500 only 92 Location name information 47 (POI information...

Reference Manual
Page 32
... icon in auto sort mode....... 71 List by date mode 71 5 Battery level indicator 18 6 Protect icon 74 7 Eye-Fi communication indicator 98, E85 8 Recorded GPS information indicator (COOLPIX S9500 only 90 Compass display (compass) 9 (COOLPIX S9500 only 92 10 Small picture 74, E18 11 Crop 69, E19 12...guide E11 Movie playback guide 87 19 Quick effects 32 20 Volume indicator 74, 87 Location name information 21 (POI information) (COOLPIX S9500 only 91 22 D-Lighting icon 74 23 Quick retouch icon 74 24 Quick effects icon 28 25 Glamour retouch icon 74 26 Sequence...
... icon in auto sort mode....... 71 List by date mode 71 5 Battery level indicator 18 6 Protect icon 74 7 Eye-Fi communication indicator 98, E85 8 Recorded GPS information indicator (COOLPIX S9500 only 90 Compass display (compass) 9 (COOLPIX S9500 only 92 10 Small picture 74, E18 11 Crop 69, E19 12...guide E11 Movie playback guide 87 19 Quick effects 32 20 Volume indicator 74, 87 Location name information 21 (POI information) (COOLPIX S9500 only 91 22 D-Lighting icon 74 23 Quick retouch icon 74 24 Quick effects icon 28 25 Glamour retouch icon 74 26 Sequence...

Reference Manual
Page 34
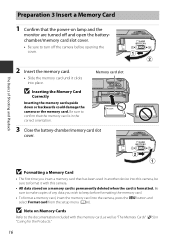
...Basics of Shooting and Playback Preparation 1 Insert the Battery 1 Open the battery-chamber/memory card slot cover. 2 Insert the included battery (Rechargeable Li-ion Battery EN-EL12). Be sure to push the orange battery latch up in the direction indicated by the arrow ...battery (2). • When the battery is inserted correctly, the battery latch will lock the battery in the correct orientation. 3 Close the battery-chamber/memory card slot cover. • Charge the battery before the first use or when the battery is in place. BInserting the Battery Correctly Inserting the battery...
...Basics of Shooting and Playback Preparation 1 Insert the Battery 1 Open the battery-chamber/memory card slot cover. 2 Insert the included battery (Rechargeable Li-ion Battery EN-EL12). Be sure to push the orange battery latch up in the direction indicated by the arrow ...battery (2). • When the battery is inserted correctly, the battery latch will lock the battery in the correct orientation. 3 Close the battery-chamber/memory card slot cover. • Charge the battery before the first use or when the battery is in place. BInserting the Battery Correctly Inserting the battery...

Reference Manual
Page 35
...and Playback Preparation 1 Insert the Battery Removing the Battery Turn the camera off before using the camera. B Notes on lamp and the monitor have turned off (A19) and be hot immediately after using the battery. 13 To eject the battery, open the battery-chamber/ memory card slot cover... and push the orange battery latch in the direction shown (1). The Basics of "For Your Safety" (Avi) thoroughly before...
...and Playback Preparation 1 Insert the Battery Removing the Battery Turn the camera off before using the camera. B Notes on lamp and the monitor have turned off (A19) and be hot immediately after using the battery. 13 To eject the battery, open the battery-chamber/ memory card slot cover... and push the orange battery latch in the direction shown (1). The Basics of "For Your Safety" (Avi) thoroughly before...

Reference Manual
Page 36
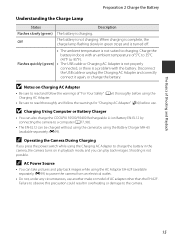
...hours and 50 minutes is securely held in place. Push the plug adapter firmly until it is required to charge a fully exhausted battery. • When the battery has been completely charged, the charge lamp turns off . • When connecting the cable, be sure that the plug is ...) for more information. 3 Disconnect the Charging AC Adapter from the electrical outlet and then disconnect the USB cable. 14 Preparation 2 Charge the Battery 1 Prepare the included Charging AC Adapter EH-70P. Once the two are connected, attempting to forcibly remove the plug adapter could damage the product...
...hours and 50 minutes is securely held in place. Push the plug adapter firmly until it is required to charge a fully exhausted battery. • When the battery has been completely charged, the charge lamp turns off . • When connecting the cable, be sure that the plug is ...) for more information. 3 Disconnect the Charging AC Adapter from the electrical outlet and then disconnect the USB cable. 14 Preparation 2 Charge the Battery 1 Prepare the included Charging AC Adapter EH-70P. Once the two are connected, attempting to forcibly remove the plug adapter could damage the product...
Reference Manual
Page 37
... and correctly connect it again, or change the battery. B Charging Using Computer or Battery Charger • You can also charge the COOLPIX S9500/S9400 Rechargeable Li-ion Battery EN-EL12 by using the Charging AC Adapter to charge the battery in playback mode, and you press the power ...switch while using the Battery Charger MH-65 (available separately; When charging is not suited to a computer...
... and correctly connect it again, or change the battery. B Charging Using Computer or Battery Charger • You can also charge the COOLPIX S9500/S9400 Rechargeable Li-ion Battery EN-EL12 by using the Charging AC Adapter to charge the battery in playback mode, and you press the power ...switch while using the Battery Charger MH-65 (available separately; When charging is not suited to a computer...
Reference Manual
Page 38
... another device into this camera. • All data stored on a memory card is permanently deleted when the card is formatted. Memory card slot 3 Close the battery-chamber/memory card slot cover. The Basics of any data you insert a memory card that has been used in the correct orientation. Preparation 3 Insert a Memory...
... another device into this camera. • All data stored on a memory card is permanently deleted when the card is formatted. Memory card slot 3 Close the battery-chamber/memory card slot cover. The Basics of any data you insert a memory card that has been used in the correct orientation. Preparation 3 Insert a Memory...
Reference Manual
Page 39
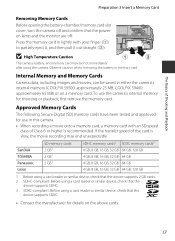
Press the memory card in either the camera's internal memory (COOLPIX S9500: approximately 23 MB, COOLPIX S9400: approximately 65 MB) or on the above cards. 17 To use in this camera. • When recording a movie onto a memory card, a memory card with ... using a card reader or similar device, check that the poweron lamp and the monitor are off. Before using the camera. Observe caution when removing the battery or memory card. Internal Memory and Memory Cards Camera data, including images and movies, can be hot immediately after using a card reader or similar device...
Press the memory card in either the camera's internal memory (COOLPIX S9500: approximately 23 MB, COOLPIX S9400: approximately 65 MB) or on the above cards. 17 To use in this camera. • When recording a movie onto a memory card, a memory card with ... using a card reader or similar device, check that the poweron lamp and the monitor are off. Before using the camera. Observe caution when removing the battery or memory card. Internal Memory and Memory Cards Camera data, including images and movies, can be hot immediately after using a card reader or similar device...

Reference Manual
Page 40
...card, the image quality, and the image size (image mode) (A62). • The number of exposures remaining Battery Level Display b B N Battery exhausted. Battery level indicator The Basics of Shooting and Playback 29m 0s 970 Number of exposures remaining shown in the illustration differs ...power switch to turn on the camera. • If you are recorded to charge or replace the battery. Description Battery level high. Prepare to the internal memory (COOLPIX S9500: approximately 23 MB, COOLPIX S9400: approximately 65 MB). • The number of pictures that can be stored depends on ....
...card, the image quality, and the image size (image mode) (A62). • The number of exposures remaining Battery Level Display b B N Battery exhausted. Battery level indicator The Basics of Shooting and Playback 29m 0s 970 Number of exposures remaining shown in the illustration differs ...power switch to turn on the camera. • If you are recorded to charge or replace the battery. Description Battery level high. Prepare to the internal memory (COOLPIX S9500: approximately 23 MB, COOLPIX S9400: approximately 65 MB). • The number of pictures that can be stored depends on ....

Reference Manual
Page 41
... are using the AC Adapter EH-62F (available separately), the camera enters standby mode after the camera is turned on). • To turn on Battery Drain Battery power drains faster than usual while the camera is recording log data (A92) or using the Auto off , the camera will enter standby mode, and...
... are using the AC Adapter EH-62F (available separately), the camera enters standby mode after the camera is turned on). • To turn on Battery Drain Battery power drains faster than usual while the camera is recording log data (A92) or using the Auto off , the camera will enter standby mode, and...

Reference Manual
Page 43
.... Date and time D M Y 15 05 2013 15 10 Edit Date and time 15/05/2013 15:10 OK? The backup battery operates the clock for more information. Yes No C The Clock Battery • The camera's clock is displayed. Set the date and time again. The Basics of Shooting and Playback Step 1 Turn... settings in z setup menu (A96). • In the Time zone setting of Time zone and date in images as they are captured by an backup battery. The backup battery charges after about 10 hours of "Setting the Display Language, Date, and Time" (A20) for several days. • If the camera's backup...
.... Date and time D M Y 15 05 2013 15 10 Edit Date and time 15/05/2013 15:10 OK? The backup battery operates the clock for more information. Yes No C The Clock Battery • The camera's clock is displayed. Set the date and time again. The Basics of Shooting and Playback Step 1 Turn... settings in z setup menu (A96). • In the Time zone setting of Time zone and date in images as they are captured by an backup battery. The backup battery charges after about 10 hours of "Setting the Display Language, Date, and Time" (A20) for several days. • If the camera's backup...
Reference Manual
Page 48
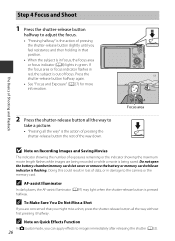
.../memory card slot cover or remove the battery or memory card while an indicator is pressed halfway. C To Make Sure You Do Not Miss a Shot If you are being recorded or while a movie ...
.../memory card slot cover or remove the battery or memory card while an indicator is pressed halfway. C To Make Sure You Do Not Miss a Shot If you are being recorded or while a movie ...
Reference Manual
Page 72
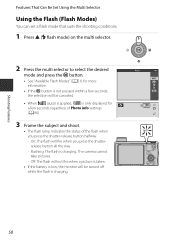
Off: The flash will not fire when a picture is taken. • If the battery is low, the monitor will be canceled. • When U (auto) is applied, D is only displayed for a few seconds regardless of Photo info settings (A96). 3 Frame ...
Off: The flash will not fire when a picture is taken. • If the battery is low, the monitor will be canceled. • When U (auto) is applied, D is only displayed for a few seconds regardless of Photo info settings (A96). 3 Frame ...


