

Reference Manual
Page 13
...data of the GPS options menu to Off. • The GPS may be updated. • Use the location name information only as a guide. ● Notes on GPS/electronic compass • Do not operate the GPS/electronic compass while you transfer still pictures or movies recorded with... information for outside Japan is not displayed. • An individual may not function properly in China. Introduction Notes on GPS/electronic compass (COOLPIX S9300 only) ● Location name data of this camera Before using Create log, GPS functions will not be identified from the government in China...
...data of the GPS options menu to Off. • The GPS may be updated. • Use the location name information only as a guide. ● Notes on GPS/electronic compass • Do not operate the GPS/electronic compass while you transfer still pictures or movies recorded with... information for outside Japan is not displayed. • An individual may not function properly in China. Introduction Notes on GPS/electronic compass (COOLPIX S9300 only) ● Location name data of this camera Before using Create log, GPS functions will not be identified from the government in China...
Reference Manual
Page 26
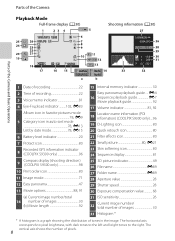
... (shooting direction) 9 (COOLPIX S9300 only 98 10 Print order icon 80 11 Image mode 71 12 Easy panorama 47 13 Movie options 88, 91 (a) Current image number/total 14 number of tones in the image. E4 16 Sequence playback guide E7 Movie playback guide 92 17 Volume indicator 81..., 92 Location name information (POI 18 information) (COOLPIX S9300 only) ....96 19 D-Lighting icon 80 20 Quick retouch icon 80 21 Filter effects icon ...
... (shooting direction) 9 (COOLPIX S9300 only 98 10 Print order icon 80 11 Image mode 71 12 Easy panorama 47 13 Movie options 88, 91 (a) Current image number/total 14 number of tones in the image. E4 16 Sequence playback guide E7 Movie playback guide 92 17 Volume indicator 81..., 92 Location name information (POI 18 information) (COOLPIX S9300 only) ....96 19 D-Lighting icon 80 20 Quick retouch icon 80 21 Filter effects icon ...
Reference Manual
Page 28
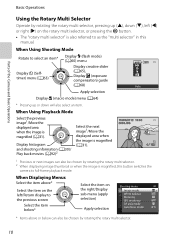
.... When Using Shooting Mode Rotate to select an item* Display m (flash mode) (A60) menu Display creative slider Display n (Selftimer) menu (A63) (A65), Display o (exposure compensation) guide (A68) Auto Apply selection Display D (macro mode) menu (A64) * Pressing up (H), down will also select an item. When Displaying Menus Select the item above* Select...
.... When Using Shooting Mode Rotate to select an item* Display m (flash mode) (A60) menu Display creative slider Display n (Selftimer) menu (A63) (A65), Display o (exposure compensation) guide (A68) Auto Apply selection Display D (macro mode) menu (A64) * Pressing up (H), down will also select an item. When Displaying Menus Select the item above* Select...

Reference Manual
Page 49
Display position guide • To adjust the zoom ratio, rotate the zoom control toward f (h)/g (i). The zoom increases up to about 10×. • To view a different area of ...
Display position guide • To adjust the zoom ratio, rotate the zoom control toward f (h)/g (i). The zoom increases up to about 10×. • To view a different area of ...
Reference Manual
Page 67
... pictures cannot be played back in this mode for each setting. - HDMI 3D output: On (default setting) • When the camera is aligned with the guide on a 3D-compatible TV or monitor for example, shooting a moving subject or a scene with m (image size: 1920 × 1080 pixels) as a JPEG file. B Note on...
... pictures cannot be played back in this mode for each setting. - HDMI 3D output: On (default setting) • When the camera is aligned with the guide on a 3D-compatible TV or monitor for example, shooting a moving subject or a scene with m (image size: 1920 × 1080 pixels) as a JPEG file. B Note on...
Reference Manual
Page 85
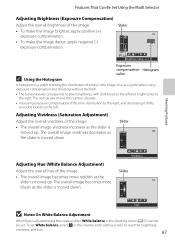
Adjusting Vividness (Saturation Adjustment) Adjust the overall vividness of the image. • The overall image vividness increases as a guide when using the creative slider, White balance in the creative slider setting screen to reset the brightness, vividness, and hue. 67 Vividness Slider Hue B Notes ...
Adjusting Vividness (Saturation Adjustment) Adjust the overall vividness of the image. • The overall image vividness increases as a guide when using the creative slider, White balance in the creative slider setting screen to reset the brightness, vividness, and hue. 67 Vividness Slider Hue B Notes ...
Reference Manual
Page 86
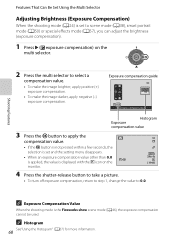
... applied, the value is the Fireworks show scene mode (A46), the exposure compensation cannot be used. Shooting Features 2 Press the multi selector to 0.0. Exposure compensation guide +0.3 +0.3 Exposure compensation Histogram Exposure compensation value 3 Press the k button to apply the compensation value. • If the k button is not pressed within a few seconds, the...
... applied, the value is the Fireworks show scene mode (A46), the exposure compensation cannot be used. Shooting Features 2 Press the multi selector to 0.0. Exposure compensation guide +0.3 +0.3 Exposure compensation Histogram Exposure compensation value 3 Press the k button to apply the compensation value. • If the k button is not pressed within a few seconds, the...
Reference Manual
Page 102
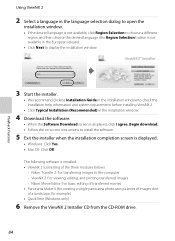
.... 5 Exit the installer when the installation completion screen is displayed. • Windows: Click Yes. • Mac OS: Click OK. Nikon Movie Editor: For basic editing of transferred movies • Panorama Maker 6 (for creating a single panorama photo using a series of images ... the European release). • Click Next to display the installation window. 3 Start the installer. • We recommend clicking Installation Guide in the installation window to check the installation help information and system requirements before installing ViewNX 2. • Click Typical Installation (Recommended)...
.... 5 Exit the installer when the installation completion screen is displayed. • Windows: Click Yes. • Mac OS: Click OK. Nikon Movie Editor: For basic editing of transferred movies • Panorama Maker 6 (for creating a single panorama photo using a series of images ... the European release). • Click Next to display the installation window. 3 Start the installer. • We recommend clicking Installation Guide in the installation window to check the installation help information and system requirements before installing ViewNX 2. • Click Typical Installation (Recommended)...
Reference Manual
Page 122
... when the camera is displayed on the monitor. 29m 0s • The camera focuses on the subject at the wide-angle position. • The framing guide is moved vertically - Reference Section E2
... when the camera is displayed on the monitor. 29m 0s • The camera focuses on the subject at the wide-angle position. • The framing guide is moved vertically - Reference Section E2
Reference Manual
Page 123
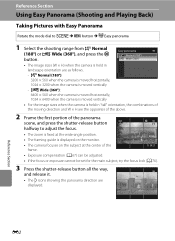
... too fast, there is a large amount of camera shake or there is little change in subject such as a gray area. Example of moving the camera Guide • The user, without shifting position, moves the camera, from the start shooting. • When the camera detects the panorama direction, the shooting starts... shooting ends. Using Easy Panorama (Shooting and Playing Back) 4 Move the camera straight and slowly in one of the four directions to end of the guide, horizontally or vertically in an arc. • If about 15 seconds (in W Normal (180°)) or 30 seconds (in X Wide (360°)) ...
... too fast, there is a large amount of camera shake or there is little change in subject such as a gray area. Example of moving the camera Guide • The user, without shifting position, moves the camera, from the start shooting. • When the camera detects the panorama direction, the shooting starts... shooting ends. Using Easy Panorama (Shooting and Playing Back) 4 Move the camera straight and slowly in one of the four directions to end of the guide, horizontally or vertically in an arc. • If about 15 seconds (in W Normal (180°)) or 30 seconds (in X Wide (360°)) ...
Reference Manual
Page 125
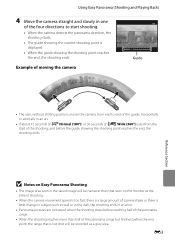
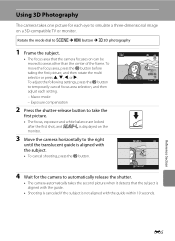
...Macro mode - Cancel 4 Wait for each setting. - To adjust the following settings, press the k button to the right until the translucent guide is aligned with the guide within 10 seconds. Exposure compensation 29m 0s 8610 2 Press the shutter-release button to take the first picture. • The focus, exposure...to automatically release the shutter. • The camera automatically takes the second picture when it detects that the subject is aligned with the guide. • Shooting is canceled if the subject is displayed on can be moved to areas other than the center of the frame. To...
...Macro mode - Cancel 4 Wait for each setting. - To adjust the following settings, press the k button to the right until the translucent guide is aligned with the guide within 10 seconds. Exposure compensation 29m 0s 8610 2 Press the shutter-release button to take the first picture. • The focus, exposure...to automatically release the shutter. • The camera automatically takes the second picture when it detects that the subject is aligned with the guide. • Shooting is canceled if the subject is displayed on can be moved to areas other than the center of the frame. To...
Reference Manual
Page 126
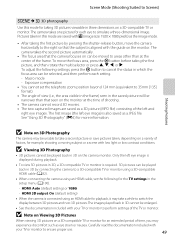
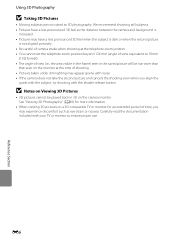
.... B Notes on Viewing 3D Pictures • 3D pictures cannot be narrower than that seen on the monitor at the time of time, you align the guide with the subject, try shooting with your TV or monitor to ensure proper use. E6 Reference Section Using 3D Photography B Taking 3D Pictures • Moving...
.... B Notes on Viewing 3D Pictures • 3D pictures cannot be narrower than that seen on the monitor at the time of time, you align the guide with the subject, try shooting with your TV or monitor to ensure proper use. E6 Reference Section Using 3D Photography B Taking 3D Pictures • Moving...
Reference Manual
Page 155
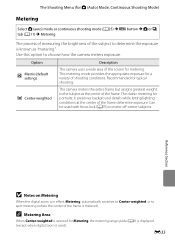
... When Center-weighted is selected for a variety of the screen for typical shooting. This metering mode provides the appropriate exposure for Metering, the metering range guide (A6) is displayed (except when digital zoom is used with focus lock (A76) to choose how the camera meters exposure. Can be used ). Use this...
... When Center-weighted is selected for a variety of the screen for typical shooting. This metering mode provides the appropriate exposure for Metering, the metering range guide (A6) is displayed (except when digital zoom is used with focus lock (A76) to choose how the camera meters exposure. Can be used ). Use this...
Reference Manual
Page 185
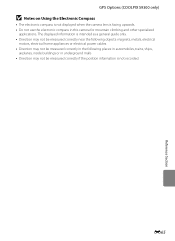
... GPS Options (COOLPIX S9300 only) B Notes on Using the Electronic Compass • The electronic compass is not displayed when the camera lens is facing upwards. • Do not use the electronic compass in underground malls • Direction may not be measured correctly if the position information is intended as a general guide only. •...
... GPS Options (COOLPIX S9300 only) B Notes on Using the Electronic Compass • The electronic compass is not displayed when the camera lens is facing upwards. • Do not use the electronic compass in underground malls • Direction may not be measured correctly if the position information is intended as a general guide only. •...
Reference Manual
Page 214
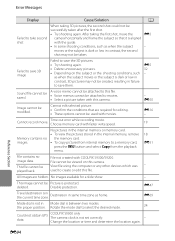
...Delete unnecessary pictures. • Depending on this file. Cannot edit selected picture. • Confirm the conditions that it is aligned with the guide. • In some shooting conditions, such as home. No pictures in the internal memory or memory card. • To view the ...contrast, the second shot may not be modified. No images available for editing. • These options cannot be taken. COOLPIX S9300 only The camera clock is protected. deleted. Destination in the current time zone. Time out error while recording movie. Choose memory ...
...Delete unnecessary pictures. • Depending on this file. Cannot edit selected picture. • Confirm the conditions that it is aligned with the guide. • In some shooting conditions, such as home. No pictures in the internal memory or memory card. • To view the ...contrast, the second shot may not be modified. No images available for editing. • These options cannot be taken. COOLPIX S9300 only The camera clock is protected. deleted. Destination in the current time zone. Time out error while recording movie. Choose memory ...


