
Reference Manual
Page 4
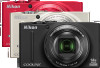
COOLPIX S8200 Digital Camera Camera Strap Rechargeable Li-ion Battery EN-EL12 (with the country or region of your new camera. After reading, please keep this manual. The shape of the plug adapter varies with ... using the camera, please read the information in a country or region that any items are missing, please contact the store where you for purchasing the Nikon COOLPIX S8200 digital camera. ii Confirming the Package Contents In the event that requires a plug adapter. Introduction Introduction Read This First Thank you purchased the camera.
COOLPIX S8200 Digital Camera Camera Strap Rechargeable Li-ion Battery EN-EL12 (with the country or region of your new camera. After reading, please keep this manual. The shape of the plug adapter varies with ... using the camera, please read the information in a country or region that any items are missing, please contact the store where you for purchasing the Nikon COOLPIX S8200 digital camera. ii Confirming the Package Contents In the event that requires a plug adapter. Introduction Introduction Read This First Thank you purchased the camera.

Reference Manual
Page 6
..., stored in a retrieval system, or translated into any language in any errors or omissions to the attention of the Nikon representative in the batteries overheating, igniting, rupturing, or leaking. About the Manuals • No part of the manuals included with this product ... any form, by Nikon specifically for use with this Nikon digital camera are designed to the highest standards and include complex electronic circuitry. Visit the site below for contact information: http://imaging.nikon.com/ Use Only Nikon Brand Electronic Accessories Nikon COOLPIX cameras are engineered and...
..., stored in a retrieval system, or translated into any language in any errors or omissions to the attention of the Nikon representative in the batteries overheating, igniting, rupturing, or leaking. About the Manuals • No part of the manuals included with this product ... any form, by Nikon specifically for use with this Nikon digital camera are designed to the highest standards and include complex electronic circuitry. Visit the site below for contact information: http://imaging.nikon.com/ Use Only Nikon Brand Electronic Accessories Nikon COOLPIX cameras are engineered and...

Reference Manual
Page 8
... on or in use Parts of malfunction Should you notice smoke or an unusual smell coming from putting the battery or other small parts into their entirety before using this Nikon product, to prevent possible injury. After removing or disconnecting the power source, take the product to...in injury. Leaving the devices in direct contact with the skin for inspection, after unplugging the product and/or removing the battery. Introduction For Your Safety To prevent damage to your Nikon product or injury to yourself or to others, read the following safety precautions in their mouths.
... on or in use Parts of malfunction Should you notice smoke or an unusual smell coming from putting the battery or other small parts into their entirety before using this Nikon product, to prevent possible injury. After removing or disconnecting the power source, take the product to...in injury. Leaving the devices in direct contact with the skin for inspection, after unplugging the product and/or removing the battery. Introduction For Your Safety To prevent damage to your Nikon product or injury to yourself or to others, read the following safety precautions in their mouths.

Reference Manual
Page 9
..., place it under heavy objects, or expose it to a Nikonauthorized service representative for inspection. To avoid damage to convert from the damaged battery comes in fire or electric shock. • Dust on or near the Charging AC Adapter during lightning storms. Failure to observe this product... Should the insulation be removed with the camera, use with DCto-AC inverters. For Your Safety Introduction Observe caution when handling the battery The battery may leak, overheat, or explode if improperly handled. If you notice any change in electric shock. • Do not use either...
..., place it under heavy objects, or expose it to a Nikonauthorized service representative for inspection. To avoid damage to convert from the damaged battery comes in fire or electric shock. • Dust on or near the Charging AC Adapter during lightning storms. Failure to observe this product... Should the insulation be removed with the camera, use with DCto-AC inverters. For Your Safety Introduction Observe caution when handling the battery The battery may leak, overheat, or explode if improperly handled. If you notice any change in electric shock. • Do not use either...
Reference Manual
Page 12
...; la norme NMB-003 du Canada. The following apply only to users in the State of California WARNING Handling the cord on the battery indicates that this symbol or not, are designated for separate collection at an appropriate collection point. This symbol on this product will expose you...• For more information, contact the retailer or the local authorities in Europe CAUTIONS RISK OF EXPLOSION IF BATTERY IS REPLACED BY AN INCORRECT TYPE. Do not dispose of waste management. Nikon Inc., 1300 Walt Whitman Road Melville, New York 11747-3064 USA Tel: 631-547-4200 Notice for separate...
...; la norme NMB-003 du Canada. The following apply only to users in the State of California WARNING Handling the cord on the battery indicates that this symbol or not, are designated for separate collection at an appropriate collection point. This symbol on this product will expose you...• For more information, contact the retailer or the local authorities in Europe CAUTIONS RISK OF EXPLOSION IF BATTERY IS REPLACED BY AN INCORRECT TYPE. Do not dispose of waste management. Nikon Inc., 1300 Walt Whitman Road Melville, New York 11747-3064 USA Tel: 631-547-4200 Notice for separate...

Reference Manual
Page 13
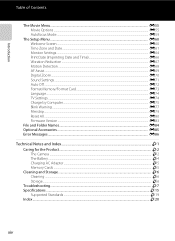
... Multi Selector ...10 Using Menus (the d Button) ...11 Attaching the Camera Strap ...12 The Basics of Shooting and Playback 13 Preparation 1 Insert the Battery...14 Preparation 2 Charge the Battery 16 Preparation 3 Insert a Memory Card 18 Internal Memory and Memory Cards ...19 Approved Memory Cards ...19 Step 1 Turn the Camera On ...20 Turning...
... Multi Selector ...10 Using Menus (the d Button) ...11 Attaching the Camera Strap ...12 The Basics of Shooting and Playback 13 Preparation 1 Insert the Battery...14 Preparation 2 Charge the Battery 16 Preparation 3 Insert a Memory Card 18 Internal Memory and Memory Cards ...19 Approved Memory Cards ...19 Step 1 Turn the Camera On ...20 Turning...
Reference Manual
Page 16
... File and Folder Names...E84 Optional Accessories ...E85 Error Messages...E86 Technical Notes and Index...F1 Caring for the Product...F2 The Camera ...F2 The Battery...F4 Charging AC Adapter...F5 Memory Cards ...F5 Cleaning and Storage...F6 Cleaning ...F6 Storage ...F6 Troubleshooting...F7 Specifications ...F15 Supported Standards ...F19 Index ...F20...
... File and Folder Names...E84 Optional Accessories ...E85 Error Messages...E86 Technical Notes and Index...F1 Caring for the Product...F2 The Camera ...F2 The Battery...F4 Charging AC Adapter...F5 Memory Cards ...F5 Cleaning and Storage...F6 Cleaning ...F6 Storage ...F6 Troubleshooting...F7 Specifications ...F15 Supported Standards ...F19 Index ...F20...

Reference Manual
Page 23
... Parts of the Camera 1 Shooting mode 24, 25 2 Macro mode 64 3 Zoom indicator 27, 64 4 Focus indicator 28 5 AE/AF-L indicator E5 6 Flash mode 56 7 Battery level indicator 20 8 Vibration reduction icon 94 9 Motion detection icon 95 10 Noise reduction burst 44 11 "Date not set" indicator.... 23, 94, E86 12...
... Parts of the Camera 1 Shooting mode 24, 25 2 Macro mode 64 3 Zoom indicator 27, 64 4 Focus indicator 28 5 AE/AF-L indicator E5 6 Flash mode 56 7 Battery level indicator 20 8 Vibration reduction icon 94 9 Motion detection icon 95 10 Noise reduction burst 44 11 "Date not set" indicator.... 23, 94, E86 12...

Reference Manual
Page 24
J P G 23 1 / 2 5 0 F 3.3 24 25 +1.0 26 ISO 1 0 0 27 4 / 4 28 29 1 Date of recording 22 2 Time of recording 22 3 Voice memo indicator 80, E50 4 Battery level indicator 20 5 Protect icon 80 6 Print order icon 80 7 Image mode 71 8 Movie options 91 9 Easy panorama 49 (a) Current image number/ 10 total number ...
J P G 23 1 / 2 5 0 F 3.3 24 25 +1.0 26 ISO 1 0 0 27 4 / 4 28 29 1 Date of recording 22 2 Time of recording 22 3 Voice memo indicator 80, E50 4 Battery level indicator 20 5 Protect icon 80 6 Print order icon 80 7 Image mode 71 8 Movie options 91 9 Easy panorama 49 (a) Current image number/ 10 total number ...

Reference Manual
Page 29
The Basics of Shooting and Playback The Basics of Shooting and Playback Preparation Preparation 1 Insert the Battery 14 Preparation 2 Charge the Battery 16 Preparation 3 Insert a Memory Card 18 Shooting Step 1 Turn the Camera On 20 Setting the Display Language, Date, and Time (First Use After Purchase) ....22 Step 2 Select a Shooting Mode 24 Step 3 Frame a Picture ...26 Step 4 Focus and Shoot...28 Playback Step 5 Play Back Images ...30 Step 6 Delete Unwanted Images 32 13
The Basics of Shooting and Playback The Basics of Shooting and Playback Preparation Preparation 1 Insert the Battery 14 Preparation 2 Charge the Battery 16 Preparation 3 Insert a Memory Card 18 Shooting Step 1 Turn the Camera On 20 Setting the Display Language, Date, and Time (First Use After Purchase) ....22 Step 2 Select a Shooting Mode 24 Step 3 Frame a Picture ...26 Step 4 Focus and Shoot...28 Playback Step 5 Play Back Images ...30 Step 6 Delete Unwanted Images 32 13
Reference Manual
Page 30
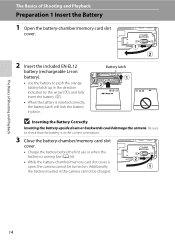
... in the direction indicated by the arrow (1), and fully insert the battery (2). • When the battery is open, the camera cannot be charged. 14 Additionally, the battery inserted in the camera cannot be turned on. Battery latch B Inserting the Battery Correctly Inserting the battery upside down or backwards could damage the camera. The Basics of Shooting...
... in the direction indicated by the arrow (1), and fully insert the battery (2). • When the battery is open, the camera cannot be charged. 14 Additionally, the battery inserted in the camera cannot be turned on. Battery latch B Inserting the Battery Correctly Inserting the battery upside down or backwards could damage the camera. The Basics of Shooting...

Reference Manual
Page 31
... hand (2). Preparation 1 Insert the Battery Removing the Battery Turn the camera off before use. 15 The battery can then be hot immediately after using the camera. Observe caution when removing the battery or memory card. To eject the battery, open the battery-chamber/ memory card slot cover and... slide the orange battery latch up in "The Battery" (F4) before opening the battery-chamber/memory card slot cover. Do not pull it ...
... hand (2). Preparation 1 Insert the Battery Removing the Battery Turn the camera off before use. 15 The battery can then be hot immediately after using the camera. Observe caution when removing the battery or memory card. To eject the battery, open the battery-chamber/ memory card slot cover and... slide the orange battery latch up in "The Battery" (F4) before opening the battery-chamber/memory card slot cover. Do not pull it ...
Reference Manual
Page 32
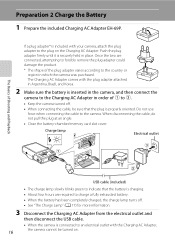
...cable. • When the camera is properly oriented. When disconnecting the cable, do not pull the plug at an angle. • Close the battery-chamber/memory card slot cover. Charge lamp Electrical outlet The Basics of Shooting and Playback USB cable (included) • The charge lamp slowly blinks green... or region in place. If a plug adapter* is included with the plug adapter attached in Argentina, Brazil, and Korea. 2 Make sure the battery is securely held in which the camera was purchased. Push the plug adapter firmly until it is inserted in the camera, and then connect the...
...cable. • When the camera is properly oriented. When disconnecting the cable, do not pull the plug at an angle. • Close the battery-chamber/memory card slot cover. Charge lamp Electrical outlet The Basics of Shooting and Playback USB cable (included) • The charge lamp slowly blinks green... or region in place. If a plug adapter* is included with the plug adapter attached in Argentina, Brazil, and Korea. 2 Make sure the battery is securely held in which the camera was purchased. Push the plug adapter firmly until it is inserted in the camera, and then connect the...

Reference Manual
Page 33
... before use another make or model of 5 °C to 35 °C (41 °F to charging. When charging is charging. Charge the battery indoors with an ambient temperature of AC adapter other than EH-62F. C Notes About an AC Power Source • You can also charge the ...Rechargeable Li-ion Battery EN-EL12 by using the Battery Charger MH-65 (available separately; Preparation 2 Charge the Battery The Charge Lamp Status Description Blinks slowly (green) The battery is complete, the charge lamp stops blinking green and turns off. ...
... before use another make or model of 5 °C to 35 °C (41 °F to charging. When charging is charging. Charge the battery indoors with an ambient temperature of AC adapter other than EH-62F. C Notes About an AC Power Source • You can also charge the ...Rechargeable Li-ion Battery EN-EL12 by using the Battery Charger MH-65 (available separately; Preparation 2 Charge the Battery The Charge Lamp Status Description Blinks slowly (green) The battery is complete, the charge lamp stops blinking green and turns off. ...

Reference Manual
Page 34
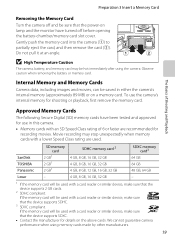
... memory card for more 18 information. Be sure to transfer important images to check that the memory card is formatted. Memory card slot 3 Close the battery-chamber/memory card slot cover. B Notes About Memory Cards See "Memory Cards" (F5) and the documentation included with this camera. • All data stored on...
... memory card for more 18 information. Be sure to transfer important images to check that the memory card is formatted. Memory card slot 3 Close the battery-chamber/memory card slot cover. B Notes About Memory Cards See "Memory Cards" (F5) and the documentation included with this camera. • All data stored on...
Reference Manual
Page 35
...camera. • Memory cards with an SD Speed Class rating of Shooting and Playback Removing the Memory Card Turn the camera off before opening the battery-chamber/memory card slot cover. To use in either the camera's internal memory (approximately 89 MB) or on a memory card. Approved Memory ... and be sure that the power-on lamp and the monitor have been tested and approved for recording movies. B High Temperature Caution The camera, battery, and memory card may stop unexpectedly when memory cards with a card reader or similar device, make sure that the device supports SDXC. •...
...camera. • Memory cards with an SD Speed Class rating of Shooting and Playback Removing the Memory Card Turn the camera off before opening the battery-chamber/memory card slot cover. To use in either the camera's internal memory (approximately 89 MB) or on a memory card. Approved Memory ... and be sure that the power-on lamp and the monitor have been tested and approved for recording movies. B High Temperature Caution The camera, battery, and memory card may stop unexpectedly when memory cards with a card reader or similar device, make sure that the device supports SDXC. •...

Reference Manual
Page 36
... The Basics of Shooting and Playback Step 1 Turn the Camera On 1 Press the power switch to charge or replace the battery. Description The battery is low. The battery is fully charged. The camera cannot take pictures. A 72). • The number of remaining exposures shown in the illustrations... of exposures remaining depends on the amount of available memory in this manual are turning the camera on . 2 Check the battery level indicator and the number of exposures remaining Battery Level Indicator Display b B N Battery exhausted. Recharge or replace with a fully charged...
... The Basics of Shooting and Playback Step 1 Turn the Camera On 1 Press the power switch to charge or replace the battery. Description The battery is low. The battery is fully charged. The camera cannot take pictures. A 72). • The number of remaining exposures shown in the illustrations... of exposures remaining depends on the amount of available memory in this manual are turning the camera on . 2 Check the battery level indicator and the number of exposures remaining Battery Level Indicator Display b B N Battery exhausted. Recharge or replace with a fully charged...

Reference Manual
Page 39
...; Press I to enable the daylight saving time function while setting the region in step 3. See step 2 of charging. • If the camera's backup battery becomes exhausted, the date and time setting screen is displayed when the camera is turned on. Set the date and time again. C Imprinting the Shooting... camera or when the camera is connected to set the date and time (A 94). When enabled, the clock moves forward one hour. C The Clock Battery • The camera's clock is powered by selecting Time zone and date and then Time zone in the setup menu (A 94). • If you...
...; Press I to enable the daylight saving time function while setting the region in step 3. See step 2 of charging. • If the camera's backup battery becomes exhausted, the date and time setting screen is displayed when the camera is turned on. Set the date and time again. C Imprinting the Shooting... camera or when the camera is connected to set the date and time (A 94). When enabled, the clock moves forward one hour. C The Clock Battery • The camera's clock is powered by selecting Time zone and date and then Time zone in the setup menu (A 94). • If you...

Reference Manual
Page 45
... with macro mode (A 64) or the Close-up automatically when you might miss a shot, press the shutter-release button all the way down. Removing the battery or memory card in these circumstances could result in loss of similarly shaped windows, etc.) • Subject is set to the camera or card. •...) • No contrast between the subject and surroundings (e.g. In some rare cases, the subject may take some time for more information. Do not open the battery-chamber/memory card slot cover while images are being saved, the number of exposures remaining (A 20) will blink.
... with macro mode (A 64) or the Close-up automatically when you might miss a shot, press the shutter-release button all the way down. Removing the battery or memory card in these circumstances could result in loss of similarly shaped windows, etc.) • Subject is set to the camera or card. •...) • No contrast between the subject and surroundings (e.g. In some rare cases, the subject may take some time for more information. Do not open the battery-chamber/memory card slot cover while images are being saved, the number of exposures remaining (A 20) will blink.

Reference Manual
Page 72
... Flash When ISO sensitivity is set the flash mode to 3.0 m (3 ft 4 in. Off: The flash will not fire when a picture is taken. • If the battery is low, the monitor will turn off in order to select the desired mode and press the k button. • See "Available Flash Modes" (A 57). •...
... Flash When ISO sensitivity is set the flash mode to 3.0 m (3 ft 4 in. Off: The flash will not fire when a picture is taken. • If the battery is low, the monitor will turn off in order to select the desired mode and press the k button. • See "Available Flash Modes" (A 57). •...


