
S6000 User's Manual
Page 4
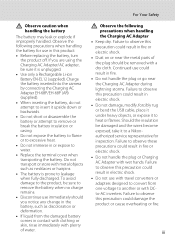
..., information that should be performed only by qualified technicians. WARNINGS Turn off in the event of flammable gas Do not use the product...Charging AC Adapter break open as this equipment. ii For Your Safety To prevent damage to your Nikon product or injury to yourself or to others, read the following safety precautions in their mouths. ...After removing or disconnecting the power source, take the product to a Nikon-authorized service representative for inspection. Do not disassemble Touching the internal parts of an infant or child. ...
..., information that should be performed only by qualified technicians. WARNINGS Turn off in the event of flammable gas Do not use the product...Charging AC Adapter break open as this equipment. ii For Your Safety To prevent damage to your Nikon product or injury to yourself or to others, read the following safety precautions in their mouths. ...After removing or disconnecting the power source, take the product to a Nikon-authorized service representative for inspection. Do not disassemble Touching the internal parts of an infant or child. ...
S6000 User's Manual
Page 5
... or store with metal objects such as discoloration or deformation. • If liquid from one voltage to observe this product: • Before replacing the battery, turn the product off. To avoid damage to the product, be sure it upside down or backwards. • Do not short or disassemble the battery or...
... or store with metal objects such as discoloration or deformation. • If liquid from one voltage to observe this product: • Before replacing the battery, turn the product off. To avoid damage to the product, be sure it upside down or backwards. • Do not short or disassemble the battery or...

S6000 User's Manual
Page 6
...or mouth. Playing CDROMs on audio CD equipment. Observe caution when using inside an airplane or the hospital Turn the power off while inside the airplane during take off when using the flash Using the flash close to... observe this precaution could result in a hospital. iv Turn the power off or landing. Follow the instructions of the hospital. Handle moving parts. CD-ROMs The CD-... input and output jacks, use only the cables provided or sold by Nikon for the purpose, to prevent liquid crystal from the subject.
...or mouth. Playing CDROMs on audio CD equipment. Observe caution when using inside an airplane or the hospital Turn the power off while inside the airplane during take off when using the flash Using the flash close to... observe this precaution could result in a hospital. iv Turn the power off or landing. Follow the instructions of the hospital. Handle moving parts. CD-ROMs The CD-... input and output jacks, use only the cables provided or sold by Nikon for the purpose, to prevent liquid crystal from the subject.
S6000 User's Manual
Page 7
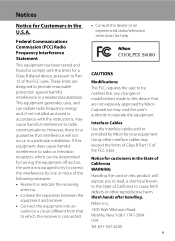
CAUTIONS Modifications The FCC requires the user to be determined by turning the equipment off and on, the user is encouraged to try to correct the interference by Nikon for Customers in a residential installation. Notices Notice for your equipment. This equipment generates, uses, and ... authority to provide reasonable protection against harmful interference in the U.S.A. Using other reproductive harm. These limits are not expressly approved by Nikon Corporation may exceed the limits of Class B Part 15 of California WARNING Handling the cord on a circuit different from that to...
CAUTIONS Modifications The FCC requires the user to be determined by turning the equipment off and on, the user is encouraged to try to correct the interference by Nikon for Customers in a residential installation. Notices Notice for your equipment. This equipment generates, uses, and ... authority to provide reasonable protection against harmful interference in the U.S.A. Using other reproductive harm. These limits are not expressly approved by Nikon Corporation may exceed the limits of Class B Part 15 of California WARNING Handling the cord on a circuit different from that to...
S6000 User's Manual
Page 9
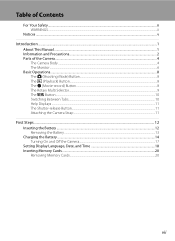
... The Shutter-release Button...11 Attaching the Camera Strap ...11 First Steps ...12 Inserting the Battery ...12 Removing the Battery ...13 Charging the Battery ...14 Turning On and Off the Camera...17 Setting Display Language, Date, and Time 18 Inserting Memory Cards ...20 Removing Memory Cards...20 vii
... The Shutter-release Button...11 Attaching the Camera Strap ...11 First Steps ...12 Inserting the Battery ...12 Removing the Battery ...13 Charging the Battery ...14 Turning On and Off the Camera...17 Setting Display Language, Date, and Time 18 Inserting Memory Cards ...20 Removing Memory Cards...20 vii

S6000 User's Manual
Page 10
Table of Contents Basic Photography and Playback: A (Auto) Mode 22 Step 1 Turn the Camera On and Select A (Auto) Mode 22 Indicators Displayed in A (Auto) Mode 23 Step 2 Frame a Picture ...24 Using the Zoom...25 Step 3 Focus and ...
Table of Contents Basic Photography and Playback: A (Auto) Mode 22 Step 1 Turn the Camera On and Select A (Auto) Mode 22 Indicators Displayed in A (Auto) Mode 23 Step 2 Frame a Picture ...24 Using the Zoom...25 Step 3 Focus and ...

S6000 User's Manual
Page 20
... playback mode to display the playback-mode selection menu and switch playback modes (A 75). • When the camera is off, holding down the c button will turn the camera on in shooting mode to start movie recording (A 100). Press the b (movie-record) button again to stop movie recording. • Press the b (movie...
... playback mode to display the playback-mode selection menu and switch playback modes (A 75). • When the camera is off, holding down the c button will turn the camera on in shooting mode to start movie recording (A 100). Press the b (movie-record) button again to stop movie recording. • Press the b (movie...

S6000 User's Manual
Page 25
... • Be sure to storage. 13 observe due caution when removing the battery. The battery can then be removed by the arrow (1). Removing the Battery Turn the camera off (A 17) and be sure that the battery may become hot during use . • If the battery will not be used for the... slot cover and slide the orange battery latch in the direction indicated by hand (2). • Note that the power-on lamp and the monitor have turned off before returning it to read and follow the warnings for an extended period, recharge it at least once every six months and run it...
... • Be sure to storage. 13 observe due caution when removing the battery. The battery can then be removed by the arrow (1). Removing the Battery Turn the camera off (A 17) and be sure that the battery may become hot during use . • If the battery will not be used for the... slot cover and slide the orange battery latch in the direction indicated by hand (2). • Note that the power-on lamp and the monitor have turned off before returning it to read and follow the warnings for an extended period, recharge it at least once every six months and run it...
S6000 User's Manual
Page 26
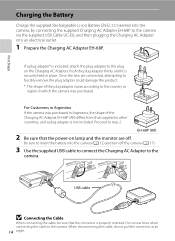
... Adapter EH-68P to the camera via the supplied USB Cable UC-E6, and then plugging the Charging AC Adapter into the camera (A 12) and turn off . Push the plug adapter firmly until it is properly oriented.
... Adapter EH-68P to the camera via the supplied USB Cable UC-E6, and then plugging the Charging AC Adapter into the camera (A 12) and turn off . Push the plug adapter firmly until it is properly oriented.

S6000 User's Manual
Page 27
... (green) Battery charging. Charging the Battery The following chart explains charge lamp status when the camera is complete, the charge lamp stops blinking green and turns off. Flickers (green) • The ambient temperature is not suited to indicate that the battery is a problem with an ambient temperature of 5 °C to 35...
... (green) Battery charging. Charging the Battery The following chart explains charge lamp status when the camera is complete, the charge lamp stops blinking green and turns off. Flickers (green) • The ambient temperature is not suited to indicate that the battery is a problem with an ambient temperature of 5 °C to 35...
S6000 User's Manual
Page 28
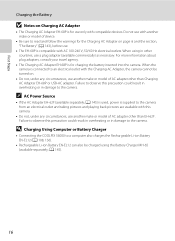
... MH-65 (available separately; D Charging Using Computer or Battery Charger • Connecting the COOLPIX S6000 to a computer also charges the Rechargeable Li-ion Battery EN-EL12 (A 108, 136). • Rechargeable Li-ion Battery EN-EL12 can also be turned on. • Do not, under any circumstances, use another make or model of AC...
... MH-65 (available separately; D Charging Using Computer or Battery Charger • Connecting the COOLPIX S6000 to a computer also charges the Rechargeable Li-ion Battery EN-EL12 (A 108, 136). • Rechargeable Li-ion Battery EN-EL12 can also be turned on. • Do not, under any circumstances, use another make or model of AC...

S6000 User's Manual
Page 29
...on lamp (green) will light for a moment and the monitor will enter standby mode. • When the monitor has turned off in playback mode (A 29). If the camera is turned off, both the power-on in standby mode (the power-on lamp is blinking), press the following button to reactivate ... to elapse before the camera enters standby mode can be changed from the Auto off option (A 133) in shooting or playback mode, the camera will turn off. If no operations are performed for about a minute (default setting) in the setup menu (A 120). 17 First Steps C Power Saving Function (Auto Off...
...on lamp (green) will light for a moment and the monitor will enter standby mode. • When the monitor has turned off in playback mode (A 29). If the camera is turned off, both the power-on in standby mode (the power-on lamp is blinking), press the following button to reactivate ... to elapse before the camera enters standby mode can be changed from the Auto off option (A 133) in shooting or playback mode, the camera will turn off. If no operations are performed for about a minute (default setting) in the setup menu (A 120). 17 First Steps C Power Saving Function (Auto Off...

S6000 User's Manual
Page 30
...moment and the monitor will not be set. For information on the daylight saving time option. If No is selected, the date and time will turn on the camera. When the daylight saving time option is enabled, W is displayed at the top of the monitor. Yes No Cancel London Casablanca... D Daylight Saving Time If daylight saving time is in effect, press the rotary multi selector H in the time zone selection screen displayed in step 4 to turn on using the rotary multi selector, see "The Rotary Multi Selector" (A 9). 3 Choose Yes and press the k button. First Steps Setting Display Language, Date,...
...moment and the monitor will not be set. For information on the daylight saving time option. If No is selected, the date and time will turn on the camera. When the daylight saving time option is enabled, W is displayed at the top of the monitor. Yes No Cancel London Casablanca... D Daylight Saving Time If daylight saving time is in effect, press the rotary multi selector H in the time zone selection screen displayed in step 4 to turn on using the rotary multi selector, see "The Rotary Multi Selector" (A 9). 3 Choose Yes and press the k button. First Steps Setting Display Language, Date,...

S6000 User's Manual
Page 32
... memory card and data recorded to partially eject the card. Close the battery-chamber/memory card slot cover. Removing Memory Cards Before removing memory cards, turn off and open the batterychamber/memory card slot cover. Open the battery-chamber/memory card slot cover and press the card in the internal memory...
... memory card and data recorded to partially eject the card. Close the battery-chamber/memory card slot cover. Removing Memory Cards Before removing memory cards, turn off and open the batterychamber/memory card slot cover. Open the battery-chamber/memory card slot cover and press the card in the internal memory...
S6000 User's Manual
Page 33
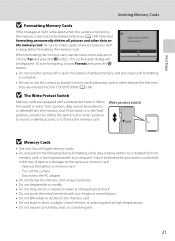
B The Write Protect Switch Memory cards are inserted into the COOLPIX S6000 (A 134). Write protect switch B Memory Cards • Use only Secure Digital memory cards. • Do not perform the following during data transfer to a computer. When ... it by sliding the switch to the "write" position to record or delete pictures, or to format the memory card. Yes No • Do not turn the camera off the camera - Be sure to make copies of data or in damage to the camera or memory card: - Failure to observe this...
B The Write Protect Switch Memory cards are inserted into the COOLPIX S6000 (A 134). Write protect switch B Memory Cards • Use only Secure Digital memory cards. • Do not perform the following during data transfer to a computer. When ... it by sliding the switch to the "write" position to record or delete pictures, or to format the memory card. Yes No • Do not turn the camera off the camera - Be sure to make copies of data or in damage to the camera or memory card: - Failure to observe this...

S6000 User's Manual
Page 34
...displayed. 2 Press the A button to charge or replace the battery. Basic Photography and Playback: A (Auto) Mode 3 Use the rotary multi selector to turn on. Auto mode 4 Check the battery level and the number of the internal memory or memory card and image mode setting (A 37). 22 Basic Photography... and Playback: A (Auto) Mode Step 1 Turn the Camera On and Select A (Auto) Mode This section describes taking pictures in A (auto) mode, an automatic, "point-andshoot" mode recommended for ...
...displayed. 2 Press the A button to charge or replace the battery. Basic Photography and Playback: A (Auto) Mode 3 Use the rotary multi selector to turn on. Auto mode 4 Check the battery level and the number of the internal memory or memory card and image mode setting (A 37). 22 Basic Photography... and Playback: A (Auto) Mode Step 1 Turn the Camera On and Select A (Auto) Mode This section describes taking pictures in A (auto) mode, an automatic, "point-andshoot" mode recommended for ...
S6000 User's Manual
Page 35
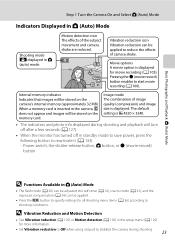
.... • Set Vibration reduction to Off when using a tripod to stabilize the camera during shooting and playback will turn off after a few seconds (A 127). • When the monitor has turned off in A (Auto) Mode • The flash mode (A 30) can be adjusted, the self-timer (A...Motion Detection • See Vibration reduction (A 129) or Motion detection (A 130) in A (auto) mode. Basic Photography and Playback: A (Auto) Mode Step 1 Turn the Camera On and Select A (Auto) Mode Indicators Displayed in A (Auto) Mode Shooting mode A displayed in the setup menu (A 120) for movie recording (A...
.... • Set Vibration reduction to Off when using a tripod to stabilize the camera during shooting and playback will turn off after a few seconds (A 127). • When the monitor has turned off in A (Auto) Mode • The flash mode (A 30) can be adjusted, the self-timer (A...Motion Detection • See Vibration reduction (A 129) or Motion detection (A 130) in A (auto) mode. Basic Photography and Playback: A (Auto) Mode Step 1 Turn the Camera On and Select A (Auto) Mode Indicators Displayed in A (Auto) Mode Shooting mode A displayed in the setup menu (A 120) for movie recording (A...

S6000 User's Manual
Page 36
Hold the camera steadily in flash is at or near the center of the frame. 8 24 When taking pictures in portrait ("tall") orientation, turn the camera so that the intended subject is above the lens. 2 Frame the picture. Basic Photography and Playback: A (Auto) Mode Step 2 Frame a Picture 1 Ready the camera. Frame the picture so that the built-in both hands. Keep fingers, hair and other objects away from the lens, built-in flash, AF assist-illuminator and microphone.
Hold the camera steadily in flash is at or near the center of the frame. 8 24 When taking pictures in portrait ("tall") orientation, turn the camera so that the intended subject is above the lens. 2 Frame the picture. Basic Photography and Playback: A (Auto) Mode Step 2 Frame a Picture 1 Ready the camera. Frame the picture so that the built-in both hands. Keep fingers, hair and other objects away from the lens, built-in flash, AF assist-illuminator and microphone.

S6000 User's Manual
Page 37
... of picture quality according to zoom in so that interpolation is applied at zoom positions beyond the V position, interpolation is initiated and the zoom indicator turns yellow to indicate that the subject fills a larger area of V moves to the right as interpolation to magnify images, resulting in to zoom out, thus...
... of picture quality according to zoom in so that interpolation is applied at zoom positions beyond the V position, interpolation is initiated and the zoom indicator turns yellow to indicate that the subject fills a larger area of V moves to the right as interpolation to magnify images, resulting in to zoom out, thus...

S6000 User's Manual
Page 41
.... Press the k button again to return to full-frame playback mode. 100NIKON 0004.JPG 1 / 2 5 0 F 3.7 +1.0 ISO 100 4/ 4 C Pressing the c Button to Turn On the Camera When the camera is off in the playback menu (A 82), the auto sort menu (A 78), or the list by date menu (A 81...in full-frame playback mode to display the histogram and shooting information (A 70). C Deleting the Last Picture Taken While in playback mode. The lens will turn the camera on Playback" (A 69) or "Editing Pictures" (A 93) for playback display except pictures taken with Continuous, BSS, Multishot 16, and ...
.... Press the k button again to return to full-frame playback mode. 100NIKON 0004.JPG 1 / 2 5 0 F 3.7 +1.0 ISO 100 4/ 4 C Pressing the c Button to Turn On the Camera When the camera is off in the playback menu (A 82), the auto sort menu (A 78), or the list by date menu (A 81...in full-frame playback mode to display the histogram and shooting information (A 70). C Deleting the Last Picture Taken While in playback mode. The lens will turn the camera on Playback" (A 69) or "Editing Pictures" (A 93) for playback display except pictures taken with Continuous, BSS, Multishot 16, and ...


