Product Manual
Page 4
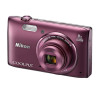
Introduction Introduction Read This First Thank you for purchasing the Nikon COOLPIX S5300 digital camera. After reading, please keep this manual. Before using the camera, please read the information in "For Your Safety" (Aviii-x) and familiarize yourself with the information provided in this manual handy and refer to it to enhance your enjoyment of your new camera. ii
Introduction Introduction Read This First Thank you for purchasing the Nikon COOLPIX S5300 digital camera. After reading, please keep this manual. Before using the camera, please read the information in "For Your Safety" (Aviii-x) and familiarize yourself with the information provided in this manual handy and refer to it to enhance your enjoyment of your new camera. ii
Product Manual
Page 5
iii Introduction About This Manual If you want to start using the camera right away, see "Parts of Shooting and Playback" (A10). To learn about the parts of the camera and information that is displayed in the monitor, see "The Basics of the Camera" (A1).
iii Introduction About This Manual If you want to start using the camera right away, see "Parts of Shooting and Playback" (A10). To learn about the parts of the camera and information that is displayed in the monitor, see "The Basics of the Camera" (A1).
Product Manual
Page 6
... displayed in the camera monitor, and the names of buttons or messages displayed on a computer monitor appear in bold. • In this manual, images are sometimes omitted from monitor display samples so that monitor indicators can be more clearly shown. • Illustrations and monitor content shown ...in this manual may differ from the actual product. This icon marks notes and information that should be read before using the camera. iv These icons...
... displayed in the camera monitor, and the names of buttons or messages displayed on a computer monitor appear in bold. • In this manual, images are sometimes omitted from monitor display samples so that monitor indicators can be more clearly shown. • Illustrations and monitor content shown ...in this manual may differ from the actual product. This icon marks notes and information that should be read before using the camera. iv These icons...

Product Manual
Page 8
...any language in any damages resulting from being in these manuals at any time and without Nikon's prior written permission. • Nikon reserves the right to change the specifications of the hardware and software described in these manuals is accurate and complete, we would appreciate it were ...you to bring any errors or omissions to the attention of the Nikon representative in a foreign country is prohibited. Notice Concerning Prohibition of...
...any language in any damages resulting from being in these manuals at any time and without Nikon's prior written permission. • Nikon reserves the right to change the specifications of the hardware and software described in these manuals is accurate and complete, we would appreciate it were ...you to bring any errors or omissions to the attention of the Nikon representative in a foreign country is prohibited. Notice Concerning Prohibition of...

Product Manual
Page 18
Introduction Table of Contents Introduction ii Read This First ii About This Manual iii Information and Precautions v For Your Safety viii WARNINGS viii Notices xi Wi-Fi (Wireless LAN Network xiii Parts of the Camera 1 The Camera Body 1 ...
Introduction Table of Contents Introduction ii Read This First ii About This Manual iii Information and Precautions v For Your Safety viii WARNINGS viii Notices xi Wi-Fi (Wireless LAN Network xiii Parts of the Camera 1 The Camera Body 1 ...

Product Manual
Page 29
... remaining (still images 20 17 Internal memory indicator 20 18 Aperture value 27 19 Focus area (target finding AF) ....63, E46 20 Focus area (for manual or center 65, E45 21 Focus area (face detection, pet detection 26, 39, 42, 61, E44 22 Focus area (subject tracking E45, E47 23 Shutter...
... remaining (still images 20 17 Internal memory indicator 20 18 Aperture value 27 19 Focus area (target finding AF) ....63, E46 20 Focus area (for manual or center 65, E45 21 Focus area (face detection, pet detection 26, 39, 42, 61, E44 22 Focus area (subject tracking E45, E47 23 Shutter...

Product Manual
Page 76
The camera enters macro mode when i is set to ON. 7 Self-timer cannot be changed . Pet portrait auto release can be selected manually. 2 Cannot be used. W (off (A39). Shooting Features 54 The flash mode setting is fixed at fill flash with red-eye reduction. 5 Slow sync with red-...
The camera enters macro mode when i is set to ON. 7 Self-timer cannot be changed . Pet portrait auto release can be selected manually. 2 Cannot be used. W (off (A39). Shooting Features 54 The flash mode setting is fixed at fill flash with red-eye reduction. 5 Slow sync with red-...

Product Manual
Page 102
... smart device to connect to Google Play Store, App Store or other online apps marketplace and search for "Wireless Mobile Utility." • Check the user's manual provided with your smart device for further details. 2 Check the description and other information and install the software. • For more information about how to...
... smart device to connect to Google Play Store, App Store or other online apps marketplace and search for "Wireless Mobile Utility." • Check the user's manual provided with your smart device for further details. 2 Check the description and other information and install the software. • For more information about how to...

Product Manual
Page 103
... options screen. Connect to smart device SSID: Password: Back Cancel 2 Set the Wi-Fi setting on the smart device to On. • Check the user's manual provided with the Wi-Fi communication indicator (A7). 81
... options screen. Connect to smart device SSID: Password: Back Cancel 2 Set the Wi-Fi setting on the smart device to On. • Check the user's manual provided with the Wi-Fi communication indicator (A7). 81

Product Manual
Page 111
Connecting the Camera to a TV, Computer, or Printer Viewing Images Start ViewNX 2. • Images are displayed in ViewNX 2 when transfer is complete. • Consult online help for more information on the desktop. • Mac: Click the ViewNX 2 icon in the Dock. 89 C Starting ViewNX 2 Manually • Windows: Double-click the ViewNX 2 shortcut on using ViewNX 2.
Connecting the Camera to a TV, Computer, or Printer Viewing Images Start ViewNX 2. • Images are displayed in ViewNX 2 when transfer is complete. • Consult online help for more information on the desktop. • Mac: Click the ViewNX 2 icon in the Dock. 89 C Starting ViewNX 2 Manually • Windows: Double-click the ViewNX 2 shortcut on using ViewNX 2.

Product Manual
Page 148
B Notes About White Balance • Set the flash to W (off) when white balance is automatically adjusted to suit lighting conditions. Option a Auto (default setting) b Preset manual c Daylight d Incandescent e Fluorescent f Cloudy g Flash Description White balance is set to any setting other than Auto and Flash (A47). • Some functions cannot be used ...
B Notes About White Balance • Set the flash to W (off) when white balance is automatically adjusted to suit lighting conditions. Option a Auto (default setting) b Preset manual c Daylight d Incandescent e Fluorescent f Cloudy g Flash Description White balance is set to any setting other than Auto and Flash (A47). • Some functions cannot be used ...

Product Manual
Page 149
...Cancel and press the k button. Preset manual 4 Frame the reference object in to select Preset manual in the White balance menu, and press the k button. • The camera zooms in the measuring window. Cancel Measure Preset manual Reference Section Cancel Measure Measuring window E37 ...Using Preset Manual Use the procedure below to measure the white balance value under the lighting used during shooting. 1 Place ...
...Cancel and press the k button. Preset manual 4 Frame the reference object in to select Preset manual in the White balance menu, and press the k button. • The camera zooms in the measuring window. Cancel Measure Preset manual Reference Section Cancel Measure Measuring window E37 ...Using Preset Manual Use the procedure below to measure the white balance value under the lighting used during shooting. 1 Place ...

Product Manual
Page 150
E38 Reference Section B Notes About Preset Manual A value for flash lighting cannot be measured with Preset manual. No image is complete. When shooting using the flash, set White balance to measure the value. • The shutter is released and measurement is saved. 5 Press the k button to Auto or Flash.
E38 Reference Section B Notes About Preset Manual A value for flash lighting cannot be measured with Preset manual. No image is complete. When shooting using the flash, set White balance to measure the value. • The shutter is released and measurement is saved. 5 Press the k button to Auto or Flash.

Product Manual
Page 157
... k button again. The focus area automatically moves to moving subjects. See "Using Subject Tracking" (E47) for more information. To return to track the subject. Option x Manual Description Use the multi selector HIJK to move the focus area to where you want to focus. • To use the multi selector to take...
... k button again. The focus area automatically moves to moving subjects. See "Using Subject Tracking" (E47) for more information. To return to track the subject. Option x Manual Description Use the multi selector HIJK to move the focus area to where you want to focus. • To use the multi selector to take...

Product Manual
Page 199
.... • Leaving the setting as Enable will not be uploaded if signal strength is insufficient even if Enable is selected. • Refer to the instruction manual of the Eye-Fi card in the camera can be confirmed in a shorter period of time. B Notes About Eye-Fi Cards • Note that images...
.... • Leaving the setting as Enable will not be uploaded if signal strength is insufficient even if Enable is selected. • Refer to the instruction manual of the Eye-Fi card in the camera can be confirmed in a shorter period of time. B Notes About Eye-Fi Cards • Note that images...

Product Manual
Page 225
... and 97% vertical (compared to actual picture) Approx. 99% horizontal and 99% vertical (compared to actual picture) Technical Notes and Index F17 type CMOS; Specifications Nikon COOLPIX S5300 Digital Camera Type Number of lens) Face priority, manual with 99 focus areas, center, subject tracking, target finding AF 7.5 cm (3-in .
... and 97% vertical (compared to actual picture) Approx. 99% horizontal and 99% vertical (compared to actual picture) Technical Notes and Index F17 type CMOS; Specifications Nikon COOLPIX S5300 Digital Camera Type Number of lens) Face priority, manual with 99 focus areas, center, subject tracking, target finding AF 7.5 cm (3-in .

Product Manual
Page 229
... × 59 mm (2.2 × 2.7 × 2.4 in.) Approx. 48 g (1.7 oz) (excluding plug adapter) For Argentina: Approx. 73 g (2.6 oz) For Brazil: Approx. 70 g (2.5 oz) B Specifications • Nikon will not be held liable for any errors this manual may contain. • The appearance of this product and its specifications are subject to change without notice.
... × 59 mm (2.2 × 2.7 × 2.4 in.) Approx. 48 g (1.7 oz) (excluding plug adapter) For Argentina: Approx. 73 g (2.6 oz) For Brazil: Approx. 70 g (2.5 oz) B Specifications • Nikon will not be held liable for any errors this manual may contain. • The appearance of this product and its specifications are subject to change without notice.

Product Manual
Page 232
... are either registered trademarks or trademarks of Microsoft Corporation in the United States and/or other documentation provided with your Nikon product are trademarks or registered trademarks of Apple Inc., in this manual or the other countries. • Mac, OS X, the iFrame logo and the iFrame symbol are the trademarks or registered...
... are either registered trademarks or trademarks of Microsoft Corporation in the United States and/or other documentation provided with your Nikon product are trademarks or registered trademarks of Apple Inc., in this manual or the other countries. • Mac, OS X, the iFrame logo and the iFrame symbol are the trademarks or registered...
Product Manual
Page 237
Preset manual E37 Pre-shooting cache E39, E41 Pressing halfway 27 Print ..... 68, 84, E27, E29, E52 Print date 18, 77, E53, E55, E78 Print order 68, ...
Preset manual E37 Pre-shooting cache E39, E41 Pressing halfway 27 Print ..... 68, 84, E27, E29, E52 Print date 18, 77, E53, E55, E78 Print order 68, ...

Product Manual
Page 240
YP3L01(11) 6MN37611-01 No reproduction in any form of this manual, in whole or in part (except for brief quotation in critical articles or reviews), may be made without written authorization from NIKON CORPORATION.
YP3L01(11) 6MN37611-01 No reproduction in any form of this manual, in whole or in part (except for brief quotation in critical articles or reviews), may be made without written authorization from NIKON CORPORATION.


