
Reference Manual
Page 5
... imaging and photography. http://imaging.nikon.com/ Use Only Nikon Brand Electronic Accessories Nikon COOLPIX cameras are engineered and proven to operate within the operational and safety requirements of the camera or result in the batteries overheating, igniting, rupturing, or leaking. For more information about Nikon brand accessories, contact a local authorized Nikon dealer. Introduction Information and Precautions...
... imaging and photography. http://imaging.nikon.com/ Use Only Nikon Brand Electronic Accessories Nikon COOLPIX cameras are engineered and proven to operate within the operational and safety requirements of the camera or result in the batteries overheating, igniting, rupturing, or leaking. For more information about Nikon brand accessories, contact a local authorized Nikon dealer. Introduction Information and Precautions...
Reference Manual
Page 8
.... Handle the camera strap with the camera, Charging AC Adapter, or AC adapter for inspection, after unplugging the product and/or removing the battery. Do not remain in their mouths. WARNINGS Turn off in the event of malfunction Should you notice smoke or an unusual smell coming from ...Do not use the camera or Charging AC Adapter in the presence of the camera or Charging AC Adapter could result from failure to a Nikon-authorized service representative for extended periods may result in use Parts of an infant or child. The consequences that should be performed only by ...
.... Handle the camera strap with the camera, Charging AC Adapter, or AC adapter for inspection, after unplugging the product and/or removing the battery. Do not remain in their mouths. WARNINGS Turn off in the event of malfunction Should you notice smoke or an unusual smell coming from ...Do not use the camera or Charging AC Adapter in the presence of the camera or Charging AC Adapter could result from failure to a Nikon-authorized service representative for extended periods may result in use Parts of an infant or child. The consequences that should be performed only by ...
Reference Manual
Page 9
... use the Charging AC Adapter EH-71P (included) and USB Cable UC-E21 (included). Continued use immediately should be sure to remove the battery when no charge remains. • Discontinue use could result in order to observe this precaution could cause damage or fire. To avoid damage to... the product, be removed with metal objects such as necklaces or hairpins. • The battery is also available to charge the battery without using a camera that supports battery charging. Do not transport or store with a dry cloth. in fire. • Do not handle the plug...
... use the Charging AC Adapter EH-71P (included) and USB Cable UC-E21 (included). Continued use immediately should be sure to remove the battery when no charge remains. • Discontinue use could result in order to observe this precaution could cause damage or fire. To avoid damage to... the product, be removed with metal objects such as necklaces or hairpins. • The battery is also available to charge the battery without using a camera that supports battery charging. Do not transport or store with a dry cloth. in fire. • Do not handle the plug...
Reference Manual
Page 10
... 4 in.) from the monitor touching the skin or entering the eyes or mouth. Follow the instructions of the lens Failure to a Nikon-authorized service representative for the purpose, to maintain compliance with product regulations. Should the insulation be taken to observe this precaution could result ... could cause temporary visual impairment The flash should be no less than those provided or sold by Nikon could result in damage or malfunction. Use the appropriate power supply (battery, Charging AC Adapter, AC adapter, USB cable) Using a power supply other objects are not pinched...
... 4 in.) from the monitor touching the skin or entering the eyes or mouth. Follow the instructions of the lens Failure to a Nikon-authorized service representative for the purpose, to maintain compliance with product regulations. Should the insulation be taken to observe this precaution could result ... could cause temporary visual impairment The flash should be no less than those provided or sold by Nikon could result in damage or malfunction. Use the appropriate power supply (battery, Charging AC Adapter, AC adapter, USB cable) Using a power supply other objects are not pinched...
Reference Manual
Page 12
...that might result from incorrect disposal. • For more information, contact the retailer or the local authorities in Europe CAUTIONS RISK OF EXPLOSION IF BATTERY IS REPLACED BY AN INCORRECT TYPE. Tel: 631-547-4200 Notice for Customers in Canada CAN ICES-3 B / NMB-3 B Notices for ...; This product is designated for human health and the environment that electrical and electronic equipment is to cause birth defects or other reproductive harm. x Nikon Inc., 1300 Walt Whitman Road, Melville, New York 11747-3064, U.S.A. Do not dispose of as household waste. • For more information,...
...that might result from incorrect disposal. • For more information, contact the retailer or the local authorities in Europe CAUTIONS RISK OF EXPLOSION IF BATTERY IS REPLACED BY AN INCORRECT TYPE. Tel: 631-547-4200 Notice for Customers in Canada CAN ICES-3 B / NMB-3 B Notices for ...; This product is designated for human health and the environment that electrical and electronic equipment is to cause birth defects or other reproductive harm. x Nikon Inc., 1300 Walt Whitman Road, Melville, New York 11747-3064, U.S.A. Do not dispose of as household waste. • For more information,...
Reference Manual
Page 16
... (s Button 3 For Shooting ...4 For Playback...7 Preparing for Shooting 9 How to Attach the Camera Strap and Lens Cap 9 Insert the Battery and Memory Card 10 Removing the Battery or Memory Card 10 Charge the Battery ...11 Opening and Adjusting the Angle of the Monitor 13 Turn the Camera On and Set the Display Language...
... (s Button 3 For Shooting ...4 For Playback...7 Preparing for Shooting 9 How to Attach the Camera Strap and Lens Cap 9 Insert the Battery and Memory Card 10 Removing the Battery or Memory Card 10 Charge the Battery ...11 Opening and Adjusting the Angle of the Monitor 13 Turn the Camera On and Set the Display Language...

Reference Manual
Page 21
Table of Contents Technical Notes and Index F1 Caring for the Product ...F2 The Camera...F2 The Battery ...F3 The Charging AC Adapter...F4 Memory Cards...F5 Cleaning and Storage...F6 Cleaning...F6 Storage ...F6 Troubleshooting ...F7 Specifications ...F16 Approved Memory Cards...F20 USER LICENSE AGREEMENT FOR LOCATION NAME DATA F22 Index...F28 xix
Table of Contents Technical Notes and Index F1 Caring for the Product ...F2 The Camera...F2 The Battery ...F3 The Charging AC Adapter...F4 Memory Cards...F5 Cleaning and Storage...F6 Cleaning...F6 Storage ...F6 Troubleshooting ...F7 Specifications ...F16 Approved Memory Cards...F20 USER LICENSE AGREEMENT FOR LOCATION NAME DATA F22 Index...F28 xix

Reference Manual
Page 24
..., 57 16 l (delete) button 23 17 k (apply selection) button 50, E116, E119 Rotary multi selector 18 (multi selector 25, E116, E118 19 Tripod socket 20 Battery-chamber/memory card slot cover 10 * Also referred to as the "multi selector" in this manual. 2
..., 57 16 l (delete) button 23 17 k (apply selection) button 50, E116, E119 Rotary multi selector 18 (multi selector 25, E116, E118 19 Tripod socket 20 Battery-chamber/memory card slot cover 10 * Also referred to as the "multi selector" in this manual. 2

Reference Manual
Page 27
... 29 28 27 26 25 24 22 Aperture value 30 23 Shutter speed 30 24 ISO sensitivity 52 Charging AC adapter 25 connection indicator 26 Battery level indicator 16 27 "Date not set" indicator...... 57, F8 28 Date stamp 57 29 Travel destination icon 57 30 Location data reception 59 31... Log display E42 Wi-Fi communication 32 indicator 60, E45 33 White balance 51 34 COOLPIX Picture Control 51 35 Active D-Lighting 52 Continuous shooting 36 mode 52, E8 37 Backlighting (HDR 27, E7 Noise reduction burst/single 38 shot E4...
... 29 28 27 26 25 24 22 Aperture value 30 23 Shutter speed 30 24 ISO sensitivity 52 Charging AC adapter 25 connection indicator 26 Battery level indicator 16 27 "Date not set" indicator...... 57, F8 28 Date stamp 57 29 Travel destination icon 57 30 Location data reception 59 31... Log display E42 Wi-Fi communication 32 indicator 60, E45 33 White balance 51 34 COOLPIX Picture Control 51 35 Active D-Lighting 52 Continuous shooting 36 mode 52, E8 37 Backlighting (HDR 27, E7 Noise reduction burst/single 38 shot E4...
Reference Manual
Page 29
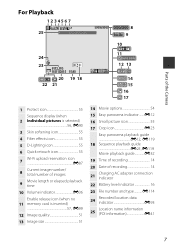
... playback guide E25, E119 Movie playback guide E32 19 Time of recording 14 20 Date of recording 14 Charging AC adapter connection 21 indicator 22 Battery level indicator 16 23 File number and type...........E114 Recorded location data 24 indicator E93 Location name information 25 (POI information E41 7
... playback guide E25, E119 Movie playback guide E32 19 Time of recording 14 20 Date of recording 14 Charging AC adapter connection 21 indicator 22 Battery level indicator 16 23 File number and type...........E114 Recorded location data 24 indicator E93 Location name information 25 (POI information E41 7

Reference Manual
Page 32
... and select Format card in the setup menu (A57). Removing the Battery or Memory Card Turn the camera off , and then open the battery-chamber/memory card slot cover. • Move the battery latch to eject the battery. • Gently push the memory card into the camera to insert...as they may become hot. 10 Preparing for Shooting Insert the Battery and Memory Card Battery latch Memory card slot • With the battery's positive and negative terminals oriented correctly, move the orange battery latch (3), and fully insert the battery (4). • Slide the memory card in until it with ...
... and select Format card in the setup menu (A57). Removing the Battery or Memory Card Turn the camera off , and then open the battery-chamber/memory card slot cover. • Move the battery latch to eject the battery. • Gently push the memory card into the camera to insert...as they may become hot. 10 Preparing for Shooting Insert the Battery and Memory Card Battery latch Memory card slot • With the battery's positive and negative terminals oriented correctly, move the orange battery latch (3), and fully insert the battery (4). • Slide the memory card in until it with ...
Reference Manual
Page 33
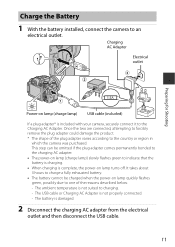
...off. The ambient temperature is not properly connected. - The USB cable or Charging AC Adapter is not suited to indicate that the battery is charging. • When charging is damaged. 2 Disconnect the charging AC adapter from the electrical outlet and then disconnect the USB cable.... remove the plug adapter could damage the product. * The shape of the reasons described below. - Preparing for Shooting Charge the Battery 1 With the battery installed, connect the camera to the country or region in which the camera was purchased. Charging AC Adapter Electrical outlet Power-on ...
...off. The ambient temperature is not properly connected. - The USB cable or Charging AC Adapter is not suited to indicate that the battery is charging. • When charging is damaged. 2 Disconnect the charging AC adapter from the electrical outlet and then disconnect the USB cable.... remove the plug adapter could damage the product. * The shape of the reasons described below. - Preparing for Shooting Charge the Battery 1 With the battery installed, connect the camera to the country or region in which the camera was purchased. Charging AC Adapter Electrical outlet Power-on ...
Reference Manual
Page 34
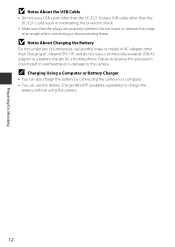
...than Charging AC Adapter EH-71P, and do not use the Battery Charger MH-67P (available separately) to charge the battery without using the camera. 12 C Charging Using a Computer or Battery Charger • You can also charge the battery by connecting the camera to the camera. Do not insert or...disconnecting them. Failure to observe this precaution could result in damage to a computer. • You can use a commercially available USB-AC adapter or a battery charger for Shooting B Notes About the USB Cable • Do not use a USB cable other than the UC-E21. Using a USB cable other ...
...than Charging AC Adapter EH-71P, and do not use the Battery Charger MH-67P (available separately) to charge the battery without using the camera. 12 C Charging Using a Computer or Battery Charger • You can also charge the battery by connecting the camera to the camera. Do not insert or...disconnecting them. Failure to observe this precaution could result in damage to a computer. • You can use a commercially available USB-AC adapter or a battery charger for Shooting B Notes About the USB Cable • Do not use a USB cable other than the UC-E21. Using a USB cable other ...
Reference Manual
Page 37
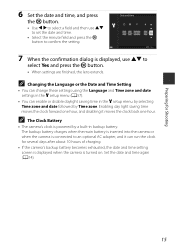
...• You can run the clock for Shooting 15 Preparing for several days after about 10 hours of charging. • If the camera's backup battery becomes exhausted, the date and time setting screen is displayed when the camera is powered by a built-in the z setup menu by selecting Time ... confirmation dialog is connected to select Yes and press the k button. • When settings are finished, the lens extends. The backup battery charges when the main battery is inserted into the camera or when the camera is displayed, use HI to set the date and time. • Select the minute...
...• You can run the clock for Shooting 15 Preparing for several days after about 10 hours of charging. • If the camera's backup battery becomes exhausted, the date and time setting screen is displayed when the camera is powered by a built-in the z setup menu by selecting Time ... confirmation dialog is connected to select Yes and press the k button. • When settings are finished, the lens extends. The backup battery charges when the main battery is inserted into the camera or when the camera is displayed, use HI to set the date and time. • Select the minute...

Reference Manual
Page 38
.... • Press the s (display) button to switch the information displayed in the monitor during shooting and play back. • Battery level indicator b: The battery level is low. 25m 0s 1/250 F5.6 840 Battery level indicator Number of exposures remaining 2 Hold the camera steady. • Keep fingers and other objects away from the lens...
.... • Press the s (display) button to switch the information displayed in the monitor during shooting and play back. • Battery level indicator b: The battery level is low. 25m 0s 1/250 F5.6 840 Battery level indicator Number of exposures remaining 2 Hold the camera steady. • Keep fingers and other objects away from the lens...

Reference Manual
Page 40
.../memory card slot cover or remove the battery or memory card while an indicator is at a telephoto position • When using the flash, gently push to lower the flash until it clicks shut. ...
.../memory card slot cover or remove the battery or memory card while an indicator is at a telephoto position • When using the flash, gently push to lower the flash until it clicks shut. ...

Reference Manual
Page 57
Shooting Features 35 Noise reduction filter Active D-Lighting Multiple exposure Save user settings Reset user settings Zoom memory B The Clock Battery If the internal clock battery (A15) is recommended. Writing down any important setting is exhausted, the settings saved in M will also be saved. 3 Press the d (menu) button to display the ...
Shooting Features 35 Noise reduction filter Active D-Lighting Multiple exposure Save user settings Reset user settings Zoom memory B The Clock Battery If the internal clock battery (A15) is recommended. Writing down any important setting is exhausted, the settings saved in M will also be saved. 3 Press the d (menu) button to display the ...

Reference Manual
Page 80
... default values. Allows you to change the camera's display language. View the current camera firmware version. E108 Allows you to set whether or not the battery in the monitor when operating manual focus. E106 Allows you to reset the sequential numbering of E108 file numbers when Yes is connected E107 to...
... default values. Allows you to change the camera's display language. View the current camera firmware version. E108 Allows you to set whether or not the battery in the monitor when operating manual focus. E106 Allows you to reset the sequential numbering of E108 file numbers when Yes is connected E107 to...

Reference Manual
Page 83
HDMI micro connector (Type D) Insert the plug straight. • Before connecting the camera to an external device, make sure the remaining battery level is used, this document. Before disconnecting, make or model of images and movies by connecting the camera to a TV, Printer, or Computer 61 Connecting ...
HDMI micro connector (Type D) Insert the plug straight. • Before connecting the camera to an external device, make sure the remaining battery level is used, this document. Before disconnecting, make or model of images and movies by connecting the camera to a TV, Printer, or Computer 61 Connecting ...
Reference Manual
Page 98
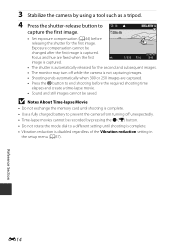
... 3 Stabilize the camera by pressing the b (e) button. • Do not rotate the mode dial to a different setting until shooting is complete. • Use a fully charged battery to prevent the camera from turning off unexpectedly. • Time-lapse movies cannot be recorded by using a tool such as a tripod. 4 Press the shutter-release...
... 3 Stabilize the camera by pressing the b (e) button. • Do not rotate the mode dial to a different setting until shooting is complete. • Use a fully charged battery to prevent the camera from turning off unexpectedly. • Time-lapse movies cannot be recorded by using a tool such as a tripod. 4 Press the shutter-release...


