
User Manual
Page 13
Table of Contents Basic Camera Setup ...185 Setup Menu...185 Welcome Screen ...187 Time Zone and Date...188 Monitor Settings...191 Print Date ...192 Vibration Reduction ...193 Motion Detection...195 AF Assist...196 Red-eye Reduction ...196 Digital Zoom...197 Assign Side Zoom Control ...198 Sound Settings...199 Auto Off ...199 Format Memory/Format Card...200 Language...201 TV Settings ...201 Charge by Computer...202 Reset File Numbering...202 Blink Warning ...203 Reset All ...205 Firmware Version...208 Caring for the Camera...209 Caring for the Camera ...209 Cleaning ...211 Storage ...212 xi
Table of Contents Basic Camera Setup ...185 Setup Menu...185 Welcome Screen ...187 Time Zone and Date...188 Monitor Settings...191 Print Date ...192 Vibration Reduction ...193 Motion Detection...195 AF Assist...196 Red-eye Reduction ...196 Digital Zoom...197 Assign Side Zoom Control ...198 Sound Settings...199 Auto Off ...199 Format Memory/Format Card...200 Language...201 TV Settings ...201 Charge by Computer...202 Reset File Numbering...202 Blink Warning ...203 Reset All ...205 Firmware Version...208 Caring for the Camera...209 Caring for the Camera ...209 Cleaning ...211 Storage ...212 xi
User Manual
Page 200
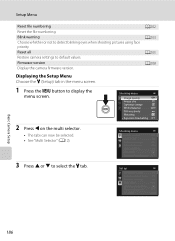
... Setup Menu Choose the z (Setup) tab in the menu screen. 1 Press the d button to detect blinking eyes when shooting pictures using face priority. Firmware version Display the camera firmware version. Reset all Restore camera settings to select the z tab. Shooting menu Image quality Image size Optimize image White balance ISO sensitivity Metering...
... Setup Menu Choose the z (Setup) tab in the menu screen. 1 Press the d button to detect blinking eyes when shooting pictures using face priority. Firmware version Display the camera firmware version. Reset all Restore camera settings to select the z tab. Shooting menu Image quality Image size Optimize image White balance ISO sensitivity Metering...

User Manual
Page 222
... number available in the memory. To change these settings back to the default settings when Reset all is performed. Firmware Version Press the d button M z (Setup menu) (A186) M Firmware version Displays the current camera firmware version. Setup Menu Others Option Paper size (A181, 182) Frame intvl for the next shot pictures start from "0001...) Default value Default 3 s Number icon (black) • Choosing Reset all also clears the current file number (A215) in the internal memory or the memory card. COOLPIX P500 Ver.X.X Back Basic Camera Setup 208
... number available in the memory. To change these settings back to the default settings when Reset all is performed. Firmware Version Press the d button M z (Setup menu) (A186) M Firmware version Displays the current camera firmware version. Setup Menu Others Option Paper size (A181, 182) Frame intvl for the next shot pictures start from "0001...) Default value Default 3 s Number icon (black) • Choosing Reset all also clears the current file number (A215) in the internal memory or the memory card. COOLPIX P500 Ver.X.X Back Basic Camera Setup 208

User Manual
Page 249
... priority 95 Favorite pictures 122 Favorite pictures menu 126 Favorite pictures mode 122 File name 215 Fill flash 36 Filter effects 152 Fireworks show m 57 Firmware version 208 Flash exposure compensation 101 Flash indicator 38 Flash mode 36 Focus 15, 32, 95, 101 Focus area 32, 95 Focus lock 33 Focus...
... priority 95 Favorite pictures 122 Favorite pictures menu 126 Favorite pictures mode 122 File name 215 Fill flash 36 Filter effects 152 Fireworks show m 57 Firmware version 208 Flash exposure compensation 101 Flash indicator 38 Flash mode 36 Focus 15, 32, 95, 101 Focus area 32, 95 Focus lock 33 Focus...

