P100 User's Manual
Page 9
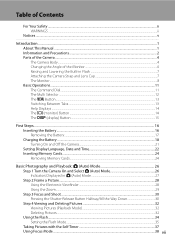
... the Battery...17 Charging the Battery ...18 Turning On and Off the Camera...21 Setting Display Language, Date and Time 22 Inserting Memory Cards...24 Removing Memory Cards...24 Basic Photography and Playback: A (Auto) Mode 26 Step 1 Turn the Camera On and Select A (Auto) Mode 26 Indicators... Displayed in A (Auto) Mode 27 Step 2 Frame a Picture...28 Using the Electronic Viewfinder ...28 Using the Zoom...29 Step 3 Focus and Shoot ...30 Pressing ...
... the Battery...17 Charging the Battery ...18 Turning On and Off the Camera...21 Setting Display Language, Date and Time 22 Inserting Memory Cards...24 Removing Memory Cards...24 Basic Photography and Playback: A (Auto) Mode 26 Step 1 Turn the Camera On and Select A (Auto) Mode 26 Indicators... Displayed in A (Auto) Mode 27 Step 2 Frame a Picture...28 Using the Electronic Viewfinder ...28 Using the Zoom...29 Step 3 Focus and Shoot ...30 Pressing ...

P100 User's Manual
Page 13
... this manual thoroughly before use the product will apply only to as the "default setting". • The names of menu items displayed in the camera monitor, and the names of Nikon COOLPIX P100 digital camera. Read this manual, images are indicated in the camera's internal memory or on the memory card. C Memory Cards Pictures taken with...
... this manual thoroughly before use the product will apply only to as the "default setting". • The names of menu items displayed in the camera monitor, and the names of Nikon COOLPIX P100 digital camera. Read this manual, images are indicated in the camera's internal memory or on the memory card. C Memory Cards Pictures taken with...

P100 User's Manual
Page 15
...software, potentially resulting in the malicious use by law from discarded storage devices using commercial deletion software, or format the device and then completely refill it with copyright notices The copying or reproduction of copyrighted creative works such as memory cards or built-in a foreign country... was digitally copied or reproduced by public agencies and private groups, ID cards and tickets, such as passes and meal coupons. • Comply with images containing no private information (for business use of a scanner, digital camera or other device may be recovered from ...
...software, potentially resulting in the malicious use by law from discarded storage devices using commercial deletion software, or format the device and then completely refill it with copyright notices The copying or reproduction of copyrighted creative works such as memory cards or built-in a foreign country... was digitally copied or reproduced by public agencies and private groups, ID cards and tickets, such as passes and meal coupons. • Comply with images containing no private information (for business use of a scanner, digital camera or other device may be recovered from ...
P100 User's Manual
Page 28
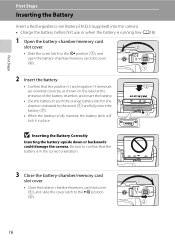
... Insert a Rechargeable Li-ion Battery EN-EL5 (supplied) into the camera. • Charge the battery before first use or when the battery is running low (A18). 1 Open the battery-chamber/memory card slot cover. • Slide the cover latch to the Y position (1), and open the battery-chamber/memory... entrance of the battery chamber, and insert the battery. • Use the battery to the Z position (2). 16 PUSH TO EJECT PUSH TO EJECT 3 Close the battery-chamber/memory card slot cover. • Close the battery-chamber/memory card slot cover (1), and slide the cover latch to push the orange...
... Insert a Rechargeable Li-ion Battery EN-EL5 (supplied) into the camera. • Charge the battery before first use or when the battery is running low (A18). 1 Open the battery-chamber/memory card slot cover. • Slide the cover latch to the Y position (1), and open the battery-chamber/memory... entrance of the battery chamber, and insert the battery. • Use the battery to the Z position (2). 16 PUSH TO EJECT PUSH TO EJECT 3 Close the battery-chamber/memory card slot cover. • Close the battery-chamber/memory card slot cover (1), and slide the cover latch to push the orange...
P100 User's Manual
Page 29
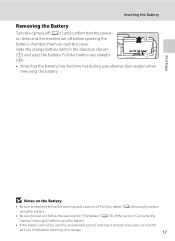
...read and follow the warnings for "The Battery" (A176) of "For Your Safety" (Aii) thoroughly before using the battery. • Be sure to storage. 17 First Steps B Notes on lamp and the monitor are... off (A21) and confirm that the battery may become hot during use; on the Battery • Be sure to read and follow the warnings and cautions of the section "...Caring for the Camera" thoroughly before using the battery. • If the battery will not be used for an extended period, recharge it at least once every six months...
...read and follow the warnings for "The Battery" (A176) of "For Your Safety" (Aii) thoroughly before using the battery. • Be sure to storage. 17 First Steps B Notes on lamp and the monitor are... off (A21) and confirm that the battery may become hot during use; on the Battery • Be sure to read and follow the warnings and cautions of the section "...Caring for the Camera" thoroughly before using the battery. • If the battery will not be used for an extended period, recharge it at least once every six months...
P100 User's Manual
Page 37
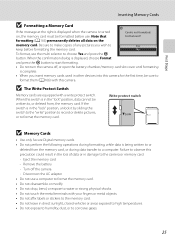
...25 Remove the battery - Disconnect the AC adapter • Do not use the multi selector to choose Yes and press the k button. When this precaution could result in the loss of any pictures you insert memory cards used in other devices into this camera for the first time, be sure to... format them (A166) with this camera. Eject the memory card - First Steps Inserting Memory Cards B Formatting a Memory Card If the message at the right is displayed when ...
...25 Remove the battery - Disconnect the AC adapter • Do not use the multi selector to choose Yes and press the k button. When this precaution could result in the loss of any pictures you insert memory cards used in other devices into this camera for the first time, be sure to... format them (A166) with this camera. Eject the memory card - First Steps Inserting Memory Cards B Formatting a Memory Card If the message at the right is displayed when ...
P100 User's Manual
Page 39
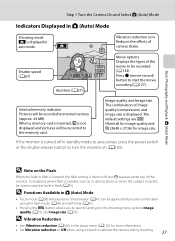
...the monitor is turned off and W appears at the top of the movie to be recorded to internal memory (approx. 43 MB). When a memory card is inserted, C is not displayed and pictures will be recorded (A133). Shutter speed (A67) 1/250 F5.6 17 Aperture (A67) Movie options Displays ...sure to raise the built-in A (Auto) Mode • Focus mode (A38) and exposure compensation (A41) can be applied and pictures can be taken using a tripod to stabilize the camera during shooting. 27 D Vibration Reduction • See Vibration reduction (A160) in auto mode. The default settings are W (...
...the monitor is turned off and W appears at the top of the movie to be recorded to internal memory (approx. 43 MB). When a memory card is inserted, C is not displayed and pictures will be recorded (A133). Shutter speed (A67) 1/250 F5.6 17 Aperture (A67) Movie options Displays ...sure to raise the built-in A (Auto) Mode • Focus mode (A38) and exposure compensation (A41) can be applied and pictures can be taken using a tripod to stabilize the camera during shooting. 27 D Vibration Reduction • See Vibration reduction (A160) in auto mode. The default settings are W (...

P100 User's Manual
Page 42
...focus area display. To release the shutter and take a picture, press the shutter-release button the rest of the focus and exposure. Do not use force when pressing the shutter-release button, as this position. Pressing the Shutter-Release Button Halfway/All the Way Down The camera features a two...-release button. Press the shutter-release Press the shutter-release button halfway to lock button the rest of the way down to the memory card or internal memory. To set focus and exposure, press the shutter-release button halfway, stopping when you feel resistance. When the subject is...
...focus area display. To release the shutter and take a picture, press the shutter-release button the rest of the focus and exposure. Do not use force when pressing the shutter-release button, as this position. Pressing the Shutter-Release Button Halfway/All the Way Down The camera features a two...-release button. Press the shutter-release Press the shutter-release button halfway to lock button the rest of the way down to the memory card or internal memory. To set focus and exposure, press the shutter-release button halfway, stopping when you feel resistance. When the subject is...

P100 User's Manual
Page 43
... the subject may light by pressing the shutter-release button halfway. 31 D Focus Lock Use focus lock to be focused on another subject and use focus lock. Do not open the battery-chamber/memory card slot cover while pictures are at different distances from the camera (e.g., an animal inside a... cage) • Subject is moving rapidly In the situations noted above, try pressing the shutter-release button halfway to refocus several times, or focus on using focus lock, ...
... the subject may light by pressing the shutter-release button halfway. 31 D Focus Lock Use focus lock to be focused on another subject and use focus lock. Do not open the battery-chamber/memory card slot cover while pictures are at different distances from the camera (e.g., an animal inside a... cage) • Subject is moving rapidly In the situations noted above, try pressing the shutter-release button halfway to refocus several times, or focus on using focus lock, ...

P100 User's Manual
Page 44
Pictures can also be displayed in the monitor. 44 Internal memory indicator 2 Use the multi selector to fast forward pictures. Yes No Continue holding down H, I , J or K to view additional pictures. Basic Photography and Playback: A (Auto) Mode Step 4 Viewing ...; Press the multi selector H, I , J or K to choose Yes and press the k button. • The picture that is not displayed and pictures stored on the memory card will be restored. • To exit without deleting the picture, choose No and press the k button. 32 Erase 1 image? When memory...
Pictures can also be displayed in the monitor. 44 Internal memory indicator 2 Use the multi selector to fast forward pictures. Yes No Continue holding down H, I , J or K to view additional pictures. Basic Photography and Playback: A (Auto) Mode Step 4 Viewing ...; Press the multi selector H, I , J or K to choose Yes and press the k button. • The picture that is not displayed and pictures stored on the memory card will be restored. • To exit without deleting the picture, choose No and press the k button. 32 Erase 1 image? When memory...
P100 User's Manual
Page 75
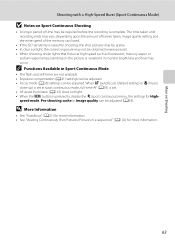
More on Shooting Shooting with a High-Speed Burst (Sport Continuous Mode) B Notes on Sport Continuous Shooting • A longer period of the memory card used. • If the ISO sensitivity is raised for shooting, the shot pictures may be grainy. • In clear sunlight, the correct exposure may not be ...
More on Shooting Shooting with a High-Speed Burst (Sport Continuous Mode) B Notes on Sport Continuous Shooting • A longer period of the memory card used. • If the ISO sensitivity is raised for shooting, the shot pictures may be grainy. • In clear sunlight, the correct exposure may not be ...

P100 User's Manual
Page 99
BSS may become slower depending on the image quality, image size, memory card type or shooting conditions. • This feature cannot be used simultaneously with certain features. B Note on the picture or variations in monitor brightness and hue may occur. Interval Timer Shooting Images are... for the first picture in each shooting (A102). Choose from 30 s, 1 min, 5 min, or 10 min. 1 Display the shooting menu (A74), use the multi selector to 1/30 second. Continuous Single Continuous H Continuous L BSS Multi-shot 16 Intvl timer shooting 87 Focus, exposure and white balance are fixed...
BSS may become slower depending on the image quality, image size, memory card type or shooting conditions. • This feature cannot be used simultaneously with certain features. B Note on the picture or variations in monitor brightness and hue may occur. Interval Timer Shooting Images are... for the first picture in each shooting (A102). Choose from 30 s, 1 min, 5 min, or 10 min. 1 Display the shooting menu (A74), use the multi selector to 1/30 second. Continuous Single Continuous H Continuous L BSS Multi-shot 16 Intvl timer shooting 87 Focus, exposure and white balance are fixed...

P100 User's Manual
Page 100
... and Folder Names" (A181) for extended periods, use another make or model of AC adapter. More on... picture and initiate interval timer shooting. • Monitor turns off unexpectedly during recording, use a fully charged battery. • To power the camera continuously for more information. ... mode dial to end recording. • Recording will end automatically if the internal memory or memory card becomes full, or when the maximum amount of frames have been recorded. Shooting Options: Shooting Menu ... not, under any circumstances, use the AC Adapter EH-62A (available separately from...
... and Folder Names" (A181) for extended periods, use another make or model of AC adapter. More on... picture and initiate interval timer shooting. • Monitor turns off unexpectedly during recording, use a fully charged battery. • To power the camera continuously for more information. ... mode dial to end recording. • Recording will end automatically if the internal memory or memory card becomes full, or when the maximum amount of frames have been recorded. Shooting Options: Shooting Menu ... not, under any circumstances, use the AC Adapter EH-62A (available separately from...

P100 User's Manual
Page 120
...Pictures and Number of Copies to Print Press the d button M c (Playback menu) (A107) M a Print set If you choose to use one of the following methods to print pictures that are recorded on a memory card, the pictures to print and the number of copies can be set in advance on the memory... from a digital photo lab that has a DPOF service. • Printing by connecting the camera to a PictBridge-compatible (A198) printer (A146). ( When the memory card is removed from the camera, the print settings can also be printed. • Rotate the zoom control to g (i) to switch to full-frame playback, or...
...Pictures and Number of Copies to Print Press the d button M c (Playback menu) (A107) M a Print set If you choose to use one of the following methods to print pictures that are recorded on a memory card, the pictures to print and the number of copies can be set in advance on the memory... from a digital photo lab that has a DPOF service. • Printing by connecting the camera to a PictBridge-compatible (A198) printer (A146). ( When the memory card is removed from the camera, the print settings can also be printed. • Rotate the zoom control to g (i) to switch to full-frame playback, or...

P100 User's Manual
Page 122
Pause Restart End Frame intvl More on Playback B Notes on a memory card in an automatic slide show begins. • Press the multi selector K to view pictures in the order recorded, or J to pause the slide show. 3 Choose ... the first frame of movies (A137) included in reverse order. The check mark (w) will be added to the loop option when enabled. 2 The slide show . 1 Use the multi selector to the playback menu.
Pause Restart End Frame intvl More on Playback B Notes on a memory card in an automatic slide show begins. • Press the multi selector K to view pictures in the order recorded, or J to pause the slide show. 3 Choose ... the first frame of movies (A137) included in reverse order. The check mark (w) will be added to the loop option when enabled. 2 The slide show . 1 Use the multi selector to the playback menu.

P100 User's Manual
Page 126
... the picture 90°. Press the multi selector J or K to 180° in the portrait (vertical) orientation can be deleted using the Delete option. Note, however, that were recorded in either direction. See "Selecting Pictures" (A112) for more information. Hidden pictures... cannot be rotated 90° clockwise or counterclockwise. Pictures that formatting the camera's internal memory or the memory card will permanently erase hidden files (A166). 114 i Hide Image Press the d button M c (Playback menu) (A107) M i Hide image Hide ...
... the picture 90°. Press the multi selector J or K to 180° in the portrait (vertical) orientation can be deleted using the Delete option. Note, however, that were recorded in either direction. See "Selecting Pictures" (A112) for more information. Hidden pictures... cannot be rotated 90° clockwise or counterclockwise. Pictures that formatting the camera's internal memory or the memory card will permanently erase hidden files (A166). 114 i Hide Image Press the d button M c (Playback menu) (A107) M i Hide image Hide ...

P100 User's Manual
Page 127
.... Playback Options: Playback Menu h Copy: Copying Between the Internal Memory and Memory Card Press the d button M c (Playback menu) (A107) M h Copy Copy pictures between the internal memory and a memory card. 1 Use the multi selector to select an option from Copy the copy screen and press the... k button. • q: Copy pictures from internal memory to memory card. • r: Copy pictures from the picture selection screen (A112). ...
.... Playback Options: Playback Menu h Copy: Copying Between the Internal Memory and Memory Card Press the d button M c (Playback menu) (A107) M h Copy Copy pictures between the internal memory and a memory card. 1 Use the multi selector to select an option from Copy the copy screen and press the... k button. • q: Copy pictures from internal memory to memory card. • r: Copy pictures from the picture selection screen (A112). ...

P100 User's Manual
Page 130
... the monitor. Enlarge the image or refine the composition and create a copy containing only the portion visible in the internal memory or on the memory card. • Perform one of the picture. Create a small copy of the picture that provides a little more impact. Create a copy with enhanced ...(A120) D-Lighting (A121) Skin softening (A122) Small picture (A124) Black border (A125) Crop (A126) Application Easily create a copy with cameras other than COOLPIX P100. • If a copy created using this camera to display the pictures 118 individually, and then select a picture.
... the monitor. Enlarge the image or refine the composition and create a copy containing only the portion visible in the internal memory or on the memory card. • Perform one of the picture. Create a small copy of the picture that provides a little more impact. Create a copy with enhanced ...(A120) D-Lighting (A121) Skin softening (A122) Small picture (A124) Black border (A125) Crop (A126) Application Easily create a copy with cameras other than COOLPIX P100. • If a copy created using this camera to display the pictures 118 individually, and then select a picture.

P100 User's Manual
Page 156
... complete, follow the procedure described below to a memory card using the camera (A115). Clicking the Nikon Transfer or ViewNX icon on Nikon Transfer or ViewNX, start Panorama Maker. D Viewing Nikon Transfer and ViewNX Help Information For more information on using Nikon Transfer. • If the memory card capacity is 2 GB or more information. 144 D Panorama Creation with Panorama...
... complete, follow the procedure described below to a memory card using the camera (A115). Clicking the Nikon Transfer or ViewNX icon on Nikon Transfer or ViewNX, start Panorama Maker. D Viewing Nikon Transfer and ViewNX Help Information For more information on using Nikon Transfer. • If the memory card capacity is 2 GB or more information. 144 D Panorama Creation with Panorama...

P100 User's Manual
Page 178
...! Setup Menu l/m Format Memory/Format Card Press the d button M z (Setup menu) (A153) M Format memory/Format card Use this camera. 166 Formatting Memory Card When the memory card is inserted in the camera, the Format card option appears in the setup menu. Format No Format card All images will be deleted! Be ...8226; Do not turn off the camera, disconnect the AC adapter, or open the battery-chamber/memory card slot cover during formatting. • The first time you insert the memory cards used in other devices into this camera, be sure to format them with this option to format the ...
...! Setup Menu l/m Format Memory/Format Card Press the d button M z (Setup menu) (A153) M Format memory/Format card Use this camera. 166 Formatting Memory Card When the memory card is inserted in the camera, the Format card option appears in the setup menu. Format No Format card All images will be deleted! Be ...8226; Do not turn off the camera, disconnect the AC adapter, or open the battery-chamber/memory card slot cover during formatting. • The first time you insert the memory cards used in other devices into this camera, be sure to format them with this option to format the ...


