P100 User's Manual
Page 9
... s (display) Button ...15 First Steps ...16 Inserting the Battery ...16 Removing the Battery...17 Charging the Battery ...18 Turning On and Off the Camera...21 Setting Display Language, Date and Time 22 Inserting Memory Cards...24 Removing Memory Cards...24 Basic Photography and Playback: A (Auto) Mode 26 Step 1 Turn the Camera... Button Halfway/All the Way Down 30 Step 4 Viewing and Deleting Pictures 32 Viewing Pictures (Playback Mode) ...32 Deleting Pictures...32 Using the Flash...34 Setting the Flash Mode...35 Taking Pictures with the Self-Timer 37 Using Focus Mode ...38 vii
... s (display) Button ...15 First Steps ...16 Inserting the Battery ...16 Removing the Battery...17 Charging the Battery ...18 Turning On and Off the Camera...21 Setting Display Language, Date and Time 22 Inserting Memory Cards...24 Removing Memory Cards...24 Basic Photography and Playback: A (Auto) Mode 26 Step 1 Turn the Camera... Button Halfway/All the Way Down 30 Step 4 Viewing and Deleting Pictures 32 Viewing Pictures (Playback Mode) ...32 Deleting Pictures...32 Using the Flash...34 Setting the Flash Mode...35 Taking Pictures with the Self-Timer 37 Using Focus Mode ...38 vii
P100 User's Manual
Page 10
... Playback ...101 Operations in Subject Tracking Mode 59 Subject Tracking Menu ...61 Shooting with a High-Speed Burst (Sport Continuous Mode 62 Sport Continuous Menu...64 Setting the Exposure for Shooting (A, B, C, D Modes 66 A, B, C, D Modes ...66 A (Programmed Auto) Mode...68 B (Shutter-Priority Auto) Mode ...69 C... Reduction ...94 Q Distortion Control ...94 J Active D-Lighting ...95 Functions that Cannot be Applied Simultaneously 96 Using M (User Setting Mode)...98 Save the Settings in M ...99 Resetting Saved Settings ...100 More on a Moving Subject in Full-Frame Playback 101 viii
... Playback ...101 Operations in Subject Tracking Mode 59 Subject Tracking Menu ...61 Shooting with a High-Speed Burst (Sport Continuous Mode 62 Sport Continuous Menu...64 Setting the Exposure for Shooting (A, B, C, D Modes 66 A, B, C, D Modes ...66 A (Programmed Auto) Mode...68 B (Shutter-Priority Auto) Mode ...69 C... Reduction ...94 Q Distortion Control ...94 J Active D-Lighting ...95 Functions that Cannot be Applied Simultaneously 96 Using M (User Setting Mode)...98 Save the Settings in M ...99 Resetting Saved Settings ...100 More on a Moving Subject in Full-Frame Playback 101 viii
P100 User's Manual
Page 11
... (Pictures in a sequence 102 Viewing Multiple Pictures: Thumbnail Playback 104 Calendar display ...105 Taking a Closer Look: Playback Zoom 106 Playback Options: Playback Menu 107 a Print Set: Setting the Pictures and Number of Copies to Print 108 b Slide Show...110 c Delete: Deleting Multiple Pictures 111 d Protect ...113 f Rotate Image...114 i Hide Image...114...
... (Pictures in a sequence 102 Viewing Multiple Pictures: Thumbnail Playback 104 Calendar display ...105 Taking a Closer Look: Playback Zoom 106 Playback Options: Playback Menu 107 a Print Set: Setting the Pictures and Number of Copies to Print 108 b Slide Show...110 c Delete: Deleting Multiple Pictures 111 d Protect ...113 f Rotate Image...114 i Hide Image...114...
P100 User's Manual
Page 12
...Time...148 Printing Multiple Pictures ...149 Basic Camera Setup ...152 Setup Menu...152 c Welcome Screen...154 d Date ...155 e Monitor Settings...158 f Date Imprint ...159 g Vibration Reduction...160 U Motion Detection...162 h AF Assist ...163 K Red-eye reduction...163 u Digital Zoom...164 ...i Sound Settings...165 k Auto Off...165 l/m Format Memory/Format Card 166 n Language...167 H TV Settings...167 V Charge by Computer ...168 d Blink Warning...169 p Reset All...171 P Reset file numbering...174 r ...
...Time...148 Printing Multiple Pictures ...149 Basic Camera Setup ...152 Setup Menu...152 c Welcome Screen...154 d Date ...155 e Monitor Settings...158 f Date Imprint ...159 g Vibration Reduction...160 U Motion Detection...162 h AF Assist ...163 K Red-eye reduction...163 u Digital Zoom...164 ...i Sound Settings...165 k Auto Off...165 l/m Format Memory/Format Card 166 n Language...167 H TV Settings...167 V Charge by Computer ...168 d Blink Warning...169 p Reset All...171 P Reset file numbering...174 r ...

P100 User's Manual
Page 13
... Notations • A Secure Digital (SD) memory card is referred to as the "default setting". • The names of menu items displayed in the camera monitor, and the names of Nikon COOLPIX P100 digital camera. Symbols and Conventions To make it where all new pictures will read before the internal... notes, C information that monitor indicators can be read before use, and keep it easier to as a "memory card". • The setting at the time of purchase is available elsewhere in this manual, images are sometimes omitted from actual display. Screen Samples In this manual or ...
... Notations • A Secure Digital (SD) memory card is referred to as the "default setting". • The names of menu items displayed in the camera monitor, and the names of Nikon COOLPIX P100 digital camera. Symbols and Conventions To make it where all new pictures will read before the internal... notes, C information that monitor indicators can be read before use, and keep it easier to as a "memory card". • The setting at the time of purchase is available elsewhere in this manual, images are sometimes omitted from actual display. Screen Samples In this manual or ...
P100 User's Manual
Page 19
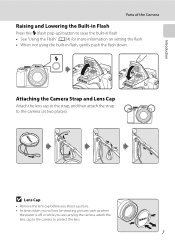
... Built-in Flash Press the m (flash pop-up) button to raise the built-in flash. • See "Using the Flash" (A34) for more information on setting the flash. • When not using the built-in flash, gently push the flash down.
... Built-in Flash Press the m (flash pop-up) button to raise the built-in flash. • See "Using the Flash" (A34) for more information on setting the flash. • When not using the built-in flash, gently push the flash down.
P100 User's Manual
Page 20
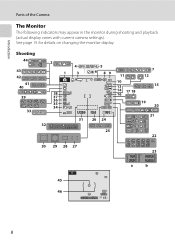
Shooting 44 43 42 41 40 39 33 2 1 38 37 36 35 34 32 4 3 1/250 31 5 6 89 F5.6 999 26 24 11 10 13 14 17 18 16 7 12 15 19 20 21 25 22 30 29 28 27 23 999 1m00s 9999 1m00s a b 45 46 1/250 F5.6 17 8 Introduction Parts of the Camera The Monitor The following indicators may appear in the monitor during shooting and playback (actual display varies with current camera settings). See page 15 for details on changing the monitor display.
Shooting 44 43 42 41 40 39 33 2 1 38 37 36 35 34 32 4 3 1/250 31 5 6 89 F5.6 999 26 24 11 10 13 14 17 18 16 7 12 15 19 20 21 25 22 30 29 28 27 23 999 1m00s 9999 1m00s a b 45 46 1/250 F5.6 17 8 Introduction Parts of the Camera The Monitor The following indicators may appear in the monitor during shooting and playback (actual display varies with current camera settings). See page 15 for details on changing the monitor display.
P100 User's Manual
Page 21
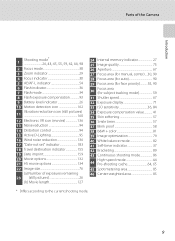
... Electronic VR icon (movies 136 13 Noise reduction 94 14 Distortion control 94 15 Active D-Lighting 95 16 Wind noise reduction 136 17 "Date not set" indicator 183 18 Travel destination indicator 155 19 Date imprint 159 20 Movie options 132 21 HS movie options 134 22 Image size 76 (a) Number...
... Electronic VR icon (movies 136 13 Noise reduction 94 14 Distortion control 94 15 Active D-Lighting 95 16 Wind noise reduction 136 17 "Date not set" indicator 183 18 Travel destination indicator 155 19 Date imprint 159 20 Movie options 132 21 HS movie options 134 22 Image size 76 (a) Number...

P100 User's Manual
Page 23
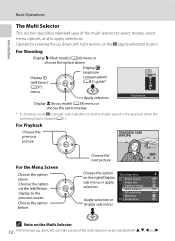
Introduction For Shooting Mode Programmed auto (mode dial set to A) Shutter-priority auto (mode dial set to B) Aperture-priority auto (mode dial set to C) Manual (mode dial set to D) For Playback Mode Full-frame playback or thumbnail playback Calendar display Use Description A Change the flexible program 68 Adjust shutter speed 69 Adjust aperture ...
Introduction For Shooting Mode Programmed auto (mode dial set to A) Shutter-priority auto (mode dial set to B) Aperture-priority auto (mode dial set to C) Manual (mode dial set to D) For Playback Mode Full-frame playback or thumbnail playback Calendar display Use Description A Change the flexible program 68 Adjust shutter speed 69 Adjust aperture ...
P100 User's Manual
Page 24
... the multi selector to select modes, select menu options, and to the previous screen Choose the option below * In shooting mode D (manual), select whether to set the shutter speed or the aperture when the command dial is rotated (A71). For Shooting Display m (flash mode) (A34) menu or choose the option above...
... the multi selector to select modes, select menu options, and to the previous screen Choose the option below * In shooting mode D (manual), select whether to set the shutter speed or the aperture when the command dial is rotated (A71). For Shooting Display m (flash mode) (A34) menu or choose the option above...

P100 User's Manual
Page 25
... Continuous Shooting menu Image quality Image size Optimize image White balance ISO sensitivity Metering Continuous Set up Welcome screen Date Monitor settings Date imprint Vibration reduction Motion detection AF assist Press the multi selector J to the next set of the monitor to display the corresponding menu. • Press the d button again to choose...
... Continuous Shooting menu Image quality Image size Optimize image White balance ISO sensitivity Metering Continuous Set up Welcome screen Date Monitor settings Date imprint Vibration reduction Motion detection AF assist Press the multi selector J to the next set of the monitor to display the corresponding menu. • Press the d button again to choose...

P100 User's Manual
Page 26
... g (j) when M is clearly visible. Shooting menu Image quality Image size Optimize image White balance ISO sensitivity Metering Continuous White balance For accurate color reproduction, choose a setting that suits the shooting conditions.
... g (j) when M is clearly visible. Shooting menu Image quality Image size Optimize image White balance ISO sensitivity Metering Continuous White balance For accurate color reproduction, choose a setting that suits the shooting conditions.

P100 User's Manual
Page 27
... information Display the picture and the shooting data. Information hidden Display only the taken picture. 1 Available only when mode dial is set to the right. Use highlights as a guide when setting exposure. 3 The histogram is chosen. 15 The horizontal axis corresponds to pixel brightness, with dark tones to the left and bright...
... information Display the picture and the shooting data. Information hidden Display only the taken picture. 1 Available only when mode dial is set to the right. Use highlights as a guide when setting exposure. 3 The histogram is chosen. 15 The horizontal axis corresponds to pixel brightness, with dark tones to the left and bright...
P100 User's Manual
Page 33
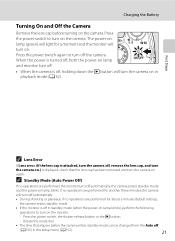
..., both the power-on lamp and monitor turn off. • When the camera is off, holding down the c button will light for about a minute (default setting), the camera enters standby mode. • If the monitor is displayed, check that elapses before turning on . Rotate the mode dial. • The time that...
..., both the power-on lamp and monitor turn off. • When the camera is off, holding down the c button will light for about a minute (default setting), the camera enters standby mode. • If the monitor is displayed, check that elapses before turning on . Rotate the mode dial. • The time that...

P100 User's Manual
Page 34
...London Casablanca Back D Daylight Saving Time If daylight saving time is selected, the date and time will turn on the daylight saving time option. Setting Display Language, Date and Time A language-selection dialog is displayed the first time the camera is displayed at the top of the monitor. Date... Set time and date? 4 Press the multi selector J or K to turn off the daylight saving time option, press I. 22 London Casablanca Back When the ...
...London Casablanca Back D Daylight Saving Time If daylight saving time is selected, the date and time will turn on the daylight saving time option. Setting Display Language, Date and Time A language-selection dialog is displayed the first time the camera is displayed at the top of the monitor. Date... Set time and date? 4 Press the multi selector J or K to turn off the daylight saving time option, press I. 22 London Casablanca Back When the ...

P100 User's Manual
Page 35
...00 Edit Date D M Y 15 05 2010 15 10 Edit 7 Make sure that the lens cap is removed, and then press the k button or K. • The settings are displayed. D Changing the Date and Time and Imprinting the Date • Select Date from Date (A155) in the setup menu (A152) to change the... which the day, month and year are applied and monitor display reverts to shooting mode. • The lens will extend at this time. First Steps Setting Display Language, Date and Time 5 Edit the date. • Press H or I to edit the highlighted item. • Press K to change the time zone and ...
...00 Edit Date D M Y 15 05 2010 15 10 Edit 7 Make sure that the lens cap is removed, and then press the k button or K. • The settings are displayed. D Changing the Date and Time and Imprinting the Date • Select Date from Date (A155) in the setup menu (A152) to change the... which the day, month and year are applied and monitor display reverts to shooting mode. • The lens will extend at this time. First Steps Setting Display Language, Date and Time 5 Edit the date. • Press H or I to edit the highlighted item. • Press K to change the time zone and ...
P100 User's Manual
Page 39
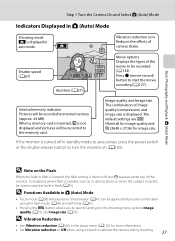
...(Auto) Mode Indicators Displayed in A (Auto) Mode Shooting mode A is fixed to off in the setup menu (A152) for more information. • Set Vibration reduction to Off when using the flash mode (A34) and self-timer (A37). • Pressing the d button allows you to internal memory (approx.... Vibration reduction icon Reduces the effects of the movie to the memory card. Internal memory indicator Pictures will be recorded to be recorded to specify settings for image size. In situations where flash is needed, such as in flash (A35). When a memory card is inserted, C is turned...
...(Auto) Mode Indicators Displayed in A (Auto) Mode Shooting mode A is fixed to off in the setup menu (A152) for more information. • Set Vibration reduction to Off when using the flash mode (A34) and self-timer (A37). • Pressing the d button allows you to internal memory (approx.... Vibration reduction icon Reduces the effects of the movie to the memory card. Internal memory indicator Pictures will be recorded to be recorded to specify settings for image size. In situations where flash is needed, such as in flash (A35). When a memory card is inserted, C is turned...

P100 User's Manual
Page 41
... a wider view. The position of the zoom positions at which shooting still pictures without interpolation is applied at the current image size setting. Or rotate in either direction will adjust the zoom quickly, while rotating the control partially will not operate. 29 Interpolation is possible... at zoom positions beyond the V position, interpolation is initiated and the zoom indicator turns yellow to the right as interpolation to set the digital zoom so that interpolation is in the g direction will not be displayed when digital zoom is being applied. When zoom ...
... a wider view. The position of the zoom positions at which shooting still pictures without interpolation is applied at the current image size setting. Or rotate in either direction will adjust the zoom quickly, while rotating the control partially will not operate. 29 Interpolation is possible... at zoom positions beyond the V position, interpolation is initiated and the zoom indicator turns yellow to the right as interpolation to set the digital zoom so that interpolation is in the g direction will not be displayed when digital zoom is being applied. When zoom ...

P100 User's Manual
Page 42
Change the composition and press the shutter-release button halfway again. 2 Press the shutter-release button the rest of the way down . To set focus and exposure, press the shutter-release button halfway, stopping when you feel resistance. Focus and exposure lock while the shutter-release button is held ...
Change the composition and press the shutter-release button halfway again. 2 Press the shutter-release button the rest of the way down . To set focus and exposure, press the shutter-release button halfway, stopping when you feel resistance. Focus and exposure lock while the shutter-release button is held ...
P100 User's Manual
Page 45
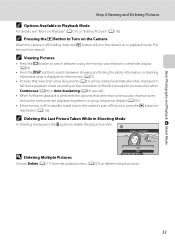
... displayed in full-frame playback mode according to the orientation of the face (except for pictures shot when Continuous (A86) or Auto bracketing (A89) was set). • When full-frame playback is performed for pictures that were shot continuously, those pictures shot at the same time are displayed together in a group...
... displayed in full-frame playback mode according to the orientation of the face (except for pictures shot when Continuous (A86) or Auto bracketing (A89) was set). • When full-frame playback is performed for pictures that were shot continuously, those pictures shot at the same time are displayed together in a group...


