User Manual
Page 5
...batteries with EN-MH2-B2 batteries (available separately), purchase two sets (total of the plug should handling the battery The battery ...short or disassemble the battery or attempt to • Do not handle the plug or battery charger with COOLPIX L120. • Insert batteries in or expose to remove or break the battery insulation or casing. iii separately)...; Batteries are using the AC adapter, be damaged and the wires become exposed, take it to a Nikon-authorized service representative for use with DC-to remove the inverters. objects such as discoloration or deformation. ...
...batteries with EN-MH2-B2 batteries (available separately), purchase two sets (total of the plug should handling the battery The battery ...short or disassemble the battery or attempt to • Do not handle the plug or battery charger with COOLPIX L120. • Insert batteries in or expose to remove or break the battery insulation or casing. iii separately)...; Batteries are using the AC adapter, be damaged and the wires become exposed, take it to a Nikon-authorized service representative for use with DC-to remove the inverters. objects such as discoloration or deformation. ...
User Manual
Page 9
... Screen 13 About the Shutter-release Button...13 First Steps ...14 Inserting the Batteries ...14 Applicable Batteries ...14 Turning On and Off the Camera...14 Setting Display Language, Date and Time 16 Inserting Memory Cards ...18 Removing Memory Cards...18 vii
... Screen 13 About the Shutter-release Button...13 First Steps ...14 Inserting the Batteries ...14 Applicable Batteries ...14 Turning On and Off the Camera...14 Setting Display Language, Date and Time 16 Inserting Memory Cards ...18 Removing Memory Cards...18 vii
User Manual
Page 10
... Faces Automatically (Smart Portrait Mode 46 Shooting Continuously at High Speed (Sport Continuous 48 Changing the Sport Continuous Shooting Mode Settings 49 Auto Mode...50 Macro Mode...51 Changing A (Auto) Mode Settings (Shooting Menu 52 Displaying the Shooting Menu...52 Image Mode (Image Quality/Image Size 53 White Balance (Adjusting Hue) ...55...
... Faces Automatically (Smart Portrait Mode 46 Shooting Continuously at High Speed (Sport Continuous 48 Changing the Sport Continuous Shooting Mode Settings 49 Auto Mode...50 Macro Mode...51 Changing A (Auto) Mode Settings (Shooting Menu 52 Displaying the Shooting Menu...52 Image Mode (Image Quality/Image Size 53 White Balance (Adjusting Hue) ...55...

User Manual
Page 11
... and Contrast 76 g Small Picture: Decreasing Image Size 77 o Crop: Creating a Cropped Copy ...78 Movie Recording and Playback...79 Recording Movies ...79 Changing Movie Recording Settings ...82 Movie Options ...84 Autofocus Mode...85 Electronic VR ...85 Wind Noise Reduction...86 Enhanced Resolution ...86 Movie Playback ...87 Deleting Movies...87 Editing Movies...
... and Contrast 76 g Small Picture: Decreasing Image Size 77 o Crop: Creating a Cropped Copy ...78 Movie Recording and Playback...79 Recording Movies ...79 Changing Movie Recording Settings ...82 Movie Options ...84 Autofocus Mode...85 Electronic VR ...85 Wind Noise Reduction...86 Enhanced Resolution ...86 Movie Playback ...87 Deleting Movies...87 Editing Movies...

User Manual
Page 12
... Setup Menu...103 Welcome Screen ...105 Time Zone and Date...106 Monitor Settings...110 Print Date...112 Vibration Reduction ...113 Motion Detection ...114 AF Assist...115 Sound Settings ...115 Auto Off ...116 Format Memory/Format Card ...117 Language...118 TV Settings ...119 Blink Warning ...119 Reset All ...121 Battery Type ...123 Firmware Version...
... Setup Menu...103 Welcome Screen ...105 Time Zone and Date...106 Monitor Settings...110 Print Date...112 Vibration Reduction ...113 Motion Detection ...114 AF Assist...115 Sound Settings ...115 Auto Off ...116 Format Memory/Format Card ...117 Language...118 TV Settings ...119 Blink Warning ...119 Reset All ...121 Battery Type ...123 Firmware Version...
User Manual
Page 13
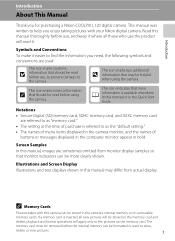
... are used to find the information you enjoy taking pictures with this manual, images are referred to as "memory card." • The setting at the time of purchase is inserted, all those who use , to prevent damage to the pictures on removable memory cards. This icon...before use, and keep it easier to store, delete or view pictures. 1 Introduction Introduction About This Manual Thank you for purchasing a Nikon COOLPIX L120 digital camera. Notations • Secure Digital (SD) memory card, SDHC memory card, and SDXC memory card are sometimes omitted from actual display.
... are used to find the information you enjoy taking pictures with this manual, images are referred to as "memory card." • The setting at the time of purchase is inserted, all those who use , to prevent damage to the pictures on removable memory cards. This icon...before use, and keep it easier to store, delete or view pictures. 1 Introduction Introduction About This Manual Thank you for purchasing a Nikon COOLPIX L120 digital camera. Notations • Secure Digital (SD) memory card, SDHC memory card, and SDXC memory card are sometimes omitted from actual display.

User Manual
Page 19
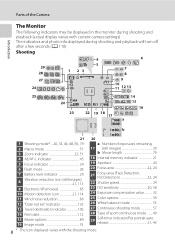
Introduction Parts of the Camera Raising and Lowering the Flash Press the m (flash pop-up) button to raise the flash. • See "Using the Flash" (A 28) for more information on setting the flash. • Push the flash down gently to lower the flash until it clicks into place when not in use. 7
Introduction Parts of the Camera Raising and Lowering the Flash Press the m (flash pop-up) button to raise the flash. • See "Using the Flash" (A 28) for more information on setting the flash. • Push the flash down gently to lower the flash until it clicks into place when not in use. 7
User Manual
Page 20
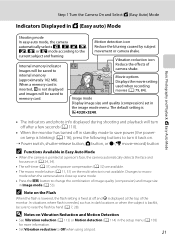
... 8 Vibration reduction icon (still images 21, 113 9 Electronic VR (movies 85 10 Motion detection icon 21, 114 11 Wind noise reduction 86 12 "Date not set" indicator 132 13 Travel destination indicator 106 14 Print date 112 15 Movie options 84 16 Image mode 53 1m00s b 1m00s 20 a Number of exposures... seconds (A 110). Parts of sport continuous mode ....... 49 29 Self-timer indicator/Pet portrait auto release 31, 43 8 * The icon displayed varies with current camera settings).
... 8 Vibration reduction icon (still images 21, 113 9 Electronic VR (movies 85 10 Motion detection icon 21, 114 11 Wind noise reduction 86 12 "Date not set" indicator 132 13 Travel destination indicator 106 14 Print date 112 15 Movie options 84 16 Image mode 53 1m00s b 1m00s 20 a Number of exposures... seconds (A 110). Parts of sport continuous mode ....... 49 29 Self-timer indicator/Pet portrait auto release 31, 43 8 * The icon displayed varies with current camera settings).

User Manual
Page 21
... 67 11 Small picture 77 12 D-Lighting icon 76 13 Protect icon 71 14 File number and type 131 * The icon displayed varies with the setting that was set at the time of shooting. 9
... 67 11 Small picture 77 12 D-Lighting icon 76 13 Protect icon 71 14 File number and type 131 * The icon displayed varies with the setting that was set at the time of shooting. 9

User Manual
Page 24
.... The camera exits the menu display. 12 Shooting menu Image mode White balance Continuous ISO sensitivity Color options 2 Press the multi selector H or I to apply settings of each menu item. Use the multi selector (A 11) to choose an item and press the k button. Shooting menu Image mode White balance Continuous ISO...
.... The camera exits the menu display. 12 Shooting menu Image mode White balance Continuous ISO sensitivity Color options 2 Press the multi selector H or I to apply settings of each menu item. Use the multi selector (A 11) to choose an item and press the k button. Shooting menu Image mode White balance Continuous ISO...
User Manual
Page 25
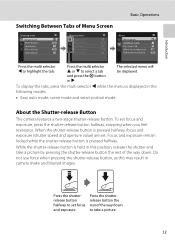
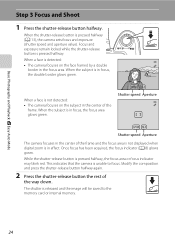
... portrait mode About the Shutter-release Button The camera features a two-stage shutter-release button. Press the shutterrelease button halfway to set focus and exposure, press the shutter-release button halfway, stopping when you feel resistance. When the shutter-release button is pressed ...and exposure remain locked while the shutter-release button is pressed halfway, focus and exposure (shutter speed and aperture value) are set. While the shutter-release button is displayed in camera shake and blurred images. Introduction Basic Operations Switching Between Tabs of the way...
... portrait mode About the Shutter-release Button The camera features a two-stage shutter-release button. Press the shutterrelease button halfway to set focus and exposure, press the shutter-release button halfway, stopping when you feel resistance. When the shutter-release button is pressed ...and exposure remain locked while the shutter-release button is pressed halfway, focus and exposure (shutter speed and aperture value) are set. While the shutter-release button is displayed in camera shake and blurred images. Introduction Basic Operations Switching Between Tabs of the way...
User Manual
Page 27
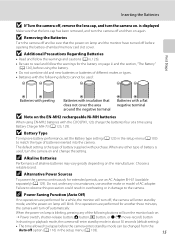
... • Batteries with purchase. Choose a reliable brand. Failure to observe this precaution could result in overheating or in about 30 seconds (default setting). • The time allowed to the camera. When any of the following defects cannot be changed from the Auto off automatically. C Alkaline Batteries... standby mode can be used , turn off and be sure that does not cover the area around the negative terminal Batteries with the COOLPIX L120, charge the batteries four at a time using the battery. • Do not combine old and new batteries or batteries of batteries ...
... • Batteries with purchase. Choose a reliable brand. Failure to observe this precaution could result in overheating or in about 30 seconds (default setting). • The time allowed to the camera. When any of the following defects cannot be changed from the Auto off automatically. C Alkaline Batteries... standby mode can be used , turn off and be sure that does not cover the area around the negative terminal Batteries with the COOLPIX L120, charge the batteries four at a time using the battery. • Do not combine old and new batteries or batteries of batteries ...

User Manual
Page 28
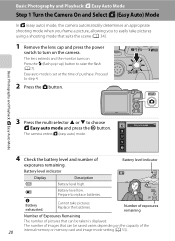
...turn on the camera. Language Multi selector 3 Press H or I to choose the desired language and press the k button. selection screen and the date and time setting screen for the camera clock are displayed. 1 Press the power switch to choose your home time zone (A 109) and press the k button. To cancel the... time zone and date settings, select No. 4 Press J or K to turn on (the power-on lamp turns off when the monitor turns on , the language- When the daylight saving ...
...turn on the camera. Language Multi selector 3 Press H or I to choose the desired language and press the k button. selection screen and the date and time setting screen for the camera clock are displayed. 1 Press the power switch to choose your home time zone (A 109) and press the k button. To cancel the... time zone and date settings, select No. 4 Press J or K to turn on (the power-on lamp turns off when the monitor turns on , the language- When the daylight saving ...
User Manual
Page 29
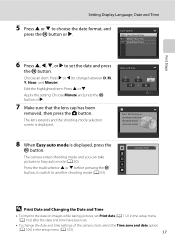
..., to switch to choose the date format, and press the k button or K. Edit the highlighted item: Press H or I , or K to change the date and time settings of the camera clock, select the Time zone and date option (A 106) in the setup menu (A 103) after the date and time have been... is displayed. Date and time D M Y 01 01 2011 00 00 Edit Press this button in Easy auto mode (A 20). Choose an item: Press K or J (to set Print date (A 112) in the setup menu (A 103). 17 The lens extends and the shooting-mode selection screen is displayed, press the k button. First Steps...
..., to switch to choose the date format, and press the k button or K. Edit the highlighted item: Press H or I , or K to change the date and time settings of the camera clock, select the Time zone and date option (A 106) in the setup menu (A 103) after the date and time have been... is displayed. Date and time D M Y 01 01 2011 00 00 Edit Press this button in Easy auto mode (A 20). Choose an item: Press K or J (to set Print date (A 112) in the setup menu (A 103). 17 The lens extends and the shooting-mode selection screen is displayed, press the k button. First Steps...
User Manual
Page 32
... multi selector H or I to raise the flash (A 7). Cannot take pictures using a shooting mode that can be taken is set at the time of the 20 internal memory or memory card and image mode setting (A 53). Replace the batteries. 30 Number of exposures remaining Number of Exposures Remaining The number of exposures remaining...
... multi selector H or I to raise the flash (A 7). Cannot take pictures using a shooting mode that can be taken is set at the time of the 20 internal memory or memory card and image mode setting (A 53). Replace the batteries. 30 Number of exposures remaining Number of Exposures Remaining The number of exposures remaining...
User Manual
Page 33
... and Motion Detection • See Vibration reduction (A 113) or Motion detection (A 114) in the setup menu (A 103) for more information. • Set Vibration reduction to the movement or camera shake. D Notes on . ➝ Power switch, shutter-release button, A button, or b (e movie-record)... Reduce the blurring caused by hand (A 7, 28). Vibration reduction icon Internal memory indicator Images will be saved to Movie options Displays the movie setting used when recording 30 movies (A 79, 84). In situations where flash is backlit, be sure to raise the flash by subject h, i, or...
... and Motion Detection • See Vibration reduction (A 113) or Motion detection (A 114) in the setup menu (A 103) for more information. • Set Vibration reduction to the movement or camera shake. D Notes on . ➝ Power switch, shutter-release button, A button, or b (e movie-record)... Reduce the blurring caused by hand (A 7, 28). Vibration reduction icon Internal memory indicator Images will be saved to Movie options Displays the movie setting used when recording 30 movies (A 79, 84). In situations where flash is backlit, be sure to raise the flash by subject h, i, or...
User Manual
Page 35
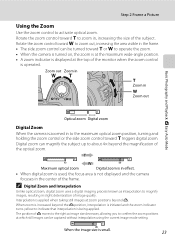
... is not displayed and the camera focuses in the frame. • The side zoom control can be captured without interpolation using the current image mode setting. C Digital Zoom and Interpolation Unlike optical zoom, digital zoom uses a digital imaging process known as image size decreases, allowing you to zoom out, increasing the...
... is not displayed and the camera focuses in the frame. • The side zoom control can be captured without interpolation using the current image mode setting. C Digital Zoom and Interpolation Unlike optical zoom, digital zoom uses a digital imaging process known as image size decreases, allowing you to zoom out, increasing the...
User Manual
Page 36
... not detected: • The camera focuses on the face framed by a double border in the focus area. When a face is pressed halfway (A 13), the camera sets focus and exposure (shutter speed and aperture value). The shutter is detected: • The camera focuses on the subject in the center of the way...
... not detected: • The camera focuses on the face framed by a double border in the focus area. When a face is pressed halfway (A 13), the camera sets focus and exposure (shutter speed and aperture value). The shutter is detected: • The camera focuses on the subject in the center of the way...
User Manual
Page 40
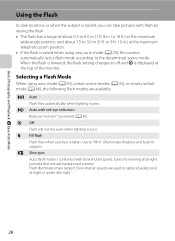
Suited to "fill-in . When the flash is lowered, the flash setting changes to off and W is displayed at the maximum wide-angle position, and about 0.5 to 6.0 m (1 ft. 8 in " (illuminate) shadows and back-lit subjects. V Auto with ... include background scenery. W Off Flash will not fire even when lighting is poor. Selecting a Flash Mode When using easy auto mode (A 20), the camera automatically sets a flash mode according to 9 ft. 10 in portraits (A 30). U Auto Flash fires automatically when lighting is poor. X Fill flash Flash fires when a picture is raised...
Suited to "fill-in . When the flash is lowered, the flash setting changes to off and W is displayed at the maximum wide-angle position, and about 0.5 to 6.0 m (1 ft. 8 in " (illuminate) shadows and back-lit subjects. V Auto with ... include background scenery. W Off Flash will not fire even when lighting is poor. Selecting a Flash Mode When using easy auto mode (A 20), the camera automatically sets a flash mode according to 9 ft. 10 in portraits (A 30). U Auto Flash fires automatically when lighting is poor. X Fill flash Flash fires when a picture is raised...

User Manual
Page 41
... 30 B Lowering the Flash Push the flash down gently to select a mode, and press the k button. If a setting is not applied by pressing the k button within a few seconds, regardless of the Photo info settings (A 110). The icon for a few seconds, the selection is displayed. When the flash is lowered, flash mode is...
... 30 B Lowering the Flash Push the flash down gently to select a mode, and press the k button. If a setting is not applied by pressing the k button within a few seconds, regardless of the Photo info settings (A 110). The icon for a few seconds, the selection is displayed. When the flash is lowered, flash mode is...


