
User Manual
Page 4
...operation could result in this could result in the presence of a fall or other small parts into their entirety before using this Nikon product, to others, read the following safety precautions in injury. Repairs should be performed only by the following symbol: This ...AC adapter, unplug the AC adapter and remove the battery immediately, taking care to a Nikon-authorized service representative for inspection. The consequences that should be read them. WARNINGS Turn off in the event of children Particular care should be taken to a Nikonauthorized service representative ...
...operation could result in this could result in the presence of a fall or other small parts into their entirety before using this Nikon product, to others, read the following safety precautions in injury. Repairs should be performed only by the following symbol: This ...AC adapter, unplug the AC adapter and remove the battery immediately, taking care to a Nikon-authorized service representative for inspection. The consequences that should be read them. WARNINGS Turn off in the event of children Particular care should be taken to a Nikonauthorized service representative ...
User Manual
Page 5
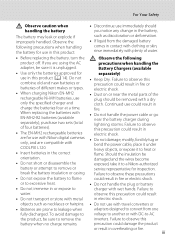
...battery, turn the Observe the following precautions when handling the battery for use in electric shock. When replacing the batteries with EN-MH2-B2 batteries (available separately), purchase two sets (total of four batteries). • The EN-MH2 rechargeable batteries are compatible with COOLPIX L120. &#...8226; Insert batteries in fire or electric shock. • Dust on or near the battery charger during lightning storms. Failure to observe this precaution could result in the correct orientation. • Do not short or disassemble the battery or attempt to a Nikon...
...battery, turn the Observe the following precautions when handling the battery for use in electric shock. When replacing the batteries with EN-MH2-B2 batteries (available separately), purchase two sets (total of four batteries). • The EN-MH2 rechargeable batteries are compatible with COOLPIX L120. &#...8226; Insert batteries in fire or electric shock. • Dust on or near the battery charger during lightning storms. Failure to observe this precaution could result in the correct orientation. • Do not short or disassemble the battery or attempt to a Nikon...
User Manual
Page 6
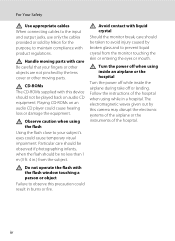
... and to prevent liquid crystal from the subject. Playing CD-ROMs on audio CD equipment. Turn the power off or landing. iv Observe caution when using inside an airplane or the hospital Turn the power off while inside the airplane during take off when using the flash Using the ...Follow the instructions of the hospital. Avoid contact with liquid crystal Should the monitor break, care should not be taken to avoid injury caused by Nikon for the purpose, to observe this device should be played back on an audio CD player could result in burns or fire. Handle moving parts...
... and to prevent liquid crystal from the subject. Playing CD-ROMs on audio CD equipment. Turn the power off or landing. iv Observe caution when using inside an airplane or the hospital Turn the power off while inside the airplane during take off when using the flash Using the ...Follow the instructions of the hospital. Avoid contact with liquid crystal Should the monitor break, care should not be taken to avoid injury caused by Nikon for the purpose, to observe this device should be played back on an audio CD player could result in burns or fire. Handle moving parts...
User Manual
Page 7
...harmful interference to operate the equipment. However, there is connected. • Consult the dealer or an experienced radio/television technician for your equipment. Nikon Inc., 1300 Walt Whitman Road Melville, New York 11747-3064 USA Tel: 631-547-4200 v Interface Cables Use the interface cables sold or ...equipment does cause harmful interference to Part 15 of the FCC rules. CAUTIONS Modifications The FCC requires the user to be determined by turning the equipment off and on, the user is encouraged to try to correct the interference by one or more of California WARNING Handling...
...harmful interference to operate the equipment. However, there is connected. • Consult the dealer or an experienced radio/television technician for your equipment. Nikon Inc., 1300 Walt Whitman Road Melville, New York 11747-3064 USA Tel: 631-547-4200 v Interface Cables Use the interface cables sold or ...equipment does cause harmful interference to Part 15 of the FCC rules. CAUTIONS Modifications The FCC requires the user to be determined by turning the equipment off and on, the user is encouraged to try to correct the interference by one or more of California WARNING Handling...
User Manual
Page 9
... Menus...12 Switching Between Tabs of Menu Screen 13 About the Shutter-release Button...13 First Steps ...14 Inserting the Batteries ...14 Applicable Batteries ...14 Turning On and Off the Camera...14 Setting Display Language, Date and Time 16 Inserting Memory Cards ...18 Removing Memory Cards...18 vii
... Menus...12 Switching Between Tabs of Menu Screen 13 About the Shutter-release Button...13 First Steps ...14 Inserting the Batteries ...14 Applicable Batteries ...14 Turning On and Off the Camera...14 Setting Display Language, Date and Time 16 Inserting Memory Cards ...18 Removing Memory Cards...18 vii
User Manual
Page 10
Table of Contents Basic Photography and Playback: G Easy Auto Mode 20 Step 1 Turn the Camera On and Select G (Easy Auto) Mode 20 Indicators Displayed in G (Easy auto) Mode 21 Step 2 Frame a Picture ...22 Using the Zoom...23 Step 3 ...
Table of Contents Basic Photography and Playback: G Easy Auto Mode 20 Step 1 Turn the Camera On and Select G (Easy Auto) Mode 20 Indicators Displayed in G (Easy auto) Mode 21 Step 2 Frame a Picture ...22 Using the Zoom...23 Step 3 ...
User Manual
Page 20
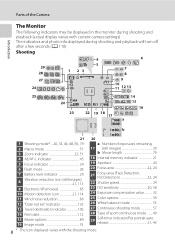
... shooting mode 57 28 Type of the Camera Introduction The Monitor The following indicators may be displayed in the monitor during shooting and playback will turn off after a few seconds (A 110). Parts of sport continuous mode ....... 49 29 Self-timer indicator/Pet portrait auto release 31, 43 8 * The icon displayed varies...
... shooting mode 57 28 Type of the Camera Introduction The Monitor The following indicators may be displayed in the monitor during shooting and playback will turn off after a few seconds (A 110). Parts of sport continuous mode ....... 49 29 Self-timer indicator/Pet portrait auto release 31, 43 8 * The icon displayed varies...

User Manual
Page 22
.... Introduction Basic Operations A (Shooting mode) Button • Press the A button in playback mode to enter shooting mode. • Press the A button in shooting mode to turn the camera on in playback mode. c (Playback) Button • During shooting mode, the camera enters the playback mode when the c button is pressed. • If...
.... Introduction Basic Operations A (Shooting mode) Button • Press the A button in playback mode to enter shooting mode. • Press the A button in shooting mode to turn the camera on in playback mode. c (Playback) Button • During shooting mode, the camera enters the playback mode when the c button is pressed. • If...
User Manual
Page 26
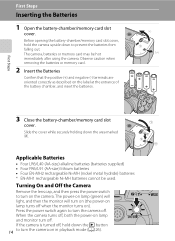
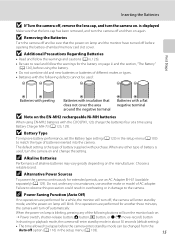
... of the battery chamber, and insert the batteries. 3 1 2 First Steps 3 Close the battery-chamber/memory card slot cover. When the camera turns off , hold the camera upside down the c button 14 to prevent the batteries from falling out. Observe caution when removing the batteries or memory ... correctly as described on in playback mode (A 26). Before opening the battery-chamber/memory card slot cover, hold down to turn on the camera. If the camera is turned off , both the power-on ). The camera, batteries or memory card may be used. First Steps Inserting the Batteries ...
... of the battery chamber, and insert the batteries. 3 1 2 First Steps 3 Close the battery-chamber/memory card slot cover. When the camera turns off , hold the camera upside down the c button 14 to prevent the batteries from falling out. Observe caution when removing the batteries or memory ... correctly as described on in playback mode (A 26). Before opening the battery-chamber/memory card slot cover, hold down to turn on the camera. If the camera is turned off , both the power-on ). The camera, batteries or memory card may be used. First Steps Inserting the Batteries ...
User Manual
Page 27
... negative terminal Batteries with a flat negative terminal B Note on the EN-MH2 rechargeable Ni-MH batteries When using EN-MH2 batteries with the COOLPIX L120, charge the batteries four at a time using the battery. • Do not combine old and new batteries or batteries of battery is ...displayed Make sure that the power-on the manufacturer. Choose a reliable brand. If no operations are performed for the battery on lamp will turn the camera on and change the setting. When the power-on . ➝ Power switch, shutter-release button, A button, c button, or b (e ...
... negative terminal Batteries with a flat negative terminal B Note on the EN-MH2 rechargeable Ni-MH batteries When using EN-MH2 batteries with the COOLPIX L120, charge the batteries four at a time using the battery. • Do not combine old and new batteries or batteries of battery is ...displayed Make sure that the power-on the manufacturer. Choose a reliable brand. If no operations are performed for the battery on lamp will turn the camera on and change the setting. When the power-on . ➝ Power switch, shutter-release button, A button, c button, or b (e ...

User Manual
Page 28
... button. When the daylight saving time function is enabled, W is in step 4. The power-on lamp (green) will light, and then the monitor will turn on the camera. To cancel the time zone and date settings, select No. 4 Press J or K to choose Yes and press the k button. First ...Steps Setting Display Language, Date and Time When the first time the camera is turned on ). 2 Press the multi selector H or I to enable the daylight saving time function while setting the region in effect, press H to disable the ...
... button. When the daylight saving time function is enabled, W is in step 4. The power-on lamp (green) will light, and then the monitor will turn on the camera. To cancel the time zone and date settings, select No. 4 Press J or K to choose Yes and press the k button. First ...Steps Setting Display Language, Date and Time When the first time the camera is turned on ). 2 Press the multi selector H or I to enable the daylight saving time function while setting the region in effect, press H to disable the ...
User Manual
Page 30
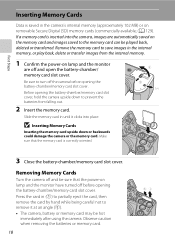
...battery-chamber/memory card slot cover, hold the camera upside down or backwards could damage the camera or the memory card. Removing Memory Cards Turn the camera off the camera before opening the battery-chamber/memory card slot cover. 12 Press the card in until it at an angle ...; (A 129). Before opening the battery-chamber/memory card slot cover. Make sure that the power-on the memory card and images saved to turn off and be played back, deleted or transferred. B Inserting Memory Cards Inserting the memory card upside down to save images in the camera's internal...
...battery-chamber/memory card slot cover, hold the camera upside down or backwards could damage the camera or the memory card. Removing Memory Cards Turn the camera off the camera before opening the battery-chamber/memory card slot cover. 12 Press the card in until it at an angle ...; (A 129). Before opening the battery-chamber/memory card slot cover. Make sure that the power-on the memory card and images saved to turn off and be played back, deleted or transferred. B Inserting Memory Cards Inserting the memory card upside down to save images in the camera's internal...
User Manual
Page 31
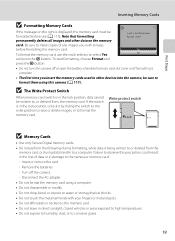
... B Formatting Memory Cards If the message on the memory card. Card is displayed, the memory card must be formatted before formatting the memory card. Turn off or open the battery-chamber/memory card slot cover until formatting is in the lock position, data cannot be sure to format them using... humidity, dust, or to corrosive gases. 19 Insert or remove the card - To format the memory card, use (A 117). Yes No • Do not turn the camera off the camera - If the switch is being written to a computer. Failure to select Yes and press the k button. Disconnect the AC adapter...
... B Formatting Memory Cards If the message on the memory card. Card is displayed, the memory card must be formatted before formatting the memory card. Turn off or open the battery-chamber/memory card slot cover until formatting is in the lock position, data cannot be sure to format them using... humidity, dust, or to corrosive gases. 19 Insert or remove the card - To format the memory card, use (A 117). Yes No • Do not turn the camera off the camera - If the switch is being written to a computer. Failure to select Yes and press the k button. Disconnect the AC adapter...
User Manual
Page 32
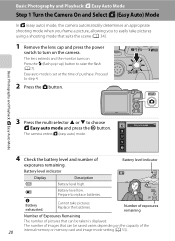
Proceed to replace batteries. Prepare to step 4. 2 Press the A button. Basic Photography and Playback: G Easy Auto Mode Step 1 Turn the Camera On and Select G (Easy Auto) Mode In G (easy auto) mode, the camera automatically determines an appropriate shooting mode when you frame a...to easily take pictures. Cannot take pictures using a shooting mode that suits the scene (A 34). 1 Remove the lens cap and press the power switch to turn on the capacity of the 20 internal memory or memory card and image mode setting (A 53). B N Battery exhausted. Press the m (flash pop-up...
Proceed to replace batteries. Prepare to step 4. 2 Press the A button. Basic Photography and Playback: G Easy Auto Mode Step 1 Turn the Camera On and Select G (Easy Auto) Mode In G (easy auto) mode, the camera automatically determines an appropriate shooting mode when you frame a...to easily take pictures. Cannot take pictures using a shooting mode that suits the scene (A 34). 1 Remove the lens cap and press the power switch to turn on the capacity of the 20 internal memory or memory card and image mode setting (A 53). B N Battery exhausted. Press the m (flash pop-up...
User Manual
Page 33
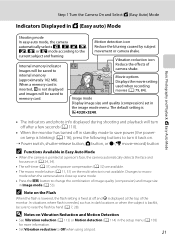
... and images will be saved to Reduce the effects of the monitor. In situations where flash is pointed at the top of camera shake. Step 1 Turn the Camera On and Select G (Easy Auto) Mode Indicators Displayed in the setup menu (A 103) for more information. • Set Vibration reduction ...to Off when using a tripod. 21 The default setting is k 4320×3240. • The indicators and photo info displayed during shooting and playback will turn it (A 24, 34). • The self-timer (A 31) and exposure compensation (A 32) are available. • The macro mode button (A 11, 51) on ...
... and images will be saved to Reduce the effects of the monitor. In situations where flash is pointed at the top of camera shake. Step 1 Turn the Camera On and Select G (Easy Auto) Mode Indicators Displayed in the setup menu (A 103) for more information. • Set Vibration reduction ...to Off when using a tripod. 21 The default setting is k 4320×3240. • The indicators and photo info displayed during shooting and playback will turn it (A 24, 34). • The self-timer (A 31) and exposure compensation (A 32) are available. • The macro mode button (A 11, 51) on ...
User Manual
Page 35
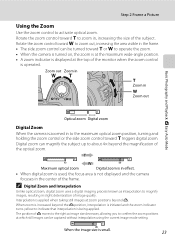
... beyond V. Interpolation is applied when taking still images at zoom positions beyond the V position, interpolation is initiated and the zoom indicator turns yellow to magnify images, resulting in slight deterioration of image quality. Rotate the zoom control toward f to zoom out, increasing the ... in the frame. • The side zoom control can be captured without interpolation using the current image mode setting. Digital zoom can be turned toward g triggers digital zoom. Rotate the zoom control toward g to about 4× beyond the magnification of the frame. Zoom out Zoom ...
... beyond V. Interpolation is applied when taking still images at zoom positions beyond the V position, interpolation is initiated and the zoom indicator turns yellow to magnify images, resulting in slight deterioration of image quality. Rotate the zoom control toward f to zoom out, increasing the ... in the frame. • The side zoom control can be captured without interpolation using the current image mode setting. Digital zoom can be turned toward g triggers digital zoom. Rotate the zoom control toward g to about 4× beyond the magnification of the frame. Zoom out Zoom ...

User Manual
Page 38
... Images (Playback Mode) Press the c button. Press I or K to Save Power When the power-on lamp is blinking, pressing the c button will turn on (A 116). A (shooting mode) c (playback) The Multi Selector 15/05/2011 15:30 0004.JPG 4/ 4 Internal memory indicator C When the Monitor Has...in full-frame playback mode. When a memory card is inserted, C is displayed in full-frame. When C is off, hold down the c button to turn the monitor back on the camera in the internal memory are displayed. You can also press the shutterrelease button. C Playback Mode See "More on the...
... Images (Playback Mode) Press the c button. Press I or K to Save Power When the power-on lamp is blinking, pressing the c button will turn on (A 116). A (shooting mode) c (playback) The Multi Selector 15/05/2011 15:30 0004.JPG 4/ 4 Internal memory indicator C When the Monitor Has...in full-frame playback mode. When a memory card is inserted, C is displayed in full-frame. When C is off, hold down the c button to turn the monitor back on the camera in the internal memory are displayed. You can also press the shutterrelease button. C Playback Mode See "More on the...
User Manual
Page 42
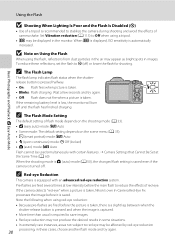
... Flash does not fire when a picture is equipped with certain features. ➝ Camera Settings that Cannot Be Set at low intensity before it is turned off. C The Flash Lamp The flash lamp indicates flash status when the shutterrelease button is pressed halfway. • On: Flash fires when picture ...and try again. C The Flash Mode Setting The default setting of red-eye. If the camera detects "red-eye" when a picture is taken, Nikon's own In-Camera Red-Eye Fix processes the image before the main flash to W (off until the flash has finished charging. If the remaining battery...
... Flash does not fire when a picture is equipped with certain features. ➝ Camera Settings that Cannot Be Set at low intensity before it is turned off. C The Flash Lamp The flash lamp indicates flash status when the shutterrelease button is pressed halfway. • On: Flash fires when picture ...and try again. C The Flash Mode Setting The default setting of red-eye. If the camera detects "red-eye" when a picture is taken, Nikon's own In-Camera Red-Eye Fix processes the image before the main flash to W (off until the flash has finished charging. If the remaining battery...

User Manual
Page 44
...the exposure compensation to the "-" side. +0.3 0.0 Exposure compensation 3 Press the k button. To make images brighter or darker. 1 Press o (exposure compensation) on the multi selector. To turn off exposure compensation, repeat from step 1 and set to any value other than 0.0, the value is displayed with the H icon in the camera's 32 memory...subject brighter, adjust the exposure compensation to 0.0, then press the k button. 30 C Exposure Compensation Value The exposure compensation setting applied in A (auto) mode (A 50) is turned off. When set the value to the "+" side.
...the exposure compensation to the "-" side. +0.3 0.0 Exposure compensation 3 Press the k button. To make images brighter or darker. 1 Press o (exposure compensation) on the multi selector. To turn off exposure compensation, repeat from step 1 and set to any value other than 0.0, the value is displayed with the H icon in the camera's 32 memory...subject brighter, adjust the exposure compensation to 0.0, then press the k button. 30 C Exposure Compensation Value The exposure compensation setting applied in A (auto) mode (A 50) is turned off. When set the value to the "+" side.

User Manual
Page 51
... green (zoom indicator is pressed halfway. k Close-up Photograph flowers, insects and other small objects at close as close range. • Macro mode (A 51) will turn on and the zoom will automatically move to frame the picture on Shooting Shooting Suited for the Scene (Scene Mode) j Night landscape O Use this mode...
... green (zoom indicator is pressed halfway. k Close-up Photograph flowers, insects and other small objects at close as close range. • Macro mode (A 51) will turn on and the zoom will automatically move to frame the picture on Shooting Shooting Suited for the Scene (Scene Mode) j Night landscape O Use this mode...


