
L110 User's Manual
Page 4
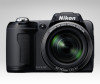
...the event of the camera or AC adapter could result in this section are indicated by qualified technicians. Do not disassemble Touching the internal parts of malfunction Should you notice smoke or an unusual smell coming from putting the battery or other accident, take the equipment to a ... adapter, unplug the AC adapter and remove the battery immediately, taking care to avoid burns. For Your Safety To prevent damage to your Nikon product or injury to yourself or to others, read the following symbol: This icon marks warnings, information that should be read before using...
...the event of the camera or AC adapter could result in this section are indicated by qualified technicians. Do not disassemble Touching the internal parts of malfunction Should you notice smoke or an unusual smell coming from putting the battery or other accident, take the equipment to a ... adapter, unplug the AC adapter and remove the battery immediately, taking care to avoid burns. For Your Safety To prevent damage to your Nikon product or injury to yourself or to others, read the following symbol: This icon marks warnings, information that should be read before using...
L110 User's Manual
Page 5
... separately) • Keep Dry. Failure to observe these precautions • Do not expose the battery to a Nikon-authorized service representative for use in this product: you are compatible with COOLPIX L110. • Insert batteries in the correct orientation. • Do not short or disassemble the battery or attempt ... in fire. • Do not handle the power cable or go near the metal parts of different makes or types. • When charging Nikon EN-MH2 rechargeable Ni-MH batteries, use with Nikon digital cameras only, and are using the AC adapter, be removed with a dry cloth...
... separately) • Keep Dry. Failure to observe these precautions • Do not expose the battery to a Nikon-authorized service representative for use in this product: you are compatible with COOLPIX L110. • Insert batteries in the correct orientation. • Do not short or disassemble the battery or attempt ... in fire. • Do not handle the power cable or go near the metal parts of different makes or types. • When charging Nikon EN-MH2 rechargeable Ni-MH batteries, use with Nikon digital cameras only, and are using the AC adapter, be removed with a dry cloth...

L110 User's Manual
Page 6
... iv For Your Safety Use appropriate cables When connecting cables to the input and output jacks, use only the cables provided or sold by Nikon for the purpose, to maintain compliance with care Be careful that your subject's eyes could cause hearing loss or damage the equipment. The ... fire. Particular care should be observed if photographing infants, when the flash should be no less than 1 m (3 ft. 4 in a hospital. Handle moving parts. Do not operate the flash with the flash window touching a person or object Failure to observe this camera may disrupt the electronic systems of the...
... iv For Your Safety Use appropriate cables When connecting cables to the input and output jacks, use only the cables provided or sold by Nikon for the purpose, to maintain compliance with care Be careful that your subject's eyes could cause hearing loss or damage the equipment. The ... fire. Particular care should be observed if photographing infants, when the flash should be no less than 1 m (3 ft. 4 in a hospital. Handle moving parts. Do not operate the flash with the flash window touching a person or object Failure to observe this camera may disrupt the electronic systems of the...

L110 User's Manual
Page 7
...known to the State of California to cause birth defects or other interface cables may exceed the limits of Class B Part 15 of the FCC rules. Using other reproductive harm. Nikon Inc., 1300 Walt Whitman Road Melville, New York 11747-3064 USA Tel: 631-547-4200 v Notices Notice for ... may void the user's authority to comply with the limits for your equipment. Interface Cables Use the interface cables sold or provided by Nikon Corporation may cause harmful interference to radio or television reception, which can radiate radio frequency energy and, if not installed and used in a...
...known to the State of California to cause birth defects or other interface cables may exceed the limits of Class B Part 15 of the FCC rules. Using other reproductive harm. Nikon Inc., 1300 Walt Whitman Road Melville, New York 11747-3064 USA Tel: 631-547-4200 v Notices Notice for ... may void the user's authority to comply with the limits for your equipment. Interface Cables Use the interface cables sold or provided by Nikon Corporation may cause harmful interference to radio or television reception, which can radiate radio frequency energy and, if not installed and used in a...
L110 User's Manual
Page 9
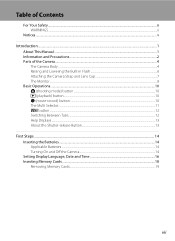
Table of Contents For Your Safety...ii WARNINGS...ii Notices ...v Introduction ...1 About This Manual ...1 Information and Precautions...2 Parts of the Camera...4 The Camera Body ...4 Raising and Lowering the Built-in Flash 6 Attaching the Camera Strap and Lens Cap 7 The Monitor...8 Basic Operations...10 A (...
Table of Contents For Your Safety...ii WARNINGS...ii Notices ...v Introduction ...1 About This Manual ...1 Information and Precautions...2 Parts of the Camera...4 The Camera Body ...4 Raising and Lowering the Built-in Flash 6 Attaching the Camera Strap and Lens Cap 7 The Monitor...8 Basic Operations...10 A (...
L110 User's Manual
Page 14
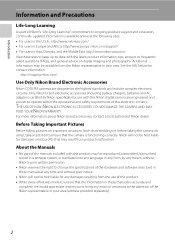
...malfunction. See the URL below for contact information: http://imaging.nikon.com/ Use Only Nikon Brand Electronic Accessories Nikon COOLPIX cameras are engineered and proven to operate within the operational and safety requirements of Nikon's "Life-Long Learning" commitment to ongoing product support and ...camera on digital imaging and photography. About the Manuals • No part of the manuals included with this Nikon digital camera are designed to ensure that may be available from the Nikon representative in your area (address provided separately). 2 Introduction Information and...
...malfunction. See the URL below for contact information: http://imaging.nikon.com/ Use Only Nikon Brand Electronic Accessories Nikon COOLPIX cameras are engineered and proven to operate within the operational and safety requirements of Nikon's "Life-Long Learning" commitment to ongoing product support and ...camera on digital imaging and photography. About the Manuals • No part of the manuals included with this Nikon digital camera are designed to ensure that may be available from the Nikon representative in your area (address provided separately). 2 Introduction Information and...

L110 User's Manual
Page 16
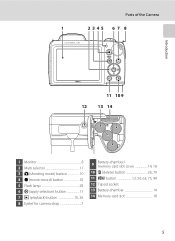
Parts of the Camera The Camera Body 1 2 34 5 6 7 8 Introduction 14 13 12 9 10 11 Zoom control 23 f : wide 23 1 g : tele 23 h : thumbnail playback 60 i : playback zoom .../video output 80, 83, 88 11 Pin cover 80, 83, 88 12 Lens 120, 133 13 DC input connector (for AC adapter available separately from Nikon) .... 15, 122 14 DC input connector cover 15 4
Parts of the Camera The Camera Body 1 2 34 5 6 7 8 Introduction 14 13 12 9 10 11 Zoom control 23 f : wide 23 1 g : tele 23 h : thumbnail playback 60 i : playback zoom .../video output 80, 83, 88 11 Pin cover 80, 83, 88 12 Lens 120, 133 13 DC input connector (for AC adapter available separately from Nikon) .... 15, 122 14 DC input connector cover 15 4
L110 User's Manual
Page 17
Parts of the Camera 1 2345 6 7 8 Introduction 11 10 9 12 13 14 1 Monitor 8 2 Multi selector 11 3 A (shooting mode) button 10 4 b (movie-record) button 10 5 Flash lamp 29 6 k (apply selection) button 11 7 c (playback) button 10, 26 8 Eyelet for camera strap 7 9 Battery-chamber/ memory card slot cover 14, 18 10 l (delete) button 26, 79 11 d button 12, 50, 63, 75, 94 12 Tripod socket 13 Battery-chamber 14 14 Memory card slot 18 5
Parts of the Camera 1 2345 6 7 8 Introduction 11 10 9 12 13 14 1 Monitor 8 2 Multi selector 11 3 A (shooting mode) button 10 4 b (movie-record) button 10 5 Flash lamp 29 6 k (apply selection) button 11 7 c (playback) button 10, 26 8 Eyelet for camera strap 7 9 Battery-chamber/ memory card slot cover 14, 18 10 l (delete) button 26, 79 11 d button 12, 50, 63, 75, 94 12 Tripod socket 13 Battery-chamber 14 14 Memory card slot 18 5

L110 User's Manual
Page 18
Introduction Parts of the Camera Raising and Lowering the Built-in Flash Raising the built-in use. 6 Push the built-in flash down gently to lower the builtin flash when not in flash See "Using the Flash" (A 29) for more information about flash settings. Lowering the Built-in Flash.
Introduction Parts of the Camera Raising and Lowering the Built-in Flash Raising the built-in use. 6 Push the built-in flash down gently to lower the builtin flash when not in flash See "Using the Flash" (A 29) for more information about flash settings. Lowering the Built-in Flash.
L110 User's Manual
Page 19
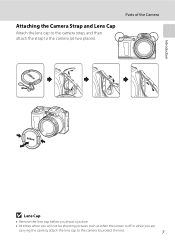
Parts of the Camera Introduction B Lens Cap • Remove the lens cap before you shoot a picture. • At times when you will not be shooting pictures such as when the power is off or while you are carrying the camera, attach the lens cap to the camera to the camera (at two places). Attaching the Camera Strap and Lens Cap Attach the lens cap to the camera strap, and then attach the strap to protect the lens. 7
Parts of the Camera Introduction B Lens Cap • Remove the lens cap before you shoot a picture. • At times when you will not be shooting pictures such as when the power is off or while you are carrying the camera, attach the lens cap to the camera to the camera (at two places). Attaching the Camera Strap and Lens Cap Attach the lens cap to the camera strap, and then attach the strap to protect the lens. 7
L110 User's Manual
Page 20
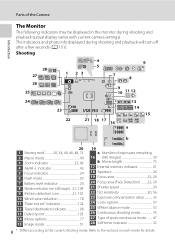
Parts of sport continuous mode ....... 47 28 Self-timer indicator 32 8 * Differs according to the sections on each mode for details. Shooting 4 6 28 10 27 1 23 5 7 8 ...
Parts of sport continuous mode ....... 47 28 Self-timer indicator 32 8 * Differs according to the sections on each mode for details. Shooting 4 6 28 10 27 1 23 5 7 8 ...
L110 User's Manual
Page 21
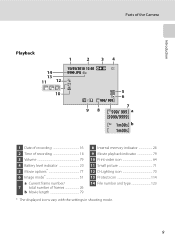
Parts of the Camera Introduction Playback 1 2 34 14 13 11 12 15/05/2010 12:00 9999.JPG 10 5 6 999/ 999 98 7 999/ 999 a 9999/9999 ...
Parts of the Camera Introduction Playback 1 2 34 14 13 11 12 15/05/2010 12:00 9999.JPG 10 5 6 999/ 999 98 7 999/ 999 a 9999/9999 ...

L110 User's Manual
Page 23
... options Exit C Notes on the Multi Selector In this manual, H, I, J and K are used in some cases for indicating the up , down , left and right operating parts of the multi selector to select modes, select menu options and to the next screen). Select the item to the right/ go to the previous...
... options Exit C Notes on the Multi Selector In this manual, H, I, J and K are used in some cases for indicating the up , down , left and right operating parts of the multi selector to select modes, select menu options and to the next screen). Select the item to the right/ go to the previous...
L110 User's Manual
Page 68
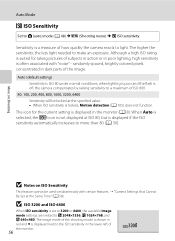
... cannot be locked at ISO 80, but is displayed next to the ISO sensitivity in the lower left of subjects in action or in dark parts of how quickly the camera reacts to light. randomly spaced, brightly colored pixels concentrated in poor lighting, high sensitivity is often associated with certain features...
... cannot be locked at ISO 80, but is displayed next to the ISO sensitivity in the lower left of subjects in action or in dark parts of how quickly the camera reacts to light. randomly spaced, brightly colored pixels concentrated in poor lighting, high sensitivity is often associated with certain features...
L110 User's Manual
Page 74
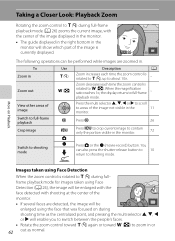
... also press the shutter-release button to 10 return to full-frame - View other areas of image Press the multi selector H, I , J or K will show which part of the image is rotated to g (i) during shooting time as the centralized point, and pressing the multi selector H, I , J or K to scroll to areas of the...
... also press the shutter-release button to 10 return to full-frame - View other areas of image Press the multi selector H, I , J or K will show which part of the image is rotated to g (i) during shooting time as the centralized point, and pressing the multi selector H, I , J or K to scroll to areas of the...
L110 User's Manual
Page 115
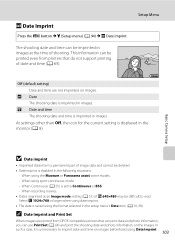
... setting is set to imprint date and time on images beforehand using sport continuous mode. - Basic Camera Setup B Date imprint • Imprinted dates form a permanent part of O 640×480 may be deleted. • Date imprint is unnecessary to Continuous or BSS. - In such a case, it is disabled in images. Setup...
... setting is set to imprint date and time on images beforehand using sport continuous mode. - Basic Camera Setup B Date imprint • Imprinted dates form a permanent part of O 640×480 may be deleted. • Date imprint is unnecessary to Continuous or BSS. - In such a case, it is disabled in images. Setup...
L110 User's Manual
Page 130
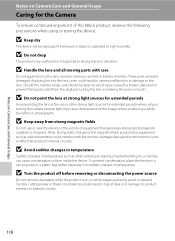
...broken glass and to prevent the liquid crystal from strong magnetic fields Do not use or save this Nikon product, observe the following precautions when using or storing the camera. These parts are being saved or deleted. B Do not point the lens at strong light sources for extended periods... light sources for the Camera To ensure continued enjoyment of this device in damage to high humidity. B Handle the lens and all moving parts with the monitor, damage data saved on the memory card, or affect the product's internal circuitry. Intense light may malfunction if subjected to...
...broken glass and to prevent the liquid crystal from strong magnetic fields Do not use or save this Nikon product, observe the following precautions when using or storing the camera. These parts are being saved or deleted. B Do not point the lens at strong light sources for extended periods... light sources for the Camera To ensure continued enjoyment of this device in damage to high humidity. B Handle the lens and all moving parts with the monitor, damage data saved on the memory card, or affect the product's internal circuitry. Intense light may malfunction if subjected to...
L110 User's Manual
Page 132
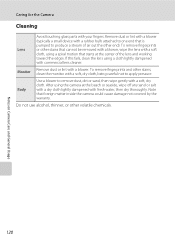
... the camera could cause damage not covered by the warranty. To remove fingerprints and other volatile chemicals. Caring for the Camera Cleaning Avoid touching glass parts with a soft, dry cloth, being careful not to apply pressure. Notes on Camera Care and General Usage 120
... the camera could cause damage not covered by the warranty. To remove fingerprints and other volatile chemicals. Caring for the Camera Cleaning Avoid touching glass parts with a soft, dry cloth, being careful not to apply pressure. Notes on Camera Care and General Usage 120
L110 User's Manual
Page 156
No reproduction in any form of this manual, in whole or in part (except for brief quotation in Japan CT0A03(11) 6MM74211-03 Printed in critical articles or reviews), may be made without written authorization from NIKON CORPORATION.
No reproduction in any form of this manual, in whole or in part (except for brief quotation in Japan CT0A03(11) 6MM74211-03 Printed in critical articles or reviews), may be made without written authorization from NIKON CORPORATION.


