
User Manual
Page 1
En The Nikon Guide to Digital Photography with the DIGITAL CAMERA
En The Nikon Guide to Digital Photography with the DIGITAL CAMERA

User Manual
Page 3
...damage, modify, forcibly tug or bend the power cable, place it under heavy objects, or expose it to a Nikon-authorized service representative for inspection. Should the camera or battery charger break open as this precaution could cause permanent visual impairment. Should the insulation be removed with a ...For Your Safety To prevent damage to your Nikon product or injury to yourself or to others, read the following safety precautions in the event of malfunction Should you notice smoke or an unusual smell coming from the camera, battery charger, or AC adapter (available ...
...damage, modify, forcibly tug or bend the power cable, place it under heavy objects, or expose it to a Nikon-authorized service representative for inspection. Should the camera or battery charger break open as this precaution could cause permanent visual impairment. Should the insulation be removed with a ...For Your Safety To prevent damage to your Nikon product or injury to yourself or to others, read the following safety precautions in the event of malfunction Should you notice smoke or an unusual smell coming from the camera, battery charger, or AC adapter (available ...

User Manual
Page 4
... product under such circumstances may leak or explode if improperly handled. Continuing to observe this product: • Before replacing the battery, turn the camera off . Failure to use , or when the product is unplugged. • Before replacing the battery, turn the product off and allow the...operating the flash Using the flash close to water. Do not fire the unit while the flash head is unplugged. • Use only rechargeable Nikon ENEL5 lithium-ion batteries (supplied) or CP1 lithium batteries (available separately). • When inserting the battery, do not attempt to insert it...
... product under such circumstances may leak or explode if improperly handled. Continuing to observe this product: • Before replacing the battery, turn the camera off . Failure to use , or when the product is unplugged. • Before replacing the battery, turn the product off and allow the...operating the flash Using the flash close to water. Do not fire the unit while the flash head is unplugged. • Use only rechargeable Nikon ENEL5 lithium-ion batteries (supplied) or CP1 lithium batteries (available separately). • When inserting the battery, do not attempt to insert it...

User Manual
Page 6
...by national and international copyright laws. Notice Concerning Prohibition of Copying or Reproduction Note that has been digitally copied or reproduced by means of a scanner, digital camera or other device may be provided for customers in a foreign country is governed by law is prohibited..., government bonds, or local government bonds, even if such copies or reproductions are circulated in Canada CAUTION ATTENTION This class B digital apparatus meets all Cet appareil numéique de la classe B requirements of copyrighted creative works such as passes and meal coupons...
...by national and international copyright laws. Notice Concerning Prohibition of Copying or Reproduction Note that has been digitally copied or reproduced by means of a scanner, digital camera or other device may be provided for customers in a foreign country is governed by law is prohibited..., government bonds, or local government bonds, even if such copies or reproductions are circulated in Canada CAUTION ATTENTION This class B digital apparatus meets all Cet appareil numéique de la classe B requirements of copyrighted creative works such as passes and meal coupons...

User Manual
Page 7
... users in the batteries overheating, igniting, rupturing, or leaking. Use Only Nikon Brand Electronic Accessories Nikon COOLPIX cameras are designed to operate within the operational and safety requirements of this Nikon digital camera are engineered and proven to the highest standards and include complex electronic circuitry. Only Nikon brand electronic accessories (including battery chargers, batteries, AC adapters, and...
... users in the batteries overheating, igniting, rupturing, or leaking. Use Only Nikon Brand Electronic Accessories Nikon COOLPIX cameras are designed to operate within the operational and safety requirements of this Nikon digital camera are engineered and proven to the highest standards and include complex electronic circuitry. Only Nikon brand electronic accessories (including battery chargers, batteries, AC adapters, and...
User Manual
Page 8
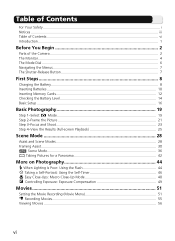
Table of Contents For Your Safety ...i Notices ...iii Table of Contents ...vi Introduction...1 Before You Begin 2 Parts of the Camera ...2 The Monitor...4 The Mode Dial ...6 Navigating the Menus...7 The Shutter-Release Button 7 First Steps 8 Charging the Battery...8 Inserting Batteries ...10 Inserting Memory Cards...12 Checking ...
Table of Contents For Your Safety ...i Notices ...iii Table of Contents ...vi Introduction...1 Before You Begin 2 Parts of the Camera ...2 The Monitor...4 The Mode Dial ...6 Navigating the Menus...7 The Shutter-Release Button 7 First Steps 8 Charging the Battery...8 Inserting Batteries ...10 Inserting Memory Cards...12 Checking ...

User Manual
Page 9
More on Playback 57 Viewing Pictures on the Camera 57 Cropping Pictures...60 Adjusting a Picture Tone Automatically (D-Lighting 61 Voice Memos: Recording and Playback 62 Viewing Pictures on TV...64 Viewing Pictures on a Computer ...
More on Playback 57 Viewing Pictures on the Camera 57 Cropping Pictures...60 Adjusting a Picture Tone Automatically (D-Lighting 61 Voice Memos: Recording and Playback 62 Viewing Pictures on TV...64 Viewing Pictures on a Computer ...

User Manual
Page 10
The Set-up Menu 116 Using the Set-up Menu 116 Welcome Screen ...118 Date...120 Monitor Settings ...122 Date Imprint...124 AF Assist ...126 Sound Settings...127 Blur Warning...128 Auto Off ...129 Format Memory/Card 130 Language...132 Interface (USB/Video mode 132 Auto Transfer...133 Reset All...134 Menus ...135 Firmware Version ...135 Technical Notes 136 Optional Accessories ...136 Caring for Your Camera 138 Error Messages ...141 Troubleshooting...145 Specifications...148 Index ...152 viii
The Set-up Menu 116 Using the Set-up Menu 116 Welcome Screen ...118 Date...120 Monitor Settings ...122 Date Imprint...124 AF Assist ...126 Sound Settings...127 Blur Warning...128 Auto Off ...129 Format Memory/Card 130 Language...132 Interface (USB/Video mode 132 Auto Transfer...133 Reset All...134 Menus ...135 Firmware Version ...135 Technical Notes 136 Optional Accessories ...136 Caring for Your Camera 138 Error Messages ...141 Troubleshooting...145 Specifications...148 Index ...152 viii

User Manual
Page 11
Read this manual may be helpful when using your camera. Internal Memory and SD Memory Card This camera uses both internal memory and a SD memory card for your Nikon digital camera. Before You Begin First Steps Basic Photography Scene Mode More on Photography Movies More... remove the memory card first. Introduction Thank you insert a memory card into the camera, pictures will automatically be stored on the card instead of a Nikon COOLPIX 7900 (E7900)/COOLPIX 5900 (E5900) digital camera. If you for storing pictures. This icon marks notes, information that more information is...
Read this manual may be helpful when using your camera. Internal Memory and SD Memory Card This camera uses both internal memory and a SD memory card for your Nikon digital camera. Before You Begin First Steps Basic Photography Scene Mode More on Photography Movies More... remove the memory card first. Introduction Thank you insert a memory card into the camera, pictures will automatically be stored on the card instead of a Nikon COOLPIX 7900 (E7900)/COOLPIX 5900 (E5900) digital camera. If you for storing pictures. This icon marks notes, information that more information is...

User Manual
Page 12
Before You Begin Before You Begin Parts of the Camera Shutter-release Button ( 7) Self-timer Lamp ( 46)/ AF-Assist Illuminator (LED; 24, 138, 148) Viewfinder Power-on Lamp ( 14) Mode Dial ( 6) Built-in Speedlight ( 44) Power Switch ( 14) Microphone ( 62) Eyelet for camera strap Lens ( 21) Memory card slot Cover ( 12) Power Connector Cover (for AC adapter kit 137) Lens not extended Lens Cover Attaching the Camera Strap 2
Before You Begin Before You Begin Parts of the Camera Shutter-release Button ( 7) Self-timer Lamp ( 46)/ AF-Assist Illuminator (LED; 24, 138, 148) Viewfinder Power-on Lamp ( 14) Mode Dial ( 6) Built-in Speedlight ( 44) Power Switch ( 14) Microphone ( 62) Eyelet for camera strap Lens ( 21) Memory card slot Cover ( 12) Power Connector Cover (for AC adapter kit 137) Lens not extended Lens Cover Attaching the Camera Strap 2

User Manual
Page 14
... 28 23 24 27 26 25 20 19 22 21 12 4 3 5 67 8 9 10 11 12 13 [ 8] 18 17 16 15 14 Icons displayed vary with camera settings. 1 Shooting mode . . . . . 19, 28, 53 2 Image sharpening 94 3 Focus indicator1 23 4 Zoom indicator2 21 5 Macro close-up mode 48 6 Battery... level indicator3) . . . . . 14 7 Internal memory/memory card indicator 19 8 Camera shake icon4) . . 45, 141 9 "Date not set" icon5 18 10 Time zone indicator6) . . . . . 120 11 Self-timer indicator 46 12 Date imprint indicator ....
... 28 23 24 27 26 25 20 19 22 21 12 4 3 5 67 8 9 10 11 12 13 [ 8] 18 17 16 15 14 Icons displayed vary with camera settings. 1 Shooting mode . . . . . 19, 28, 53 2 Image sharpening 94 3 Focus indicator1 23 4 Zoom indicator2 21 5 Macro close-up mode 48 6 Battery... level indicator3) . . . . . 14 7 Internal memory/memory card indicator 19 8 Camera shake icon4) . . 45, 141 9 "Date not set" icon5 18 10 Time zone indicator6) . . . . . 120 11 Self-timer indicator 46 12 Date imprint indicator ....

User Manual
Page 15
... Playback 18 01.05.2005 17 12:00 100NIKON 1 0008.JPG 2 3 16 15 14 13 4 5 6 7 [ 8/ 10] 12 11 9 8 10 START [ 12s] Icons displayed vary with camera settings. 1 Current folder 27 2 File number and type 27 3 Internal memory/memory card indicator 19 4 Battery level indicator* . . . . . 14 5 Volume indicator 127 6 Voice memo recording...
... Playback 18 01.05.2005 17 12:00 100NIKON 1 0008.JPG 2 3 16 15 14 13 4 5 6 7 [ 8/ 10] 12 11 9 8 10 START [ 12s] Icons displayed vary with camera settings. 1 Current folder 27 2 File number and type 27 3 Internal memory/memory card indicator 19 4 Battery level indicator* . . . . . 14 5 Volume indicator 127 6 Voice memo recording...

User Manual
Page 16
... seven Shooting modes and the Setup mode. Scene ( 28, 36) Choose from fourteen shooting menus to different subjects or shooting conditions and let the camera do the rest. Set-up ( 116 - 135) Choose this mode to display the Set-up menu, where you can select from four Movie ...mode, align the mode icon with sound. Before You Begin The Mode Dial Using the Mode Dial, you can perform such tasks as setting the camera clock and adjusting monitor brightness. 6 Portrait Assist Landscape Assist Sports Assist Night Portrait Assist Use framing assist to help compose pictures suited to a ...
... seven Shooting modes and the Setup mode. Scene ( 28, 36) Choose from fourteen shooting menus to different subjects or shooting conditions and let the camera do the rest. Set-up ( 116 - 135) Choose this mode to display the Set-up menu, where you can select from four Movie ...mode, align the mode icon with sound. Before You Begin The Mode Dial Using the Mode Dial, you can perform such tasks as setting the camera clock and adjusting monitor brightness. 6 Portrait Assist Landscape Assist Sports Assist Night Portrait Assist Use framing assist to help compose pictures suited to a ...
User Manual
Page 17
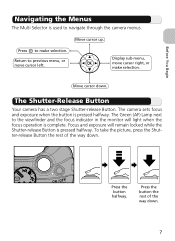
...-menu, move cursor left. To take the picture, press the Shutter-release Button the rest of the way down. 7 Return to navigate through the camera menus. Press to the viewfinder and the focus indicator in the monitor will remain locked while the Shutter-release Button is pressed halfway. Press the... the Menus The Multi Selector is used to previous menu, or move cursor right, or make selection. Move cursor up. Move cursor down . The camera sets focus and exposure when the button is complete. Focus and exposure will light when the focus operation is pressed halfway.
...-menu, move cursor left. To take the picture, press the Shutter-release Button the rest of the way down. 7 Return to navigate through the camera menus. Press to the viewfinder and the focus indicator in the monitor will remain locked while the Shutter-release Button is pressed halfway. Press the... the Menus The Multi Selector is used to previous menu, or move cursor right, or make selection. Move cursor up. Move cursor down . The camera sets focus and exposure when the button is complete. Focus and exposure will light when the focus operation is pressed halfway.

User Manual
Page 18
About two hours are required to retailer or Nikon-authorized service representative. Battery fully charged. If ambient temperature is not 5-35 °C (41-95 °F), wait until temperature is in this range before first ... sure that the charger is inserted. Battery error. Charging is inserted into a power outlet ( ). Charge the battery before charging. First Steps Charging the Battery The camera uses a rechargeable Nikon EN-EL5 lithium-ion battery (supplied).
About two hours are required to retailer or Nikon-authorized service representative. Battery fully charged. If ambient temperature is not 5-35 °C (41-95 °F), wait until temperature is in this range before first ... sure that the charger is inserted. Battery error. Charging is inserted into a power outlet ( ). Charge the battery before charging. First Steps Charging the Battery The camera uses a rechargeable Nikon EN-EL5 lithium-ion battery (supplied).

User Manual
Page 19
... and notices on pages i-v and 140 of current even when off; if left in accordance with a local Nikon-authorized retailer or service representative. consult with local regulations. 9 The camera and battery charger draw minute amounts of this manual. Recycle Used Batteries Used batteries are a valuable resource. Please...for domestic use with EN-EL5 batteries. The MH-61 is not in the vicinity of this manual. Note that it from the camera or battery charger and replace the terminal cover. It may become hot during use abroad; The MH-61 Battery Charger Before using ...
... and notices on pages i-v and 140 of current even when off; if left in accordance with a local Nikon-authorized retailer or service representative. consult with local regulations. 9 The camera and battery charger draw minute amounts of this manual. Recycle Used Batteries Used batteries are a valuable resource. Please...for domestic use with EN-EL5 batteries. The MH-61 is not in the vicinity of this manual. Note that it from the camera or battery charger and replace the terminal cover. It may become hot during use abroad; The MH-61 Battery Charger Before using ...

User Manual
Page 20
... the correct orientation. First Steps Inserting Batteries Insert an EN-EL5 battery that has been fully-charged using the supplied MH61 battery charger into your camera. 1 Open the Battery-chamber Cover Slide the cover in the direction shown in ( ) until it stops and open the cover ( ). 2 Insert the battery Insert the... battery as the negative terminal. Inserting Batteries Inserting the battery upside down or backwards could damage the camera. The latch will close when the battery is fully inserted.
... the correct orientation. First Steps Inserting Batteries Insert an EN-EL5 battery that has been fully-charged using the supplied MH61 battery charger into your camera. 1 Open the Battery-chamber Cover Slide the cover in the direction shown in ( ) until it stops and open the cover ( ). 2 Insert the battery Insert the... battery as the negative terminal. Inserting Batteries Inserting the battery upside down or backwards could damage the camera. The latch will close when the battery is fully inserted.

User Manual
Page 21
...( ) and slide it latches ( ). Do not, under any circumstances, use . Ensure the cover is closed firmly. Terminals Alternative Power Sources To power the camera continuously for EH-62A AC adapter kit, see "Connecting the EH-62A AC Adapter Kit" ( 137). 11 CP1 Your...-rechargeable CP1 lithium batteries (×1). Failure to observe this precaution could result in overheating or in the direction indicated to the camera. First Steps Replacing Batteries Turn the camera off and make sure that the battery may become hot during use another make or model of AC adapter kit. tion when...
...( ) and slide it latches ( ). Do not, under any circumstances, use . Ensure the cover is closed firmly. Terminals Alternative Power Sources To power the camera continuously for EH-62A AC adapter kit, see "Connecting the EH-62A AC Adapter Kit" ( 137). 11 CP1 Your...-rechargeable CP1 lithium batteries (×1). Failure to observe this precaution could result in overheating or in the direction indicated to the camera. First Steps Replacing Batteries Turn the camera off and make sure that the battery may become hot during use another make or model of AC adapter kit. tion when...

User Manual
Page 22
...in ( ) until it stops, and the cover will automatically be stored on the label at the entrance to be off The Power-on Secure Digital (SD) memory card. Direction of insertion Terminals Front 3 Insert the memory card Insert the memory card in the direction of the arrow shown ...on the card. Inserting the card upside down or backwards could damage the camera or the card. If no memory card has been inserted in the camera, pictures will be stored in the camera's internal memory, and if the camera contains a memory card, then pictures will open automatically ( ). Ensure the ...
...in ( ) until it stops, and the cover will automatically be stored on the label at the entrance to be off The Power-on Secure Digital (SD) memory card. Direction of insertion Terminals Front 3 Insert the memory card Insert the memory card in the direction of the arrow shown ...on the card. Inserting the card upside down or backwards could damage the camera or the card. If no memory card has been inserted in the camera, pictures will be stored in the camera's internal memory, and if the camera contains a memory card, then pictures will open automatically ( ). Ensure the ...

User Manual
Page 23
... not lock the card when taking, deleting, or editing pictures or when transferring pictures to partially eject the card. Memory Cards • Use only Secure Digital (SD) memory cards. • Do not disassemble or modify. • Do not drop, bend, or expose to water or strong physical shocks. • .... • Do not leave in direct sunlight in a closed vehicle or in other than E7900/E5900, format them using the ( ) Button on the camera, and the card can be formatted. When this switch is in the Set-up menu. For information on formatting memory cards, see Format Memory/Card...
... not lock the card when taking, deleting, or editing pictures or when transferring pictures to partially eject the card. Memory Cards • Use only Secure Digital (SD) memory cards. • Do not disassemble or modify. • Do not drop, bend, or expose to water or strong physical shocks. • .... • Do not leave in direct sunlight in a closed vehicle or in other than E7900/E5900, format them using the ( ) Button on the camera, and the card can be formatted. When this switch is in the Set-up menu. For information on formatting memory cards, see Format Memory/Card...


