
User Manual
Page 4
... the product break open as this could result in their entirety before using this product: • Before replacing the battery, turn the product off immediately in this equipment. Observe the following precautions when handling batteries for inspection. The consequences that should be sure...improperly handled. After removing the battery, take the product to a Nikon-authorized service representative for use in the event of malfunction, the product should be read before using this section are using the camera strap Never place the strap around the neck of a fall ...
... the product break open as this could result in their entirety before using this product: • Before replacing the battery, turn the product off immediately in this equipment. Observe the following precautions when handling batteries for inspection. The consequences that should be sure...improperly handled. After removing the battery, take the product to a Nikon-authorized service representative for use in the event of malfunction, the product should be read before using this section are using the camera strap Never place the strap around the neck of a fall ...

User Manual
Page 5
... on battery power for the purpose, to your subject's eyes could cause hearing loss or damage the equipment. Before removing the battery, turn the camera off and allow the battery to prevent liquid crystal from putting the batteries or other small parts into their mouths. This is normal and... Keep out of reach of children Particular care should be no charge remains. • Immediately after use only the cables provided or sold by Nikon for an extended period, the battery may become hot during use immediately should be taken to not put your eye accidentally. CD - When using...
... on battery power for the purpose, to your subject's eyes could cause hearing loss or damage the equipment. Before removing the battery, turn the camera off and allow the battery to prevent liquid crystal from putting the batteries or other small parts into their mouths. This is normal and... Keep out of reach of children Particular care should be no charge remains. • Immediately after use only the cables provided or sold by Nikon for an extended period, the battery may become hot during use immediately should be taken to not put your eye accidentally. CD - When using...

User Manual
Page 6
Turn the product off before exposing it to strong shocks or vibration. Strong static charges or the magnetic fields produced by equipment such as occur ... another while the AC adapter (available separately) is on the memory card, or affect the product's internal circuitry. Cautions To ensure continued enjoyment of your Nikon product, observe the following precautions when storing or using the device: Keep dry The device will be damaged if immersed in water or subjected to...
Turn the product off before exposing it to strong shocks or vibration. Strong static charges or the magnetic fields produced by equipment such as occur ... another while the AC adapter (available separately) is on the memory card, or affect the product's internal circuitry. Cautions To ensure continued enjoyment of your Nikon product, observe the following precautions when storing or using the device: Keep dry The device will be damaged if immersed in water or subjected to...

User Manual
Page 7
...Commission (FCC) Radio Frequency Interference Statement This equipment has been tested and found to operate the equipment. These limits are not expressly approved by Nikon Corporation may void the user's authority to comply with the limits for help. Tel.: 631-547-4200 the receiver is connected. • Consult... on , the user is encour- Notice for your area (address provided separately). This equipment generates, uses, and can be determined by turning the Use the interface cables sold or provided equipment off and on a circuit different from the use of the FCC rules.
...Commission (FCC) Radio Frequency Interference Statement This equipment has been tested and found to operate the equipment. These limits are not expressly approved by Nikon Corporation may void the user's authority to comply with the limits for help. Tel.: 631-547-4200 the receiver is connected. • Consult... on , the user is encour- Notice for your area (address provided separately). This equipment generates, uses, and can be determined by turning the Use the interface cables sold or provided equipment off and on a circuit different from the use of the FCC rules.
User Manual
Page 18
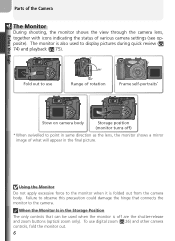
...and playback ( 75). 0° Fold out to use digital zoom ( 26) and other camera controls, fold the monitor out. 6 Before You Begin Parts of the Camera The Monitor During shooting, the monitor shows the view through the camera lens, together with icons indicating the status of rotation Frame... self-portraits* Stow on camera body Storage position (monitor turns off) * When swivelled to the monitor when...
...and playback ( 75). 0° Fold out to use digital zoom ( 26) and other camera controls, fold the monitor out. 6 Before You Begin Parts of the Camera The Monitor During shooting, the monitor shows the view through the camera lens, together with icons indicating the status of rotation Frame... self-portraits* Stow on camera body Storage position (monitor turns off) * When swivelled to the monitor when...

User Manual
Page 21
... through lens only Monitor shows current settings and view through lens Monitor off ( , P, S, A, and M only) The monitor turns off automatically when face down . Before You Begin Parts of the way down on the camera body. 9 The (Monitor) Button The button controls the monitor. Focus and exposure will light when the focus operation...
... through lens only Monitor shows current settings and view through lens Monitor off ( , P, S, A, and M only) The monitor turns off automatically when face down . Before You Begin Parts of the way down on the camera body. 9 The (Monitor) Button The button controls the monitor. Focus and exposure will light when the focus operation...

User Manual
Page 26
...battery charger provided (about two hours are required to the closed position ( ; 2 ). For more information, see the documentation provided with the camera. Charge the battery as shown in the label inside EN2C-ERL51 the battery chamber. 4 Close the battery-chamber cover Close the battery-chamber ...charge remains). Note that EN-EL1 batteries must be charged before first use. 1 Turn the camera off Check that the battery-chamber cover is properly latched. 14 First Steps Inserting Batteries A Nikon EN-EL1 rechargeable lithium-ion battery is included with the battery charger.
...battery charger provided (about two hours are required to the closed position ( ; 2 ). For more information, see the documentation provided with the camera. Charge the battery as shown in the label inside EN2C-ERL51 the battery chamber. 4 Close the battery-chamber cover Close the battery-chamber ...charge remains). Note that EN-EL1 batteries must be charged before first use. 1 Turn the camera off Check that the battery-chamber cover is properly latched. 14 First Steps Inserting Batteries A Nikon EN-EL1 rechargeable lithium-ion battery is included with the battery charger.

User Manual
Page 28
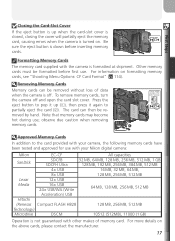
...slot cover Direction of insertion Front Terminals 3 Insert the memory card Check that the card is all the way down or backwards could damage the camera or the card. Inserting Memory Cards Insert the memory card terminals first. Inserting the card upside down , then insert the memory card ... direction of the arrow as shown in the correct orientation. 4 Close the memory card slot cover 16 First Steps Inserting Memory Cards The camera stores pictures on CompactFlash™ memory cards. 1 Turn the camera off Check that the power-on the underside of the memory card slot cover.
...slot cover Direction of insertion Front Terminals 3 Insert the memory card Check that the card is all the way down or backwards could damage the camera or the card. Inserting Memory Cards Insert the memory card terminals first. Inserting the card upside down , then insert the memory card ... direction of the arrow as shown in the correct orientation. 4 Close the memory card slot cover 16 First Steps Inserting Memory Cards The camera stores pictures on CompactFlash™ memory cards. 1 Turn the camera off Check that the power-on the underside of the memory card slot cover.
User Manual
Page 29
To remove memory cards, turn the camera off . Press the eject button to pop it again to the card provided with your camera, the following memory cards have been tested and approved for use with your Nikon digital camera: Nikon EC-CF All capacities SanDisk SDCFB SDCFH Ultra 32 MB, 64 MB, 128 MB... For more details on formatting memory cards, see "Shooting Menu Options: CF Card Format" ( 114). Be sure the eject button is turned on. Formatting Memory Cards The memory card supplied with other makes of data when the camera is not guaranteed with the camera is formatted at shipment.
To remove memory cards, turn the camera off . Press the eject button to pop it again to the card provided with your camera, the following memory cards have been tested and approved for use with your Nikon digital camera: Nikon EC-CF All capacities SanDisk SDCFB SDCFH Ultra 32 MB, 64 MB, 128 MB... For more details on formatting memory cards, see "Shooting Menu Options: CF Card Format" ( 114). Be sure the eject button is turned on. Formatting Memory Cards The memory card supplied with other makes of data when the camera is not guaranteed with the camera is formatted at shipment.

User Manual
Page 30
Low battery; Replace with EXHAUSTED fully-charged battery. fewer shots can be taken consecutively in the monitor For information on lamp will light. 3 Check the battery level in "continuous" mode. BATTERY Battery exhausted. The power-on opening the monitor, see "Parts of the Camera: The Monitor" ( 6). WARNING ! ! Ready spare battery. Display Meaning Charge sufficient for normal opNO ICON eration. First Steps Checking the Battery Level 1 Select mode 2 Turn the camera on The power-on lamp will blink when the "battery exhausted" warning is displayed. 18
Low battery; Replace with EXHAUSTED fully-charged battery. fewer shots can be taken consecutively in the monitor For information on lamp will light. 3 Check the battery level in "continuous" mode. BATTERY Battery exhausted. The power-on opening the monitor, see "Parts of the Camera: The Monitor" ( 6). WARNING ! ! Ready spare battery. Display Meaning Charge sufficient for normal opNO ICON eration. First Steps Checking the Battery Level 1 Select mode 2 Turn the camera on The power-on lamp will blink when the "battery exhausted" warning is displayed. 18

User Manual
Page 31
...(Standby Mode) If no operations are displayed), the monitor will turn off option in the setup menu ( 140). The camera will turn off automatically and the camera will enter standby mode to reduce the drain on the batteries (when the camera is powered by an AC adapter, the monitor will not enter... standby mode when connected to select a new mode The length of time before the camera enters standby ...
...(Standby Mode) If no operations are displayed), the monitor will turn off option in the setup menu ( 140). The camera will turn off automatically and the camera will enter standby mode to reduce the drain on the batteries (when the camera is powered by an AC adapter, the monitor will not enter... standby mode when connected to select a new mode The length of time before the camera enters standby ...

User Manual
Page 32
...Fr Français Es Español Es Español Display options. The Clock Battery When the main batteries are installed or the camera is powered by an AC adapter, the clock battery will charge in about ten hours. numbers Shutter sound Auto off Rotate mode dial to ...SET UP and turn camera on. First Steps Basic Setup Before using the camera for the first time, choose a language for camera menus and messages and set the camera clock to setup menu. numbers Shutter sound Auto off Return to the correct ...
...Fr Français Es Español Es Español Display options. The Clock Battery When the main batteries are installed or the camera is powered by an AC adapter, the clock battery will charge in about ten hours. numbers Shutter sound Auto off Rotate mode dial to ...SET UP and turn camera on. First Steps Basic Setup Before using the camera for the first time, choose a language for camera menus and messages and set the camera clock to setup menu. numbers Shutter sound Auto off Return to the correct ...

User Manual
Page 36
... such shooting menu settings as white balance and sensitivity (ISO equivalency), allowing settings to the options available in mode, the camera focuses continuously until the shutter-release button is ready to 3 Turn the camera on A beep will sound and the power-on lamp will light. Basic Photography Taking Pictures in Mode This section...
... such shooting menu settings as white balance and sensitivity (ISO equivalency), allowing settings to the options available in mode, the camera focuses continuously until the shutter-release button is ready to 3 Turn the camera on A beep will sound and the power-on lamp will light. Basic Photography Taking Pictures in Mode This section...

User Manual
Page 38
...with two types of 16 ×. To cancel digital zoom, press until the zoom indicator turns white. 26 Zoom out Zoom in Indicator in monitor shows amount of zoom when either button is pressed Digital zoom 2 Frame the subject The camera is used to further magnify the image up to...the viewfinder will trigger digital zoom. Taking Pictures in Auto Mode Basic Photography Step 2-Frame the Picture A 1 Ready the camera Hold the camera steadily in the digital zoom range. The zoom indicator will turn yellow, and the green (AF) lamp next to 4 ×, and digital zoom, in the monitor A or...
...with two types of 16 ×. To cancel digital zoom, press until the zoom indicator turns white. 26 Zoom out Zoom in Indicator in monitor shows amount of zoom when either button is pressed Digital zoom 2 Frame the subject The camera is used to further magnify the image up to...the viewfinder will trigger digital zoom. Taking Pictures in Auto Mode Basic Photography Step 2-Frame the Picture A 1 Ready the camera Hold the camera steadily in the digital zoom range. The zoom indicator will turn yellow, and the green (AF) lamp next to 4 ×, and digital zoom, in the monitor A or...

User Manual
Page 39
... the two frames in the viewfinder display. • In mode, the camera focuses on the camera ( 148) Use the viewfinder when the monitor has been turned off or in sharp focus when your eye. Digital zoom is not available when the monitor is to the viewfinder.... Digital Zoom In digital zoom, data from the camera's image sensor are simply enlarged, producing a slightly "grainy" image. Framing ...
... the two frames in the viewfinder display. • In mode, the camera focuses on the camera ( 148) Use the viewfinder when the monitor has been turned off or in sharp focus when your eye. Digital zoom is not available when the monitor is to the viewfinder.... Digital Zoom In digital zoom, data from the camera's image sensor are simply enlarged, producing a slightly "grainy" image. Framing ...

User Manual
Page 41
... Autofocus does not perform well when: • The focus area contains objects at the same distance, or use manual focus ( 72). Do not turn the camera off , pictures can continue to take pictures until the icon is displayed. form well if, for example, the subject is the same color as ...-release button is displayed. More on page 30 During Recording While pictures are being recorded to focus on another subject at different distances from the camera. Autofocus may not perform well with objects inside a cage, because the bars of the cage will be in focus. 29 When the Monitor...
... Autofocus does not perform well when: • The focus area contains objects at the same distance, or use manual focus ( 72). Do not turn the camera off , pictures can continue to take pictures until the icon is displayed. form well if, for example, the subject is the same color as ...-release button is displayed. More on page 30 During Recording While pictures are being recorded to focus on another subject at different distances from the camera. Autofocus may not perform well with objects inside a cage, because the bars of the cage will be in focus. 29 When the Monitor...

User Manual
Page 45
.... When Lighting Is Poor When lighting is poor and the flash is displayed, the monitor will turn off ( ) or set to indicate that the flash is charging. When the camera is 0.5-2.8 m/1´8˝-9´2˝ (Auto ISO). Check that pictures may be affected by... turning noise reduction on a steady, level surface. 33 Keep the Flash Window Clear Keep your finger briefly ...
.... When Lighting Is Poor When lighting is poor and the flash is displayed, the monitor will turn off ( ) or set to indicate that the flash is charging. When the camera is 0.5-2.8 m/1´8˝-9´2˝ (Auto ISO). Check that pictures may be affected by... turning noise reduction on a steady, level surface. 33 Keep the Flash Window Clear Keep your finger briefly ...

User Manual
Page 46
...Flash is pressed. To focus as 1 cm (0.4˝) to use it works When to the lens, zoom the camera out until desired mode displayed in the monitor turns green. is scenes through foreground disabled. Manual Focus For information on manual focus, see above) Use for close ...as close -ups. Camera can focus on Photography: Manual Focus" ( 72). 34 Option How it NO ICON Camera automatically adjusts focus Use when...
...Flash is pressed. To focus as 1 cm (0.4˝) to use it works When to the lens, zoom the camera out until desired mode displayed in the monitor turns green. is scenes through foreground disabled. Manual Focus For information on manual focus, see above) Use for close ...as close -ups. Camera can focus on Photography: Manual Focus" ( 72). 34 Option How it NO ICON Camera automatically adjusts focus Use when...

User Manual
Page 47
...until and icons are displayed in the scene-mode menu. When using the self-timer option, mount the camera on a tripod (recommended) or rest it prevents pictures from being blurred by camera movement that occurs when the shutter-release button is released. Ad- just settings and frame picture. Count-...down timer in the shooting menu is selected in monitor. The self-timer is not available in movie mode or when Fireworks show is automatically set to turn self-...
...until and icons are displayed in the scene-mode menu. When using the self-timer option, mount the camera on a tripod (recommended) or rest it prevents pictures from being blurred by camera movement that occurs when the shutter-release button is released. Ad- just settings and frame picture. Count-...down timer in the shooting menu is selected in monitor. The self-timer is not available in movie mode or when Fireworks show is automatically set to turn self-...

User Manual
Page 48
... or when the background is much darker than the main subject. In and modes, exposure compensation will be reset to ±0 when the camera is turned off or the mode dial is very dark, which can make naturally bright subjects look dim and naturally dark subjects appear over -exposure, tends...dial: Compensation displayed in order to lower exposure when the frame is very bright and raise exposure when the frame is turned to alter exposure from the value suggested by the camera. Choosing a Value for Exposure Compensation As a rule of thumb, select positive values when large areas of the frame...
... or when the background is much darker than the main subject. In and modes, exposure compensation will be reset to ±0 when the camera is turned off or the mode dial is very dark, which can make naturally bright subjects look dim and naturally dark subjects appear over -exposure, tends...dial: Compensation displayed in order to lower exposure when the frame is very bright and raise exposure when the frame is turned to alter exposure from the value suggested by the camera. Choosing a Value for Exposure Compensation As a rule of thumb, select positive values when large areas of the frame...


