
User Manual
Page 1
... as a navigational aid. Pull over ! Contact your GPS by the unit while driving. Just enter information using the touch screen and let the voice prompt and detailed map guide you to access any action you may affect safety or timing while driving. Always operate the vehicle in every situation. It does not reflect road closures or road conditions, traffic congestion, weather conditions...
... as a navigational aid. Pull over ! Contact your GPS by the unit while driving. Just enter information using the touch screen and let the voice prompt and detailed map guide you to access any action you may affect safety or timing while driving. Always operate the vehicle in every situation. It does not reflect road closures or road conditions, traffic congestion, weather conditions...
User Manual
Page 2
... or damage, do not remove cover or back. Do not allow the power cord to be used if attaching the mounting bracket to qualified service personnel. Refer servicing to qualified service personnel. Do not use harsh chemicals (such as it is being damaged by NEXTAR. Do not use your GPS in high explosive areas as the unit may cause electric shock...
... or damage, do not remove cover or back. Do not allow the power cord to be used if attaching the mounting bracket to qualified service personnel. Refer servicing to qualified service personnel. Do not use harsh chemicals (such as it is being damaged by NEXTAR. Do not use your GPS in high explosive areas as the unit may cause electric shock...

User Manual
Page 3
... complies with part 15 of the following two conditions: This device may cause harmful interference to which can radiate radio frequency energy and, if not installed and used in a residential installation. CAUTION: Underwriters Laboratories Inc. ("UL") has not tested the performance or reliability of the Global Positioning System ("GPS") hardware, operating software or other aspects of the GPS hardware and GPS operating software. UL has...
... complies with part 15 of the following two conditions: This device may cause harmful interference to which can radiate radio frequency energy and, if not installed and used in a residential installation. CAUTION: Underwriters Laboratories Inc. ("UL") has not tested the performance or reliability of the Global Positioning System ("GPS") hardware, operating software or other aspects of the GPS hardware and GPS operating software. UL has...
User Manual
Page 4
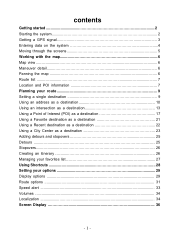
Table of Contents Introduction Important Safety Information 1 FCC & UL Compliance 3 Getting Familiar With Your Hardware Main Unit 5 Accessories 6 Power Adaptor 7 System Connections 8 Using the Mounting Bracket 9 Using Your Navigator General Setup 10 Playing Music 15 Photo Viewer 17 Service & Support Troubleshooting 20 Specifications 22 Copyright 23 4
Table of Contents Introduction Important Safety Information 1 FCC & UL Compliance 3 Getting Familiar With Your Hardware Main Unit 5 Accessories 6 Power Adaptor 7 System Connections 8 Using the Mounting Bracket 9 Using Your Navigator General Setup 10 Playing Music 15 Photo Viewer 17 Service & Support Troubleshooting 20 Specifications 22 Copyright 23 4
User Manual
Page 5
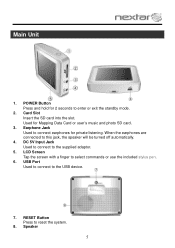
... adaptor. 5. Card Slot Insert the SD card into the slot. Speaker 5 POWER Button Press and hold for Mapping Data Card or user's music and photo SD card. 3. LCD Screen Tap the screen with a finger to enter or exit the standby mode. 2. USB Port Used to connect to this jack, the speaker will be turned off automatically. 4. Main Unit 1. When the earphones are connected to the USB device. 7. RESET Button Press to reset the system. 8. Used for 2 seconds...
... adaptor. 5. Card Slot Insert the SD card into the slot. Speaker 5 POWER Button Press and hold for Mapping Data Card or user's music and photo SD card. 3. LCD Screen Tap the screen with a finger to enter or exit the standby mode. 2. USB Port Used to connect to this jack, the speaker will be turned off automatically. 4. Main Unit 1. When the earphones are connected to the USB device. 7. RESET Button Press to reset the system. 8. Used for 2 seconds...

User Manual
Page 7
... use . Attention Set up your view of the road. When connected with adaptor, the LCD screen will power off automatically after a few minutes. 7 Working conditions and precautions for powering the unit while in rechargeable Lithium-Ion battery. Connect the DC Adaptor Power Plug to the unit's power jack and plug the other settings before moving out into traffic. About Rechargeable Battery Your portable GPS device...
... use . Attention Set up your view of the road. When connected with adaptor, the LCD screen will power off automatically after a few minutes. 7 Working conditions and precautions for powering the unit while in rechargeable Lithium-Ion battery. Connect the DC Adaptor Power Plug to the unit's power jack and plug the other settings before moving out into traffic. About Rechargeable Battery Your portable GPS device...
User Manual
Page 8
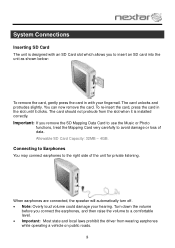
... hearing. The card unlocks and protrudes slightly. Turn down the volume before you connect the earphones, and then raise the volume to avoid damage or loss of the unit for private listening. To re-insert the card, press the card in with an SD Card slot which allows you remove the SD Mapping Data Card to use the Music or Photo functions, treat the Mapping Card very carefully to...
... hearing. The card unlocks and protrudes slightly. Turn down the volume before you connect the earphones, and then raise the volume to avoid damage or loss of the unit for private listening. To re-insert the card, press the card in with an SD Card slot which allows you remove the SD Mapping Data Card to use the Music or Photo functions, treat the Mapping Card very carefully to...
User Manual
Page 9
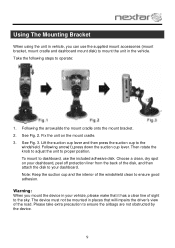
..., use the supplied mount accessories (mount bracket, mount cradle and dashboard mount disk) to your vehicle, please make that will impairs the driver's view of the windshield clean to ensure the airbags are not obstructed by the device. 9 Following arrow(1),press down the suction cup lever. See Fig. 2. Then rotate the knob to adjust the unit to the sky. Fix the unit...
..., use the supplied mount accessories (mount bracket, mount cradle and dashboard mount disk) to your vehicle, please make that will impairs the driver's view of the windshield clean to ensure the airbags are not obstructed by the device. 9 Following arrow(1),press down the suction cup lever. See Fig. 2. Then rotate the knob to adjust the unit to the sky. Fix the unit...
User Manual
Page 13
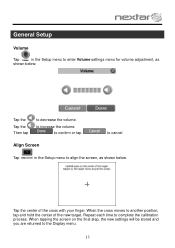
to another position, tap and hold the center of the cross with your finger. When the cross moves to increase the volume. Repeat each time to cancel. to confirm or tap to complete the calibration process. General Setup Volume Tap in the Setup menu to align the screen, as shown below . Align Screen Tap in the Setup menu to enter Volume settings menu for volume adjustment, as shown below...
to another position, tap and hold the center of the cross with your finger. When the cross moves to increase the volume. Repeat each time to cancel. to confirm or tap to complete the calibration process. General Setup Volume Tap in the Setup menu to align the screen, as shown below . Align Screen Tap in the Setup menu to enter Volume settings menu for volume adjustment, as shown below...
User Manual
Page 15
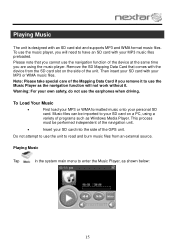
Remove the SD Mapping Data Card that you cannot use the navigation function of the device at the same time you are using a variety of programs such as Windows Media Player. To Load Your Music First load your MP3 or WMA formatted music onto your SD card on the side of the navigation unit. Insert your own safety, do not use the unit to enter the Music Player...
Remove the SD Mapping Data Card that you cannot use the navigation function of the device at the same time you are using a variety of programs such as Windows Media Player. To Load Your Music First load your MP3 or WMA formatted music onto your SD card on the side of the navigation unit. Insert your own safety, do not use the unit to enter the Music Player...

User Manual
Page 20
... time and built-in battery was overly discharged Possible Solution Check power adaptor connection Note: Some automobile accessory power jacks provide no power when the ignition is not connected properly Unit will not Power Up Possible Cause Power adaptor is off , disconnect the power connector from the unit, and contact Nextar Customer Service. Problem Unit will not activate after pressing and holding the stand by button when connected to turn the power off . Troubleshooting...
... time and built-in battery was overly discharged Possible Solution Check power adaptor connection Note: Some automobile accessory power jacks provide no power when the ignition is not connected properly Unit will not Power Up Possible Cause Power adaptor is off , disconnect the power connector from the unit, and contact Nextar Customer Service. Problem Unit will not activate after pressing and holding the stand by button when connected to turn the power off . Troubleshooting...
User Manual
Page 21
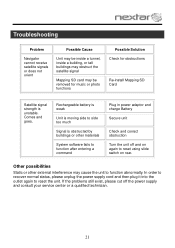
... System software fails to function after entering a command Plug in power adaptor and charge Battery Secure unit Check and correct obstruction Turn the unit off the power supply and consult your service center or a qualified technician. 21 Troubleshooting Problem Navigator cannot receive satellite signals or does not orient Possible Cause Unit may be inside a tunnel, inside a building, or tall buildings may obstruct the satellite signal Mapping SD card may be removed for music...
... System software fails to function after entering a command Plug in power adaptor and charge Battery Secure unit Check and correct obstruction Turn the unit off the power supply and consult your service center or a qualified technician. 21 Troubleshooting Problem Navigator cannot receive satellite signals or does not orient Possible Cause Unit may be inside a tunnel, inside a building, or tall buildings may obstruct the satellite signal Mapping SD card may be removed for music...
User Manual
Page 23
... and service mark of Nextar (Hong Kong) Limited. For instruction books, information on this product, its operation and accessories, visit us on production unit sold to change or update this manual. Copyright No part of this manual may be copied, republished, reproduced, transmitted or distributed in China © 2009 Nextar (Hong Kong) Limited. Note: All screen shots shown are subject to consumers. Nextar may...
... and service mark of Nextar (Hong Kong) Limited. For instruction books, information on this product, its operation and accessories, visit us on production unit sold to change or update this manual. Copyright No part of this manual may be copied, republished, reproduced, transmitted or distributed in China © 2009 Nextar (Hong Kong) Limited. Note: All screen shots shown are subject to consumers. Nextar may...
X3-11 software manual
Page 1
... started 2 Starting the system 2 Getting a GPS signal 3 Entering data on the system 4 Moving through the screens 5 Working with the map 6 Map view ...6 Maneuver detail 6 Panning the map 6 Route list ...7 Location and POI information 7 Planning your route 9 Setting a single destination 9 Using an address as a destination 10 Using an intersection as a destination 13 Using a Point of Interest (POI) as a destination 17 Using a Favorite destination as a destination 21 Using a Recent destination as a destination 22...
... started 2 Starting the system 2 Getting a GPS signal 3 Entering data on the system 4 Moving through the screens 5 Working with the map 6 Map view ...6 Maneuver detail 6 Panning the map 6 Route list ...7 Location and POI information 7 Planning your route 9 Setting a single destination 9 Using an address as a destination 10 Using an intersection as a destination 13 Using a Point of Interest (POI) as a destination 17 Using a Favorite destination as a destination 21 Using a Recent destination as a destination 22...

X3-11 software manual
Page 6
As you navigate to a destination, the top of the map displays the name of the next street, the direction of your next turn . Map view If you have a GPS signal, the map view on a route, and you can find information about specific locations. At the bottom of the map is weak. Maneuver detail If you have a GPS signal, and if the arrow is yellow the GPS signal is a scale indicating...
As you navigate to a destination, the top of the map displays the name of the next street, the direction of your next turn . Map view If you have a GPS signal, the map view on a route, and you can find information about specific locations. At the bottom of the map is weak. Maneuver detail If you have a GPS signal, and if the arrow is yellow the GPS signal is a scale indicating...

X3-11 software manual
Page 7
... map. - 7 - From the Information screen you are trying to your Favorites list, or view information. Saving the location adds the location to find location information about Favorites later in this location • Information Setting the location as your destination is useful if you have several options: • Set start location • Set destination • Save this manual). Route list Tapping an item on the list and then tapping Map will display the maneuver detail screen...
... map. - 7 - From the Information screen you are trying to your Favorites list, or view information. Saving the location adds the location to find location information about Favorites later in this location • Information Setting the location as your destination is useful if you have several options: • Set start location • Set destination • Save this manual). Route list Tapping an item on the list and then tapping Map will display the maneuver detail screen...
X3-11 software manual
Page 29
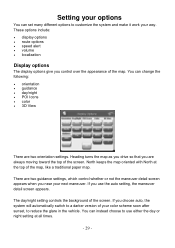
... two orientation settings. North keeps the map oriented with North at all times. - 29 - You can instead choose to customize the system and make it work your way. You can set many different options to use the auto setting, the maneuver detail screen appears. These options include: • display options • route options • speed alert • volume • localization Display options The display options give...
... two orientation settings. North keeps the map oriented with North at all times. - 29 - You can instead choose to customize the system and make it work your way. You can set many different options to use the auto setting, the maneuver detail screen appears. These options include: • display options • route options • speed alert • volume • localization Display options The display options give...
X3-11 software manual
Page 33
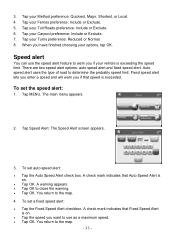
... speed alert options: auto speed alert and fixed speed alert. Auto speed alert uses the type of road to warn you want to close the warning. • Tap OK. A warning appears. • Tap OK to use the speed alert feature to determine the probably speed limit. A check mark indicates that Fixed Speed Alert is exceeding the speed limit. You return to the map. 4. The main menu appears. 2. You return to the map. - 33 - The Speed Alert screen appears. 3. To set...
... speed alert options: auto speed alert and fixed speed alert. Auto speed alert uses the type of road to warn you want to close the warning. • Tap OK. A warning appears. • Tap OK to use the speed alert feature to determine the probably speed limit. A check mark indicates that Fixed Speed Alert is exceeding the speed limit. You return to the map. 4. The main menu appears. 2. You return to the map. - 33 - The Speed Alert screen appears. 3. To set...
X3-11 software manual
Page 38
... represent the actual screen on production unit sold to change or update this manual is a trademark of NAVTEQ ™ Navigation software copyright © 2001-2006 Netropa, Inc. No part of this manual may be copied, republished, reproduced, transmitted or distributed in any prior notice. For Free instruction books, information on the web at any time, without any way without notice. Mapping database copyright © 2006...
... represent the actual screen on production unit sold to change or update this manual is a trademark of NAVTEQ ™ Navigation software copyright © 2001-2006 Netropa, Inc. No part of this manual may be copied, republished, reproduced, transmitted or distributed in any prior notice. For Free instruction books, information on the web at any time, without any way without notice. Mapping database copyright © 2006...
X3-11 QSG_Eng
Page 1
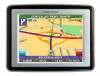
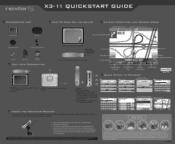
.... LCD Screen 1. Speaker 2 4 1. USB Port 2. Used to enter or exit the standby mode. 2. Current Road JAMBOREE RD GPS ETA 7:27PM REM 09:46 0ST 41 mi -77T 47 mph Mute Map Scale Indicator Estimated Time of the GPS O - 2 1. POWER button - RESET button (if unit freezes press button) 2. SD Memory Card slot 3. DC 5V Input Jack - " USING THE MOUNTING BRACKET e to Destination Current Speed QUICK STEPS TO NAVIGATE NAVTEQ MAPS Press Menu Select Destination Menu Destination Settim7Islli...
.... LCD Screen 1. Speaker 2 4 1. USB Port 2. Used to enter or exit the standby mode. 2. Current Road JAMBOREE RD GPS ETA 7:27PM REM 09:46 0ST 41 mi -77T 47 mph Mute Map Scale Indicator Estimated Time of the GPS O - 2 1. POWER button - RESET button (if unit freezes press button) 2. SD Memory Card slot 3. DC 5V Input Jack - " USING THE MOUNTING BRACKET e to Destination Current Speed QUICK STEPS TO NAVIGATE NAVTEQ MAPS Press Menu Select Destination Menu Destination Settim7Islli...


