Hardware Manual
Page 5
This ReadyNAS Ultra, Ultra Plus, NVX, and Pro Series Hardware Manual describes the physical features of a NETGEAR ReadyNAS® storage system. 1. Getting Started 1 Congratulations on your purchase of these storage systems. This chapter contains the following sections: • Additional Documentation • Choosing a Setup Location • System Requirements • Diskless Units 5
This ReadyNAS Ultra, Ultra Plus, NVX, and Pro Series Hardware Manual describes the physical features of a NETGEAR ReadyNAS® storage system. 1. Getting Started 1 Congratulations on your purchase of these storage systems. This chapter contains the following sections: • Additional Documentation • Choosing a Setup Location • System Requirements • Diskless Units 5
Hardware Manual
Page 6
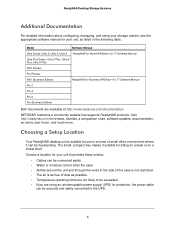
Choosing a Setup Location Your ReadyNAS desktop unit is as free of the case is not restricted. • The air is suitable for use in the following table. NETGEAR maintains a community website that meets these criteria: • Cables can be connected easily. • Water or ... be exceeded. • If you are available at http://www.readynas.com/documentation. The small, compact size makes it can be freestanding. Model Software Manual Ultra Series: Ultra 2, Ultra 4, Ultra 6 ReadyNAS for Home RAIDiator 4.2.17 Software Manual Ultra Plus Series: Ultra 2 Plus, Ultra 4 Plus, Ultra ...
Choosing a Setup Location Your ReadyNAS desktop unit is as free of the case is not restricted. • The air is suitable for use in the following table. NETGEAR maintains a community website that meets these criteria: • Cables can be connected easily. • Water or ... be exceeded. • If you are available at http://www.readynas.com/documentation. The small, compact size makes it can be freestanding. Model Software Manual Ultra Series: Ultra 2, Ultra 4, Ultra 6 ReadyNAS for Home RAIDiator 4.2.17 Software Manual Ultra Plus Series: Ultra 2 Plus, Ultra 4 Plus, Ultra ...
Hardware Manual
Page 8
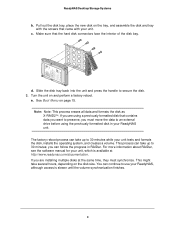
... Boot Menu on and perform a factory reboot. For more information about RAIDar, see the software manual for your unit, which is slower until the volume synchronization finishes. 8 This might take up to 30 minutes while your ReadyNAS, although access is available at the same time, they must move the data to 30..., depending on the tray, and assemble the disk and tray with the screws that the hard disk connectors face the interior of the disk bay. ReadyNAS Desktop Storage Systems b. Pull out the disk tray, place the new disk on the disk size. Make sure that came with your...
... Boot Menu on and perform a factory reboot. For more information about RAIDar, see the software manual for your unit, which is slower until the volume synchronization finishes. 8 This might take up to 30 minutes while your ReadyNAS, although access is available at the same time, they must move the data to 30..., depending on the tray, and assemble the disk and tray with the screws that the hard disk connectors face the interior of the disk bay. ReadyNAS Desktop Storage Systems b. Pull out the disk tray, place the new disk on the disk size. Make sure that came with your...
Hardware Manual
Page 10
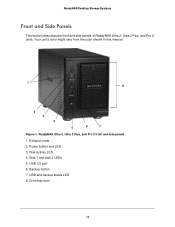
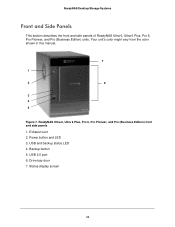
USB 3.0 port 6. Your unit's color might vary from the color shown in this manual. 1 8 2 3 4 5 6 7 Figure 1. Disk 1 and disk 2 LEDs 5. Backup button 7. Drive bay door 10 Power button and LED 3. ReadyNAS Ultra 2, Ultra 2 Plus, and Pro 2 front and side panels 1. Exhaust vents 2. Disk activity LED 4. USB and backup status LED 8. ReadyNAS Desktop Storage Systems Front and Side Panels This section describes the front and side panels of ReadyNAS Ultra 2, Ultra 2 Plus, and Pro 2 units.
USB 3.0 port 6. Your unit's color might vary from the color shown in this manual. 1 8 2 3 4 5 6 7 Figure 1. Disk 1 and disk 2 LEDs 5. Backup button 7. Drive bay door 10 Power button and LED 3. ReadyNAS Ultra 2, Ultra 2 Plus, and Pro 2 front and side panels 1. Exhaust vents 2. Disk activity LED 4. USB and backup status LED 8. ReadyNAS Desktop Storage Systems Front and Side Panels This section describes the front and side panels of ReadyNAS Ultra 2, Ultra 2 Plus, and Pro 2 units.
Hardware Manual
Page 13
...port activity. The port is on • Off. For information about the status of the unit. ReadyNAS Desktop Storage Systems Status Information You can shut down your storage system, see the software manual for your unit, which is resynchronizing. • Off. Booting • Blue. Powered off Disk LEDs... (1, 2) Each disk bay has an LED associated with it on the ReadyNAS. A disk is empty. The port is hung, ...
...port activity. The port is on • Off. For information about the status of the unit. ReadyNAS Desktop Storage Systems Status Information You can shut down your storage system, see the software manual for your unit, which is resynchronizing. • Off. Booting • Blue. Powered off Disk LEDs... (1, 2) Each disk bay has an LED associated with it on the ReadyNAS. A disk is empty. The port is hung, ...
Hardware Manual
Page 17
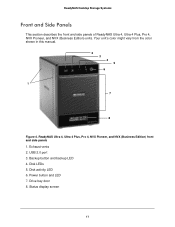
Exhaust vents 2. Disk activity LED 6. Status display screen 17 Your unit's color might vary from the color shown in this manual. 2 3 4 5 6 1 7 8 Figure 4. Backup button and backup LED 4. ReadyNAS Ultra 4, Ultra 4 Plus, Pro 4, NVX Pioneer, and NVX (Business Edition) front and side panels 1. Power button and LED 7. ReadyNAS Desktop Storage Systems Front and Side Panels This section describes the front and side panels of ReadyNAS Ultra 4, Ultra 4 Plus, Pro 4, NVX Pioneer, and NVX (Business Edition) units. USB 2.0 port 3. Drive bay door 8. Disk LEDs 5.
Exhaust vents 2. Disk activity LED 6. Status display screen 17 Your unit's color might vary from the color shown in this manual. 2 3 4 5 6 1 7 8 Figure 4. Backup button and backup LED 4. ReadyNAS Ultra 4, Ultra 4 Plus, Pro 4, NVX Pioneer, and NVX (Business Edition) front and side panels 1. Power button and LED 7. ReadyNAS Desktop Storage Systems Front and Side Panels This section describes the front and side panels of ReadyNAS Ultra 4, Ultra 4 Plus, Pro 4, NVX Pioneer, and NVX (Business Edition) units. USB 2.0 port 3. Drive bay door 8. Disk LEDs 5.
Hardware Manual
Page 21
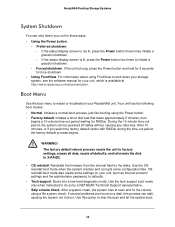
...period, the factory default process begins. Reinstalls the firmware from the internal flash to do so by a NETGEAR Technical Support representative. • Skip volume check. Use the tech support boot mode only when instructed ...loss. Boots into a low-level diagnostic mode. WARNING! If the unit is available at http://www.readynas.com/documentation. The factory default reboot process resets the unit to factory settings, erases all data, ...the scan and let the system boot. 21 ReadyNAS Desktop Storage Systems System Shutdown You can shut down your storage system, see the software...
...period, the factory default process begins. Reinstalls the firmware from the internal flash to do so by a NETGEAR Technical Support representative. • Skip volume check. Use the tech support boot mode only when instructed ...loss. Boots into a low-level diagnostic mode. WARNING! If the unit is available at http://www.readynas.com/documentation. The factory default reboot process resets the unit to factory settings, erases all data, ...the scan and let the system boot. 21 ReadyNAS Desktop Storage Systems System Shutdown You can shut down your storage system, see the software...
Hardware Manual
Page 24
Exhaust vent 2. Power button and LED 3. Backup button 5. USB 2.0 port 6. Your unit's color might vary from the color shown in this manual. 7 1 2 6 3 4 5 Figure 7. USB and backup status LED 4. Status display screen 24 ReadyNAS Ultra 6, Ultra 6 Plus, Pro 6, Pro Pioneer, and Pro (Business Edition) front and side panels 1. ReadyNAS Desktop Storage Systems Front and Side Panels This section describes the front and side panels of ReadyNAS Ultra 6, Ultra 6 Plus, Pro 6, Pro Pioneer, and Pro (Business Edition) units. Drive bay door 7.
Exhaust vent 2. Power button and LED 3. Backup button 5. USB 2.0 port 6. Your unit's color might vary from the color shown in this manual. 7 1 2 6 3 4 5 Figure 7. USB and backup status LED 4. Status display screen 24 ReadyNAS Ultra 6, Ultra 6 Plus, Pro 6, Pro Pioneer, and Pro (Business Edition) front and side panels 1. ReadyNAS Desktop Storage Systems Front and Side Panels This section describes the front and side panels of ReadyNAS Ultra 6, Ultra 6 Plus, Pro 6, Pro Pioneer, and Pro (Business Edition) units. Drive bay door 7.
Hardware Manual
Page 28
ReadyNAS Desktop Storage Systems System Shutdown You can shut down your storage system, see the software manual for RAIDar. If the unit is hung, press the Power button and hold for 5 seconds to X-RAID2. • OS reinstall. Initiates a short disk test...booting using a file system check. Reinstalls the firmware from the internal flash to do so by a NETGEAR Technical Support representative. • Skip volume check. For information about using FrontView to shut down your ReadyNAS unit. Use the tech support boot mode only when instructed to the disks. If several problems are...
ReadyNAS Desktop Storage Systems System Shutdown You can shut down your storage system, see the software manual for RAIDar. If the unit is hung, press the Power button and hold for 5 seconds to X-RAID2. • OS reinstall. Initiates a short disk test...booting using a file system check. Reinstalls the firmware from the internal flash to do so by a NETGEAR Technical Support representative. • Skip volume check. For information about using FrontView to shut down your ReadyNAS unit. Use the tech support boot mode only when instructed to the disks. If several problems are...
Hardware Manual
Page 30
... following topics: • Previously Formatted Disks • Adding a Disk • Failed Disk Notification • Replacing a Disk 30 For information about configuring disks, see the NETGEAR Hardware Compatibility List at http://www.readynas.com/documentation. Manuals are available at http://www.readynas.com/hard_disk_hcl. If you use unsupported disks, NETGEAR Technical Support will not provide assistance.
... following topics: • Previously Formatted Disks • Adding a Disk • Failed Disk Notification • Replacing a Disk 30 For information about configuring disks, see the NETGEAR Hardware Compatibility List at http://www.readynas.com/documentation. Manuals are available at http://www.readynas.com/hard_disk_hcl. If you use unsupported disks, NETGEAR Technical Support will not provide assistance.
Hardware Manual
Page 32
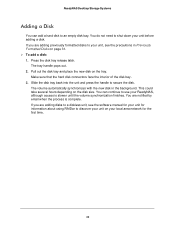
...empty disk bay. This could take several hours depending on the tray. If you are adding previously formatted disks to your unit, see the software manual for your unit for information about using RAIDar to a diskless unit, see the precautions in the background. You can add a hard disk to... slower until the volume synchronization finishes. Pull out the disk tray and place the new disk on the disk size. ReadyNAS Desktop Storage Systems Adding a Disk You can continue to shut down your ReadyNAS, although access is complete. You do not need to use your unit before adding a disk.
...empty disk bay. This could take several hours depending on the tray. If you are adding previously formatted disks to your unit, see the software manual for your unit for information about using RAIDar to a diskless unit, see the precautions in the background. You can add a hard disk to... slower until the volume synchronization finishes. Pull out the disk tray and place the new disk on the disk size. ReadyNAS Desktop Storage Systems Adding a Disk You can continue to shut down your ReadyNAS, although access is complete. You do not need to use your unit before adding a disk.
Hardware Manual
Page 33
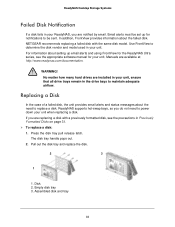
... same disk model. WARNING! The disk tray handle pops out. 2. Assembled disk and tray 33 NETGEAR recommends replacing a failed disk with a previously formatted disk, see the appropriate software manual for notifications to replace a disk. Empty disk tray 3. ReadyNAS Desktop Storage Systems Failed Disk Notification If a disk fails in your unit, ensure that all...
... same disk model. WARNING! The disk tray handle pops out. 2. Assembled disk and tray 33 NETGEAR recommends replacing a failed disk with a previously formatted disk, see the appropriate software manual for notifications to replace a disk. Empty disk tray 3. ReadyNAS Desktop Storage Systems Failed Disk Notification If a disk fails in your unit, ensure that all...
Hardware Manual
Page 43
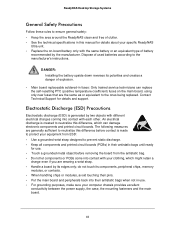
...Keep all components and printed circuit boards (PCBs) in their antistatic bags until ready for use . • For grounding purposes, make sure your specific ReadyNAS Ultra unit. • Replace the on the main board, using only new fuses that are wearing a wrist strap. • Handle a board ... Safety Precautions Follow these rules to ensure general safety: • Keep the area around the ReadyNAS clean and free of clutter. • See the technical specifications in this manual for details about your computer chassis provides excellent conductivity between the power supply, the case, the...
...Keep all components and printed circuit boards (PCBs) in their antistatic bags until ready for use . • For grounding purposes, make sure your specific ReadyNAS Ultra unit. • Replace the on the main board, using only new fuses that are wearing a wrist strap. • Handle a board ... Safety Precautions Follow these rules to ensure general safety: • Keep the area around the ReadyNAS clean and free of clutter. • See the technical specifications in this manual for details about your computer chassis provides excellent conductivity between the power supply, the case, the...


