ReadyNAS OS 6 Installation Guide
Page 1
Installation ReadyNAS OS 6 Desktop Storage
Installation ReadyNAS OS 6 Desktop Storage
ReadyNAS OS 6 Installation Guide
Page 3
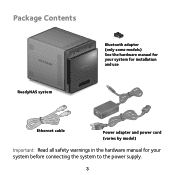
Package Contents ReadyNAS system Bluetooth adapter (only some models) See the hardware manual for your system for installation and use Ethernet cable Power adapter and power cord (varies by model) Important: Read all safety warnings in the hardware manual for your system before connecting the system to the power supply. 3
Package Contents ReadyNAS system Bluetooth adapter (only some models) See the hardware manual for your system for installation and use Ethernet cable Power adapter and power cord (varies by model) Important: Read all safety warnings in the hardware manual for your system before connecting the system to the power supply. 3
ReadyNAS OS 6 Installation Guide
Page 4
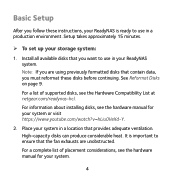
...Basic Setup After you follow these disks before continuing. Install all available disks that contain data, you must reformat these instructions, your ReadyNAS is important to use in a production environment. For a list of placement considerations, see the hardware manual for your storage system... your system or visit https://www.youtube.com/watch?v=hLiu0VeXd-Y. 2. For information about installing disks, see the Hardware Compatibility List at netgear.com/readynas-hcl. Place your system. 4 See Reformat Disks on page 9. For a complete list of supported disks, see the hardware manual...
...Basic Setup After you follow these disks before continuing. Install all available disks that contain data, you must reformat these instructions, your ReadyNAS is important to use in a production environment. For a list of placement considerations, see the hardware manual for your storage system... your system or visit https://www.youtube.com/watch?v=hLiu0VeXd-Y. 2. For information about installing disks, see the Hardware Compatibility List at netgear.com/readynas-hcl. Place your system. 4 See Reformat Disks on page 9. For a complete list of supported disks, see the hardware manual...
ReadyNAS OS 6 Installation Guide
Page 5
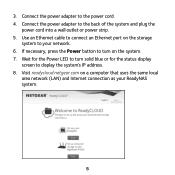
Connect the power adapter to display the system's IP address. 8. Wait for the Power LED to turn on the storage system to the power cord. 4. Visit readycloud.netgear.com on a computer that uses the same local area network (LAN) and Internet connection as your network. 6. 3. Use an Ethernet cable to connect an Ethernet port on the system. 7. If necessary, press the Power button to turn solid blue or for the status display screen to the back of the system and plug the power cord into a wall outlet or power strip. 5. Connect the power adapter to your ReadyNAS system. 5
Connect the power adapter to display the system's IP address. 8. Wait for the Power LED to turn on the storage system to the power cord. 4. Visit readycloud.netgear.com on a computer that uses the same local area network (LAN) and Internet connection as your network. 6. 3. Use an Ethernet cable to connect an Ethernet port on the system. 7. If necessary, press the Power button to turn solid blue or for the status display screen to the back of the system and plug the power cord into a wall outlet or power strip. 5. Connect the power adapter to your ReadyNAS system. 5
ReadyNAS OS 6 Installation Guide
Page 6
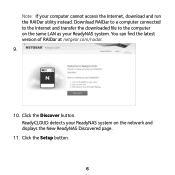
Note: If your ReadyNAS system on the same LAN as your ReadyNAS system. Click the Start button for setting up a new ReadyNAS. 10. You can find the latest version of RAIDar at netgear.com/raidar. 9. ReadyCLOUD detects your computer cannot access the Internet, download and run the RAIDar utility instead. Download RAIDar to a computer connected to the Internet and transfer the downloaded file to the computer on the network and displays the New ReadyNAS Discovered page. 11. Click the Setup button. 6 Click the Discover button.
Note: If your ReadyNAS system on the same LAN as your ReadyNAS system. Click the Start button for setting up a new ReadyNAS. 10. You can find the latest version of RAIDar at netgear.com/raidar. 9. ReadyCLOUD detects your computer cannot access the Internet, download and run the RAIDar utility instead. Download RAIDar to a computer connected to the Internet and transfer the downloaded file to the computer on the network and displays the New ReadyNAS Discovered page. 11. Click the Setup button. 6 Click the Discover button.
ReadyNAS OS 6 Installation Guide
Page 7
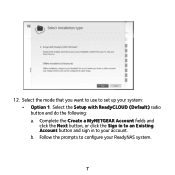
Complete the Create a MyNETGEAR Account fields and click the Next button, or click the Sign in to an Existing Account button and sign in to your system: • Option 1. Select the Setup with ReadyCLOUD (Default) radio button and do the following: a. b. Select the mode that you want to use to configure your ReadyNAS system. 7 Follow the prompts to set up your account. 12.
Complete the Create a MyNETGEAR Account fields and click the Next button, or click the Sign in to an Existing Account button and sign in to your system: • Option 1. Select the Setup with ReadyCLOUD (Default) radio button and do the following: a. b. Select the mode that you want to use to configure your ReadyNAS system. 7 Follow the prompts to set up your account. 12.
ReadyNAS OS 6 Installation Guide
Page 8
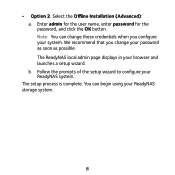
• Option 2. Note: You can begin using your ReadyNAS system. You can change these credentials when you change your password as soon as possible. Follow the prompts of the setup wizard to configure your ReadyNAS storage system. 8 Enter admin for the user name, enter password for the password, and click the OK button. The setup process is complete. We recommend that you configure your browser and launches a setup wizard. The ReadyNAS local admin page displays in your system. Select the Offline Installation (Advanced): a. b.
• Option 2. Note: You can begin using your ReadyNAS system. You can change these credentials when you change your password as soon as possible. Follow the prompts of the setup wizard to configure your ReadyNAS storage system. 8 Enter admin for the user name, enter password for the password, and click the OK button. The setup process is complete. We recommend that you configure your browser and launches a setup wizard. The ReadyNAS local admin page displays in your system. Select the Offline Installation (Advanced): a. b.
ReadyNAS OS 6 Installation Guide
Page 9
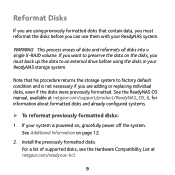
Reformat Disks If you are adding or replacing individual disks, even if the disks were previously formatted. See the ReadyNAS OS manual, available at netgear.com/readynas-hcl. 9 WARNING: This process erases all data and reformats all disks into a single X-RAID volume. ... disks, see the Hardware Compatibility List at netgear.com/support/product/ReadyNAS_OS_6, for information about formatted disks and already configured systems. ¾¾ To reformat previously formatted disks: 1. Install the previously formatted disks. If your ReadyNAS storage system. If you want to preserve ...
Reformat Disks If you are adding or replacing individual disks, even if the disks were previously formatted. See the ReadyNAS OS manual, available at netgear.com/readynas-hcl. 9 WARNING: This process erases all data and reformats all disks into a single X-RAID volume. ... disks, see the Hardware Compatibility List at netgear.com/support/product/ReadyNAS_OS_6, for information about formatted disks and already configured systems. ¾¾ To reformat previously formatted disks: 1. Install the previously formatted disks. If your ReadyNAS storage system. If you want to preserve ...
ReadyNAS OS 6 Installation Guide
Page 11
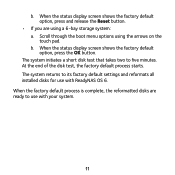
... a 6-bay storage system: a. b. The system initiates a short disk test that takes two to its factory default settings and reformats all installed disks for use with ReadyNAS OS 6. The system returns to five minutes. When the factory default process is complete, the reformatted disks are using the arrows on the touch pad...
... a 6-bay storage system: a. b. The system initiates a short disk test that takes two to its factory default settings and reformats all installed disks for use with ReadyNAS OS 6. The system returns to five minutes. When the factory default process is complete, the reformatted disks are using the arrows on the touch pad...
Hardware Manual
Page 2
... document before connecting the power supply. Trademarks © NETGEAR, Inc., NETGEAR, and the NETGEAR Logo are used for purchasing this NETGEAR product. Conformity For the current EU Declaration of NETGEAR, Inc. Any non-NETGEAR trademarks are trademarks of Conformity, visit http://kb.netgear.com/app/answers/detail/a_id/11621. ReadyNAS OS 6 Desktop Storage Systems Support Thank you use...
... document before connecting the power supply. Trademarks © NETGEAR, Inc., NETGEAR, and the NETGEAR Logo are used for purchasing this NETGEAR product. Conformity For the current EU Declaration of NETGEAR, Inc. Any non-NETGEAR trademarks are trademarks of Conformity, visit http://kb.netgear.com/app/answers/detail/a_id/11621. ReadyNAS OS 6 Desktop Storage Systems Support Thank you use...
Hardware Manual
Page 3
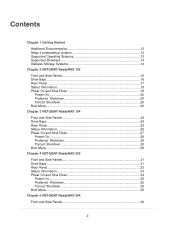
...Rear Panel...17 Status Information 18 Power On and Shut Down 19 Power On...20 Preferred Shutdown 20 Forced Shutdown 20 Boot Menu...20 Chapter 3 NETGEAR ReadyNAS 104 Front and Side Panels 24 Drive Bays...24 Rear Panel...25 Status Information 26 Power On and Shut Down 27 Power On...28 Preferred... Shutdown 28 Forced Shutdown 28 Boot Menu...28 Chapter 4 NETGEAR ReadyNAS 202 Front and Side Panels 31 Drive Bays...31 Rear Panel...32 Status Information 33 Power On and Shut Down 34 Power On...35 Preferred...
...Rear Panel...17 Status Information 18 Power On and Shut Down 19 Power On...20 Preferred Shutdown 20 Forced Shutdown 20 Boot Menu...20 Chapter 3 NETGEAR ReadyNAS 104 Front and Side Panels 24 Drive Bays...24 Rear Panel...25 Status Information 26 Power On and Shut Down 27 Power On...28 Preferred... Shutdown 28 Forced Shutdown 28 Boot Menu...28 Chapter 4 NETGEAR ReadyNAS 202 Front and Side Panels 31 Drive Bays...31 Rear Panel...32 Status Information 33 Power On and Shut Down 34 Power On...35 Preferred...
Hardware Manual
Page 4
...Rear Panel...40 Status Information 41 Power On and Shut Down 42 Power On...43 Preferred Shutdown 43 Forced Shutdown 43 Boot Menu...43 Chapter 6 NETGEAR ReadyNAS 212 Front and Side Panels 46 Drive Bays...46 Rear Panel...47 Status Information 48 Power On and Shut Down 49 Power On...50 Preferred... Shutdown 50 Forced Shutdown 50 Boot Menu...50 Chapter 7 NETGEAR ReadyNAS 214 Front and Side Panels 54 Drive Bays...54 Rear Panel...55 Status Information 56 Power On and Shut Down 57 Power On...58 Preferred...
...Rear Panel...40 Status Information 41 Power On and Shut Down 42 Power On...43 Preferred Shutdown 43 Forced Shutdown 43 Boot Menu...43 Chapter 6 NETGEAR ReadyNAS 212 Front and Side Panels 46 Drive Bays...46 Rear Panel...47 Status Information 48 Power On and Shut Down 49 Power On...50 Preferred... Shutdown 50 Forced Shutdown 50 Boot Menu...50 Chapter 7 NETGEAR ReadyNAS 214 Front and Side Panels 54 Drive Bays...54 Rear Panel...55 Status Information 56 Power On and Shut Down 57 Power On...58 Preferred...
Hardware Manual
Page 5
... Panel...78 Status Information 79 Power On and Shut Down 80 Power On...80 Preferred Shutdown 81 Forced Shutdown 81 Boot Menu...81 Chapter 11 NETGEAR ReadyNAS 422 Front and Side Panels 84 Drive Bays...85 Rear Panel...86 Status Information 87 Power On and Shut Down 87 Power On...88 Preferred... Panel...94 Status Information 95 Power On and Shut Down 95 Power On...96 Preferred Shutdown 96 Forced Shutdown 96 Boot Menu...97 Chapter 13 NETGEAR ReadyNAS 426 Front and Side Panels 100 Drive Bays...101 Rear Panel...102 Status Information 103 Power On and Shut Down 103 Power On...104 Preferred...
... Panel...78 Status Information 79 Power On and Shut Down 80 Power On...80 Preferred Shutdown 81 Forced Shutdown 81 Boot Menu...81 Chapter 11 NETGEAR ReadyNAS 422 Front and Side Panels 84 Drive Bays...85 Rear Panel...86 Status Information 87 Power On and Shut Down 87 Power On...88 Preferred... Panel...94 Status Information 95 Power On and Shut Down 95 Power On...96 Preferred Shutdown 96 Forced Shutdown 96 Boot Menu...97 Chapter 13 NETGEAR ReadyNAS 426 Front and Side Panels 100 Drive Bays...101 Rear Panel...102 Status Information 103 Power On and Shut Down 103 Power On...104 Preferred...
Hardware Manual
Page 6
......110 Status Information 111 Power On and Shut Down 111 Power On...112 Preferred Shutdown 112 Forced Shutdown 112 Boot Menu...113 Chapter 15 NETGEAR ReadyNAS 516 Front and Side Panels 116 Drive Bays...116 Rear Panel...117 Status Information 118 Power On and Shut Down 119 Power On...119 ...Preferred Shutdown 120 Forced Shutdown 120 Boot Menu...120 Chapter 16 NETGEAR ReadyNAS 524X Front and Side Panels 123 Drive Bays...124 Rear Panel...125 Status Information 126 Power On and Shut Down 127 Power On...127 ...
......110 Status Information 111 Power On and Shut Down 111 Power On...112 Preferred Shutdown 112 Forced Shutdown 112 Boot Menu...113 Chapter 15 NETGEAR ReadyNAS 516 Front and Side Panels 116 Drive Bays...116 Rear Panel...117 Status Information 118 Power On and Shut Down 119 Power On...119 ...Preferred Shutdown 120 Forced Shutdown 120 Boot Menu...120 Chapter 16 NETGEAR ReadyNAS 524X Front and Side Panels 123 Drive Bays...124 Rear Panel...125 Status Information 126 Power On and Shut Down 127 Power On...127 ...
Hardware Manual
Page 7
... 143 Status Information 144 Power On and Shut Down 145 Power On...145 Preferred Shutdown 146 Forced Shutdown 146 Boot Menu...146 Chapter 19 NETGEAR ReadyNAS 716X Front and Side Panels 149 Drive Bays...149 Rear Panel...150 Status Information 151 Power On and Shut Down 153 Power On...153 Preferred ...Shutdown 154 Forced Shutdown 154 Boot Menu...154 Chapter 20 NETGEAR EDA 500 Front and Side Panels 157 Drive Bays...157 Rear Panel...158 Status Information 159 Power On and Shut Down 160 Power On...160...
... 143 Status Information 144 Power On and Shut Down 145 Power On...145 Preferred Shutdown 146 Forced Shutdown 146 Boot Menu...146 Chapter 19 NETGEAR ReadyNAS 716X Front and Side Panels 149 Drive Bays...149 Rear Panel...150 Status Information 151 Power On and Shut Down 153 Power On...153 Preferred ...Shutdown 154 Forced Shutdown 154 Boot Menu...154 Chapter 20 NETGEAR EDA 500 Front and Side Panels 157 Drive Bays...157 Rear Panel...158 Status Information 159 Power On and Shut Down 160 Power On...160...
Hardware Manual
Page 12
This manual describes the physical features of a NETGEAR ReadyNAS® storage system. Getting Started 1 Congratulations on your purchase of the ReadyNAS OS 6 desktop storage systems. This chapter contains the following sections: • Additional Documentation on page 13 • Setup Location on page 13 • Supported Operating Systems on page 13 • Supported Browsers on page 14 • Diskless Storage Systems on page 14 12
This manual describes the physical features of a NETGEAR ReadyNAS® storage system. Getting Started 1 Congratulations on your purchase of the ReadyNAS OS 6 desktop storage systems. This chapter contains the following sections: • Additional Documentation on page 13 • Setup Location on page 13 • Supported Operating Systems on page 13 • Supported Browsers on page 14 • Diskless Storage Systems on page 14 12
Hardware Manual
Page 13
... configuring, managing, and using an uninterruptable power supply (UPS) for protection, the power cable can be freestanding. Visit www.netgear.com/readynas for use in the side of the case is not restricted. • The air is supported on a closet shelf. Supported ... • Temperature operating limits are not likely to the UPS. Choose a location for your ReadyNAS storage system, see the ReadyNAS OS 6 Software Manual, which is available at netgear.com/support/product/ReadyNAS_OS_6. NETGEAR maintains a community website that meets these criteria: • Cables can be connected easily. &#...
... configuring, managing, and using an uninterruptable power supply (UPS) for protection, the power cable can be freestanding. Visit www.netgear.com/readynas for use in the side of the case is not restricted. • The air is supported on a closet shelf. Supported ... • Temperature operating limits are not likely to the UPS. Choose a location for your ReadyNAS storage system, see the ReadyNAS OS 6 Software Manual, which is available at netgear.com/support/product/ReadyNAS_OS_6. NETGEAR maintains a community website that meets these criteria: • Cables can be connected easily. &#...

Hardware Manual
Page 14
...• Mozilla Firefox 14 and later If you experience difficulty accessing the local admin page or if you must add at netgear.com/readynas-hcl. For information about the ReadyNAS local admin page, see Add a Disk on page 165. If you use the system. For a list of supported disks...hard disk drive, a 2.5-inch hard disk drive, or a 2.5-inch solid state drive to your storage system, see the NETGEAR Hardware Compatibility List at least one disk your ReadyNAS storage system. If you use disks that are adding a previously formatted disk to an empty drive bay. Diskless Storage Systems If...
...• Mozilla Firefox 14 and later If you experience difficulty accessing the local admin page or if you must add at netgear.com/readynas-hcl. For information about the ReadyNAS local admin page, see Add a Disk on page 165. If you use the system. For a list of supported disks...hard disk drive, a 2.5-inch hard disk drive, or a 2.5-inch solid state drive to your storage system, see the NETGEAR Hardware Compatibility List at least one disk your ReadyNAS storage system. If you use disks that are adding a previously formatted disk to an empty drive bay. Diskless Storage Systems If...
Hardware Manual
Page 15
NETGEAR ReadyNAS 102 2 This chapter provides an overview of the physical features of the ReadyNAS 102 and includes the following sections: • Front and Side Panels on page 16 • Drive Bays on page 16 • Rear Panel on page 17 • Status Information on page 18 • Power On and Shut Down on page 19 • Boot Menu on page 20 15
NETGEAR ReadyNAS 102 2 This chapter provides an overview of the physical features of the ReadyNAS 102 and includes the following sections: • Front and Side Panels on page 16 • Drive Bays on page 16 • Rear Panel on page 17 • Status Information on page 18 • Power On and Shut Down on page 19 • Boot Menu on page 20 15
Hardware Manual
Page 16
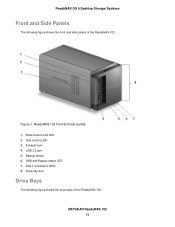
Backup button 6. Figure 1. USB and Backup status LED 7. ReadyNAS OS 6 Desktop Storage Systems Front and Side Panels The following figure shows the drive bays of the ReadyNAS 102. Drive bay door Drive Bays The following figure shows the front and side panels of the ReadyNAS 102. Exhaust vent 4. Disk 1 and Disk 2 LEDs 8. Power button and LED 2. Disk activity LED 3. NETGEAR ReadyNAS 102 16 ReadyNAS 102 front and side panels 1. USB 2.0 port 5.
Backup button 6. Figure 1. USB and Backup status LED 7. ReadyNAS OS 6 Desktop Storage Systems Front and Side Panels The following figure shows the drive bays of the ReadyNAS 102. Drive bay door Drive Bays The following figure shows the front and side panels of the ReadyNAS 102. Exhaust vent 4. Disk 1 and Disk 2 LEDs 8. Power button and LED 2. Disk activity LED 3. NETGEAR ReadyNAS 102 16 ReadyNAS 102 front and side panels 1. USB 2.0 port 5.


