Software Manual
Page 6
... Information 182 System Real-Time and Historical Monitoring 182 System Logs 185 Downloading Logs 187 SNMP Monitoring 188 System Maintenance 189 Update Firmware 189 Reset the Firmware to Factory Defaults 192 Recover the Administrator Password 192 Shut Down or Restart the System 195 Manage Power Usage 196 What Is Disk Spin-Down...
... Information 182 System Real-Time and Historical Monitoring 182 System Logs 185 Downloading Logs 187 SNMP Monitoring 188 System Maintenance 189 Update Firmware 189 Reset the Firmware to Factory Defaults 192 Recover the Administrator Password 192 Shut Down or Restart the System 195 Manage Power Usage 196 What Is Disk Spin-Down...
Software Manual
Page 11
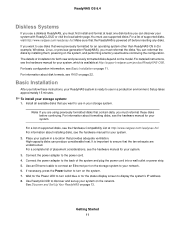
...://www.netgear.com/readynas-hcl. For a list of the system and plug the power cord into a wall outlet or power strip. 5. To install your system. 2. Install all available disks that provides adequate ventilation. Connect the power adapter to turn on the system, and performing a factory reset before continuing... formatted disks depend on page 13. For information about formatting disks, see the Hardware Compatibility List at http://www.netgear.com/readynas-hcl. The details of installation for your storage system: 1. See Discover and Set Up Your ReadyNAS on the model.
...://www.netgear.com/readynas-hcl. For a list of the system and plug the power cord into a wall outlet or power strip. 5. To install your system. 2. Install all available disks that provides adequate ventilation. Connect the power adapter to turn on the system, and performing a factory reset before continuing... formatted disks depend on page 13. For information about formatting disks, see the Hardware Compatibility List at http://www.netgear.com/readynas-hcl. The details of installation for your storage system: 1. See Discover and Set Up Your ReadyNAS on the model.
Software Manual
Page 22
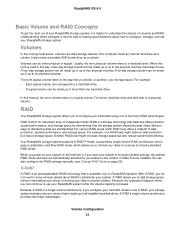
... storage space by determining how the storage system distributes data. Because the expansion happens online, you configure your hard disk drives to its factory default settings, the optimal RAID mode and level are automatically selected for redundant array of all installed hard disk drives. When you power ...on your system for the first time or if you reset your system to use your ReadyNAS storage system, it is short for you divide, or partition, your storage system includes only one ...
... storage space by determining how the storage system distributes data. Because the expansion happens online, you configure your hard disk drives to its factory default settings, the optimal RAID mode and level are automatically selected for redundant array of all installed hard disk drives. When you power ...on your system for the first time or if you reset your system to use your ReadyNAS storage system, it is short for you divide, or partition, your storage system includes only one ...
Software Manual
Page 192
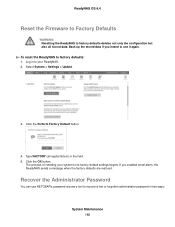
... to use NETGEAR's password recovery tool to its factory default settings begins. Type FACTORY (all stored data. Click the OK button. Recover the Administrator Password You can use it again. Back up the stored data if you enabled email alerts, the ReadyNAS sends a message when the factory defaults are restored. ReadyNAS OS 6.4 Reset the Firmware...
... to use NETGEAR's password recovery tool to its factory default settings begins. Type FACTORY (all stored data. Click the OK button. Recover the Administrator Password You can use it again. Back up the stored data if you enabled email alerts, the ReadyNAS sends a message when the factory defaults are restored. ReadyNAS OS 6.4 Reset the Firmware...
Software Manual
Page 193
... if you lost the password but it requires physical access to factory defaults. Note You can also perform an OS reinstall reboot. This process reinstalls the firmware on page 152. • Use the physical reset button. For more information, see Recover the Administrator Password Using.... This procedure is enabled, but did not enable administrator password recovery, see Set the Administrator Password on the storage system and resets the administrator user name and password to the ReadyNAS system. For more information about setting up password recovery, see Set the Administrator...
... if you lost the password but it requires physical access to factory defaults. Note You can also perform an OS reinstall reboot. This process reinstalls the firmware on page 152. • Use the physical reset button. For more information, see Recover the Administrator Password Using.... This procedure is enabled, but did not enable administrator password recovery, see Set the Administrator Password on the storage system and resets the administrator user name and password to the ReadyNAS system. For more information about setting up password recovery, see Set the Administrator...
Software Manual
Page 194
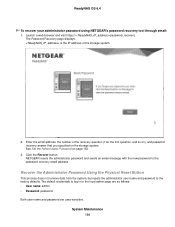
...to the password recovery email address. System Maintenance 194 See Set the Administrator Password on the storage system. NETGEAR resets the administrator password and sends an email message with the new password to the factory defaults. Click the Recover button. The default credentials to log in to the local admin page are ...the storage system. 2. The Password Recovery page displays. Launch a web browser and visit https://< ReadyNAS_IP_address>/password_recovery. ReadyNAS OS 6.4 To recover your administrator password using NETGEAR's password recovery tool through email: 1.
...to the password recovery email address. System Maintenance 194 See Set the Administrator Password on the storage system. NETGEAR resets the administrator password and sends an email message with the new password to the factory defaults. Click the Recover button. The default credentials to log in to the local admin page are ...the storage system. 2. The Password Recovery page displays. Launch a web browser and visit https://< ReadyNAS_IP_address>/password_recovery. ReadyNAS OS 6.4 To recover your administrator password using NETGEAR's password recovery tool through email: 1.
Rackmount Installation Guide
Page 7
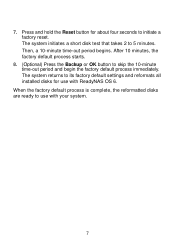
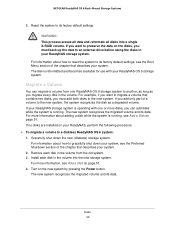
... ready to skip the 10-minute time-out period and begin the factory default process immediately. Then, a 10-minute time-out period begins. 7. The system returns to initiate a factory reset. Press and hold the Reset button for about four seconds to its factory default settings and reformats all installed disks for use with ReadyNAS OS...
... ready to skip the 10-minute time-out period and begin the factory default process immediately. Then, a 10-minute time-out period begins. 7. The system returns to initiate a factory reset. Press and hold the Reset button for about four seconds to its factory default settings and reformats all installed disks for use with ReadyNAS OS...
Rackmount Hardware Manual
Page 13
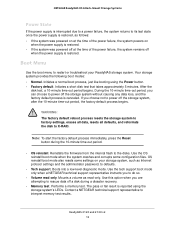
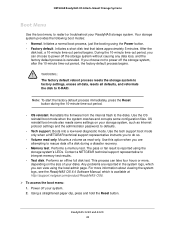
... do so. • Volume read -only. Note: To start the factory default process immediately, press the Reset button during a disaster recovery. • Memory test. OS reinstall boot mode also resets some configuration files. Boots into a low-level diagnostic mode. If you ...out period, the factory default process begins. Contact a NETGEAR technical support representative to X-RAID. Your storage system provides the following boot modes: • Normal. WARNING: The factory default reboot process resets the storage system to factory settings, erases all data, resets all defaults, and...
... do so. • Volume read -only. Note: To start the factory default process immediately, press the Reset button during a disaster recovery. • Memory test. OS reinstall boot mode also resets some configuration files. Boots into a low-level diagnostic mode. If you ...out period, the factory default process begins. Contact a NETGEAR technical support representative to X-RAID. Your storage system provides the following boot modes: • Normal. WARNING: The factory default reboot process resets the storage system to factory settings, erases all data, resets all defaults, and...
Rackmount Hardware Manual
Page 14
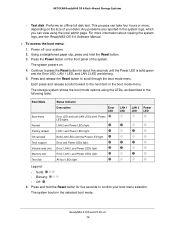
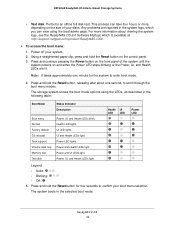
...test. Press and hold the Reset button. 3. ReadyNAS 2120 and 2120 v2 14 Power LED lights. For more , depending on . 4. NETGEAR ReadyNAS OS 6 Rack-Mount Storage Systems • Test disk. Press and release the Reset button to press the Reset button for five seconds to ...the next item in the following table: Boot Mode Boot menu Normal Factory default OS reinstall Tech support Volume ...
...test. Press and hold the Reset button. 3. ReadyNAS 2120 and 2120 v2 14 Power LED lights. For more , depending on . 4. NETGEAR ReadyNAS OS 6 Rack-Mount Storage Systems • Test disk. Press and release the Reset button to press the Reset button for five seconds to ...the next item in the following table: Boot Mode Boot menu Normal Factory default OS reinstall Tech support Volume ...
Rackmount Hardware Manual
Page 24
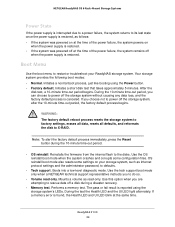
...password, to defaults. • Tech support. The pass or fail result is reported using the Power button. • Factory default. Note: To start the factory default process immediately, press the Reset button during a disaster recovery. • Memory test. Boots into a low-level diagnostic mode. Use this option when ...8226; If the system was powered on at the time of the power failure, the system remains off when the power supply is restored. NETGEAR ReadyNAS OS 6 Rack-Mount Storage Systems Power State If the power supply is interrupted due to a power failure, the system returns to ...
...password, to defaults. • Tech support. The pass or fail result is reported using the Power button. • Factory default. Note: To start the factory default process immediately, press the Reset button during a disaster recovery. • Memory test. Boots into a low-level diagnostic mode. Use this option when ...8226; If the system was powered on at the time of the power failure, the system remains off when the power supply is restored. NETGEAR ReadyNAS OS 6 Rack-Mount Storage Systems Power State If the power supply is interrupted due to a power failure, the system returns to ...

Rackmount Hardware Manual
Page 25
... the LEDs, as described in the system logs, which is available at http://support.netgear.com/product/ReadyNAS-OS6. To access the boot menu: 1. Using a straightened paper clip, press and hold the Reset button, releasing after about viewing the system logs, see the ReadyNAS OS 6.4 Software ...stops blinking or the Power, UI, and Health LEDs are reported in the following table: Boot Mode Status Indicator Description Boot menu Normal Factory default OS reinstall Tech support Volume read only Memory test Test disk Power, UI, and Health LEDs blink. Note: It takes approximately ...
... the LEDs, as described in the system logs, which is available at http://support.netgear.com/product/ReadyNAS-OS6. To access the boot menu: 1. Using a straightened paper clip, press and hold the Reset button, releasing after about viewing the system logs, see the ReadyNAS OS 6.4 Software ...stops blinking or the Power, UI, and Health LEDs are reported in the following table: Boot Mode Status Indicator Description Boot menu Normal Factory default OS reinstall Tech support Volume read only Memory test Test disk Power, UI, and Health LEDs blink. Note: It takes approximately ...
Rackmount Hardware Manual
Page 34
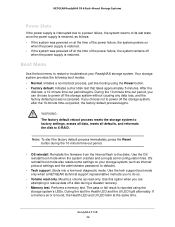
...is canceled. OS reinstall boot mode also resets some configuration files. Use this option when you choose not to power off when the power supply is restored. ReadyNAS 3138 34 Use the tech support boot mode only when a NETGEAR technical support representative instructs you can choose ... the 10-minute time-out period, you to do so. • Volume read -only. WARNING: The factory default reboot process resets the storage system to factory settings, erases all data, resets all defaults, and reformats the disk to the disks. Reinstalls the firmware from the internal flash to X-RAID....
...is canceled. OS reinstall boot mode also resets some configuration files. Use this option when you choose not to power off when the power supply is restored. ReadyNAS 3138 34 Use the tech support boot mode only when a NETGEAR technical support representative instructs you can choose ... the 10-minute time-out period, you to do so. • Volume read -only. WARNING: The factory default reboot process resets the storage system to factory settings, erases all data, resets all defaults, and reformats the disk to the disks. Reinstalls the firmware from the internal flash to X-RAID....
Rackmount Hardware Manual
Page 35
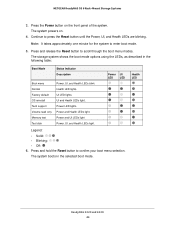
NETGEAR ReadyNAS OS 6 Rack-Mount Storage Systems • Test disk. Health LED lights. Power and Health LEDs light. Press and hold the Reset button for the system to scroll through the boot menu modes. ReadyNAS 3138 35 The storage system shows the boot mode options using the ... mode. 4. Power LED lights. UI and Health LEDs light. The system boots in the following table: Boot Mode Status Indicator Description Boot menu Normal Factory default OS reinstall Tech support Volume read only Memory test Test disk Power, UI, and Health LEDs blink. UI LED lights. Power and UI LEDs...
NETGEAR ReadyNAS OS 6 Rack-Mount Storage Systems • Test disk. Health LED lights. Power and Health LEDs light. Press and hold the Reset button for the system to scroll through the boot menu modes. ReadyNAS 3138 35 The storage system shows the boot mode options using the ... mode. 4. Power LED lights. UI and Health LEDs light. The system boots in the following table: Boot Mode Status Indicator Description Boot menu Normal Factory default OS reinstall Tech support Volume read only Memory test Test disk Power, UI, and Health LEDs blink. UI LED lights. Power and UI LEDs...
Rackmount Hardware Manual
Page 43
...; Normal. After the disk test, a 10-minute time-out period begins. Note: To start the factory default process immediately, press the Reset button during a disaster recovery. • Memory test. Use the tech support boot mode only when a NETGEAR technical support representative instructs you can choose to X-RAID. Performs an offline full disk test...
...; Normal. After the disk test, a 10-minute time-out period begins. Note: To start the factory default process immediately, press the Reset button during a disaster recovery. • Memory test. Use the tech support boot mode only when a NETGEAR technical support representative instructs you can choose to X-RAID. Performs an offline full disk test...
Rackmount Hardware Manual
Page 44
... to press the Reset button until the Power, UI, and Health LEDs are blinking. Health LED ReadyNAS 3220 and 4220 44 Power LED lights. The system boots in the following table: Boot Mode Status Indicator Description Boot menu Normal Factory default OS reinstall Tech support Volume read.... The storage system shows the boot mode options using the LEDs, as described in the selected boot mode. UI and Health LEDs light. NETGEAR ReadyNAS OS 6 Rack-Mount Storage Systems 3. Continue to confirm your boot menu selection. Note: It takes approximately one minute for the system ...
... to press the Reset button until the Power, UI, and Health LEDs are blinking. Health LED ReadyNAS 3220 and 4220 44 Power LED lights. The system boots in the following table: Boot Mode Status Indicator Description Boot menu Normal Factory default OS reinstall Tech support Volume read.... The storage system shows the boot mode options using the LEDs, as described in the selected boot mode. UI and Health LEDs light. NETGEAR ReadyNAS OS 6 Rack-Mount Storage Systems 3. Continue to confirm your boot menu selection. Note: It takes approximately one minute for the system ...
Rackmount Hardware Manual
Page 50
...into a single X-RAID volume. If no disks are installed on page 51. 4. Turn on the disks, you add only part of a volume to its factory default settings, see Add a Disk on your ReadyNAS, perform the following procedure. To migrate a volume to gracefully shut down the new (diskless) ...data and reformats all disks into the new storage system. For information about adding a disk while the system is running . NETGEAR ReadyNAS OS 6 Rack-Mount Storage Systems 3. Reset the system to the new system, the system recognizes the disk as you want to preserve the data on the new ...
...into a single X-RAID volume. If no disks are installed on page 51. 4. Turn on the disks, you add only part of a volume to its factory default settings, see Add a Disk on your ReadyNAS, perform the following procedure. To migrate a volume to gracefully shut down the new (diskless) ...data and reformats all disks into the new storage system. For information about adding a disk while the system is running . NETGEAR ReadyNAS OS 6 Rack-Mount Storage Systems 3. Reset the system to the new system, the system recognizes the disk as you want to preserve the data on the new ...


