PS110 Reference Manual
Page 11
... PS104 Print Server 1-5 Rear Panel of the Model PS105 Print Server 1-6 Rear Panel of Printer) .........3-12 Figure 3-15. ADDPORT Window (Epson Connection 3-11 Figure 3-12. NETGEAR Print Server Software Installation Window 3-19 Figure 3-22. Figure 1-5. FirstGear Introductory Window 3-2 Figure 3-2. Setup Icon 3-9 Figure 3-9. Setup Window 3-9 Figure 3-10. Add Printer Wizard Window (Manufacturer and Model of the Model PS110 Print Server 1-6 Figure 3-1. Select Program Folder Window 3-6 Figure 3-6. NETGEAR Print Server Software Installation Window 3-4 Figure...
... PS104 Print Server 1-5 Rear Panel of the Model PS105 Print Server 1-6 Rear Panel of Printer) .........3-12 Figure 3-15. ADDPORT Window (Epson Connection 3-11 Figure 3-12. NETGEAR Print Server Software Installation Window 3-19 Figure 3-22. Figure 1-5. FirstGear Introductory Window 3-2 Figure 3-2. Setup Icon 3-9 Figure 3-9. Setup Window 3-9 Figure 3-10. Add Printer Wizard Window (Manufacturer and Model of the Model PS110 Print Server 1-6 Figure 3-1. Select Program Folder Window 3-6 Figure 3-6. NETGEAR Print Server Software Installation Window 3-4 Figure...
PS110 Reference Manual
Page 12
... 4-25. Figure 3-23. Install From Disk Window 3-23 Figure 3-26. Firstgear for Print Server Setup Icon 4-9 Figure 4-9. NETGEAR Print Server Software Installation Window 4-20 Figure 4-23. NETGEAR Print Server Administration Program Window 3-26 Figure 3-29. Choose Destination Location Window 4-21 Figure 4-24. Epson Spool Manager Queue Setup Window 4-11 Figure 4-13. Choose Destination Location Window 4-5 Figure 4-5. Setup Complete Window 3-22 Figure 3-25. ADDPORT Window (Epson Connection 4-10 Figure 4-12...
... 4-25. Figure 3-23. Install From Disk Window 3-23 Figure 3-26. Firstgear for Print Server Setup Icon 4-9 Figure 4-9. NETGEAR Print Server Software Installation Window 4-20 Figure 4-23. NETGEAR Print Server Administration Program Window 3-26 Figure 3-29. Choose Destination Location Window 4-21 Figure 4-24. Epson Spool Manager Queue Setup Window 4-11 Figure 4-13. Choose Destination Location Window 4-5 Figure 4-5. Setup Complete Window 3-22 Figure 3-25. ADDPORT Window (Epson Connection 4-10 Figure 4-12...
PS110 Reference Manual
Page 13
Figure 7-4. Figure 7-6. NETGEAR Print Server Administration Program 7-2 FirstGear Setup Utility Quick Setup Screen 7-3 System Menu Tab Window 7-5 NetWare PServer Tab Window 7-7 NetWare RPrinter Tab Window 7-9 TCP/IP Menu Tab Window 7-10 Logical Port Menu Tab Window 7-12 Figure B-1. Figure D-3. NETGEAR Print Server Administration Program Window 4-27 Figure 4-30. Figure 7-3. Figure 7-7. Firstgear for Print Server Window 4-26 Figure 4-29. Figure 7-5. Three Main Address Classes B-2 Figure B-2. Figure D-2. Figure 7-2. Create NDPS...
Figure 7-4. Figure 7-6. NETGEAR Print Server Administration Program 7-2 FirstGear Setup Utility Quick Setup Screen 7-3 System Menu Tab Window 7-5 NetWare PServer Tab Window 7-7 NetWare RPrinter Tab Window 7-9 TCP/IP Menu Tab Window 7-10 Logical Port Menu Tab Window 7-12 Figure B-1. Figure D-3. NETGEAR Print Server Administration Program Window 4-27 Figure 4-30. Figure 7-3. Figure 7-7. Firstgear for Print Server Window 4-26 Figure 4-29. Figure 7-5. Three Main Address Classes B-2 Figure B-2. Figure D-2. Figure 7-2. Create NDPS...
PS110 Reference Manual
Page 21
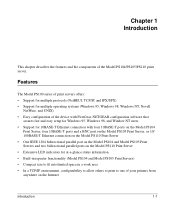
..., NETGEAR configuration software that assures fast and easy setup for Windows 95, Windows 98, and Window NT users • Support for 10BASE-T Ethernet connection with four 10BASE-T ports on the Model PS104 Print Server, four 10BASE-T ports and a BNC port on the Model PS105 Print Server, or 10/ 100BASE-T Ethernet connection on the Model PS110 Print Server • One IEEE 1284 bidirectional parallel...
..., NETGEAR configuration software that assures fast and easy setup for Windows 95, Windows 98, and Window NT users • Support for 10BASE-T Ethernet connection with four 10BASE-T ports on the Model PS104 Print Server, four 10BASE-T ports and a BNC port on the Model PS105 Print Server, or 10/ 100BASE-T Ethernet connection on the Model PS110 Print Server • One IEEE 1284 bidirectional parallel...
PS110 Reference Manual
Page 31
... Print Server Program in a Microsoft Windows networking environment. Chapter 3 Microsoft Windows 95 and Windows 98 Printing This chapter describes how to the NETGEAR print server. To correctly configure your hardware and software for the Microsoft Windows platform, you must: • Install FirstGear for Print Server software. • Run Setup. • Configure the user PC to print to configure and use the NETGEAR Model PS104/PS105/PS110 print server...
... Print Server Program in a Microsoft Windows networking environment. Chapter 3 Microsoft Windows 95 and Windows 98 Printing This chapter describes how to the NETGEAR print server. To correctly configure your hardware and software for the Microsoft Windows platform, you must: • Install FirstGear for Print Server software. • Run Setup. • Configure the user PC to print to configure and use the NETGEAR Model PS104/PS105/PS110 print server...
PS110 Reference Manual
Page 32
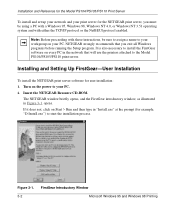
... the Model PS104/PS105/PS110 Print Server To install and set up your network and your print server for the NETGEAR print server, you exit all Windows programs before running the Setup program. The NETGEAR window briefly opens, and the FirstGear introductory window, as illustrated in the network that you must be using a PC with a Windows 95, Windows 98, Windows NT 4.0, or Windows NT 3.51 operating system...
... the Model PS104/PS105/PS110 Print Server To install and set up your network and your print server for the NETGEAR print server, you exit all Windows programs before running the Setup program. The NETGEAR window briefly opens, and the FirstGear introductory window, as illustrated in the network that you must be using a PC with a Windows 95, Windows 98, Windows NT 4.0, or Windows NT 3.51 operating system...
PS110 Reference Manual
Page 37
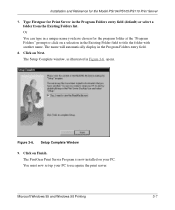
... Program Folders entry field. 8. You must now set up your PC. Microsoft Windows 95 and Windows 98 Printing 3-7 Or You can type in the Program Folders entry field (default) or select a folder from the Existing Folders list. Figure 3-6. Type Firstgear for Print Server in a unique name you have chosen for the Model PS104/PS105/PS110 Print Server 7. Setup Complete Window 9.
... Program Folders entry field. 8. You must now set up your PC. Microsoft Windows 95 and Windows 98 Printing 3-7 Or You can type in the Program Folders entry field (default) or select a folder from the Existing Folders list. Figure 3-6. Type Firstgear for Print Server in a unique name you have chosen for the Model PS104/PS105/PS110 Print Server 7. Setup Complete Window 9.
PS110 Reference Manual
Page 39
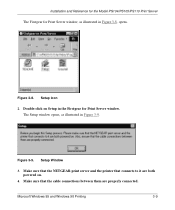
Figure 3-9. Make sure that the NETGEAR print server and the printer that the cable connections between them are both powered on Setup in the Firstgear for Print Server window, as illustrated in Figure 3-8, opens. Figure 3-8. Setup Icon 2. Setup Window 3. Microsoft Windows 95 and Windows 98 Printing 3-9 Installation and Reference for the Model PS104/PS105/PS110 Print Server The Firstgear for Print Server window. The Setup window opens, as illustrated in Figure 3-9. Make sure that connects to it are properly connected. Double-click on . 4.
Figure 3-9. Make sure that the NETGEAR print server and the printer that the cable connections between them are both powered on Setup in the Firstgear for Print Server window, as illustrated in Figure 3-8, opens. Figure 3-8. Setup Icon 2. Setup Window 3. Microsoft Windows 95 and Windows 98 Printing 3-9 Installation and Reference for the Model PS104/PS105/PS110 Print Server The Firstgear for Print Server window. The Setup window opens, as illustrated in Figure 3-9. Make sure that connects to it are properly connected. Double-click on . 4.
PS110 Reference Manual
Page 40
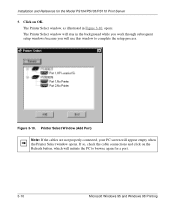
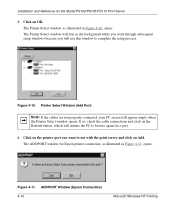
... properly connected, your PC screen will initiate the PC to complete the setup process. The Printer Select window, as illustrated in the background while you work through subsequent setup windows because you will use this window to browse again for the Model PS104/PS105/PS110 Print Server 5. If so, check the cable connections and click on OK. Click...
... properly connected, your PC screen will initiate the PC to complete the setup process. The Printer Select window, as illustrated in the background while you work through subsequent setup windows because you will use this window to browse again for the Model PS104/PS105/PS110 Print Server 5. If so, check the cable connections and click on OK. Click...

PS110 Reference Manual
Page 41
...Epson Spool Manager Queue Setup Window Microsoft Windows 95 and Windows 98 Printing 3-11 ADDPORT Window (Epson Connection) 7. Figure 3-12. Start the Epson Spool Manager. The Queue Setup window opens, as illustrated in Figure 3-12. Or Click on Add. b. Installation and Reference for Epson print connection, as illustrated in...and continue to use with the print server, and click on Yes if you do not have an Epson Stylus Color printer (or plan to install one). Click on your hard drive. The ADDPORT window for the Model PS104/PS105/PS110 Print Server 6. To disable: a.
...Epson Spool Manager Queue Setup Window Microsoft Windows 95 and Windows 98 Printing 3-11 ADDPORT Window (Epson Connection) 7. Figure 3-12. Start the Epson Spool Manager. The Queue Setup window opens, as illustrated in Figure 3-12. Or Click on Add. b. Installation and Reference for Epson print connection, as illustrated in...and continue to use with the print server, and click on Yes if you do not have an Epson Stylus Color printer (or plan to install one). Click on your hard drive. The ADDPORT window for the Model PS104/PS105/PS110 Print Server 6. To disable: a.
PS110 Reference Manual
Page 42
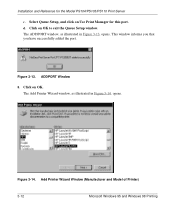
The ADDPORT window, as illustrated in Figure 3-13, opens. Figure 3-14. Click on Use Print Manager for the Model PS104/PS105/PS110 Print Server c. ADDPORT Window 8. Select Queue Setup, and click on OK to exit the Queue Setup window. Figure 3-13. Click on OK. This window informs you that you have successfully added the port. Add Printer Wizard Window (Manufacturer and Model of Printer) 3-12 Microsoft Windows 95 and Windows 98 Printing Installation and Reference for this port. The Add Printer Wizard window, as illustrated in Figure 3-14, opens. d.
The ADDPORT window, as illustrated in Figure 3-13, opens. Figure 3-14. Click on Use Print Manager for the Model PS104/PS105/PS110 Print Server c. ADDPORT Window 8. Select Queue Setup, and click on OK to exit the Queue Setup window. Figure 3-13. Click on OK. This window informs you that you have successfully added the port. Add Printer Wizard Window (Manufacturer and Model of Printer) 3-12 Microsoft Windows 95 and Windows 98 Printing Installation and Reference for this port. The Add Printer Wizard window, as illustrated in Figure 3-14, opens. d.
PS110 Reference Manual
Page 46
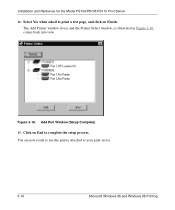
Add Port Window (Setup Complete) 13. Select Yes when asked to print a test page, and click on End to your print server. 3-16 Microsoft Windows 95 and Windows 98 Printing Installation and Reference for the Model PS104/PS105/PS110 Print Server 12. You are now ready to use the printer attached to complete the setup process. Click on Finish. The Add Printer window closes and the Printer Select window, as illustrated in Figure 3-18, comes back into view. Figure 3-18.
Add Port Window (Setup Complete) 13. Select Yes when asked to print a test page, and click on End to your print server. 3-16 Microsoft Windows 95 and Windows 98 Printing Installation and Reference for the Model PS104/PS105/PS110 Print Server 12. You are now ready to use the printer attached to complete the setup process. Click on Finish. The Add Printer window closes and the Printer Select window, as illustrated in Figure 3-18, comes back into view. Figure 3-18.
PS110 Reference Manual
Page 52
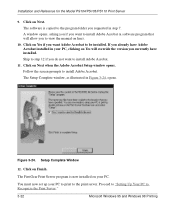
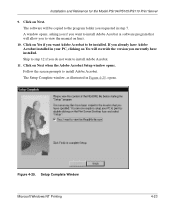
... you want to Recognize the Print Server." 3-22 Microsoft Windows 95 and Windows 98 Printing Click on Finish. Setup Complete Window 12. Click on Next. Proceed to "Setting Up Your PC to install Adobe Acrobat. 11. Skip to step 12 if you requested in step 7. Installation and Reference for the Model PS104/PS105/PS110 Print Server 9. A window opens, asking you if...
... you want to Recognize the Print Server." 3-22 Microsoft Windows 95 and Windows 98 Printing Click on Finish. Setup Complete Window 12. Click on Next. Proceed to "Setting Up Your PC to install Adobe Acrobat. 11. Skip to step 12 if you requested in step 7. Installation and Reference for the Model PS104/PS105/PS110 Print Server 9. A window opens, asking you if...
PS110 Reference Manual
Page 53
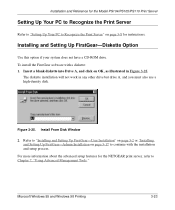
...any other drive but drive A, and you must also use a high-density disk. Figure 3-25. Microsoft Windows 95 and Windows 98 Printing 3-23 Install From Disk Window 2. Refer to "Installing and Setting Up FirstGear-User Installation" on page 3-2 or "Installing and Setting Up... and setup process. The diskette installation will not work in Figure 3-25. Installation and Reference for the Model PS104/PS105/PS110 Print Server Setting Up Your PC to Recognize the Print Server Refer to "Setting Up Your PC to Recognize the Print Server" on page 3-8 for the NETGEAR print server, refer...
...any other drive but drive A, and you must also use a high-density disk. Figure 3-25. Microsoft Windows 95 and Windows 98 Printing 3-23 Install From Disk Window 2. Refer to "Installing and Setting Up FirstGear-User Installation" on page 3-2 or "Installing and Setting Up... and setup process. The diskette installation will not work in Figure 3-25. Installation and Reference for the Model PS104/PS105/PS110 Print Server Setting Up Your PC to Recognize the Print Server Refer to "Setting Up Your PC to Recognize the Print Server" on page 3-8 for the NETGEAR print server, refer...

PS110 Reference Manual
Page 67
The Setup window, as illustrated in Figure 4-9, opens. Make sure the cable connections between them are both powered on Setup. Microsoft Windows NT Printing 4-9 Make sure the NETGEAR print server and the printer that connects to it are properly connected. Click on . 4. Installation and Reference for the Model PS104/PS105/PS110 Print Server The Firstgear for Print Server Setup Icon 2. Figure 4-8. Setup Window 3. Firstgear for Print Server window, as illustrated in Figure 4-8, opens. Figure 4-9.
The Setup window, as illustrated in Figure 4-9, opens. Make sure the cable connections between them are both powered on Setup. Microsoft Windows NT Printing 4-9 Make sure the NETGEAR print server and the printer that connects to it are properly connected. Click on . 4. Installation and Reference for the Model PS104/PS105/PS110 Print Server The Firstgear for Print Server Setup Icon 2. Figure 4-8. Setup Window 3. Firstgear for Print Server window, as illustrated in Figure 4-8, opens. Figure 4-9.
PS110 Reference Manual
Page 68
... connection, as illustrated in the background while you work through subsequent setup windows because you want to use this window to browse again for the Model PS104/PS105/PS110 Print Server 5. Figure 4-10. Figure 4-11. Click on the printer port you will use with the print server and click on the Refresh button, which will initiate the PC...
... connection, as illustrated in the background while you work through subsequent setup windows because you want to use this window to browse again for the Model PS104/PS105/PS110 Print Server 5. Figure 4-10. Figure 4-11. Click on the printer port you will use with the print server and click on the Refresh button, which will initiate the PC...

PS110 Reference Manual
Page 69
Click on the Program Files folder on Use Print Manager for the Model PS104/PS105/PS110 Print Server 7. Epson Spool Manager Queue Setup Window c. Or If you do have an Epson Stylus Color printer attached to the port, and continue on No if you do not have ...an Epson Stylus Color printer (or plan to Step 8. To disable: a. Microsoft Windows NT Printing 4-11 Installation and Reference...
Click on the Program Files folder on Use Print Manager for the Model PS104/PS105/PS110 Print Server 7. Epson Spool Manager Queue Setup Window c. Or If you do have an Epson Stylus Color printer attached to the port, and continue on No if you do not have ...an Epson Stylus Color printer (or plan to Step 8. To disable: a. Microsoft Windows NT Printing 4-11 Installation and Reference...

PS110 Reference Manual
Page 70
Installation and Reference for the Model PS104/PS105/PS110 Print Server d. Click on OK. Figure 4-13. The Add Printer Wizard, as illustrated in Figure 4-14, opens. Click on OK to exit the Queue Setup window. Add Printer Wizard Window (Add Ports) 4-12 Microsoft Windows NT Printing Add Port Window (Added port successfully) 8. Figure 4-14. The ADDPORT window, as illustrated in Figure 4-13, opens. This window informs you that you have successfully added the port.
Installation and Reference for the Model PS104/PS105/PS110 Print Server d. Click on OK. Figure 4-13. The Add Printer Wizard, as illustrated in Figure 4-14, opens. Click on OK to exit the Queue Setup window. Add Printer Wizard Window (Add Ports) 4-12 Microsoft Windows NT Printing Add Port Window (Added port successfully) 8. Figure 4-14. The ADDPORT window, as illustrated in Figure 4-13, opens. This window informs you that you have successfully added the port.
PS110 Reference Manual
Page 81
... to the program folder you already have installed. Figure 4-25. Click on Next. Installation and Reference for the Model PS104/PS105/PS110 Print Server 9. Click on Next when the Adobe Acrobat Setup window opens. If you requested in step 7. The software will override the version you want to view the manual on Yes if you...
... to the program folder you already have installed. Figure 4-25. Click on Next. Installation and Reference for the Model PS104/PS105/PS110 Print Server 9. Click on Next when the Adobe Acrobat Setup window opens. If you requested in step 7. The software will override the version you want to view the manual on Yes if you...

PS110 Reference Manual
Page 109
...NETGEAR Print Server, which is used later to your print server name in the Print Server Name field. (NETGEAR recommends that you want to add the new print server object, printer object, and print queue object. d. Select the NetWare File server volume in the Type field. This information is NETGEAR PRINT SERVER). b. Select Parallel...section of the Quick Setup Window). Also make sure that appear on the network. You must use the Model PS104/PS105/PS110 print server in to configure the NETGEAR print server. 3. To configure the NDS file server to starting any ...
...NETGEAR Print Server, which is used later to your print server name in the Print Server Name field. (NETGEAR recommends that you want to add the new print server object, printer object, and print queue object. d. Select the NetWare File server volume in the Type field. This information is NETGEAR PRINT SERVER). b. Select Parallel...section of the Quick Setup Window). Also make sure that appear on the network. You must use the Model PS104/PS105/PS110 print server in to configure the NETGEAR print server. 3. To configure the NDS file server to starting any ...
