
User Manual
Page 10
...CABINET. If a power cable is not supplied with this equipment please contact your VT45. Failure to comply with this government regulation could void your right to the equipment as possible, and should be read this manual carefully before using your NEC VT45 Projector and keep the ...manual handy for use with this equipment. The power outlet socket should be sure to remove the plug from that to radio communications. Therefore, it...
...CABINET. If a power cable is not supplied with this equipment please contact your VT45. Failure to comply with this government regulation could void your right to the equipment as possible, and should be read this manual carefully before using your NEC VT45 Projector and keep the ...manual handy for use with this equipment. The power outlet socket should be sure to remove the plug from that to radio communications. Therefore, it...

User Manual
Page 11
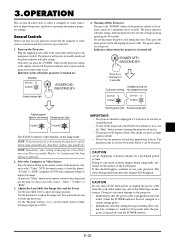
.... For best results, use your projector in accordance with any one of the projector. 7. If you wish to a steady orange glow). • Immediately after the projector is plugged into the wall outlet (when the POWER indicator has not changed to have the projector installed on the surface of the LCD panel. Doing so can harm internal...
.... For best results, use your projector in accordance with any one of the projector. 7. If you wish to a steady orange glow). • Immediately after the projector is plugged into the wall outlet (when the POWER indicator has not changed to have the projector installed on the surface of the LCD panel. Doing so can harm internal...
User Manual
Page 12
... lens while the projector is on. Do not place any objects that might fall into your NEC dealer for lamp replacement. • Allow a minimum of glass may cause injury. Doing so can redirect light coming out of heat inside your projector. Then disconnect the power cable and allow ...60 minutes to cool the projector before replacing the lamp. Do ...
... lens while the projector is on. Do not place any objects that might fall into your NEC dealer for lamp replacement. • Allow a minimum of glass may cause injury. Doing so can redirect light coming out of heat inside your projector. Then disconnect the power cable and allow ...60 minutes to cool the projector before replacing the lamp. Do ...
User Manual
Page 13
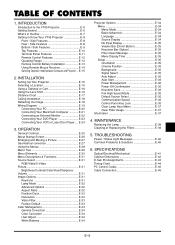
... Control Codes E-45 Cable Connection E-45 E-5 MAINTENANCE Replacing the Lamp E-38 Cleaning or Replacing the Filters E-39 5. E-15 2. TROUBLESHOOTING Power / Status Light Messages E-40 Common Problems & Solutions E-40 6. INSTALLATION Setting Up Your Projector E-16 Selecting a Location E-16 Using a Tabletop or Cart E-16 Using the Lens Shift E-16 Distance Chart E-17 Ceiling Installation...
... Control Codes E-45 Cable Connection E-45 E-5 MAINTENANCE Replacing the Lamp E-38 Cleaning or Replacing the Filters E-39 5. E-15 2. TROUBLESHOOTING Power / Status Light Messages E-40 Common Problems & Solutions E-40 6. INSTALLATION Setting Up Your Projector E-16 Selecting a Location E-16 Using a Tabletop or Cart E-16 Using the Lens Shift E-16 Distance Chart E-17 Ceiling Installation...
User Manual
Page 15
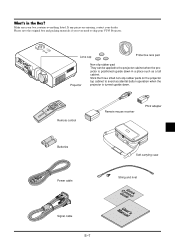
... GCuoidneQnuecictk MaUnusaelr's What's in a place such as a tall cabinet. SELECT VIDEO OFF S-VIDEO POWER MEN RGB AUTO ADJ. Stick the three small non-slip rubber pads on the projector top cabinet to avoid accidental button operation when the projector is positioned upside down . Make sure your dealer. If any pieces are missing, contact...
... GCuoidneQnuecictk MaUnusaelr's What's in a place such as a tall cabinet. SELECT VIDEO OFF S-VIDEO POWER MEN RGB AUTO ADJ. Stick the three small non-slip rubber pads on the projector top cabinet to avoid accidental button operation when the projector is positioned upside down . Make sure your dealer. If any pieces are missing, contact...
User Manual
Page 16
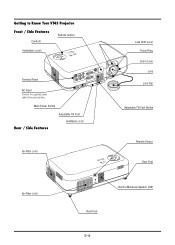
Getting to Know Your VT45 Projector Front / Side Features Controls Remote Sensor Ventilation (outlet) SOURCE AUTO ADJUST STPATOOUWNSERSTAND BY ENT ER CAN SELECT CEL MENU Terminal Panel AC Input Connect the supplied power cable's three-pin plug here. RGB OUT CONTRPOCL OUT L/MONO IN RGB IN IN IN R IN IN AC IN... Main Power Switch Rear / Side Features Adjustable Tilt Foot Ventilation (inlet) Lens Shift Lever Focus Ring Zoom Lever Lens Lens Cap Adjustable Tilt Foot Button Air-Filter...
Getting to Know Your VT45 Projector Front / Side Features Controls Remote Sensor Ventilation (outlet) SOURCE AUTO ADJUST STPATOOUWNSERSTAND BY ENT ER CAN SELECT CEL MENU Terminal Panel AC Input Connect the supplied power cable's three-pin plug here. RGB OUT CONTRPOCL OUT L/MONO IN RGB IN IN IN R IN IN AC IN... Main Power Switch Rear / Side Features Adjustable Tilt Foot Ventilation (inlet) Lens Shift Lever Focus Ring Zoom Lever Lens Lens Cap Adjustable Tilt Foot Button Air-Filter...
User Manual
Page 18
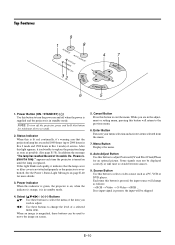
...mode. when the indicator is orange, it is on; Auto Adjust Button Use this indicator is green, the projector is advisable to turn off when the power is supplied and the projector is replaced. Status Indicator When this light appears, it is present, the input will change the level of ... If no input signal is in Eco 1 mode) of two seconds. 2. Power Button (ON / STAND BY) ( ) Use this button to replace the projection lamp as soon as possible. (See page E-38). appears each time the projector is overheated. When an image is pressed, the input source will be skipped...
...mode. when the indicator is orange, it is on; Auto Adjust Button Use this indicator is green, the projector is advisable to turn off when the power is supplied and the projector is replaced. Status Indicator When this light appears, it is present, the input will change the level of ... If no input signal is in Eco 1 mode) of two seconds. 2. Power Button (ON / STAND BY) ( ) Use this button to replace the projection lamp as soon as possible. (See page E-38). appears each time the projector is overheated. When an image is pressed, the input source will be skipped...

User Manual
Page 20
...current signal and the status of the buttons other than the SELECT button. 1. Picture Mute Button This button turns off the projector, press and hold the POWER OFF button for an optimal picture. Infrared Transmitter Direct the remote control toward the remote sensor on the cabinet. Menu Button ... button: Press this button to operate. To cancel this button to activate the mouse. LED Flashes when any one of the projector. 15. Power OFF Button If the main power is indicated by lighting the PJ button: : Use these buttons to select the menu of a selected menu item. 11. ...
...current signal and the status of the buttons other than the SELECT button. 1. Picture Mute Button This button turns off the projector, press and hold the POWER OFF button for an optimal picture. Infrared Transmitter Direct the remote control toward the remote sensor on the cabinet. Menu Button ... button: Press this button to operate. To cancel this button to activate the mouse. LED Flashes when any one of the projector. 15. Power OFF Button If the main power is indicated by lighting the PJ button: : Use these buttons to select the menu of a selected menu item. 11. ...

User Manual
Page 23
L L E E [Computer mode] OFF ON POWER VIDEO S-VIDEO RGB AUTO ADJ. MENU SELECT NTER CANCE PJ HELP FREEZE PIC-MUTE MAGNIFY VOLUME [Projector mode] Works as the Select button on the projector. MENU SELECT NTER CANCE PJ HELP FREEZE PIC-MUTE MAGNIFY VOLUME Works as a mouse for your comouter. Lit red Works as...the Computer mode the PJ button is not lit. • When any one of the POWER ON, OFF, MENU, HELP, or MAGNIFY button is lit, if you are in the Projector mode, which allows the projector menu operation using the SELECT, ENTER or CANCEL buttons. • If no buttons are ...
L L E E [Computer mode] OFF ON POWER VIDEO S-VIDEO RGB AUTO ADJ. MENU SELECT NTER CANCE PJ HELP FREEZE PIC-MUTE MAGNIFY VOLUME [Projector mode] Works as the Select button on the projector. MENU SELECT NTER CANCE PJ HELP FREEZE PIC-MUTE MAGNIFY VOLUME Works as a mouse for your comouter. Lit red Works as...the Computer mode the PJ button is not lit. • When any one of the POWER ON, OFF, MENU, HELP, or MAGNIFY button is lit, if you are in the Projector mode, which allows the projector menu operation using the SELECT, ENTER or CANCEL buttons. • If no buttons are ...
User Manual
Page 24
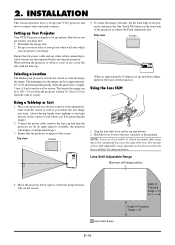
...before you get started, you can project your VT45 projector and how to release the Front Adjustable foot. Ensure that the power cable and any other cables connecting to center the image horizontally on the direction that the projector is square to move the lens vertically or horizontally.... edge of Projected Imageן1/2 Set up Your Projector Your VT45 Projector is about 39.3 feet (12.0 m) from the wall or screen. 2. NOTE: It may not be projecting the image.) 2. Determine the image size. 2. Connect the power cable, remove the lens cap and turn the...
...before you get started, you can project your VT45 projector and how to release the Front Adjustable foot. Ensure that the power cable and any other cables connecting to center the image horizontally on the direction that the projector is square to move the lens vertically or horizontally.... edge of Projected Imageן1/2 Set up Your Projector Your VT45 Projector is about 39.3 feet (12.0 m) from the wall or screen. 2. NOTE: It may not be projecting the image.) 2. Determine the image size. 2. Connect the power cable, remove the lens cap and turn the...
User Manual
Page 27
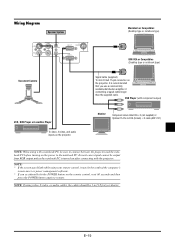
... 15-Pin-to-RCA (female) ן3 cable (ADP-CV1) NOTE: When using with the projector. In most cases signal cannot be the result of the computer's screen-saver or power management software. * If you use a commercially available distribution amplifier if connecting a signal cable longer than the ...the screen goes blank while using video, S-video, or audio cables, the cables should be sure to connect between the projector and the notebook PC before turning on the power to resume. NOTE: If using your remote control, it may be output from RGB output unless the notebook PC is ...
... 15-Pin-to-RCA (female) ן3 cable (ADP-CV1) NOTE: When using with the projector. In most cases signal cannot be the result of the computer's screen-saver or power management software. * If you use a commercially available distribution amplifier if connecting a signal cable longer than the ...the screen goes blank while using video, S-video, or audio cables, the cables should be sure to connect between the projector and the notebook PC before turning on the power to resume. NOTE: If using your remote control, it may be output from RGB output unless the notebook PC is ...

User Manual
Page 28
...) To mini D-Sub 15-pin connector on the projector and the computer. 4. Turn off the power to the projector. 3. Use the supplied signal cable to connect your PC to your projector and computer. 2. Turn on the projector. To connect to project your VT45 projector will enable you to a PC, simply: 1. ...AUOUT DIO INRGB OUT IN CONTRPOCL RGB RGB IN IN Connecting your PC to your computer's screen image for an impressive presentation. If the projector goes blank after a period of inactivity, it may be caused by a screen saver installed on the computer you use a commercially available...
...) To mini D-Sub 15-pin connector on the projector and the computer. 4. Turn off the power to the projector. 3. Use the supplied signal cable to connect your PC to your projector and computer. 2. Turn on the projector. To connect to project your VT45 projector will enable you to a PC, simply: 1. ...AUOUT DIO INRGB OUT IN CONTRPOCL RGB RGB IN IN Connecting your PC to your computer's screen image for an impressive presentation. If the projector goes blank after a period of inactivity, it may be caused by a screen saver installed on the computer you use a commercially available...

User Manual
Page 29
... The VT45's "Plug and Play" data will be necessary. Turn off the power to your projector and your Mac's video port. Therefore, the Mac adapter will have the 15 pin HD connector. Connecting Your Macintosh Computer Macintosh (Notebook type) CANCEL ENTER ... a commercially available pin adapter to connect to the Macintosh. Use the supplied signal cable to connect your Macintosh computer to a Macintosh, simply: 1. Turn on the projector and the Macintosh computer.
... The VT45's "Plug and Play" data will be necessary. Turn off the power to your projector and your Mac's video port. Therefore, the Mac adapter will have the 15 pin HD connector. Connecting Your Macintosh Computer Macintosh (Notebook type) CANCEL ENTER ... a commercially available pin adapter to connect to the Macintosh. Use the supplied signal cable to connect your Macintosh computer to a Macintosh, simply: 1. Turn on the projector and the Macintosh computer.

User Manual
Page 30
...: 1. Turn off , RGB signal will not be sent to your projector, monitor and computer. 2. E-22 Use a 15-pin cable to connect your monitor to simultaneously view on a monitor the image you're projecting. NOTE: When the main power is turned off the power to the external monitor. O N AUTO SPTOAWNSEDTRABTYUS SOURCE Connecting an External... IN Signal cable (supplied) You can connect a separate, external monitor to your VT45 to the RGB Monitor Output (Mini D-Sub 15 pin) connector on your projector. 3.
...: 1. Turn off , RGB signal will not be sent to your projector, monitor and computer. 2. E-22 Use a 15-pin cable to connect your monitor to simultaneously view on a monitor the image you're projecting. NOTE: When the main power is turned off the power to the external monitor. O N AUTO SPTOAWNSEDTRABTYUS SOURCE Connecting an External... IN Signal cable (supplied) You can connect a separate, external monitor to your VT45 to the RGB Monitor Output (Mini D-Sub 15 pin) connector on your projector. 3.

User Manual
Page 31
...RCA (female) ן3 cable to connect your DVD player to the RGB INPUT connector on the projector and DVD player. If your projector and DVD player. 2. Turn on the projector. To do so, simply: 1. Connecting Your DVD Player CANCEL ENTER SELECT DVD player Component video cable RCA...ן3 cable (ADP-CV1) Audio cable (not supplied) You can connect your DVD player's video output requirements, E-23 Turn off the power to your DVD player has the component video (Y,Cb,Cr) output, use common RCA cables (not provided) to connect a composite VIDEO output of the...
...RCA (female) ן3 cable to connect your DVD player to the RGB INPUT connector on the projector and DVD player. If your projector and DVD player. 2. Turn on the projector. To do so, simply: 1. Connecting Your DVD Player CANCEL ENTER SELECT DVD player Component video cable RCA...ן3 cable (ADP-CV1) Audio cable (not supplied) You can connect your DVD player's video output requirements, E-23 Turn off the power to your DVD player has the component video (Y,Cb,Cr) output, use common RCA cables (not provided) to connect a composite VIDEO output of the...

User Manual
Page 32
Turn off the power to keep your right and left channel connections correct for more information about your equipment's video output requirements. Be careful to the projector and VCR, laser disc player or document camera. 2. Connecting Your VCR or Laser Disc Player CANCEL ENTER SELECT VCR/ Laser disc player L R White ... your VCR or laser disc player, connect the other end to your audio equipment (if your projector. NOTE: Refer to your VCR or laser disc player to the Video input on the projector and the VCR or laser disc player. NOTE: The VT45 is played back in fast-forward ...
Turn off the power to keep your right and left channel connections correct for more information about your equipment's video output requirements. Be careful to the projector and VCR, laser disc player or document camera. 2. Connecting Your VCR or Laser Disc Player CANCEL ENTER SELECT VCR/ Laser disc player L R White ... your VCR or laser disc player, connect the other end to your audio equipment (if your projector. NOTE: Refer to your VCR or laser disc player to the Video input on the projector and the VCR or laser disc player. NOTE: The VT45 is played back in fast-forward ...
User Manual
Page 33
... running has stopped running) STATUS POWER STATUS POWER Flashing green light for a minimum of the LCD panel. The projector needs to select your projector. The projector will go out. Then, press the main power switch and unplug the power cable. General Controls Before you press the "POWER" button on the Projector Plug the supplied power cable in these images being temporarily...
... running has stopped running) STATUS POWER STATUS POWER Flashing green light for a minimum of the LCD panel. The projector needs to select your projector. The projector will go out. Then, press the main power switch and unplug the power cable. General Controls Before you press the "POWER" button on the Projector Plug the supplied power cable in these images being temporarily...
User Manual
Page 37
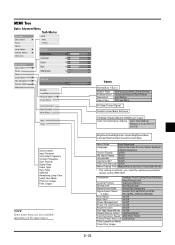
... Video/ Auto/NTSC3.58/NTSC4.43/PAL/ S-Video PAL-M/PAL-N/PAL60/SECAM Auto Adjust On/Off Auto Start On/Off Power Management On/Off Power Off Confirmation On/Off Keystone Save On/Off Fan High Speed Mode On/Off Default Source Select Last/Auto/Select Communication Speed...Menu Setup Source Index Input Terminal Horizontal Frequency Vertical Frequency Sync Polarity Signal Type Video Type Sync Type Interlace Remaining Lamp Time Lamp Hour Meter Projector Usage Filter Usage NOTE: Some menu items are not available depending on the input Source. (Toutes) Items Normal/Eco 1/Eco 2 Aspect...
... Video/ Auto/NTSC3.58/NTSC4.43/PAL/ S-Video PAL-M/PAL-N/PAL60/SECAM Auto Adjust On/Off Auto Start On/Off Power Management On/Off Power Off Confirmation On/Off Keystone Save On/Off Fan High Speed Mode On/Off Default Source Select Last/Auto/Select Communication Speed...Menu Setup Source Index Input Terminal Horizontal Frequency Vertical Frequency Sync Polarity Signal Type Video Type Sync Type Interlace Remaining Lamp Time Lamp Hour Meter Projector Usage Filter Usage NOTE: Some menu items are not available depending on the input Source. (Toutes) Items Normal/Eco 1/Eco 2 Aspect...
User Manual
Page 44
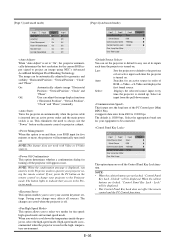
...option determines whether a confirmation dialog for your projector to select two modes for geometry and stability; If not, press the PJ button on automatically when the power cable is inserted into an active power outlet and the main power switch is 19200 bps. When the cabinet ... will be in the Projector mode. The button lights to indicate that you to the Projector mode. The changes are in the Projector mode to change once affects all sources. Turns the projector on the remote control to operate your projector using NEC's Advanced AccuBlend Intelligent Pixel ...
...option determines whether a confirmation dialog for your projector to select two modes for geometry and stability; If not, press the PJ button on automatically when the power cable is inserted into an active power outlet and the main power switch is 19200 bps. When the cabinet ... will be in the Projector mode. The button lights to indicate that you to the Projector mode. The changes are in the Projector mode to change once affects all sources. Turns the projector on the remote control to operate your projector using NEC's Advanced AccuBlend Intelligent Pixel ...
User Manual
Page 46
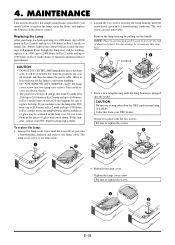
.... MAINTENANCE This section describes the simple maintenance procedures you continue to use a lamp other than the NEC replacement lamp (VT45LP). You could receive an electric shock. • The projector will appear. The lamp cover screw is an interlock on and the message will turn off , wait 60 ...seconds, and then disconnect the power cable. Reattach the lamp cover. Replacing the Lamp After your lamp has...
.... MAINTENANCE This section describes the simple maintenance procedures you continue to use a lamp other than the NEC replacement lamp (VT45LP). You could receive an electric shock. • The projector will appear. The lamp cover screw is an interlock on and the message will turn off , wait 60 ...seconds, and then disconnect the power cable. Reattach the lamp cover. Replacing the Lamp After your lamp has...


