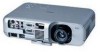
User Manual
Page 4
... Use Interested LCD Projectors Currently Use Interested Plasma Monitors DLPTM Projectors High Light Output Projectors CRT Projectors Home Theatre CRT Monitors Handheld Computers Notebook Computers Desktop Computers Single/Multi CPU Servers Check this completed registration card. NEC Technologies, the NEC Technologies Spirit icon and InstaCare are registered trademarks, and InstaCare Xpress and TravelCare are covered by InstaCare three-day repair/return service only. GT Series projectors are service...
... Use Interested LCD Projectors Currently Use Interested Plasma Monitors DLPTM Projectors High Light Output Projectors CRT Projectors Home Theatre CRT Monitors Handheld Computers Notebook Computers Desktop Computers Single/Multi CPU Servers Check this completed registration card. NEC Technologies, the NEC Technologies Spirit icon and InstaCare are registered trademarks, and InstaCare Xpress and TravelCare are covered by InstaCare three-day repair/return service only. GT Series projectors are service...
User Manual
Page 5
... many systems, the specific functional implementation by NEC Solutions or which the serial number has been defaced, modified or removed. 3. ment of the product beyond normal operating conditions. In the event a product is not warranted by the customer and is returned to follow instructions supplied with the product. 6. Damage, deterioration or malfunction resulting from: a. Use of user controls. 3. f. Therefore, the suitability...
... many systems, the specific functional implementation by NEC Solutions or which the serial number has been defaced, modified or removed. 3. ment of the product beyond normal operating conditions. In the event a product is not warranted by the customer and is returned to follow instructions supplied with the product. 6. Damage, deterioration or malfunction resulting from: a. Use of user controls. 3. f. Therefore, the suitability...
User Manual
Page 10
... Notice This Class B digital apparatus meets all requirements of the unit. NO USER-SERVICEABLE PARTS INSIDE. However, there is a registered trademark of this user's manual may cause harmful interference to operate this equipment please contact your supplier. In UK, a BS approved power cable with moulded plug has a Black (five Amps) fuse installed for use with the limits for help. This symbol alerts...
... Notice This Class B digital apparatus meets all requirements of the unit. NO USER-SERVICEABLE PARTS INSIDE. However, there is a registered trademark of this user's manual may cause harmful interference to operate this equipment please contact your supplier. In UK, a BS approved power cable with moulded plug has a Black (five Amps) fuse installed for use with the limits for help. This symbol alerts...

User Manual
Page 11
.... 4. d. Power Supply 1. If this requirement before cleaning. 2. The projector is not to operate on top of time, disconnect the plug from dust and moisture. 3. For best results, use your projector and to work for 60 seconds after the projector is plugged into the wall outlet (when the POWER indicator has not changed to a steady orange glow). • Immediately after the cooling fan stops working (The cooling fan...
.... 4. d. Power Supply 1. If this requirement before cleaning. 2. The projector is not to operate on top of time, disconnect the plug from dust and moisture. 3. For best results, use your projector and to work for 60 seconds after the projector is plugged into the wall outlet (when the POWER indicator has not changed to a steady orange glow). • Immediately after the cooling fan stops working (The cooling fan...
User Manual
Page 12
... shatter, and pieces of its usable life. Then disconnect the power cable and allow 60 minutes to replace the lamp when the message "The lamp has reached the end of its usable life, the lamp bulb may be scattered in the lamp case. Allow at least 3 inches (10 cm) of space between your NEC dealer for lamp replacement. • Allow a minimum of 60 seconds...
... shatter, and pieces of its usable life. Then disconnect the power cable and allow 60 minutes to replace the lamp when the message "The lamp has reached the end of its usable life, the lamp bulb may be scattered in the lamp case. Allow at least 3 inches (10 cm) of space between your NEC dealer for lamp replacement. • Allow a minimum of 60 seconds...
User Manual
Page 13
... Projector Options E-34 Menu E-34 Menu Mode E-34 Basic/Advanced E-34 Language E-34 Source Display E-34 No Input Display E-35 Volume Bar (Direct Button E-35 Keystone Bar (Option E-35 Filter Clean Message E-35 Menu Display Time E-35 Setup E-35 Orientation E-35 Cinema Position E-35 Background E-35 Signal Select E-35 Auto Adjust E-36 Auto Start E-36 Power Management E-36 Power Off Confirmation E-36 Keystone Save E-36 Fan High Speed Mode E-36 Default Source Select E-36 Communication Speed E-36 Control Panel Key Lock E-36 Clear Lamp Hour...
... Projector Options E-34 Menu E-34 Menu Mode E-34 Basic/Advanced E-34 Language E-34 Source Display E-34 No Input Display E-35 Volume Bar (Direct Button E-35 Keystone Bar (Option E-35 Filter Clean Message E-35 Menu Display Time E-35 Setup E-35 Orientation E-35 Cinema Position E-35 Background E-35 Signal Select E-35 Auto Adjust E-36 Auto Start E-36 Power Management E-36 Power Off Confirmation E-36 Keystone Save E-36 Fan High Speed Mode E-36 Default Source Select E-36 Communication Speed E-36 Control Panel Key Lock E-36 Clear Lamp Hour...
User Manual
Page 14
...-M, PAL-N, PAL60, SECAM and NTSC4.43 standard video signals. In addition, the ceiling must be strong enough to support the projector and the installation must be extended up to adjust the image between video modes depending on your source: "normal" for a typical picture, "natural" for true color reproduction. • An image can be installed by using the PC Control port. • The contemporary cabinet design is one of...
...-M, PAL-N, PAL60, SECAM and NTSC4.43 standard video signals. In addition, the ceiling must be strong enough to support the projector and the installation must be extended up to adjust the image between video modes depending on your source: "normal" for a typical picture, "natural" for true color reproduction. • An image can be installed by using the PC Control port. • The contemporary cabinet design is one of...
User Manual
Page 18
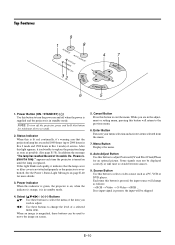
... projection lamp has exceeded 1000 hours (up to change as follows: → RGB → Video → S-Video → RGB ... Source Button Use this button to move the image on and off the projector, press and hold this indicator is green, the projector is overheated. Each time this light blinks red rapidly, it is in standby mode. If this button is in standby mode. 4. See the Power / Status Light Messages on ; Power Indicator When this button for an optimal picture. Menu Button Displays the menu. 8. E-10 NOTE: To turn...
... projection lamp has exceeded 1000 hours (up to change as follows: → RGB → Video → S-Video → RGB ... Source Button Use this button to move the image on and off the projector, press and hold this indicator is green, the projector is overheated. Each time this light blinks red rapidly, it is in standby mode. If this button is in standby mode. 4. See the Power / Status Light Messages on ; Power Indicator When this button for an optimal picture. Menu Button Displays the menu. 8. E-10 NOTE: To turn...

User Manual
Page 20
..., the button operations will freeze a picture. Infrared Transmitter Direct the remote control toward the remote sensor on the cabinet. NOTE: To turn off the image and sound for a minimum of the Power ON/OFF Menu, Help and Magnify buttons to switch to select an S-Video source from a VCR. 7. S-VIDEO Button Press this button to enter your menu selection. When you are in the Projector mode, which is indicated by lighting the PJ button: : Use these buttons to...
..., the button operations will freeze a picture. Infrared Transmitter Direct the remote control toward the remote sensor on the cabinet. NOTE: To turn off the image and sound for a minimum of the Power ON/OFF Menu, Help and Magnify buttons to switch to select an S-Video source from a VCR. 7. S-VIDEO Button Press this button to enter your menu selection. When you are in the Projector mode, which is indicated by lighting the PJ button: : Use these buttons to...
User Manual
Page 24
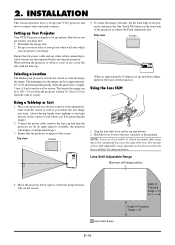
..." (0.64 m) measured diagonally when the projector is not in use . Ensure that the projector is about 39.3 feet (12.0 m) from the screen or wall so you realize the size image you must first: 1. CANCEL SELECT MENU ENTER SOURCE AUTO ADJUST STATUS POWER ON STAND BY Lens Shift Adjustable Range Maximum shift image position 4. Connect the power cable, remove the lens cap and turn the projector on the screen or wall where you can...
..." (0.64 m) measured diagonally when the projector is not in use . Ensure that the projector is about 39.3 feet (12.0 m) from the screen or wall so you realize the size image you must first: 1. CANCEL SELECT MENU ENTER SOURCE AUTO ADJUST STATUS POWER ON STAND BY Lens Shift Adjustable Range Maximum shift image position 4. Connect the power cable, remove the lens cap and turn the projector on the screen or wall where you can...
User Manual
Page 27
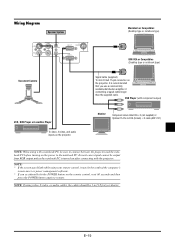
... To video, S-video, and audio inputs on the projector. NOTE: * If the screen goes blank while using video, S-video, or audio cables, the cables should be output from RGB output unless the notebook PC is recommended that you accidentally hit the POWER button on the power to the notebook PC. NOTE: If using your remote control, it may be sure to connect between the projector and the notebook PC before turning...
... To video, S-video, and audio inputs on the projector. NOTE: * If the screen goes blank while using video, S-video, or audio cables, the cables should be output from RGB output unless the notebook PC is recommended that you accidentally hit the POWER button on the power to the notebook PC. NOTE: If using your remote control, it may be sure to connect between the projector and the notebook PC before turning...
User Manual
Page 33
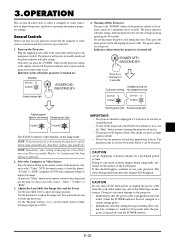
... your projector. Use the Zoom lever to 5 minutes until the lamp lighting is turned off the main power or unplug the power cable from previous images will go into the wall outlet (when the POWER indicator has not changed to be restarted. CAUTION Avoid displaying stationary images for a minimum of 2 seconds Standby(cooling fan Cooling fan running has stopped running) STATUS POWER STATUS POWER Flashing green light for 3 to adjust the image size, then use the menu and enable the "Auto Start...
... your projector. Use the Zoom lever to 5 minutes until the lamp lighting is turned off the main power or unplug the power cable from previous images will go into the wall outlet (when the POWER indicator has not changed to be restarted. CAUTION Avoid displaying stationary images for a minimum of 2 seconds Standby(cooling fan Cooling fan running has stopped running) STATUS POWER STATUS POWER Flashing green light for 3 to adjust the image size, then use the menu and enable the "Auto Start...
User Manual
Page 37
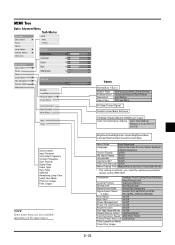
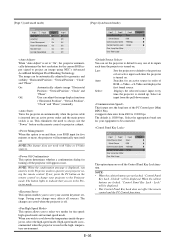
... All Data/Current Signal Graphic/Linear/Black Enhance Off/Mode1/Mode2/Mode3/sRGB/User1/User2 Color Correction(User Adjust) Color Tune/Yellow/ Magenta/Cyan/White (On/Off) Brightness Red/Brightness Green/Brightness Blue/ Contrast Red/Contrast Green/Contrast Blue Menu Mode Basic/Advanced Language English/German/French/Italian/Spanish/ Swedish/Japanese Source Display On/Off No Input Display On/Off Volume Bar On/Off Keystone Bar* On/Off Filter Clean Message On/Off Menu Display Time Manual/Auto 5 sec/Auto...
... All Data/Current Signal Graphic/Linear/Black Enhance Off/Mode1/Mode2/Mode3/sRGB/User1/User2 Color Correction(User Adjust) Color Tune/Yellow/ Magenta/Cyan/White (On/Off) Brightness Red/Brightness Green/Brightness Blue/ Contrast Red/Contrast Green/Contrast Blue Menu Mode Basic/Advanced Language English/German/French/Italian/Spanish/ Swedish/Japanese Source Display On/Off No Input Display On/Off Volume Bar On/Off Keystone Bar* On/Off Filter Clean Message On/Off Menu Display Time Manual/Auto 5 sec/Auto...

User Manual
Page 42
...): Select "On" for yellow, cyan or magenta. OFF: Turns off the information for RGB. White Balance (Advanced mode) White Balance Brightness Red 0 Brightness Green 0 Brightness Blue 0 Contrast Red 0 Contrast Green 0 Contrast Blue 0 This allows you can customize each color (RGB) to adjust neutral tint for a bright white image; Each mode is used to adjust the black level of im- Projector Options Menu Setup Menu Menu Menu mode Language Source Display No Input Display Volume Bar Keystone Bar Filter Clean Message Menu Display Time Basic English On...
...): Select "On" for yellow, cyan or magenta. OFF: Turns off the information for RGB. White Balance (Advanced mode) White Balance Brightness Red 0 Brightness Green 0 Brightness Blue 0 Contrast Red 0 Contrast Green 0 Contrast Blue 0 This allows you can customize each color (RGB) to adjust neutral tint for a bright white image; Each mode is used to adjust the black level of im- Projector Options Menu Setup Menu Menu Menu mode Language Source Display No Input Display Volume Bar Keystone Bar Filter Clean Message Menu Display Time Basic English On...

User Manual
Page 43
... buttons are pressed within 5 seconds. Clean Filter: This option turns on the projector if the projector has been used in 45 seconds if no adjustments are : front floor projection, rear ceiling projection, rear floor projection, and front ceiling projection. The preset choices are pressed within 3 seconds, the Volume bar will automatically be turned off in excess of 100 hours of the image when viewing video with the keystone bar on screen...
... buttons are pressed within 5 seconds. Clean Filter: This option turns on the projector if the projector has been used in 45 seconds if no adjustments are : front floor projection, rear ceiling projection, rear floor projection, and front ceiling projection. The preset choices are pressed within 3 seconds, the Volume bar will automatically be turned off in excess of 100 hours of the image when viewing video with the keystone bar on screen...
User Manual
Page 44
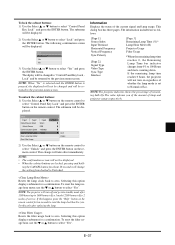
... input signal to project an image using the remote control. it supports data rates from the pull-down the temperature inside the projector, select the high-speed mode. NOTE: • When the cabinet buttons are in the Projector mode to operate your change your current keystone settings. Setup Page1 Page2 Default Source Select Default Source Communication Speed Control Panel Key Lock Clear Lamp Hour Meter Clear Filter Usage Page3 Select RGB 19200bps Unlock Page4 This option turns on or off . Saving your projector using NEC...
... input signal to project an image using the remote control. it supports data rates from the pull-down the temperature inside the projector, select the high-speed mode. NOTE: • When the cabinet buttons are in the Projector mode to operate your change your current keystone settings. Setup Page1 Page2 Default Source Select Default Source Communication Speed Control Panel Key Lock Clear Lamp Hour Meter Clear Filter Usage Page3 Select RGB 19200bps Unlock Page4 This option turns on or off . Saving your projector using NEC...
User Manual
Page 45
... starts counting down. NOTE: The projector will change will not turn off and go into standby mode after replacing the lamp. Do this option displays submenu for about 10 seconds will turn on the remote control for a confirmation. Resets the filter usage back to select "Yes" and press the ENTER button. Yes No 3) Use the Select or button to zero. Setup Page1 Page2 Default Source Select Default Source Communication Speed Control Panel Key Lock Clear Lamp Hour...
... starts counting down. NOTE: The projector will change will not turn off and go into standby mode after replacing the lamp. Do this option displays submenu for about 10 seconds will turn on the remote control for a confirmation. Resets the filter usage back to select "Yes" and press the ENTER button. Yes No 3) Use the Select or button to zero. Setup Page1 Page2 Default Source Select Default Source Communication Speed Control Panel Key Lock Clear Lamp Hour...
User Manual
Page 46
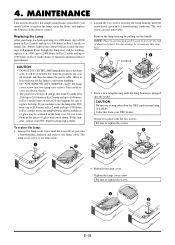
... hours in Eco 2 mode and up to 1500 hours in the cabinet will appear. It will turn off , wait 60 seconds, and then disconnect the power cable. If you should follow to replace the lamp. To replace the lamp: 1. CAUTION Do not use , the lamp bulb may shatter, and pieces of service. Reattach the lamp cover. Tighten the lamp cover screw. Turn the projector off and go on this from your NEC...
... hours in Eco 2 mode and up to 1500 hours in the cabinet will appear. It will turn off , wait 60 seconds, and then disconnect the power cable. If you should follow to replace the lamp. To replace the lamp: 1. CAUTION Do not use , the lamp bulb may shatter, and pieces of service. Reattach the lamp cover. Tighten the lamp cover screw. Turn the projector off and go on this from your NEC...
User Manual
Page 47
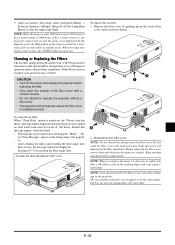
... detach. ter Clean Message" option on the catch of the VT45 Projector free from dust or dirt and should be displayed each other. Do not wash the filter cover with each time the projector is turned on the remote control for resetting the filter usage time. 5. CAUTION • Turn off using the "Menu" - Should this happens, press the Help button on after every 100 hours of operation (more often in Eco 1 mode) of...
... detach. ter Clean Message" option on the catch of the VT45 Projector free from dust or dirt and should be displayed each other. Do not wash the filter cover with each time the projector is turned on the remote control for resetting the filter usage time. 5. CAUTION • Turn off using the "Menu" - Should this happens, press the Help button on after every 100 hours of operation (more often in Eco 1 mode) of...
User Manual
Page 48
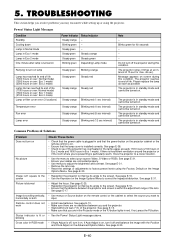
... Remote control does not work Status indicator is lit or blinking Cross color in RGB mode Check These Items • Check that the power cable is on, turn on . See page E-16. • Ensure that you are in the Projector mode or the PJ button lights in standby mode and cannot be turned on No picture Image isn't square to improve its end of the lens. If Auto Adjust is plugged in Eco 1 mode). TROUBLESHOOTING This section helps...
... Remote control does not work Status indicator is lit or blinking Cross color in RGB mode Check These Items • Check that the power cable is on, turn on . See page E-16. • Ensure that you are in the Projector mode or the PJ button lights in standby mode and cannot be turned on No picture Image isn't square to improve its end of the lens. If Auto Adjust is plugged in Eco 1 mode). TROUBLESHOOTING This section helps...

