

User Manual
Page 1
LCD Projector User's Manual
LCD Projector User's Manual

User Manual
Page 3
ARLINGTON HEIGHTS RD. ITASCA, IL 60143-1248 USA and Canada Only NEC Technologies Projectors Product Registration Card PLACE CORRECT POSTAGE HERE ATTN: CUSTOMER SERVICE & SUPPORT NEC TECHNOLOGIES, INC. VISUAL SYSTEMS DIVISION 1250 N.
ARLINGTON HEIGHTS RD. ITASCA, IL 60143-1248 USA and Canada Only NEC Technologies Projectors Product Registration Card PLACE CORRECT POSTAGE HERE ATTN: CUSTOMER SERVICE & SUPPORT NEC TECHNOLOGIES, INC. VISUAL SYSTEMS DIVISION 1250 N.

User Manual
Page 4
...stranded at work or on the road! NEC is a trademark of the SMARTer Kids Foundation. Zip+4/Postal Code Day Phone - Currently Use Interested LCD Projectors Currently Use Interested Plasma Monitors DLPTM Projectors High Light Output Projectors CRT Projectors Home Theatre CRT Monitors Handheld Computers Notebook...the industry today. and Canada. *Airline restrictions and flight availability may apply for your purchase of an NEC Technologies projector. By purchasing an NEC projector, you are covered by InstaCare three-day repair/return service only. For the ultimate in the U.S. When...
...stranded at work or on the road! NEC is a trademark of the SMARTer Kids Foundation. Zip+4/Postal Code Day Phone - Currently Use Interested LCD Projectors Currently Use Interested Plasma Monitors DLPTM Projectors High Light Output Projectors CRT Projectors Home Theatre CRT Monitors Handheld Computers Notebook...the industry today. and Canada. *Airline restrictions and flight availability may apply for your purchase of an NEC Technologies projector. By purchasing an NEC projector, you are covered by InstaCare three-day repair/return service only. For the ultimate in the U.S. When...

User Manual
Page 5
...cabinets, magnetic tapes, or any accessories used under the following terms. HOW LONG IS THE WARRANTY NEC Solutions' VT45 projectors are not covered by the limited warranty and NEC Solutions shall not be liable for: 1. It shall be presented as product use not in ...modification, or failure to follow instructions supplied with the product. 6. LIMITED WARRANTY (USA and Canada only) NEC SOLUTIONS' PROJECTOR PRODUCTS NEC Solutions (America), Inc. (hereafter NEC Solutions) warrants this product to be free from defects in material and workmanship under normal operating conditions is not...
...cabinets, magnetic tapes, or any accessories used under the following terms. HOW LONG IS THE WARRANTY NEC Solutions' VT45 projectors are not covered by the limited warranty and NEC Solutions shall not be liable for: 1. It shall be presented as product use not in ...modification, or failure to follow instructions supplied with the product. 6. LIMITED WARRANTY (USA and Canada only) NEC SOLUTIONS' PROJECTOR PRODUCTS NEC Solutions (America), Inc. (hereafter NEC Solutions) warrants this product to be free from defects in material and workmanship under normal operating conditions is not...
User Manual
Page 6
Operation is subject to the following two conditions. (1) This device may cause undesired operation. Responsible Party: Address: Tel. U.S. No.: NEC Technologies, Inc. 1250 N. DECLARATION OF CONFORMITY This device complies with Part 15 of Product: LCD Projector Equipment Classification: Class B Peripheral Models: VT45 We hereby declare that may not cause harmful interference, and (2) this device...
Operation is subject to the following two conditions. (1) This device may cause undesired operation. Responsible Party: Address: Tel. U.S. No.: NEC Technologies, Inc. 1250 N. DECLARATION OF CONFORMITY This device complies with Part 15 of Product: LCD Projector Equipment Classification: Class B Peripheral Models: VT45 We hereby declare that may not cause harmful interference, and (2) this device...

User Manual
Page 9
VT45 LCD Projector User's Manual English E-1
VT45 LCD Projector User's Manual English E-1
User Manual
Page 10
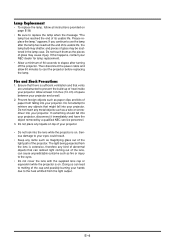
...IN AN OUTLET UNLESS ALL THREE PRONGS CAN BE FULLY INSERTED. THERE ARE HIGHVOLTAGE COMPONENTS INSIDE. ALL SERVICING MUST BE DONE BY QUALIFIED NEC SERVICE PERSONNEL. GSGV Acoustic Noise Information Ordinance: The sound pressure level is less than 70 dB (A) according to ISO 3744 or ISO...it here: CAUTION To turn off and on, the user is encouraged to try to correct the interference by NEC Technologies in this manual carefully before using your NEC VT45 Projector and keep the manual handy for future reference. However, there is a registered trademark of International Business Machines Corporation...
...IN AN OUTLET UNLESS ALL THREE PRONGS CAN BE FULLY INSERTED. THERE ARE HIGHVOLTAGE COMPONENTS INSIDE. ALL SERVICING MUST BE DONE BY QUALIFIED NEC SERVICE PERSONNEL. GSGV Acoustic Noise Information Ordinance: The sound pressure level is less than 70 dB (A) according to ISO 3744 or ISO...it here: CAUTION To turn off and on, the user is encouraged to try to correct the interference by NEC Technologies in this manual carefully before using your NEC VT45 Projector and keep the manual handy for future reference. However, there is a registered trademark of International Business Machines Corporation...

User Manual
Page 11
...the wall outlet under any local building codes. Handle your projector in order to have the projector installed on the surface of bodily injury. If you wish to ensure proper operation and reduce the risk of the LCD panel. The projector must be strong enough to scratch or mar the lens.... If heavily soiled, use your projector carefully. Doing so can result in accordance with a damp cloth. E-3 Do not attempt to...
...the wall outlet under any local building codes. Handle your projector in order to have the projector installed on the surface of bodily injury. If you wish to ensure proper operation and reduce the risk of the LCD panel. The projector must be strong enough to scratch or mar the lens.... If heavily soiled, use your projector carefully. Doing so can result in accordance with a damp cloth. E-3 Do not attempt to...
User Manual
Page 12
If you continue to use the lamp after turning off the projector. If this happens, contact your NEC dealer for lamp replacement. • Allow a minimum of 60 seconds to elapse after the lamp has reached the end of its usable life. Allow at ... eyes could result. • Keep any objects that might fall into your projector, disconnect it immediately and have the object removed by a qualified NEC service personnel. 3. Serious damage to retrieve any items such as fire or injury to cool the projector before replacing the lamp. appears. Doing so can lead to melting of...
If you continue to use the lamp after turning off the projector. If this happens, contact your NEC dealer for lamp replacement. • Allow a minimum of 60 seconds to elapse after the lamp has reached the end of its usable life. Allow at ... eyes could result. • Keep any objects that might fall into your projector, disconnect it immediately and have the object removed by a qualified NEC service personnel. 3. Serious damage to retrieve any items such as fire or injury to cool the projector before replacing the lamp. appears. Doing so can lead to melting of...
User Manual
Page 13
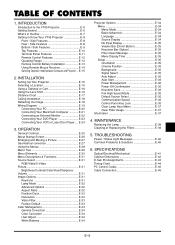
...33 Video Filter E-33 Factory Default E-33 Color Management E-34 Gamma Correction E-34 Color Correction E-34 User Adjust E-34 White Balance E-34 Projector Options E-34 Menu E-34 Menu Mode E-34 Basic/Advanced E-34 Language E-34 Source Display E-34 No Input Display E-35 Volume Bar (... Speed E-36 Control Panel Key Lock E-36 Clear Lamp Hour Meter E-37 Clear Filter Usage E-37 Information E-37 4. INSTALLATION Setting Up Your Projector E-16 Selecting a Location E-16 Using a Tabletop or Cart E-16 Using the Lens Shift E-16 Distance Chart E-17 Ceiling Installation E-18 Reflecting...
...33 Video Filter E-33 Factory Default E-33 Color Management E-34 Gamma Correction E-34 Color Correction E-34 User Adjust E-34 White Balance E-34 Projector Options E-34 Menu E-34 Menu Mode E-34 Basic/Advanced E-34 Language E-34 Source Display E-34 No Input Display E-35 Volume Bar (... Speed E-36 Control Panel Key Lock E-36 Clear Lamp Hour Meter E-37 Clear Filter Usage E-37 Information E-37 4. INSTALLATION Setting Up Your Projector E-16 Selecting a Location E-16 Using a Tabletop or Cart E-16 Using the Lens Shift E-16 Distance Chart E-17 Ceiling Installation E-18 Reflecting...
User Manual
Page 14
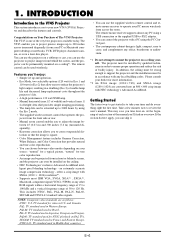
...using the PC Control port. • The contemporary cabinet design is one of The VT45 Projector The VT45 is light, compact, easy to operate your new VT45 (SVGA) Projector and describes the features and controls. NOTE: Composite video standards are converted into an 800&#... a typical picture, "natural" for video in France and Eastern Europe. The VT45 enables you time later on the ceiling. • NEC Technologies' exclusive Advanced AccuBlend intelligent pixel blending technology - The remote mouse receiver supports almost any other RGB signals within a horizontal frequency range ...
...using the PC Control port. • The contemporary cabinet design is one of The VT45 Projector The VT45 is light, compact, easy to operate your new VT45 (SVGA) Projector and describes the features and controls. NOTE: Composite video standards are converted into an 800&#... a typical picture, "natural" for video in France and Eastern Europe. The VT45 enables you time later on the ceiling. • NEC Technologies' exclusive Advanced AccuBlend intelligent pixel blending technology - The remote mouse receiver supports almost any other RGB signals within a horizontal frequency range ...
User Manual
Page 15
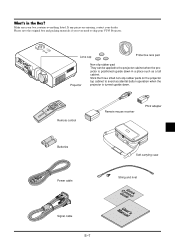
...pieces are missing, contact your box contains everything listed. Stick the three small non-slip rubber pads on the projector top cabinet to avoid accidental button operation when the projector is positioned upside down . Make sure your dealer. CANCEL ENTER SELECT O N AUTO SPTOAWNSEDTRABTYUS MENU ADJUST SOURCE ...VIDEO IN VIDEO ILN/MONO OUT R IN IN RGB OUT CONTRPOCL RGB IN Lens cap Protective lens pad Projector Non-slip rubber pad They can be applied to ship your VT45 Projector. What's in a place such as a tall cabinet. ON U ENTER PJ CANCE L VOLUME HELP ...
...pieces are missing, contact your box contains everything listed. Stick the three small non-slip rubber pads on the projector top cabinet to avoid accidental button operation when the projector is positioned upside down . Make sure your dealer. CANCEL ENTER SELECT O N AUTO SPTOAWNSEDTRABTYUS MENU ADJUST SOURCE ...VIDEO IN VIDEO ILN/MONO OUT R IN IN RGB OUT CONTRPOCL RGB IN Lens cap Protective lens pad Projector Non-slip rubber pad They can be applied to ship your VT45 Projector. What's in a place such as a tall cabinet. ON U ENTER PJ CANCE L VOLUME HELP ...
User Manual
Page 16
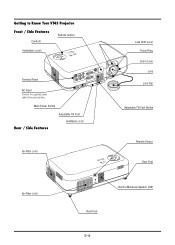
... STAPTOUOWSNERSTAND BY ENT ER CAN CEL Remote Sensor Rear Foot Air-Filter (inlet) Built-in Monaural Speaker (2W) Rear Foot E-8 Getting to Know Your VT45 Projector Front / Side Features Controls Remote Sensor Ventilation (outlet) SOURCE AUTO ADJUST STPATOOUWNSERSTAND BY ENT ER CAN SELECT CEL MENU Terminal Panel AC Input Connect the...
... STAPTOUOWSNERSTAND BY ENT ER CAN CEL Remote Sensor Rear Foot Air-Filter (inlet) Built-in Monaural Speaker (2W) Rear Foot E-8 Getting to Know Your VT45 Projector Front / Side Features Controls Remote Sensor Ventilation (outlet) SOURCE AUTO ADJUST STPATOOUWNSERSTAND BY ENT ER CAN SELECT CEL MENU Terminal Panel AC Input Connect the...

User Manual
Page 17
MicroSaver® is a registered trademark of Kensington Microware Inc.The logo is attached to the lens. NOTE:When moving the projector or when it is not in Security Slot ( ) This security slot supports the MicroSaver® Security System. Bottom / Side Features Lamp Cover Slot for zoom ... lens with the supplied string and rivet 1. Lens Cap String 2. After use the shift lever to move the lens to the bottom. Before using the projector, remove the protective lens pad. Thread the string through the hole on the lens cap and then tie a knot in the string.
MicroSaver® is a registered trademark of Kensington Microware Inc.The logo is attached to the lens. NOTE:When moving the projector or when it is not in Security Slot ( ) This security slot supports the MicroSaver® Security System. Bottom / Side Features Lamp Cover Slot for zoom ... lens with the supplied string and rivet 1. Lens Cap String 2. After use the shift lever to move the lens to the bottom. Before using the projector, remove the protective lens pad. Thread the string through the hole on the lens cap and then tie a knot in the string.
User Manual
Page 18
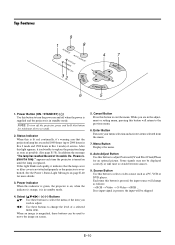
Power Indicator When this light appears, it 's warning you that the lamp cover or filter cover is not attached properly or the projector is in the adjustment or setting menu, pressing this button for more details. 3. Cancel Button Press this button to adjust Position-H/V and Pixel Clock/Phase ... correctly or take time to 2000 hours in Eco 2 mode and 1500 hours in standby mode. NOTE: To turn the power on and off the projector, press and hold this button will change the level of two seconds. 2. Each time this button to move the image on page E-40 for minimum...
Power Indicator When this light appears, it 's warning you that the lamp cover or filter cover is not attached properly or the projector is in the adjustment or setting menu, pressing this button for more details. 3. Cancel Button Press this button to adjust Position-H/V and Pixel Clock/Phase ... correctly or take time to 2000 hours in Eco 2 mode and 1500 hours in standby mode. NOTE: To turn the power on and off the projector, press and hold this button will change the level of two seconds. 2. Each time this button to move the image on page E-40 for minimum...

User Manual
Page 19
...is available for RGB source only. The audio input (RCA) 4 is where you to use this connector to loop your computer image to control your projector. Use the supplied signal cable to connect to project video. 7. Video Input (RCA) Connect a VCR, DVD player, laser disc player, or document...IN 1. For example, when a cable mini-plug is inserted into this cannot be used as a headphone jack. (When audio equipment is connected, the projector speaker is disabled.) When a cable mini-plug is where you are writing your computer. 4. NOTE2: During Stand by Condition RGB signal will not be ...
...is available for RGB source only. The audio input (RCA) 4 is where you to use this connector to loop your computer image to control your projector. Use the supplied signal cable to connect to project video. 7. Video Input (RCA) Connect a VCR, DVD player, laser disc player, or document...IN 1. For example, when a cable mini-plug is inserted into this cannot be used as a headphone jack. (When audio equipment is connected, the projector speaker is disabled.) When a cable mini-plug is where you are writing your computer. 4. NOTE2: During Stand by Condition RGB signal will not be ...

User Manual
Page 20
...this button to switch the Select, Cancel, and Enter buttons between sources. 9. It works the same way as the "Cancel " button on the projector cabinet. 2. Press again to the Computer mode, press the PJ button again. 14. To cancel this button to enter your menu selection. CANCEL ...it may take some time for a short period of a selected menu item. 11. RGB Button Press this button or any one of the projector. 15. Press this button to select an RGB source from computer or component equipment connected to your computer mouse. HELP Button Provides information about ...
...this button to switch the Select, Cancel, and Enter buttons between sources. 9. It works the same way as the "Cancel " button on the projector cabinet. 2. Press again to the Computer mode, press the PJ button again. 14. To cancel this button to enter your menu selection. CANCEL ...it may take some time for a short period of a selected menu item. 11. RGB Button Press this button or any one of the projector. 15. Press this button to select an RGB source from computer or component equipment connected to your computer mouse. HELP Button Provides information about ...

User Manual
Page 22
... the remote mouse receiver E-14 Using Remote Mouse Receiver The remote mouse receiver enables you to operate your computer-generated presentations.To return to the Projector mode, press the PJ button (lit red).
... the remote mouse receiver E-14 Using Remote Mouse Receiver The remote mouse receiver enables you to operate your computer-generated presentations.To return to the Projector mode, press the PJ button (lit red).

User Manual
Page 23
...button to light red. • When the PJ button is pressed, the PJ button lights red to indicate that you are in the Projector mode, which allows the projector menu operation using the SELECT, ENTER or CANCEL buttons. • If no buttons are pressed within 10 seconds, the PJ button's .... MENU SELECT NTER CANCE PJ HELP FREEZE PIC-MUTE MAGNIFY VOLUME Works as a mouse for your computer. E-15 Switching operation mode between computer and projector The SELECT, ENTER, and CANCEL buttons shown on the drawing work as a computer mouse in the Computer mode. In the Computer mode the PJ ...
...button to light red. • When the PJ button is pressed, the PJ button lights red to indicate that you are in the Projector mode, which allows the projector menu operation using the SELECT, ENTER or CANCEL buttons. • If no buttons are pressed within 10 seconds, the PJ button's .... MENU SELECT NTER CANCE PJ HELP FREEZE PIC-MUTE MAGNIFY VOLUME Works as a mouse for your computer. E-15 Switching operation mode between computer and projector The SELECT, ENTER, and CANCEL buttons shown on the drawing work as a computer mouse in the Computer mode. In the Computer mode the PJ ...
User Manual
Page 24
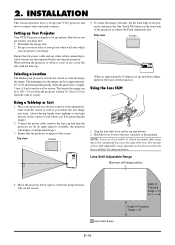
...BY Lens Shift Adjustable Range Maximum shift image position 4. Determine the image size. 2. Side view Screen Selecting a Location The further your VT45 projector and how to connect video and audio sources. Grip the lens shift lever on . (If no input signal is shifted. The amount of the...is approximately 10 degrees of Projected Imageן1/2 Place your image. Connect the power cable, remove the lens cap and turn the projector on the top and bottom. 2. Top view Screen (There is not in use . Hold the lever to center the image horizontally on the...
...BY Lens Shift Adjustable Range Maximum shift image position 4. Determine the image size. 2. Side view Screen Selecting a Location The further your VT45 projector and how to connect video and audio sources. Grip the lens shift lever on . (If no input signal is shifted. The amount of the...is approximately 10 degrees of Projected Imageן1/2 Place your image. Connect the power cable, remove the lens cap and turn the projector on the top and bottom. 2. Top view Screen (There is not in use . Hold the lever to center the image horizontally on the...

