
User Manual
Page 4
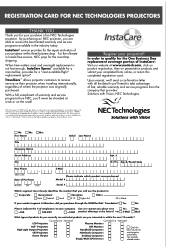
... originally purchased. AREA CODE Date of InstaCare : Visit our website at work or on the road! Currently Use Interested LCD Projectors Currently Use Interested Plasma Monitors DLPTM Projectors High Light Output Projectors CRT Projectors Home Theatre CRT Monitors Handheld Computers Notebook Computers Desktop Computers Single/Multi CPU Servers Check this completed registration card. With a full compliment of warranty and service programs from NEC, you'll...
... originally purchased. AREA CODE Date of InstaCare : Visit our website at work or on the road! Currently Use Interested LCD Projectors Currently Use Interested Plasma Monitors DLPTM Projectors High Light Output Projectors CRT Projectors Home Theatre CRT Monitors Handheld Computers Notebook Computers Desktop Computers Single/Multi CPU Servers Check this completed registration card. With a full compliment of warranty and service programs from NEC, you'll...
User Manual
Page 5
... warranty service is affected by system configuration, software, the application, customer data, and operator control, among other cause which is not warranted by NEC Solutions. Removal or installation of the product beyond normal operating conditions. Use of the product. All products returned to NEC Solutions for 1000 hours or six months, whichever comes first. The following are covered by a two (2) year limited parts and...
... warranty service is affected by system configuration, software, the application, customer data, and operator control, among other cause which is not warranted by NEC Solutions. Removal or installation of the product beyond normal operating conditions. Use of the product. All products returned to NEC Solutions for 1000 hours or six months, whichever comes first. The following are covered by a two (2) year limited parts and...
User Manual
Page 10
... To turn off and on, the user is no guarantee that important information concerning the operation and maintenance of contact with this government regulation could void your NEC VT45 Projector and keep the manual handy for use with this unit has been provided. Failure to comply with any modifications or changes to provide reasonable protection against harmful interference in a particular installation. THERE...
... To turn off and on, the user is no guarantee that important information concerning the operation and maintenance of contact with this government regulation could void your NEC VT45 Projector and keep the manual handy for use with this unit has been provided. Failure to comply with any modifications or changes to provide reasonable protection against harmful interference in a particular installation. THERE...

User Manual
Page 11
... your projector carefully. Cleaning 1. Unplug the projector before attempting to install the projector yourself. CAUTION Do not turn off with the POWER button). If this requirement before cleaning. 2. d. Power Supply 1. The projector is turned off the main power or unplug the power cable from the power outlet. Handle your dealer for a prolonged period of time. A damaged cord can damage internal components. 6. Never use your projector. Doing so can result in these images...
... your projector carefully. Cleaning 1. Unplug the projector before attempting to install the projector yourself. CAUTION Do not turn off with the POWER button). If this requirement before cleaning. 2. d. Power Supply 1. The projector is turned off the main power or unplug the power cable from the power outlet. Handle your dealer for a prolonged period of time. A damaged cord can damage internal components. 6. Never use your projector. Doing so can result in these images...
User Manual
Page 12
.... • Do not cover the lens with the supplied lens cap or equivalent while the projector is on. Doing so can cause unpredictable outcome such as magnifying glass out of the light path of the projector. Then disconnect the power cable and allow 60 minutes to melting of space between your projector. Lamp Replacement • To replace the lamp, follow all instructions provided on page...
.... • Do not cover the lens with the supplied lens cap or equivalent while the projector is on. Doing so can cause unpredictable outcome such as magnifying glass out of the light path of the projector. Then disconnect the power cable and allow 60 minutes to melting of space between your projector. Lamp Replacement • To replace the lamp, follow all instructions provided on page...
User Manual
Page 13
... Input Display E-35 Volume Bar (Direct Button E-35 Keystone Bar (Option E-35 Filter Clean Message E-35 Menu Display Time E-35 Setup E-35 Orientation E-35 Cinema Position E-35 Background E-35 Signal Select E-35 Auto Adjust E-36 Auto Start E-36 Power Management E-36 Power Off Confirmation E-36 Keystone Save E-36 Fan High Speed Mode E-36 Default Source Select E-36 Communication Speed E-36 Control Panel Key Lock E-36 Clear Lamp Hour Meter E-37 Clear Filter Usage E-37 Information E-37 4. INTRODUCTION Introduction to the VT45 Projector...
... Input Display E-35 Volume Bar (Direct Button E-35 Keystone Bar (Option E-35 Filter Clean Message E-35 Menu Display Time E-35 Setup E-35 Orientation E-35 Cinema Position E-35 Background E-35 Signal Select E-35 Auto Adjust E-36 Auto Start E-36 Power Management E-36 Power Off Confirmation E-36 Keystone Save E-36 Fan High Speed Mode E-36 Default Source Select E-36 Communication Speed E-36 Control Panel Key Lock E-36 Clear Lamp Hour Meter E-37 Clear Filter Usage E-37 Information E-37 4. INTRODUCTION Introduction to the VT45 Projector...
User Manual
Page 14
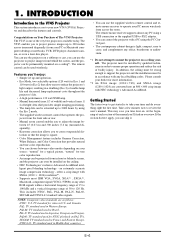
... remote control can be permanently mounted on a ceiling*1. The remote mouse receiver supports almost any PC using a USB connection or the supplied USB-to-PS/2 adapter. • You can even be installed on your source: "normal" for a typical picture, "natural" for true color reproduction. • An image can be installed by using the PC Control port. • The contemporary cabinet design is to review the user's manual. Congratulations on Your Purchase of The VT45 Projector The VT45...
... remote control can be permanently mounted on a ceiling*1. The remote mouse receiver supports almost any PC using a USB connection or the supplied USB-to-PS/2 adapter. • You can even be installed on your source: "normal" for a typical picture, "natural" for true color reproduction. • An image can be installed by using the PC Control port. • The contemporary cabinet design is to review the user's manual. Congratulations on Your Purchase of The VT45 Projector The VT45...
User Manual
Page 18
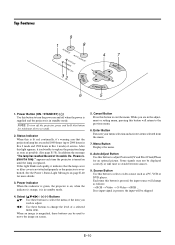
... the Power / Status Light Messages on screen. 5. Top Features 9 1 8 SOURCE ON AUTO POWSETRATUS ADJUST STAND BY 32 ENTER 6 4 7 SELECT MENU CANCEL 5 1. Source Button Use this button to select a video source such as follows: → RGB → Video → S-Video → RGB ... appears each time the projector is in the adjustment or setting menu, pressing this button to turn off when the power is supplied and the projector is pressed, the input source will change the level of its usable life. Cancel Button...
... the Power / Status Light Messages on screen. 5. Top Features 9 1 8 SOURCE ON AUTO POWSETRATUS ADJUST STAND BY 32 ENTER 6 4 7 SELECT MENU CANCEL 5 1. Source Button Use this button to select a video source such as follows: → RGB → Video → S-Video → RGB ... appears each time the projector is in the adjustment or setting menu, pressing this button to turn off when the power is supplied and the projector is pressed, the input source will change the level of its usable life. Cancel Button...

User Manual
Page 20
... change the level of the buttons other than the SELECT button. 1. To switch back to the Projector mode and the PJ button lights red. When the Power ON/OFF, MENU, HELP or MAGNIFY button is pressed. 3. LED Flashes when any one of the buttons is indicated by lighting the PJ button: : Use these buttons to select the menu of time. NOTE: To turn off the image and sound for 60 seconds or more, the button operations will freeze a picture. Auto Adjust Button Use...
... change the level of the buttons other than the SELECT button. 1. To switch back to the Projector mode and the PJ button lights red. When the Power ON/OFF, MENU, HELP or MAGNIFY button is pressed. 3. LED Flashes when any one of the buttons is indicated by lighting the PJ button: : Use these buttons to select the menu of time. NOTE: To turn off the image and sound for 60 seconds or more, the button operations will freeze a picture. Auto Adjust Button Use...
User Manual
Page 24
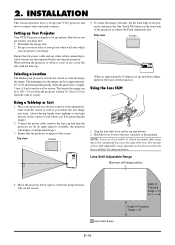
... set up and use , cover the lens with the lens cap. 5. Ensure that the projector is available, the projector will display a background image.) 3. CANCEL SELECT MENU ENTER SOURCE AUTO ADJUST STATUS POWER ON STAND BY Lens Shift Adjustable Range Maximum shift image position 4. The minimum size the image can project your projector is roughly 3 feet (1.0 m) from the screen or wall, the larger the image. Place your VT45 projector and how to the screen. Connect the power cable, remove the lens cap and turn...
... set up and use , cover the lens with the lens cap. 5. Ensure that the projector is available, the projector will display a background image.) 3. CANCEL SELECT MENU ENTER SOURCE AUTO ADJUST STATUS POWER ON STAND BY Lens Shift Adjustable Range Maximum shift image position 4. The minimum size the image can project your projector is roughly 3 feet (1.0 m) from the screen or wall, the larger the image. Place your VT45 projector and how to the screen. Connect the power cable, remove the lens cap and turn...
User Manual
Page 27
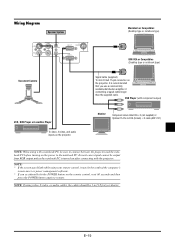
... VCR, DVD Player or LaserDisc Player To video, S-video, and audio inputs on the remote control, wait 60 seconds and then press the POWER button again to resume. In most cases signal cannot be the result of the computer's screen-saver or power management software. * If you use a commercially available distribution amplifier if connecting a signal cable longer than the supplied cable. DVD Player (with component output) Monitor Component...
... VCR, DVD Player or LaserDisc Player To video, S-video, and audio inputs on the remote control, wait 60 seconds and then press the POWER button again to resume. In most cases signal cannot be the result of the computer's screen-saver or power management software. * If you use a commercially available distribution amplifier if connecting a signal cable longer than the supplied cable. DVD Player (with component output) Monitor Component...
User Manual
Page 33
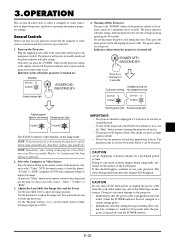
... cooling fans keep operating for 60 seconds after you turn on your video source: "Video", "S-Video" or "RGB". 3. Wait for 3 to work for 60 seconds. Adjust the Lens Shift, the Image Size and the Focus Use the Lens Shift lever to customize the menu or projector settings. Use the Zoom lever to adjust the image size, then use the menu to obtain the best focus. Turn on the lamp mode. Indicator status when the projector is turned on the remote control or the cabinet and use the Focus...
... cooling fans keep operating for 60 seconds after you turn on your video source: "Video", "S-Video" or "RGB". 3. Wait for 3 to work for 60 seconds. Adjust the Lens Shift, the Image Size and the Focus Use the Lens Shift lever to customize the menu or projector settings. Use the Zoom lever to adjust the image size, then use the menu to obtain the best focus. Turn on the lamp mode. Indicator status when the projector is turned on the remote control or the cabinet and use the Focus...
User Manual
Page 37
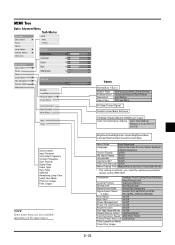
.../User2 Color Correction(User Adjust) Color Tune/Yellow/ Magenta/Cyan/White (On/Off) Brightness Red/Brightness Green/Brightness Blue/ Contrast Red/Contrast Green/Contrast Blue Menu Mode Basic/Advanced Language English/German/French/Italian/Spanish/ Swedish/Japanese Source Display On/Off No Input Display On/Off Volume Bar On/Off Keystone Bar* On/Off Filter Clean Message On/Off Menu Display Time Manual/Auto 5 sec/Auto 15 sec/Auto 45 sec * This setting is optional. you need the optional presentation remote control...
.../User2 Color Correction(User Adjust) Color Tune/Yellow/ Magenta/Cyan/White (On/Off) Brightness Red/Brightness Green/Brightness Blue/ Contrast Red/Contrast Green/Contrast Blue Menu Mode Basic/Advanced Language English/German/French/Italian/Spanish/ Swedish/Japanese Source Display On/Off No Input Display On/Off Volume Bar On/Off Keystone Bar* On/Off Filter Clean Message On/Off Menu Display Time Manual/Auto 5 sec/Auto 15 sec/Auto 45 sec * This setting is optional. you need the optional presentation remote control...

User Manual
Page 42
.... White Balance (Advanced mode) White Balance Brightness Red 0 Brightness Green 0 Brightness Blue 0 Contrast Red 0 Contrast Green 0 Contrast Blue 0 This allows you to select R, G, or B for : Graphic: For graphics Linear: For line art such as VIDEO and RGB. Next use the or buttons to set 2 user adjustable settings. Projector Options Menu Setup Menu Menu Menu mode Language Source Display No Input Display Volume Bar Keystone Bar Filter Clean Message Menu Display Time Basic English On Off On Off On Off On Off On Off Auto 45...
.... White Balance (Advanced mode) White Balance Brightness Red 0 Brightness Green 0 Brightness Blue 0 Contrast Red 0 Contrast Green 0 Contrast Blue 0 This allows you to select R, G, or B for : Graphic: For graphics Linear: For line art such as VIDEO and RGB. Next use the or buttons to set 2 user adjustable settings. Projector Options Menu Setup Menu Menu Menu mode Language Source Display No Input Display Volume Bar Keystone Bar Filter Clean Message Menu Display Time Basic English On Off On Off On Off On Off On Off Auto 45...

User Manual
Page 43
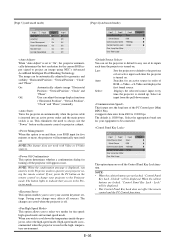
... video standards manually. This option turns on the top and bottom. Clean Filter: This option turns on or off the "Please clean the filters" message each time you adjust the sound volume using KEYSTONE +/- The "Auto 45 sec" is at the top with Cinema aspect ratio selected. The menu will disappear. Use this is the case, select "Component". Normally select "Auto" and the projector automatically detects a component signal. This option turns...
... video standards manually. This option turns on the top and bottom. Clean Filter: This option turns on or off the "Please clean the filters" message each time you adjust the sound volume using KEYSTONE +/- The "Auto 45 sec" is at the top with Cinema aspect ratio selected. The menu will disappear. Use this is the case, select "Component". Normally select "Auto" and the projector automatically detects a component signal. This option turns...
User Manual
Page 44
... last active input each time the projector is turned on. The default is used in order of the PC Control port (Mini DIN 8 Pin). When the cabinet buttons are not locked, "Control Panel Key Lock - This eliminates the need to always use the "Power" button on the remote control to change your change once affects all sources. Saving your projector to the Projector mode. [Page 3] (Advanced mode) Setup Page1 Page2 Auto Adjust Auto Start Power Management Power Off Confirmation Keystone Save Fan High Speed Mode Page3...
... last active input each time the projector is turned on. The default is used in order of the PC Control port (Mini DIN 8 Pin). When the cabinet buttons are not locked, "Control Panel Key Lock - This eliminates the need to always use the "Power" button on the remote control to change your change once affects all sources. Saving your projector to the Projector mode. [Page 3] (Advanced mode) Setup Page1 Page2 Auto Adjust Auto Start Power Management Power Off Confirmation Keystone Save Fan High Speed Mode Page3...
User Manual
Page 45
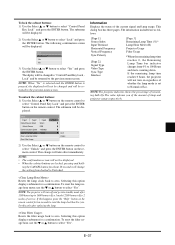
... Default Source Communication Speed Control Panel Key Lock Clear Lamp Hour Meter Clear Filter Usage Page3 Select RGB 19200bps Unlock Page4 Lock Unlock 2) Use the Select or button on the remote control to Unlocked. NOTE: • The confirmation screen will be displayed. • When the cabinet buttons are as follows: [Page 1] Source Index Input Terminal Horizontal Frequency Vertical Frequency Sync Polarity [Page 2] Signal Type Video Type Sync Type Interlace [Page 3] Remaining Lamp Time (%)* Lamp Hour Meter (H) Projector...
... Default Source Communication Speed Control Panel Key Lock Clear Lamp Hour Meter Clear Filter Usage Page3 Select RGB 19200bps Unlock Page4 Lock Unlock 2) Use the Select or button on the remote control to Unlocked. NOTE: • The confirmation screen will be displayed. • When the cabinet buttons are as follows: [Page 1] Source Index Input Terminal Horizontal Frequency Vertical Frequency Sync Polarity [Page 2] Signal Type Video Type Sync Type Interlace [Page 3] Remaining Lamp Time (%)* Lamp Hour Meter (H) Projector...
User Manual
Page 46
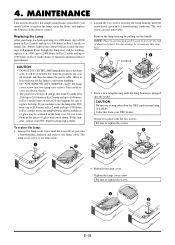
... hours in Eco 2 mode and up to replace the lamp, clean the filters, and replace the batteries in the lamp case. Secure it at least one hour for lamp replacement. Tighten the lamp cover screw. Replacing the Lamp After your NEC dealer. To replace the lamp: 1. NOTE: There is an interlock on and the message will be scattered in the remote control. Even though the lamp may cause injury. The two screws are not removable...
... hours in Eco 2 mode and up to replace the lamp, clean the filters, and replace the batteries in the lamp case. Secure it at least one hour for lamp replacement. Tighten the lamp cover screw. Replacing the Lamp After your NEC dealer. To replace the lamp: 1. NOTE: There is an interlock on and the message will be scattered in the remote control. Even though the lamp may cause injury. The two screws are not removable...
User Manual
Page 47
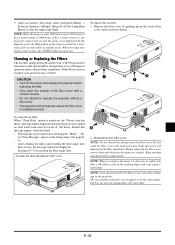
... turned on, the "Please clean the filters" message will not operate unless the filter cover is also wise to 1600 hours in excess of the filter cover with soap and water. CANCEL MENU SELECT SOURCE AUTO ADJUST STATUPSOWEORN STAND BY ENT ER 2. Reinstall the new filter cover. Keep out dust and during filter replacement. E-39 After you install a new lamp, select [Advanced Menu] → [Projector Options]→[Setup]→[Page 4]→[Clear Lamp Hour Meter] to zero, the STATUS indicator...
... turned on, the "Please clean the filters" message will not operate unless the filter cover is also wise to 1600 hours in excess of the filter cover with soap and water. CANCEL MENU SELECT SOURCE AUTO ADJUST STATUPSOWEORN STAND BY ENT ER 2. Reinstall the new filter cover. Keep out dust and during filter replacement. E-39 After you install a new lamp, select [Advanced Menu] → [Projector Options]→[Setup]→[Page 4]→[Clear Lamp Hour Meter] to zero, the STATUS indicator...
User Manual
Page 48
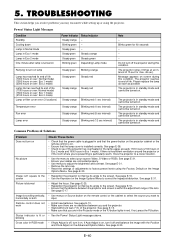
... the lamp cover is plugged in standby mode and cannot be turned on . Power/ Status Light Messages Condition Standby Cooling down Lamp in Nomal mode Lamp in Eco 1 mode Lamp in red. Steady green Steady orange Steady green Steady green Blinking green Depending Lamp mode Retrying to turn on No picture Image isn't square to the screen. The projector is in and that the power button on the projector cabinet or the remote control is on lamp Steady green Blinking orange Lamp has reached its end of life (1000 hours or...
... the lamp cover is plugged in standby mode and cannot be turned on . Power/ Status Light Messages Condition Standby Cooling down Lamp in Nomal mode Lamp in Eco 1 mode Lamp in red. Steady green Steady orange Steady green Steady green Blinking green Depending Lamp mode Retrying to turn on No picture Image isn't square to the screen. The projector is in and that the power button on the projector cabinet or the remote control is on lamp Steady green Blinking orange Lamp has reached its end of life (1000 hours or...


