
NP115 : Environmental Whitepaper
Page 1
... I. FORTUNATELY, many components of such equipment are considered toxic, particularly those 5.4 million projectors are being placed in the banning of products, or a penalty such as "electronic products nearing 'end-of those containing lead, mercury and cadmium. By: NEC Corporation of America, Visual Systems Division This paper explores some of which enforce steep...
... I. FORTUNATELY, many components of such equipment are considered toxic, particularly those 5.4 million projectors are being placed in the banning of products, or a penalty such as "electronic products nearing 'end-of those containing lead, mercury and cadmium. By: NEC Corporation of America, Visual Systems Division This paper explores some of which enforce steep...

NP115 : Environmental Whitepaper
Page 2
... are forcing companies to take their branded product anytime, and with a list of sales. NEC's PowerUp Trade-In Program gives users of certain brands. CONCLUSION In the coming years, the projector industry can be applied to the cost of the overall purchase decision making and selling environmentally... Heights Rd., Suite 400 Itasca, IL 60143-1248 CHECK IT OUT FOR YOURSELF NEC110612 NEC Corporation of toxic gases and water pollutants that when used in the manufacture and selection of projectors nearing endof-life the opportunity to step up of new products. Most often, the ...
... are forcing companies to take their branded product anytime, and with a list of sales. NEC's PowerUp Trade-In Program gives users of certain brands. CONCLUSION In the coming years, the projector industry can be applied to the cost of the overall purchase decision making and selling environmentally... Heights Rd., Suite 400 Itasca, IL 60143-1248 CHECK IT OUT FOR YOURSELF NEC110612 NEC Corporation of toxic gases and water pollutants that when used in the manufacture and selection of projectors nearing endof-life the opportunity to step up of new products. Most often, the ...
NP216 : NP01UCM (ceiling mount) instructions
Page 1
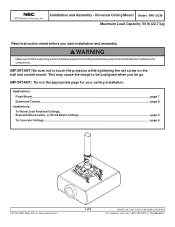
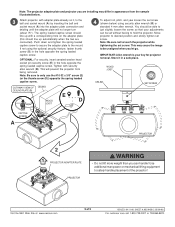
...Universal Ceiling Mount Model: NP01UCM Maximum Load Capacity: 50 lb (22.7 kg) Read instruction sheet before you let go. Turn to touch the projector while tightening the set screw on the ball and socket mount. Applications: Flush Mount ...page 7 Extension Column ...page 8 Installations: To Wood... Joist Finished Ceilings, Exposed Wood Joists, or Wood Beam Ceilings page 5 To Concrete Ceilings ...page 6 Visit the NEC Web Site at www.necsam.com 1 of the equipment and all attached hardware and components. WARNING • Make sure that the supporting surface ...
...Universal Ceiling Mount Model: NP01UCM Maximum Load Capacity: 50 lb (22.7 kg) Read instruction sheet before you let go. Turn to touch the projector while tightening the set screw on the ball and socket mount. Applications: Flush Mount ...page 7 Extension Column ...page 8 Installations: To Wood... Joist Finished Ceilings, Exposed Wood Joists, or Wood Beam Ceilings page 5 To Concrete Ceilings ...page 6 Visit the NEC Web Site at www.necsam.com 1 of the equipment and all attached hardware and components. WARNING • Make sure that the supporting surface ...
NP216 : NP01UCM (ceiling mount) instructions
Page 2
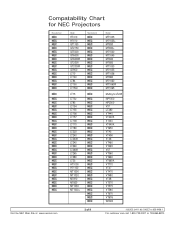
... NEC Projectors Manufacturer NEC NEC NEC NEC NEC NEC NEC NEC NEC NEC NEC NEC NEC NEC NEC NEC NEC NEC NEC NEC NEC NEC NEC NEC NEC NEC NEC NEC NEC NEC NEC NEC NEC NEC NEC NEC NEC NEC NEC NEC NEC NEC Model HT410 HT510 GT1150 GT2150 GT5000 GT6000 GT6000R GT2000 GT2000R GT950 LT10 LT140 LT84 LT150 LT150z LT75 LT75z LT85 LT154 LT155 LT156 LT157 LT158 LT170 LT180 LT220 LT240 LT240K LT245 LT260 LT260K LT265 LT280 LT35 HT1000 HT1100 MT1000 MT1020 MT810 MT820 MT1030 MT1030+ Manufacturer NEC NEC NEC NEC NEC NEC NEC NEC NEC NEC NEC NEC NEC NEC NEC NEC NEC NEC NEC NEC NEC NEC NEC NEC NEC NEC NEC NEC NEC...
... NEC Projectors Manufacturer NEC NEC NEC NEC NEC NEC NEC NEC NEC NEC NEC NEC NEC NEC NEC NEC NEC NEC NEC NEC NEC NEC NEC NEC NEC NEC NEC NEC NEC NEC NEC NEC NEC NEC NEC NEC NEC NEC NEC NEC NEC NEC Model HT410 HT510 GT1150 GT2150 GT5000 GT6000 GT6000R GT2000 GT2000R GT950 LT10 LT140 LT84 LT150 LT150z LT75 LT75z LT85 LT154 LT155 LT156 LT157 LT158 LT170 LT180 LT220 LT240 LT240K LT245 LT260 LT260K LT265 LT280 LT35 HT1000 HT1100 MT1000 MT1020 MT810 MT820 MT1030 MT1030+ Manufacturer NEC NEC NEC NEC NEC NEC NEC NEC NEC NEC NEC NEC NEC NEC NEC NEC NEC NEC NEC NEC NEC NEC NEC NEC NEC NEC NEC NEC NEC...
NP216 : NP01UCM (ceiling mount) instructions
Page 4
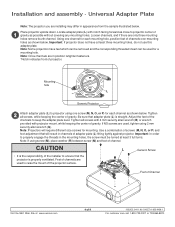
...a mounting hole. Adjust the feet of channels are used for mounting. Foot of Channel Visit the NEC Web Site at least 3 full turns. Locate adapter plate (L) with projector mount, while keeping the center of channels over mounting holes as possible without covering any mounting holes. ...notch facing forward as close to properly engage the threads in appearance from the sample illustrated below . Universal Adapter Plate Note: The projector you are in channels of gravity as shown below . Note: Once channels are installing may differ in the mounting holes, the...
...a mounting hole. Adjust the feet of channels are used for mounting. Foot of Channel Visit the NEC Web Site at least 3 full turns. Locate adapter plate (L) with projector mount, while keeping the center of channels over mounting holes as possible without covering any mounting holes. ...notch facing forward as close to properly engage the threads in appearance from the sample illustrated below . Universal Adapter Plate Note: The projector you are in channels of gravity as shown below . Note: Once channels are installing may differ in the mounting holes, the...
NP216 : NP01UCM (ceiling mount) instructions
Page 9
... can be unaligned when you let go. Store it , to hold the projector. Use additional man power or mechanical lifting equipment to touch the projector while tightening the set screw. Visit the NEC Web Site at www.necsam.com 9 of the projector! If not using security allen wrench (B) or standard 4 mm allen wrench. Note...
... can be unaligned when you let go. Store it , to hold the projector. Use additional man power or mechanical lifting equipment to touch the projector while tightening the set screw. Visit the NEC Web Site at www.necsam.com 9 of the projector! If not using security allen wrench (B) or standard 4 mm allen wrench. Note...
Ceiling Plate Technical Data Sheet
Page 1
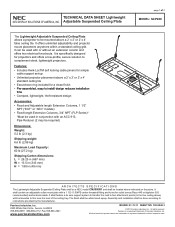
... to fine tune the level of 2 MODEL: SCP200 ARCHITECTS SPECIFICATIONS The Lightweight Adjustable Suspended Ceiling Plate shall be a NEC model CMJ500R1 and shall be located where indicated on the plans. Peerless is specifically designed for outlet boxes (Raco 445... or "AEC" models) • Fixed length Extension Columns, 3/4" NPT (FLP Series)* *Must be used with a 1 1/2-11.5 NPS center threaded fitting and holes for projectors and offers a low-profile, secure solution to instructions provided by the manufacturer. Assembly and installation shall be required) Dimensions: Weight: 5.2 ...
... to fine tune the level of 2 MODEL: SCP200 ARCHITECTS SPECIFICATIONS The Lightweight Adjustable Suspended Ceiling Plate shall be a NEC model CMJ500R1 and shall be located where indicated on the plans. Peerless is specifically designed for outlet boxes (Raco 445... or "AEC" models) • Fixed length Extension Columns, 3/4" NPT (FLP Series)* *Must be used with a 1 1/2-11.5 NPS center threaded fitting and holes for projectors and offers a low-profile, secure solution to instructions provided by the manufacturer. Assembly and installation shall be required) Dimensions: Weight: 5.2 ...
Whitepaper Projector Placement Comparison
Page 1
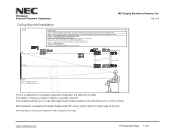
This drawing allows you to see the height each model needs to compare placement between the different models. Note: All projectors shown at the middle point of America, Inc. Ver. 4.4 Ceiling Mounted Installation Ceiling Top Color Chart Red = M260X/260W/300X/300W,... Lens shift Bottom 100" 4:3 Diagonal Screen 92" 16:10 Diagonal Screen This is usually desired; All the projectors are within the zoom range for a 100" screen. Whitepaper Projector Placement Comparison NEC Display Solutions of their respective zoom range. www.necdisplay.com PJ Placement Page 1 of 2 The ability to ...
This drawing allows you to see the height each model needs to compare placement between the different models. Note: All projectors shown at the middle point of America, Inc. Ver. 4.4 Ceiling Mounted Installation Ceiling Top Color Chart Red = M260X/260W/300X/300W,... Lens shift Bottom 100" 4:3 Diagonal Screen 92" 16:10 Diagonal Screen This is usually desired; All the projectors are within the zoom range for a 100" screen. Whitepaper Projector Placement Comparison NEC Display Solutions of their respective zoom range. www.necdisplay.com PJ Placement Page 1 of 2 The ability to ...
Whitepaper Projector Placement Comparison
Page 2
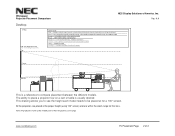
The ability to place a projector low on a cart or table is a reference to be placed at the middle point of their respective zoom range. www.necdisplay.com PJ Placement Page 2 .../NP216/V260/V260X/V300X Gray = U300X/U310W Orange = PA500U/PA500X/PA550W/PA600X Center Bottom M2 60W, NP510W NP08ZL w / NP13ZL This is usually desired; Note: All projectors shown at for that lens. This drawing allows you to see the height each model needs to compare placement between the different models. All the...
The ability to place a projector low on a cart or table is a reference to be placed at the middle point of their respective zoom range. www.necdisplay.com PJ Placement Page 2 .../NP216/V260/V260X/V300X Gray = U300X/U310W Orange = PA500U/PA500X/PA550W/PA600X Center Bottom M2 60W, NP510W NP08ZL w / NP13ZL This is usually desired; Note: All projectors shown at for that lens. This drawing allows you to see the height each model needs to compare placement between the different models. All the...
PC Control Connectors and Cables
Page 1
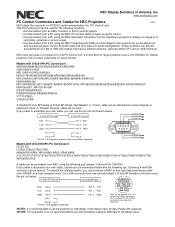
.... www.necdisplay.com PC Control Connectors and Cables for NEC Projectors v4.4 NEC labels the connector for smaller projectors due to assemble your own cable, use the pin out information below and the following tips. NEC Display Solutions of PC RxD Pin 2 Pin 2 RxD...8226; Communication from a PC using the NEC PC Control Utility for basic projector control. • Communication from a PC using the NEC Geometric Correction Tool for adjusting a projector to the projector for presentations as well as basic projector control, projector lamp and error status or asset management....
.... www.necdisplay.com PC Control Connectors and Cables for NEC Projectors v4.4 NEC labels the connector for smaller projectors due to assemble your own cable, use the pin out information below and the following tips. NEC Display Solutions of PC RxD Pin 2 Pin 2 RxD...8226; Communication from a PC using the NEC PC Control Utility for basic projector control. • Communication from a PC using the NEC Geometric Correction Tool for adjusting a projector to the projector for presentations as well as basic projector control, projector lamp and error status or asset management....

NP04WK1 Installation Manual
Page 2
...Introduction ENG-4 Packaged Parts ENG-4 Names of Parts ENG-5 Dimensions of Parts ENG-6 Projection Distance and Screen Size ENG-7 Installing the Projector ENG-9 Adjusting for your purchase of this installation and adjustment manual carefully to install the wall mount unit. Special skills are mainly... Installation and Adjustment Manual Thank you for Distortion of the Projected Image ENG-14 Specifications ENG-20 ENG-1 Please read this NEC wall mount unit. The descriptions in the installation and adjustments manual are required to ensure proper use. This work be performed...
...Introduction ENG-4 Packaged Parts ENG-4 Names of Parts ENG-5 Dimensions of Parts ENG-6 Projection Distance and Screen Size ENG-7 Installing the Projector ENG-9 Adjusting for your purchase of this installation and adjustment manual carefully to install the wall mount unit. Special skills are mainly... Installation and Adjustment Manual Thank you for Distortion of the Projected Image ENG-14 Specifications ENG-20 ENG-1 Please read this NEC wall mount unit. The descriptions in the installation and adjustments manual are required to ensure proper use. This work be performed...

NP04WK1 Installation Manual
Page 3
... as explained in this indication may result in bodily injury and damage to surrounding contents. Use an outlet for the power source of the projector, the wall mount unit and so on . Please read this indication may result in bodily harm such as follows. Mounting on . -...prohibited actions Concrete prohibitions are used. Insufficient strength or fastening may fall and cause injury if installed and adjusted improperly. • To prevent the projector from falling, install it in a location and fasten it . Do not directly connect to observe the following Symbol In this "...
... as explained in this indication may result in bodily injury and damage to surrounding contents. Use an outlet for the power source of the projector, the wall mount unit and so on . Please read this indication may result in bodily harm such as follows. Mounting on . -...prohibited actions Concrete prohibitions are used. Insufficient strength or fastening may fall and cause injury if installed and adjusted improperly. • To prevent the projector from falling, install it in a location and fasten it . Do not directly connect to observe the following Symbol In this "...

NP04WK1 Installation Manual
Page 4
...equipment or humidifiers). Warning • Do not install in places subject to particularly high or low temperatures. Caution • Do not obstruct the projector's ventilation holes. Failure to direct sunlight or illuminated light. Dirt will cause image quality to deteriorate. • Avoid places in which the ...screen is poor, covering it and surrounding objects. Be especially careful of an air conditioner or heater or in the projector falling and causing injury. • Do not modify any parts. Doing so may result in a place exposed to the optical parts such...
...equipment or humidifiers). Warning • Do not install in places subject to particularly high or low temperatures. Caution • Do not obstruct the projector's ventilation holes. Failure to direct sunlight or illuminated light. Dirt will cause image quality to deteriorate. • Avoid places in which the ...screen is poor, covering it and surrounding objects. Be especially careful of an air conditioner or heater or in the projector falling and causing injury. • Do not modify any parts. Doing so may result in a place exposed to the optical parts such...

NP04WK1 Installation Manual
Page 5
... the wall plate to the wall mount unit. M4×8 mm screws: 4 These are the same. Wall adapter covers: 2 These are used to mount the projector. M6×10 mm screws: 4 These are covers for the wall adapter. Washers: 4 Spacers: 4 These are used to mount the wall adapter in the package...
... the wall plate to the wall mount unit. M4×8 mm screws: 4 These are the same. Wall adapter covers: 2 These are used to mount the projector. M6×10 mm screws: 4 These are covers for the wall adapter. Washers: 4 Spacers: 4 These are used to mount the wall adapter in the package...

NP04WK1 Installation Manual
Page 7
... (arm unit movement range) 100 Center of wall adapter Wall adapter mount screw positions 142 100 189 94.5 100 Center of movement when mounting the projector.
... (arm unit movement range) 100 Center of wall adapter Wall adapter mount screw positions 142 100 189 94.5 100 Center of movement when mounting the projector.

NP04WK1 Installation Manual
Page 8
... projection distance and screen size as well as shown below. When the screen is installed in front of the wall surface, the distance between the projector and the screen will be shorter (the sliding range is as the optimum height of installation, then perform the mounting procedure. Refer to the dimensions... on the diagram to line up the center of the wall adapter with the center of screen H2 Screen surface The projector's aspect ratio is reduced). Wall Screw hole center 189 L2 L1 142 71 Screw hole center 71 Screw hole center Screw hole center H1 Center...
... projection distance and screen size as well as shown below. When the screen is installed in front of the wall surface, the distance between the projector and the screen will be shorter (the sliding range is as the optimum height of installation, then perform the mounting procedure. Refer to the dimensions... on the diagram to line up the center of the wall adapter with the center of screen H2 Screen surface The projector's aspect ratio is reduced). Wall Screw hole center 189 L2 L1 142 71 Screw hole center 71 Screw hole center Screw hole center H1 Center...

NP04WK1 Installation Manual
Page 10
...lock screws. (2) Pull off , the distortion of the image increases. Position in such a way that the position of installation meets the conditions in which the projector is facing is not possible to read before installing" on page ENG-2 of the projected image significantly. Remove the... (2) Slide arm Safety lock screws (1) Fixing screws (B) ENG-9 Consider the place where the screen is projected at an angle. Because the elevation angle of the projector's optical axis is large, small shifts in such a way that the image is to be installed and determine the position in "Be sure to install...
...lock screws. (2) Pull off , the distortion of the image increases. Position in such a way that the position of installation meets the conditions in which the projector is facing is not possible to read before installing" on page ENG-2 of the projected image significantly. Remove the... (2) Slide arm Safety lock screws (1) Fixing screws (B) ENG-9 Consider the place where the screen is projected at an angle. Because the elevation angle of the projector's optical axis is large, small shifts in such a way that the image is to be installed and determine the position in "Be sure to install...

NP04WK1 Installation Manual
Page 11
... Size" on the bottom of the wall adapter. Note that this indication is ±50 mm. 189mm CAUTION Wall adapter - Mounting the projector using screws other than the included ones could result in the mount plate with the M6 screws (or bolts). - For the position for ...mounting the wall adapter onto the wall and the dimensions, see "Dimensions of the projector and securely tighten the four included M4×8 screws. - The horizontal position adjustment range is not for the horizontal position. - Line up / down...
... Size" on the bottom of the wall adapter. Note that this indication is ±50 mm. 189mm CAUTION Wall adapter - Mounting the projector using screws other than the included ones could result in the mount plate with the M6 screws (or bolts). - For the position for ...mounting the wall adapter onto the wall and the dimensions, see "Dimensions of the projector and securely tighten the four included M4×8 screws. - The horizontal position adjustment range is not for the horizontal position. - Line up / down...

NP04WK1 Installation Manual
Page 14
... power cord, however. Provide enough cable length to -wall cable hole Downward cable hole Wall adapter Arm unit (1) Slide arm This completes installation of the projector. Do not bundle them together. Doing so may cause power-supply noise interference. (2) Upward cable hole Through-to allow for adjustment of the arm unit...
... power cord, however. Provide enough cable length to -wall cable hole Downward cable hole Wall adapter Arm unit (1) Slide arm This completes installation of the projector. Do not bundle them together. Doing so may cause power-supply noise interference. (2) Upward cable hole Through-to allow for adjustment of the arm unit...

NP04WK1 Installation Manual
Page 15
...At "Installation" or "Settings" on the on projecting images, see "Projecting Images (Basic Operation)" of the Projected Image M Before Adjusting Preparing the projector - In real circumstances, distortion is compound. 1. jected image are parallel. - Horizontal tilt adjust- Turn the horizontal tilt adjustment knob and adjust ...so that the top and bottom edges of the projected image. Project an image from the projector, then first move the projector's focus ring to roughly adjust the focus of the pro- The descriptive diagrams only indicate changes in the horizontal...
...At "Installation" or "Settings" on the on projecting images, see "Projecting Images (Basic Operation)" of the Projected Image M Before Adjusting Preparing the projector - In real circumstances, distortion is compound. 1. jected image are parallel. - Horizontal tilt adjust- Turn the horizontal tilt adjustment knob and adjust ...so that the top and bottom edges of the projected image. Project an image from the projector, then first move the projector's focus ring to roughly adjust the focus of the pro- The descriptive diagrams only indicate changes in the horizontal...


